2006 DC Tundra. DD meets ongoing tinkering.

wrenchMonkey_

Adventurer
Well, I have been slacking on the trip write up. I'll get around to it shortly.

I've been busy helping a friend with a project, putting a Dana 60 and a Sterling 10.5 under his Jeep JK. Ground down the front brackets on the axles and starting to weld the Artec Truss kit on. Gives me thoughts about a SAS.
20160805_210749.jpg


Also, got a package in the mail to fix my CV boots. Happy they came before the weekend, gives me something to do tomorrow.
20160805_210635.jpg
 

wrenchMonkey_

Adventurer
Got the Off Road Solutions High Angle CV boots and outters installed. CV Boot grease is the devils work, stuff is horrible to work with.
I had torn my drivers side inner from my last trip and had lost about half of my grease. I didn't want to replace the whole assembly with a aftermarket as the 6 ball bearing OEM design is stronger compared to the Tri-Lobe of the aftermarket. Worst part of the install really was getting the dust cap off on the drivers side. Besides that, pretty straight forward.
Anywho,

Joint out on the bench, getting ready to cut sheetmetal lip off the inner housing.
20160806_143332.jpg


Inner joint modified.
20160806_145558.jpg


Old vs New.
20160806_165858.jpg

20160806_165909.jpg


Installed.
20160806_183815.jpg
 
Last edited:

wrenchMonkey_

Adventurer
I was probably in it for 5-6 hours on and off. Both inner joints, specifically my torn one, I let soak in some water/simple green for a bit to clean it up. Also to get any metal dust out from cutting the flange.
If I had to do it again, I'd peg it at 1.5 hr per side, just a swap and re-pack the boot/joint.

Have lots of gloves and lots of rags/shop towels. Its messy.
 
Last edited:

wrenchMonkey_

Adventurer
Sliders are first. 2in 3/16 thick will make the main support tube and mounting brackets and I'll design the sliders part with a rear kickout from 1.75 DOM. Just spent 30 minutes under the truck looking at everything. I'll go with 1/4 or whatever thick scrap I have lying around for my 8 gusset plates that I'll weld to the frame.
 

rickashay

Explorer
Congrats again on the trip and outcome ;)

Looks like you made it through the squeeze on 7 Bridges without too much trouble. Glad to see the D-Cab made it through. We'll have to get a Tundra run going this fall. Too many Alberta Tundra owners on here for us not to unite!
 

wrenchMonkey_

Adventurer
Congrats again on the trip and outcome ;)

Looks like you made it through the squeeze on 7 Bridges without too much trouble. Glad to see the D-Cab made it through. We'll have to get a Tundra run going this fall. Too many Alberta Tundra owners on here for us not to unite!


Thanks again, still working on that write up. I keep getting side tracked.

I did, was a bit tight, but gave me a good spot to jump out and spot and let the girl drive through. While a bit nervous at first, she defiantly got better at it. Even started using her mirrors to check rear wheel placement. Once we made it through the lower tight stuff and started climbing, it was a pretty easy going drive. When we reached the top where the camp site is, we actually went straight and investigated that trail that leads to a hiking path. That begun the Alberta pinstriping paint job haha. We doubled back and headed towards the steep drop off that crosses the small creek and headed up towards the rock slide on the side of the mountain. I turned around shortly after that and headed back up to the point before the steep downtown into the valley.

Defiantly have to get something going later this year. That would be awesome.
 

wrenchMonkey_

Adventurer
Still waiting to hear back from ViAir about my sponsorship for the ADA system.

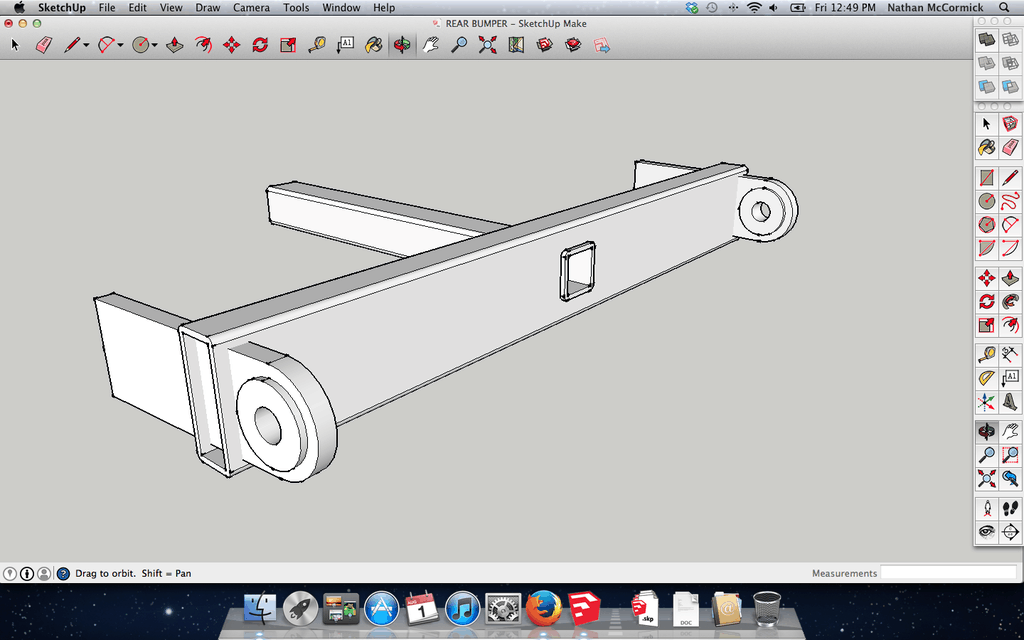
I was going to do sliders first, but waiting for a friend to do a order for DOM tubing. So, in the mean time, I'll be doing my rear bumper build. Going to pick up the 2x6 3/16 tomorrow and already have the 3/8 plate for the frame mounts/clevis. Going to head to Curt to pick up a 2in 9in receiver hitch and get to work. Should be pretty easy to get it done, just need to iron out license plate mounting, lighting and where I want to hide the 7pin hitch connector.

Credit to SMKYTXN from Tacoma World. Borrowing his design. However I am thinking license plate on the right side and a flush mount back up light on the left.

Screenshot_2014-08-01_12_49_35.png
 
Last edited:

toyotech

Expedition Leader
I'm in need of some CV boots but not liking how you had to cut the factory axle for the high angle ones. Guess I'll go back to factory boots lol.


Sent from my iPad using Tapatalk
 

IS-RIDER

Observer
I'm in need of some CV boots but not liking how you had to cut the factory axle for the high angle ones. Guess I'll go back to factory boots lol.


Sent from my iPad using Tapatalk

You my want to check out SDHQ boots. I've had good luck with them


Sent from my iPhone using Tapatalk
 

wrenchMonkey_

Adventurer
Well I got the steel this afternoon and the receiver tube. Only issue is that the 6x2 was marked .188, but after getting it home (re: carrying 12 ft of it in) it seems really heavy. I eyeballed it in the yard and seemed thick enough.

Turns out its .250, not .188. Not a big deal, but still, 17 lbs more than I need for my 6 ft piece I'll use. Not sure what to do. With the sliders, bumper, winch ect, future 35's comming, I'll be begging to save 17 lbs where I can!

Also, re-thinking my 3/8 plate for the shackle mounts. I feel with 3/4 shackles even with cheek plates, its just going to visually look thin. Perhaps I'll double up the 3/8 plate on outside face of bumper and just keep 3/8 going to the frame. Maybe I'll check around work and see if I can find some 1/2 plate scraps that I can make work also.
 

wrenchMonkey_

Adventurer
Maybe you can drill holes out on the inside to lighten it up?


Sent from my iPad using Tapatalk

I may just take it back and get the 3/16.

I am re-thinking my mounting plate thickness. I am wanting to go with something thicker. 3/4 now preferably, 5/8 to save money and 1/2 last resort, but thats not much better than 3/8. Depends what I can scrap up at work too vs buying at the steel store.

I could go with two pieces of 3/8 stacked, bevel the edges and weld them together to get the thickness I want, or, just use 3/8 from bumper to axle on the back side then double it up through the bumper to the rear. However, 2ft of 3/4 will cost me $30-40. I have all the 3/8 I need, and I can plasma that stuff at my house. Cutting the 3/4, I'd need to do it at work if the plasma is working. My B size Oxy tank cant support cutting 3/4.

1'x5" 3/4 plate weights about 12.5 lbs each and I'd need two, so I am at 25 lbs for mounting and 74lbs (1/4) or 57lbs (3/16) for the bumper. From what I remember, the stock bumper and hitch is in around 110 lbs. So I'd be around the same or slightly less. I'd rather have the thinner bumper with thicker mounting plates.
 
Last edited:

wrenchMonkey_

Adventurer
12 bolts later, this happened.
20160818_201446.jpg


Everyone else was doing it, so I jumped on the band wagon.
20160818_202915.jpg


Did a bit of CAD (cardboard aided design) to finish off the night.
20160818_213637.jpg
 

Forum statistics

Threads
186,158
Messages
2,882,638
Members
225,984
Latest member
taunger
Top