2008 Chevrolet c4500 4x4 diesel ambulance conversion

Brewdiak

kodiak conversionator
Hello all, I've been working on this truck since I bought it several years ago. At the time I had started a build thread but later deleted it however I'm going to try and put one together now in case it helps anyone and (spoiler) I'll be putting it up for sale now that it's 'done' (okay, so these DIY are never really done there's always something else that can be done - solar for one :p). A classified listing will be separate with price and more details once I get that together.

I started with a < 20k mile truck, it's a Wheeled Coach built for a GSA customer, and based on the clean carfax it spent the working years in the northern part of Virginia. I just ran the carfax and discovered it was in and around Alexandria, VA the same time I lived there (2009-2012) which was interesting. I don't think I ever saw it, because I have always loved the Kodiak/Top Kick trucks ever since my early years in Fire/Rescue when the large city nearby bought two matching kodiaks for rescue trucks. On that note, when I got this idea in late 2017 I was on a road trip tent camping, and got to wondering if I could turn a fire truck into a camper - I bought it from a dealer without doing any real research and just jumped in with both feet and a rental garage. For anyone still thinking about doing this, make sure to do one thing first - VALUE YOUR TIME. My biggest regret looking back is that all the time I spent building this truck would have been better spent camping and exploring with my dog, neither of us is young or healthy as we were.

So here's the way the truck was when I got itphpThumb_generated_thumbnail9620T27V.jpg

and the way it is now IMG_3781.JPG

it has just under 28k miles on it.
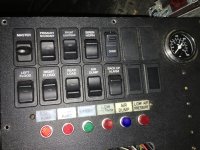
cab as purchasedphpThumb_generated_thumbnailWRAU6DBL.jpg

and now
IMG_3849.JPG

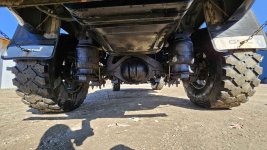
box then and now (roughly same angles) phpThumb_generated_thumbnailGHOVLJU2.jpgIMG_3772.JPGphpThumb_generated_thumbnailG5NTRF52.jpgIMG_3845.JPG
 
Last edited:

Brewdiak

kodiak conversionator
Here's some of the exterior work, I added the nosecone to the box (for those wondering the truck averages 11.5-12 mpg diesel, has a PPEI econ tune loaded). It came with 19.5 wheels, now on Stazworks 20" and Continental MPT81 335/80r20 with matching spare (poison spyder carrier). I patched the light holes using two piece aluminum patches (same thickness as the skin) that are joined with 3M panel bond, then those patches were joined from the inside of the box using the same 3M panel bond for permanent block. One item the next owner may decide to do is complete the body work - I didn't mainly because in my opinion it looks 'fine' covered by 3M vinyl wrap and I didn't want discourage myself from driving the truck through brush and trees by spending thousands on a full respray (or color change). The KC bumper lights are SAE for on-road use, and are installed in the old speaker housings. The hood side lights re-used existing emergency lighting holes and are independently controlled "alley" lights now. The mirrors were swapped for velvac heated units, and I changed all the existing windows in the box (doors) to double pane insulated (motion windows - also used for the two added windows). There is no solar on the truck, it's currently LP for hot water and the range cooktop - and espar diesel heater that I just added (originally I had a suburban LP heater but it was serious overkill for this size truck).

The box internal height is 6' at the lowest (under the wire chase), and bumper to bumper it's about 25' long (but the spare carrier adds about 18" to the OAL. It's about 10'6" high (maxxfan roof vent), and weighs around 17.5K pounds. I'll put the rest of the specs further on in the thread, or ask questions if you have any. This is all just my ideas on how to build a truck, might give someone else ideas of what to do - or not to do - on theirs.

IMG_2058.JPGIMG_2060.JPGIMG_2646.JPGIMG_3795.JPGIMG_2682.JPGIMG_3811.JPGIMG_2558.JPGIMG_2099.JPGIMG_2118.JPGIMG_2150.JPG
after the 3M panel bond sets, remove the screws and a skim coat of bondo. I did a couple coats to get it 'okay' then put 3M vinyl over (after paint).
 
Last edited:

Brewdiak

kodiak conversionator
I gutted the cab completely, other than the dashboard. I replaced a few trim panels with OEM replacements, put sound deadener all around and in the doors, and also extra insulation in the roof and doors for sound and heat. Reshaped, added the roof console, and recovered the headliner. Added glow-shift gauges to monitor: exhaust temp, oil temp, oil pressure, coolant temp, and air PSI (the rear bags are controlled independently from the floor console for side:side adjustment). Replaced the seats with National two-tone leather adjustable seats (air). Stereo upgraded, door speakers replaced (tweeters added), and added rear speakers to the custom built back wall trim pieces. A pass through to the habitat was a 'must have' for me - it's nice to be able to quickly get to the back, or on occasion it's been nice to transition up front and move to a new parking spot without having to get out and walk around. I added a TPMS system for tire pressure and temperature, and a side view camera along with the existing back up camera - the side view switches on (passenger side) when the right turn signal is activated. I wired in a trailer brake control if needed, but I haven't used it for anything - I've only towed a 2016 durango on a u-haul car trailer (see my IG #brewdiak). There are extra circuits wired from the dash switch blanks to the box electrical panel relays, and from there wires up to the hood and front bumper with the idea that I would eventually add off-road lighting or other accessories (do this while you're building... so much easier later on!). New carpet to replace the rubber floor, and a nice pass through door to insulate the habitat better (builders keep in mind how much colder/hotter the cab will get with single pane glass up front!).
phpThumb_generated_thumbnailCFBTDVDT.jpgphpThumb_generated_thumbnailWRAU6DBL.jpgIMG_2590.JPGIMG_2591.JPGIMG_2586.JPGIMG_3787.JPGIMG_3788.JPGIMG_3850.JPGIMG_8699.JPGIMG_E3854.JPG
 
Last edited:

Brewdiak

kodiak conversionator
like others, I gutted the box entirely but I didn't rip out the electrical. The electrical in these rigs is very high quality so I deconstructed it - removing circuits that would never be needed again while adding (or re-using) for my plans. On this note - take great notes along the way of where things are attached (if you do it this way) - which bus bar terminal in the roof ... to which terminal on the electrical panel ... to which wire label to the dash ... etc. I also made sure it would be a relatively simple task to later add solar to the roof - there's a wire 'chase' behind a panel in the drivers/front compartment that makes running wires from the roof into that box and/or to the electrical closet relatively painless.

insulation in the box is always a topic for discussion. Venting the boxes is very important too (I have two maxxfan's on the passenger side front and back, and also a maxxfan on the roof above the shower/head combo). For insulation in my opinion it is more vital to create a thermal break between exterior and interior than what type of insulation (spray, fiberglass, foam board, etc). I used the composite ambulance cabinet pieces to essentially line the interior of the box first, so the fasteners holding those pieces to the exterior aluminum frame don't extend all the way to the inside - rather the interior trim (cabinets, interior walls, etc) connect to the composite material (not to the aluminum structure). Hopefully that makes sense - to the extent I could accomplish it I didn't want any metal fasteners extending all the way from the interior habitat to the exterior aluminum skeleton. I think you can see this in some of the included pictures.

I also spent a lot of time considering future maintenance, upgrades, or of course repairs. It's easier to just close things up and screw the final finish work on but having the ability to easily access things later is vital. The entire front of the counter below the cooktop over to the electrical closet comes off for full access to the mechanicals and I included a concealed access panel in the 'tile' backsplash area to access the shower valve connections. I kept the wire chase cover down the ceiling to make it easier to get into the electrical and also to run new circuits if needed - but another item the future owner may want to do is change the interior ceiling (or I will probably do this) to make it classier. One reason I held off on solar, and one reason I'm thinking about the ceiling, is the technology changes and new things become possibly - there are some really cool lighting options being done by professionals and DIY'ers now beyond just recessed LED.

The couch/bed is a full mattress and has actuators to raise the back panel (for couch) or lower for the full width sleeping area. It pulls out (manually) as shown. I decided against a dinette - for my preferences a small table wasn't worth it and I prefer eating outside all the time if possible. A 12v truck fridge keeps the food and beverages cold

The shower/head combo is a stainless steel surround over a 30" fiberglass shower pan. The nature's head composting toilet currently drains into the shower/sink holding tank below the shower but it would be easy to put the nature's head tank back on - something I've been thinking about because it's nice having a 30x30" shower without the head in there when you're using it (put the liquid tank back on the head, then it's quickly removable from the shower). Having a full inside shower was another 'must have' for me on this build. The shower door is a retractable one, much better than curtains or a hinged door setup imo. IMG_3203.JPGIMG_3272.JPGIMG_3766.JPGIMG_3772.JPGIMG_3845.JPGIMG_3857.JPGIMG_3840.JPGIMG_3839.JPGIMG_3841.JPG
 
Last edited:

Brewdiak

kodiak conversionator
maintenance is another big priority for me. Having driven emergency vehicles, I know one area that is abused is brakes so I went ahead and replaced everything at all four corners so I knew they were in 'like new' condition. This included new calipers, new rotors, new hubs (front), seals and bearings, and flex lines along with a flush. Was it necessary, almost certainly not, like a lot of stuff I do - but it's done and I know it is done right. Peace of mind driving a vehicle this big is nice to have.

On this note, my Uncle long ago (long before cellphones, much less internet) told me to always get the service manual for any vehicle I owned. I got all 3 for this truck - they're nice to have. I highly suggest keeping yours in your vehicle, even if you don't DIY unfortunately not all 'mechanics' are mechanically inclined so they may need them too.

1.JPG2.JPG3.JPG4.JPG6.JPG7.JPGIMG_0628.JPGIMG_0841.JPGIMG_0894.JPGIMG_1739.JPG
 
Last edited:

Brewdiak

kodiak conversionator
I don't think an ambulance/fire conversion is complete without electrical ... so here you go. disconnect the batteries, learn to use a multi-meter, hopefully get the schematics from the original upfitter, take your time and lots of notes, and dive in.

As I posted above, I didn't rip it all out - preferring to deconstruct and take my time with it. The original equipment and wiring quality is very very good in my opinion. I did re-organize the electrical panel, remove a few things that were ambulance/emergency specific, then drop the panel to allow full access to the space above the Driver1 compartment. I also kept in mind that I might eventually decide to add solar, though I still don't know that's its important for a non-fulltimer RV, so I made sure to have easy access to the roof from this electrical closet / D1 compartment area.

Pictures for what they're worth - it's a right of passage on these DIY conversions (just like decal removal...:sick:)IMG_1960.JPGIMG_2055.JPGIMG_2230.JPGIMG_2231.JPGIMG_2554.JPGIMG_2671.JPGIMG_2797.JPGIMG_3206.JPGIMG_4421.JPGIMG_E2167.JPG
 
Last edited:

Stason

New member
maintenance is another big priority for me. Having driven emergency vehicles, I know one area that is abused is brakes so I went ahead and replaced everything at all four corners so I knew they were in 'like new' condition. This included new calipers, new rotors, new hubs (front), seals and bearings, and flex lines along with a flush. Was it necessary, almost certainly not, like a lot of stuff I do - but it's done and I know it is done right. Peace of mind driving a vehicle this big is nice to have.

On this note, my Uncle long ago (long before cellphones, much less internet) told me to always get the service manual for any vehicle I owned. I got all 3 for this truck - they're nice to have. I highly suggest keeping yours in your vehicle, even if you don't DIY unfortunately not all 'mechanics' are mechanically inclined so they may need them too.

View attachment 821279View attachment 821280View attachment 821281View attachment 821282View attachment 821283View attachment 821284View attachment 821285View attachment 821286View attachment 821287View attachment 821288
Hello. Thank you for sharing. Just beautiful thing!! I have a question, maybe even 2. Got same air ride on my Topkick. One of the bellows is lower then the other one. Looks like i ll have to replace that one, maybe. Or, should i go back to leaf springs in general? Out of your experience of driving off road. I ll end up with at least 3000+ pounds load on that rear. Also, the compressor doesnt like to shut off... maybe its because of the leak in that bellow. Thank you.
 

Attachments

  • 337695397_558274596406286_4833741076900339023_n (1).jpg
    337695397_558274596406286_4833741076900339023_n (1).jpg
    129.5 KB · Views: 19
Last edited:

Brewdiak

kodiak conversionator
Hello. Thank you for sharing. Just beautiful thing!! I have a question, maybe even 2. Got same air ride on my Topkick. One of the bellows is lower then the other one. Looks like i ll have to replace that one, maybe. Or, should i go back to leaf springs in general? Out of your experience of driving off road. I ll end up with at least 3000+ pounds load on that rear. Also, the compressor doesnt like to shut off... maybe its because of the leak in that bellow. Thank you.
I think the airbags are fine, but I did get rid of the self leveling valves that are part of the air suspension. Those are fine for level roads and if you change the load frequently, but any articulation off road just causes them to open and close constantly trying to find level. Huge waste of air and extra work for the compressor.

Chasing air leaks is annoying, the simpler you can make the system the better
 

Stason

New member
Tho
I think the airbags are fine, but I did get rid of the self leveling valves that are part of the air suspension. Those are fine for level roads and if you change the load frequently, but any articulation off road just causes them to open and close constantly trying to find level. Huge waste of air and extra work for the compressor.

Chasing air leaks is annoying, the simpler you can make the system the better
Thank you, James.
 

iggi

Ian
Awesome build! Great advice you gave "For anyone still thinking about doing this, make sure to do one thing first - VALUE YOUR TIME. My biggest regret looking back is that all the time I spent building this truck would have been better spent camping and exploring with my dog, neither of us is young or healthy as we were."

Things look easy looking at other people's builds. It's pretty shocking how much of your life doing a conversion like this can suck up.
 

Forum statistics

Threads
185,888
Messages
2,879,474
Members
225,497
Latest member
WonaWarrior
Top