3rd Gen Montero Initial Impressions/Build Thread

kchristian

Adventurer
The shop that did my timing belt confirmed that's where it's coming from. It's pretty minimal at this point so I'm just going to keep an eye on it.

As far as the plans go, they've suddenly changed. My employer has informed me that there will be some expansions in January that I am going to want to be a part of, so we are gonna head out soon and try to be back by then. Initially we had planned to leave after the new year. Now it's just a race to see how much we can get done before we leave.

So here are my build items in order of priority.
1. Dual battery set-up. DONE
2. Sleeping Platform. Must happen
3. Roof Rack. Really should happen
4. Helton Water Heater. Would be nice
5. Lift/Tires. Not necessary
6. ARB Bumper. Probably not gonna happen now that we are working with 4 months less savings.
 

Imnosaint

Adventurer
1. Dual battery set-up. DONE

I'd appreciate seeing this.

I was going the ARB route but after seeing a custom winch application done by a local shop in a 4X magazine, I'm thinking to keep things on the stealth side and build an application within the stock front facia.
 

Sabre

Overlanding Nurse
Sorry about the tardy reply; I left with the family on a backcountry camping trip to Montana and Wyoming on the day you posted this. We just got back.

I'm very happy with the mounting I fabbed up...have to get some close-ups posted in a few days when I come up for air. The rack itself was a cheap aluminum Craigslist special. It has proven itself and taken far more punishment than it was ever designed for. We've beat the heck out of the poor thing with heavy loads (high-lift jack, a couple of 20-liter fuel and water cans, second spare, full-size propane tank, etc), and then taken it on endless days of pounding, jarring, washboarded roads and trails. The improvised mounts were bomber...the rack itself is, however, starting to really show the wear and tear.

What I've learned are the following:

1. I love having a roof rack for the extra gear, but will now be searching for a strong steel one. Mounting to the OEM load bars will be no problem now that I've proven how well they work. Even with me up there as well, there's no movement of those bars; they're plenty strong. Of course, it kills the possibility of a rooftop tent, which is something I've idly speculated about. Perhaps a cargo/camping trailer will be part of our future....

2. The taller A/T tires are more than adequate for any terrain we've encountered. We even climbed a muddy slope in Idaho a few days ago after a massive deluge had turned everything to goo. By the way, it's the steepest hill the Montero has ever climbed, wet or dry, and those tires did a wonderful job.

3. The fancy plastic trim has to go, at least the bits that hang down, as they're quickly getting munched. I'll definitely be cutting those parts back, and I'm seriously considering pulling off all of the cladding.

4. The Moab trip showed us that we really want that 1.5 - 2" lift and slider rails; those will come as time & money permit.

5. I'm going to make some patterns for proper underside armor and have a shop fab up some plates for me.

6. The ARB front bumper will come as we can afford it, primarily as a platform for a winch. If anything, it's the rear that really needs an aftermarket bumper due to the poorer departure angle back there. That stealthy winch mount idea (retaining the OEM fascia) sounds good, too; I'd love to see some ideas on that.

We have no interest in sleeping in the truck, so a sleeping platform won't be part of our plan. I may well put a storage rack together back there, though, as pulling out a bunch of plastic totes to get at the one on the bottom is getting pretty old. For now, our Engel bearproof cooler is plenty adequate, although a swing-condenser fridge/freezer would be nirvana. I'm not sure what I'd do about mounting it, as that storage space in "the basement" is useless if we can't get to it.

I'll post those pics when my string of 12-hour shifts (welcome home!) is over.
 

off-roader

Expedition Leader
Yes that's a carbon fiber hood. I had a moment of inattention and was ::ahem:: compelled to replace my hood, bumper and headlights. The CF hood was cheaper than an OEM hood.
LOL!

Your platform design was inspiring to me when I was shopping around. I was completely sold on the drawers but now I'm not so sure. The 3rd gen's have a storage space underneath the rear floor which gives us about 10 inches of depth. The fridge will only be about 8 inches above what would normally be the rear floor. That was a big selling point for me as I could see myself getting pretty sick of moving the fridge every night before bed. I assume thats what you do?? Store the fridge on top of the platform and move it at night?
Thanks for the compliment. It's actually a Grasscat creation which I modified so I could sleep inside without removing the 2nd row seats. His sit's a lot lower because he doesn't mind removing his rear seats for the trips we go on.

Yes, I take out the fridge before sleeping unless it's just me back there. It's not that bad taking it out. Besides it's just easier to access things when it is out. I can still keep it plugged into the rig even when it's out. I also carry 2 jerry cans in back so I have to take them out as well. Not too difficult even though I'm vertically challenged (5'5"). I usually lift the until from the ground to the bumper, then onto the platform. It's tied down using ratchet straps. I don't recommend the cheaper friction straps since they are far less secure than the ratchet straps. I used a couple of U bolts (below) installed on the platform to attach the ratchet straps to. When not in use, they simply slide down but there is the 1/4" bar there. Since I use thermarest 2" sleeping pads, it doesn't bother me that it sticks out that 1/4" even when not in use.
1WBE9_AS01

HTH.
 

kchristian

Adventurer
OME 1.5" Lift has been ordered from 4 Wheel Parts. It was silly how much effort I had to put forth to get someone to sell me a lift. I called shop after shop and everyone said they'd get back to me in a few days/week/sometime. I couldn't believe how hard it was to get someone to take my money. Finally 4WP called me back today and took payment over the phone. About 10 minutes later someone over at Cruiser Outfitters called me back. They were about 80 bucks cheaper (no sales tax) but I don't know if they are gonna be able to meet my time frame. Waiting on a follow-up email... If I don't hear back fast it will probably be too late to cancel my order with 4WP.

I also ordered my Treadwright Warden tires. I went with 265/75-16. It's just slightly taller than stock but I think they will work great for what we need. Treadwright was awesome to work with! Super helpful staff and they are rushing my order to make sure I get on the road asap. 5 tires, $623 shipped. My bro-in-law is running some Treadwrights on his 87 4runner with a turbo I-6 out of a Supra. Sweet rig and he loves his tires.

I'd appreciate seeing this.
The write-up I followed is http://www.expeditionportal.com/for...ke-a-cheap-isolated-dual-battery-setup-for-50. I put my house battery back in the basement. Overall, I'm quite happy with how it turned out. I didn't take many photos. I was in a rush.

Checking to make sure it'll fit.
photo 1.JPG

Scrap bin 3/4in Plywood with rubber mat and corner braces.
photo 3.JPG

In the top corner you can see a 200amp breaker and the small hole I had to drill in the firewall.
photo 2.JPG

200amp solenoid mounted behind the 3rd row folding mechanism. There's not tons of space back there, but there is enough.
photo 4.jpg

I'll take and upload more pics asap. I've been busy this week. Since my last post here on the 27th, my wife and I have decided to sell most of our furniture, pack up everything else, sub-lease our apartment in Houston, load up 3 of our 4 cars far beyond their GVWR's, and drive to Denver. We are staying with my folks for a couple nights and then it's back to our place in Utah to go through everything we own to determine 'sell' or 'store'. We've moved around quite a bit in the last 3 years so we have accumulated boxes of random stuff scattered between our house in Utah, our apartment in Houston, and both of our parents places as well. Before the trip we are trying to put it all in one place. The crazy thing is that a week ago Monday we were planning to stay in Houston until at least January.

This morning somewhere in Kansas.
photo 5.JPG
 

Monterorider

Adventurer
I'd be a bit hesitant with Treadwrights. I thought they would void warranty if tires are used off-road aired down. Plus at that price you are not that far off getting brand new tires.
 
I've been seeing way too many Treadwrights giving up the ghost lately. Everytime they cross my mind, I see another report of a catastrophic failure. Not worth the gamble.
 

kchristian

Adventurer
I've never heard a bad thing about Treadwrights firsthand. Has anyone here actually owned them? I'd love to hear some first hand reviews.

And the Revo's are great but at $935 for 5 tires shipped to my home, they aren't such a great deal. I could buy an extra 3 tires from Treadwright for that.
 
I've never heard a bad thing about Treadwrights firsthand. Has anyone here actually owned them? I'd love to hear some first hand reviews.

And the Revo's are great but at $935 for 5 tires shipped to my home, they aren't such a great deal. I could buy an extra 3 tires from Treadwright for that.

FYI, I put nearly 75k on REVOs before putting on some MTs.

This just in....
http://www.centraloverland.com/forum/viewtopic.php?f=7&t=1159&p=13768#p13745

Labor day weekend, guy is in Houston, too.
 

Monterorider

Adventurer
You don't have to get 5 new tires. Get 4 + 1 used for spare. IMHO one thing you don't want to go skimpy on is ones tires.
 

kchristian

Adventurer
Well where were you guys when I said I planned to by tires from Treadwright on the very first post?! Not that it would have swayed my plans. I've done plenty of research and I've honestly had a hard time finding much against them. Of course there are some issues but brand new tires occasionally fail prematurely too. I'll be sure to update regularly with my impressions.

BTW, their customer service should be studied and imitated by every company who does business over the phone and online.
 
Last edited:

Sabre

Overlanding Nurse
Finally had some time to put up details of mounting the rack. I used a generic gutter mount aluminum rack sourced el cheapo on Craigslist. I removed the steel gutter mounts and upended them. Here's the overall picture:


This is looking front to back. Of course, the Montero's OEM load bars are curved while the bottom of this rack (like most) is flat. I just mounted it so that the rack is level when the vehicle is parked level. It means that the aft-most mount needs a larger spacer than the front two.

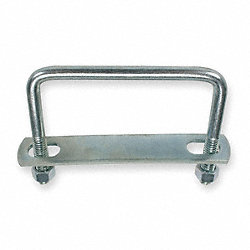
The vertical metal pieces with channels cut in them were originally the horizontal surfaces to which the rack is bolted; they're sort of a universal gutter mount that has a lot of adjustability for racks of differing sizes. At 90 degrees from this mounting surface is a two-piece clamping part that grips your gutters. If you have gutters! We used this part to clamp the Mitsu's load bars.

As you can see, I rotated the mounts 90 degrees, bringing the horizontal surfaces to vertical and bolting the mounts to the side beams of the rack rather than the bottom of it. Since this is aluminum rather than steel and I wanted a lot of strength and off-road durability, I used small pieces of 1/8" steel plate cut to short lengths (approx 1" x 3") and used as reinforcing backers for the nylock nuts that you can't see inside the rack. I wanted to prevent tearing out of the hardware mounted through the thin and relatively soft aluminum side beams.

You can see that the mounts line up fairly well, thus making good attachment points for shovels, fishing poles, awnings, etc.

In this slightly more close-up pic you can see that I used some polyethylene flat stock (white in color) to make small spacers/abrasion pads under the bottom rack beam. You can also see that I've wrapped the OEM load bar with some rubber sheeting similar to inner tube material in order to cushion it from scratching in the area in which it's clamped by the converted rack mounts.


Using a Dremel tool, I made relief cuts in the sides of the gutter clamps through which the OEM Mitsu load bars can pass. Because the gutter clamping hardware is not a very robust guage of metal, I fashioned reinforcing plates exactly like those I made for the inside of the rack's side beams. You can just see the edge of one clamped just under the head of the vertical bolt and its opposite number reinforcing the bottom of the clamp, just under the nylock nut.


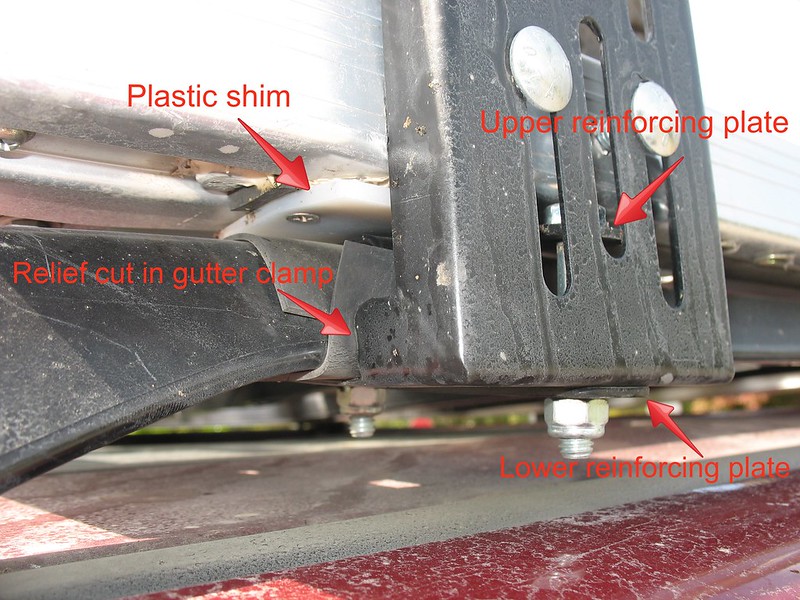
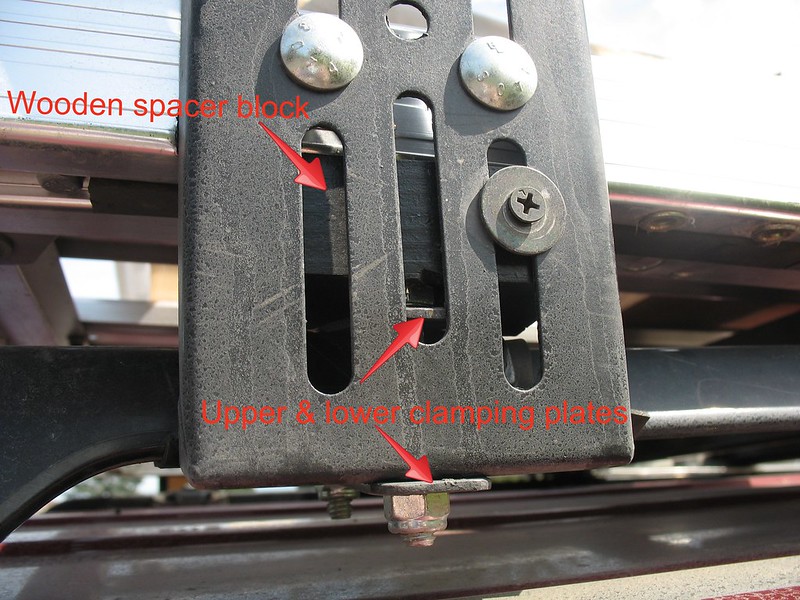
Here's the aft-most rack mount with a wooden block for a spacer. You can clearly see the upper and lower reinforcing plates I made acting as clamps held in place by the vertical bolts. These reinforcing plates allowed a very strong clamping of the OEM load bars. We overloaded the poor, cheap rack; it carried a second spare tire, two 20-liter jerry cans of gas, a high-lift jack, and various miscellaneous stuff at times including yours truly using it as a camera platform. We beat the bejesus out of this rack and, while the aluminum rack itself starting coming apart after a lot of off-road pounding, those homemade clamps never shifted a bit.


The next rack will be steel, also a large one like this, but more robust and able to take abuse without falling apart. We now know that clamping to the OEM bars will be perfectly fine...they're plenty strong.

 
Last edited:

off-roader

Expedition Leader
Nicely done on the rack. Looks fine on the roof. Have you checked the flex of the OE rack with 2 full Jerry cans and the spare? I know when I had anything heavy up top, I didn't like how much it flexed so I switched to mounting my basket to a Yakima style rack instead.
 

Forum statistics

Threads
185,896
Messages
2,879,549
Members
225,583
Latest member
vertical.dan

Members online

Top