5x10 Cargo Trailer - camper build

cmgraves

Observer
I tried to consult the wife the best I could during the build, and she had limited input. but her one note that she only cared about was the end results. That it did not being an ugly cargo trailer that we are forced to be seen sleeping in. For the interior, my first plan was to paint the floor and up the 3 walls by 12", then carpet up to the ceiling. This changed after I had poor luck finding cheap carpet, used heavy chemical glues to install (concern with off gassing and in a very small space), most importantly, it hinder the installation of the next piece.

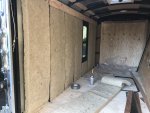
With that, what I proceeded with is installing plywood (cheaper than carpet and better end result) to the left/right sides (to the door/window) to match the ceiling and paint the remaining from the floor. This was not completed in the front (door to front - roughly 35") as this is where the shelves, fridge, drawers, etc. would be install and the ugly trailer plywood would be well hidden behind gear and shelfs etc.

Trying to find pics for this stage and will update if I locate any.
 

cmgraves

Observer
The next step was what made this trailer so successful. The kitchen. This was done by installing a 270 awning (install and end result to come) and installing a tool box on the side of the trailer. The awning was a key part here and made the trailer/camper successful to have enough room for the 4 of us. The inside of the trailer space was used for transporting camping gear, clothes, food etc. and keep dry, a place for us to change and dry, bunker into during extreme conditions, and to sleep in. thus, majority of the time during normal weather, it barely is occupied. Majority is occupied outside the trailer, and under the awning.

For reference -
the trailer has 50sqft and has a height of 5'6". I can't stand inside, but I can sit comfortable.
the awning has 108sqft and has a height of 6'6". twice as much room and we all can stand comfortable.

Thus, we do majority of our cooking, cleaning, hanging out under the awning - you are more immersed with nature. which is my main goal and objective when I go camping and doing outdoor adventures.
 

cmgraves

Observer
The kitchen box: I lucked out and was able to find a used toolbox with the exact measurements for the build (48" wide x 12' height x 15" tall). This will house the stove, propane tank (so it is not located in the interior of trailer), pots/pans, cutlery, oils, and misc. Between the box Then when the lid folds down, this becomes the counter top for preparation, stove and cooking off of, and washing dishes. Additionally, the top becomes a shelf for additional storage space.

I installed with a total of 15 self tapping screws directly into the trailers frame on its side (so the bottom of the box is placed on the side of the trailer) and used a 1/4" thick gym rubber mat (the one from costco) to act as a shock/vibration absorber, not have metal to metal contact and provide a bit of water tightness. the key part of the box was not sticking out farther than the wheel wells.

Pics directly after install. Afterwards I installed thin chains to support the lid. Down the road, i plan to modify this chain/support to allow for adjustments to ensure the counter is level when it is opened.

IMG_3170.jpg

IMG_3175.jpg
 

cmgraves

Observer
If I had a bigger budget, I would have purchase a new one that is intended purpose is to be installed sideways. The reason for this, is my current box is not water tight and water easily gets inside of it. Not a huge problem as majority of the items stored our able to get wet. Also, I drilled a couple of drain holes in the bottom to help keep water from building up.

Here is an example of a toolbox that I would have gone with:
 

billiebob

Well-known member
Not sure how the rubber mat will work. Rubber allows movement which will stress the fasteners and allow flex, movement at the trailer frame. I'd bolt directly to the frame with metal washers between the box and trailer to make all connections tight and movement free. An air space will allow moisture to drain, the mat will trap moisture.
 

cmgraves

Observer
and the first time taking the trailer out after the insulation and kitchen installed for a weekend of mountain biking. Was very impressed with transporting the bikes and comfort inside at night. But that trip later confirmed that a black camper in the sun is too hot and I had to figure a way to reduce the heat inside.
USTF2594.JPGMLXE7492.JPGRECI8393.JPG
 

cmgraves

Observer
As you can see in the pictures, I used birched wood to cover the cheap plywood so it matches the ceiling. Also, you can see the two railings on each side (1x4 oak). These are the frames to hold the platforms that will be used to make bunk beds and tables. Then the planks can be taken completely out, and the trailer becomes a cargo trailer to transport the bikes with ease. Cutting the planks to fit on the railings (or the 1x4 oak) had to be cut with high tolerance to ensure they fit into place, but not able to slide off. The planks were one of the last pieces built as I was always scared to cut the wood thinking i would screw up. The building of the planks and layout inside will be discussed later.
 

cmgraves

Observer
Billiebob - good point about the water intrusion and water being trapped. As this was aluminum to rubber to aluminum, I was not too concerned about that. Also, I plan to seal the edges around the perimeter of the rubber. But yes, I agree with your comment and a separation between box and trailer side would be ideal to manage water intrusion and ability to breath.

Regarding your concern of additional stress on the steel frame members using rubber, I feel strongly this is a non-issue.
1) the rubber is 1/4" thick and is very solid (very little flex/play)
2) the max. weight the box loaded is 80#s, and is connected to three (3) of the frame members or 26lbs/frame
3) The frame members were reinforced due to the interior build with the additional plywood and strips of oak - this trailer is very solid.

The main purpose of the rubber is to reduce vibration (e.g. on a gravel road) which will greatly reduce the stress acting on the self tapping bolts threads. (the same principle of using nylon ropes for a tow rope and not chain/cables, which as we learn, damages the vehicles at their connection points.

I was concern with this connection point at the bolt threads will start to loosen over the course of time. When installed, the box was very snug and had zero play. After driving over 7000 km (not a typo) on a variety of roads/speeds, it still remains snug and has zero play. If I had to do it again, I would not hesitate to install it the same way.
 

cmgraves

Observer
At this point, the remaining work includes:
  • shelf/storage (including pull out fridge) at the front of the trailer
  • battery and solar panel purchase
  • 3 'planks' to be cut and finished that are 57" wide and have lengths of 15", 18" and 30"
  • painting the interior floor and exterior
  • 270 awning purchase and install
  • spare tire mounting
 

cmgraves

Observer
shelf/storage (including pull out fridge) at the front of the trailer took the most of my time to design the layout with measurement to ensure I utilize and I was able to maximize the space as much as possible. This was the space that was from the door opening to the tongue, roughly 57" wide, 64" tall and 30" deep. The depth was perfect for a fridge to fit in this space, then slide out into the entrance of the slide door and access directly from outside, and is in perfect location with the outside kitchen. I ordered 200# locking sliders off of amazon for 80 bucks. totally worth it as kids climbed over the fridge when it was in the out position, and it was solid. Before starting this build, the wife was in charge of painting the floor (I am no longer allowed to paint anything due to my past results). with that, we ordered an exterior 'liquid rubber' paint that is water base (so no chemicals and no off gassing). Went with this product for being water proof, tough and durable properties and uv resistance (bought enough to do both the interior and exterior for the purpose to help keep the trailer cooler in direct sunlight.)

Finish painting and starting the progression of laying out the fridge, slides and shelfing (as seen, the blue parts on the slide locks into place automatically, which secures the fridge in place in transit). then it is a quick lift of the handles to release the slide locks, and the fridge easily moves out for easy access from the door:
TZEV7682.JPG

Showing the fridge fully out on slides, and confirms spacing for the fridge door to open fully.
AEJQ8544.JPG

the kitchen counter and fridge layout:
CPWM5481.JPG

pull out shelf (for dry foods) above the fridge:
ACKX8369.JPG

progression with shelfs:
VDIP7395.JPG
 
Last edited:

cmgraves

Observer
and the finish product:
BZYY0782.JPG

bottom shelf holds the heavy items in the large black Costco containers (and went empty, also allows for long items to fit like kayaks, canoes, etc.)

above that is the misc shelf (biking gear, dry food storage, cold weather gear, etc.),

above that is the clothes where each member gets a blue fabric bin for their clothes.

above the fridge is the pull out drawer for dry goods for immediate need/access. and the 2 red/green bins pull out - one for toiletry items/meds/vitamins and the other for one and small misc. items. This worked great as you can take out the bin out completely, easily locate your item, then put back for storage. out of the way.

behind those bins is where the battery is stored to power the fridge and inside trailer lights. I purchased the Jackery 500 and 240, and one solar panel. this proved to be the wrong tool for the job and was my biggest mistake on the project. (insufficient power and charging by solar worked half the time). The fridge (domectic CFX55) exceeded my expectations, and we never had food go bad on us. just had to run the car more often in the camp to keep the batteries charged. Next year, I will be working on a lithium battery setup.

then the very top shelf is for the sleeping bags and sleeping mats. We bought two double mats (one for the adults and one for the kids) which roll up small enough to fit up on the top shelf. and are very light, so keep the overall weight down.

for the adults, we got the:

for kids, we got the :

ours was twice as much, but 4x more comfortable. for sleeping on it for 3 week straight, the mat was not the reason of bad sleeps, and was worth every penny.
 

cmgraves

Observer
Just to add fun to the build - around the time of the shelving and fridge build out was when I had a major mountain biking crash and sustain a major knee injury. Luckily, nothing was broken or torn, just incredible swollen. I was forced to be bed rest for one week. So majority of the shelf build was be hoping on one leg in and out of the trailer cutting wood, measuring, screwing, and what not. I am all good now and 100% recovered, but what it looked like then:

YGPD5394.JPG
 

cmgraves

Observer
While I was working on the inside, the wife was working on the outside painting. the paint we got and what she did turned out way better than I expected. Finish product look great. We painted over majority of the joints, which made it tighter for water, and the UV reduction really worked and did great with keeping it cool inside in 40 degree weather (100 for below the border folks).
'
this is the product we got, and works great for the exterior:

for the interior, it was so/so. it does provide protection, but it did not finish flat/smooth, and had a lot of voids for dirt to get stuck, and does not sweep out, and always always looks dirty. I'm looking at a rubber product to install down the road. but for now, this performs well, and we use outdoor rugs to catch the dirt, and easier to clean up. so it does the job, just not pretty.


TRSH1488.JPG

JEIC9196.JPG

and the best part, the wife hand painted an orca on the front panel that turned out spectacular.
RTYC7530.JPG
 

wheelsee

New member
Recommend a LiFePO4 battery - mine is a 280 aH battery and will run my Dometic for a week and still only drop down to 73%
 

Forum statistics

Threads
186,092
Messages
2,881,890
Members
225,874
Latest member
Mitch Bears
Top