Tacoverlander
Observer
rear bumper installed


.jpg")


I believe it's about enjoying what's yours! Great bumper work . Looks awesome .
Happy camping
I know you said you are going to regear but how did the stock gears and 2.7 handle the larger tires? I'm assuming you have 4:10s right now? What is your total suspension lift height?
 it really isn't horrible. Other than 5th gear being a dog, the only time time I can really tell is when climbing the mountains on the highway. You just get in the right lane and check out the scenery...lol
 I really like what I see here Tacoverlander. I love the fact that you built everything yourself. What did you use for the hinge on your swingout? And could you post a picture of how you did your table? I am thinking about doing one myself on my swingout. Please keep us updated on the build because your truck is awesome.


View attachment 366483
The motor out of my truck and before the rebuild.
View attachment 366484
At this time I didnt really think that I would be going this far with this build so I dont have a ton of motor rebuild pictures...lol...I was just so ready to get that thing back together and running.
Next was the front winch bumper...I dont claim to be a welder. I have one and I like to build/fab things....so I built one.
got a crap load of card board and even more patience/time.
View attachment 366485
First things first...the winch mounting plate. Some heavy duty C Channel that I picked up at my local scrap yard with a little fab.
View attachment 366486
View attachment 366487
View attachment 366488
View attachment 366489
View attachment 366490

Awesome build on the bumper! I haven't been a fan of plate bumpers but I like this one!!
I was kinda hoping you would of just used masking tape to hold the metal together instead of welding it
Sweet rig man! Keep it up!
That is awesome. Pictures show exactly what I need to see. Thank you for taking the time to post the pictures. Looks like I need to get back to work on my truck now.
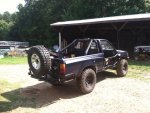
I don't have any pictures of my swingout for straight on but these pictures should show it good enough. After seeing your set up I have a lot more changes to do to mine. I used scrap hand rail for the basic frame and some 1/2'' plate with 3pt hitch tractor pins for the hinges. It is not happy with one spare tire let alone extra added weight. So with that said I will be copying some of your ideas to make this thing work right. With how its set up now I have to beat a pin out just to open the tail gate. It is getting old. But with everything in a bind from the weight of the tire it does not rattle. Any how I am done with hijacking your build. Carry on with the awesome work.
Let me know if you have any more questions.