You are using an out of date browser. It may not display this or other websites correctly.
You should upgrade or use an alternative browser.
You should upgrade or use an alternative browser.
"Arctica" 2015 Crewmax Platinum Tundra Build
- Thread starter wikid
- Start date

wikid
Adventurer
Here comes the tedious part. It makes it all worth while, when you can flip the switches and they all work. I have separated my wire runs into 3 sections
First section will be the front harness
Chicken scratch, to map it all out.
I will actually created a laminated wiring diagram, so I can refer back. I relied on memory and (this is the way I also run wires, on my FJ) Each build I try to add another element, that makes life easier in the long run
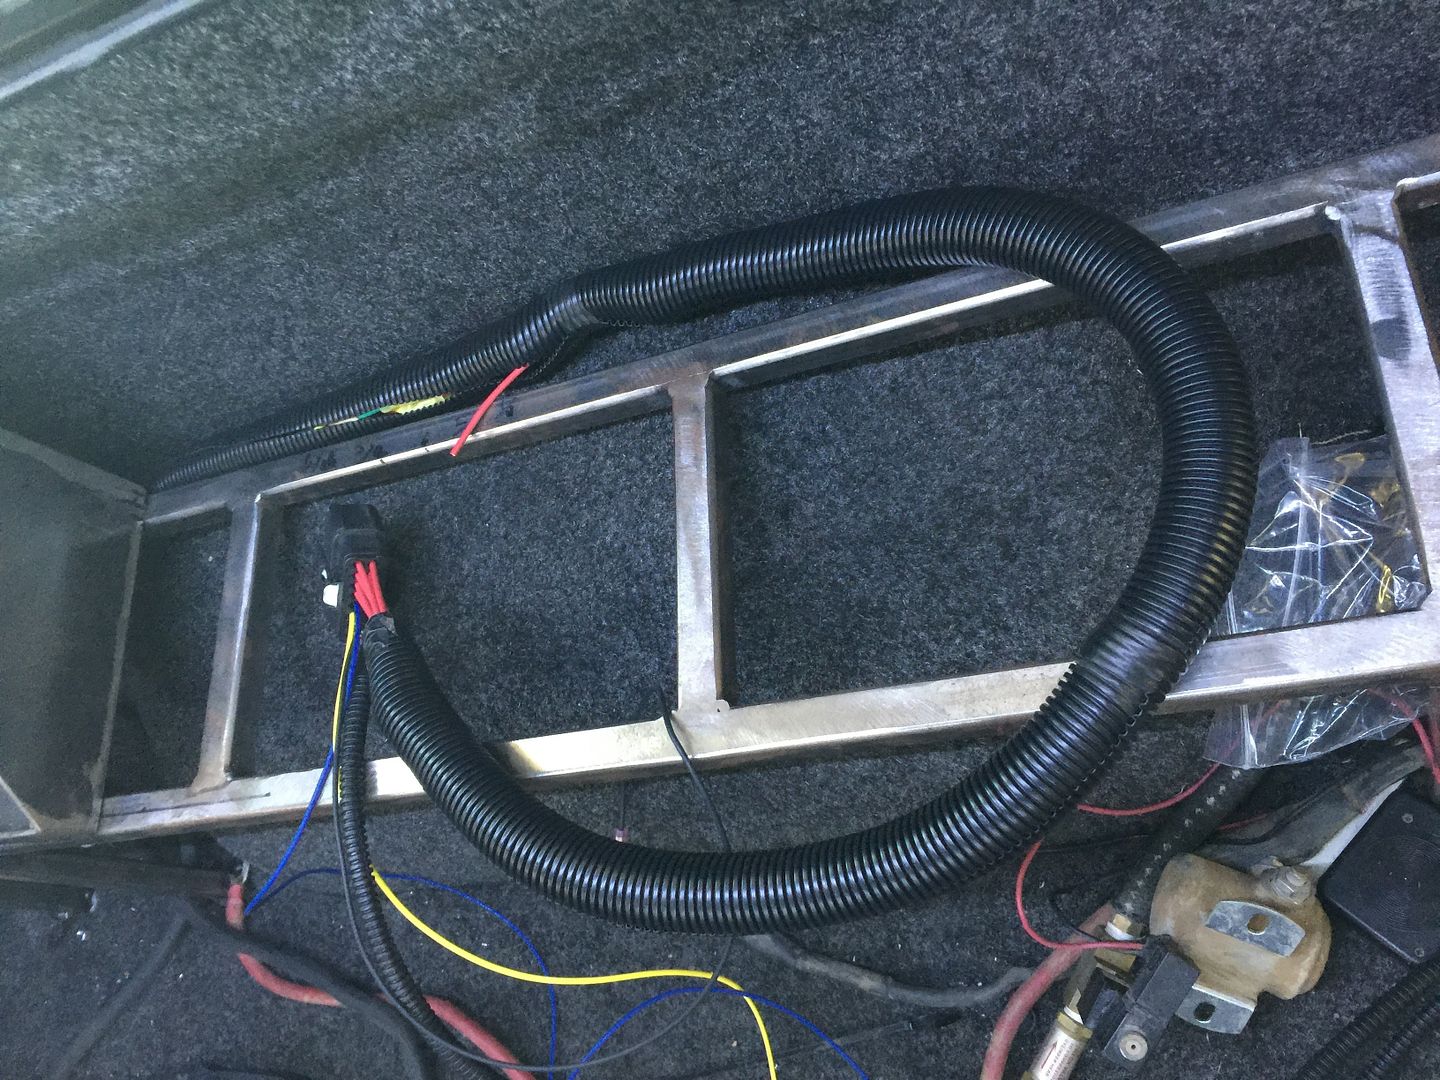
I picked up some 8 conductor 12gauge cable for these runs, along with convoluted tubing, to protect the cable, so it will have to extra layers. This one worked out just right. I have a grounding bus for the engine compartment and the bed to make my grounds nice too .
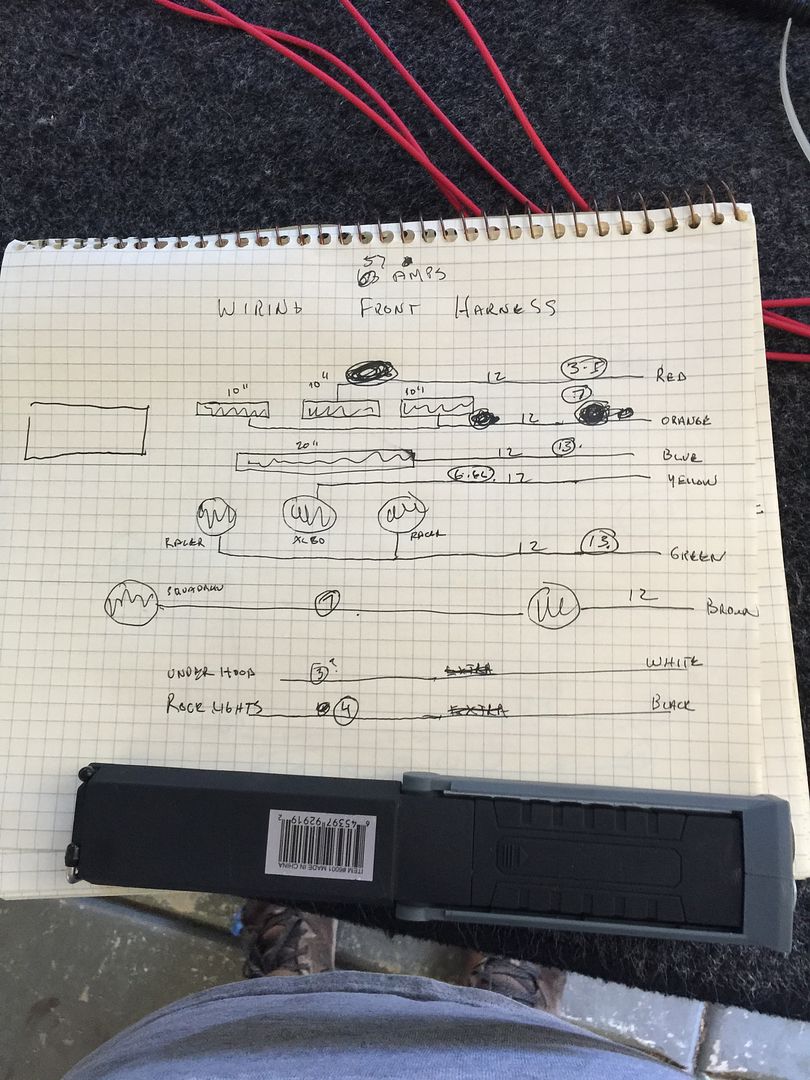
Second drawing is the roof rack.
I may even split the circuits on the side lights. Since I have strobe abilities , this would also add some more flash, when I want to . Otherwise it will also give me the ability to pick and choose if I don't want as much light in the sides

The third section is for rock lights and under hood lights . No drawing for that one yet")
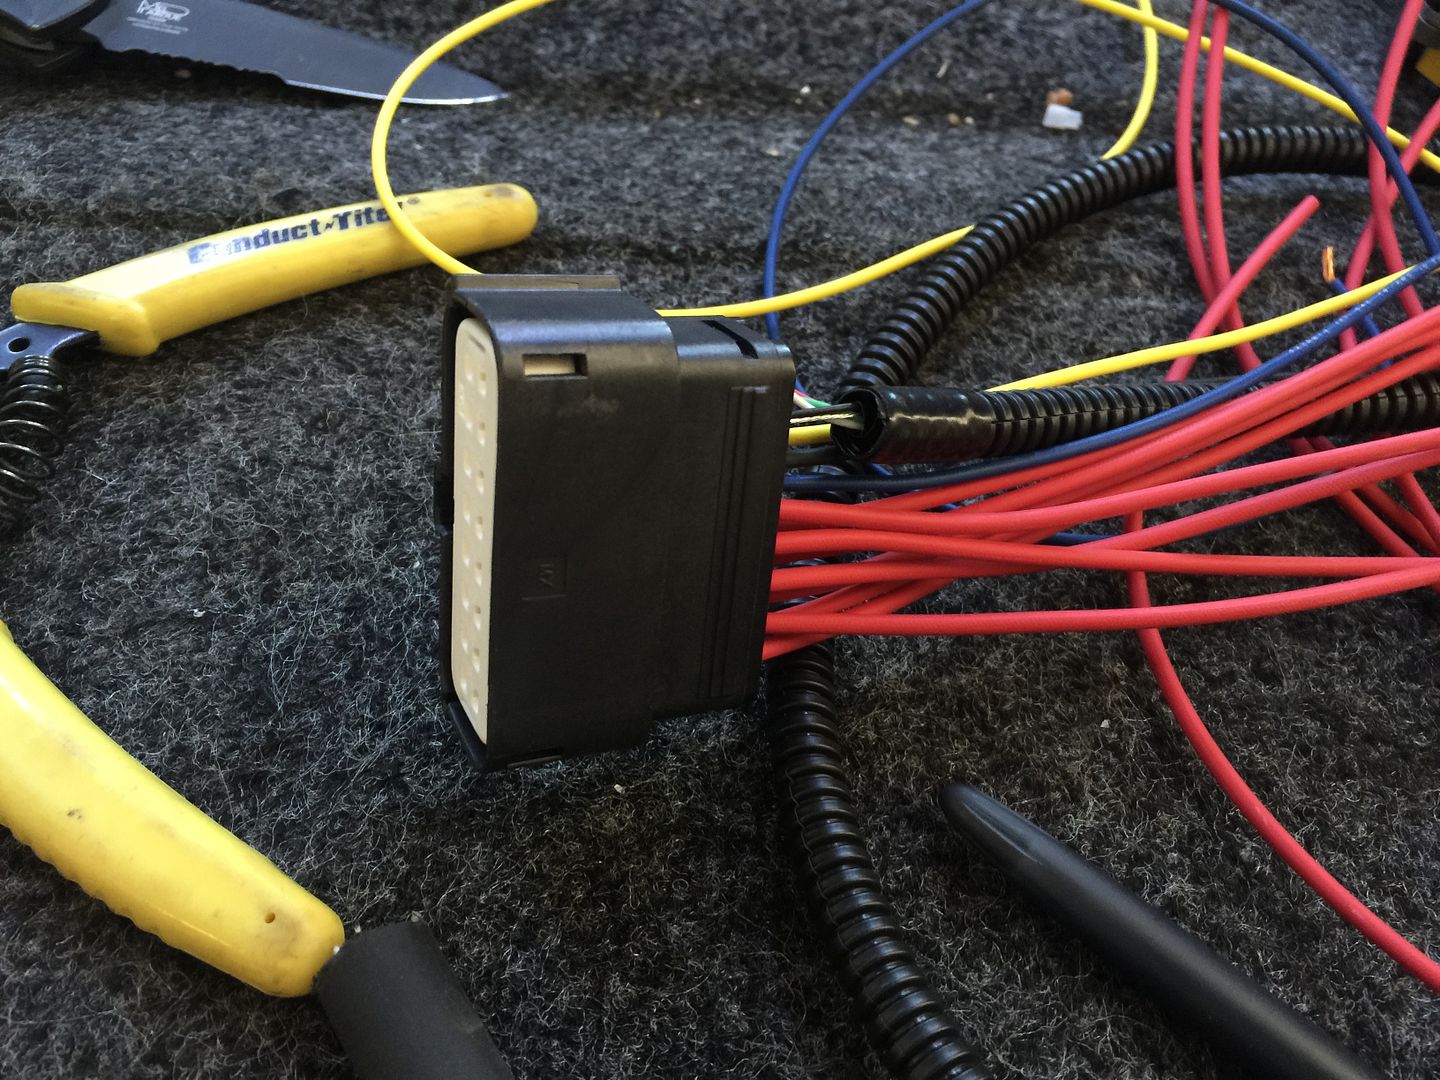
Here is the harness I am wiring in
The pins/wires are numbered, so I just need to know how to count
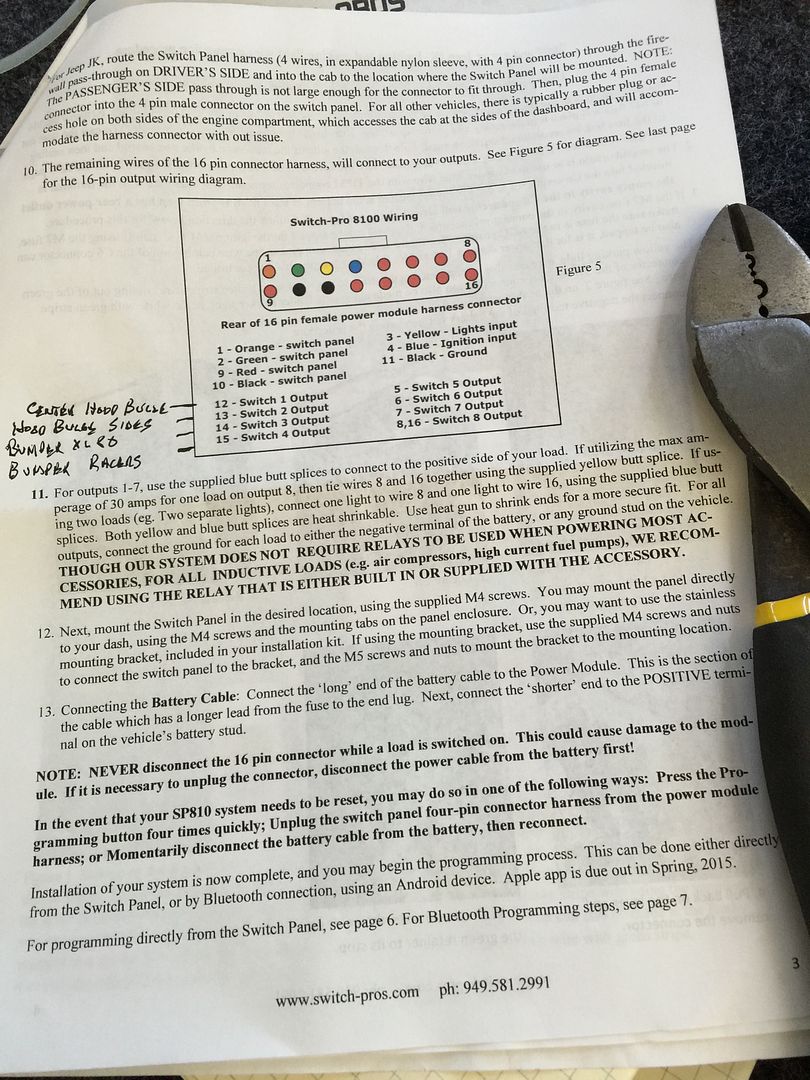
The front harness is done on the Switch-Pro end. I still need to do a small wire run inside the truck, to get the switch harness and ignition trigger wire, to the correct place, but that means pulling rear seats, trim panels, fishing the harness through the headliner and the other through the center console. I will complete the rear harness and run both of these together
Switch Pros - Home
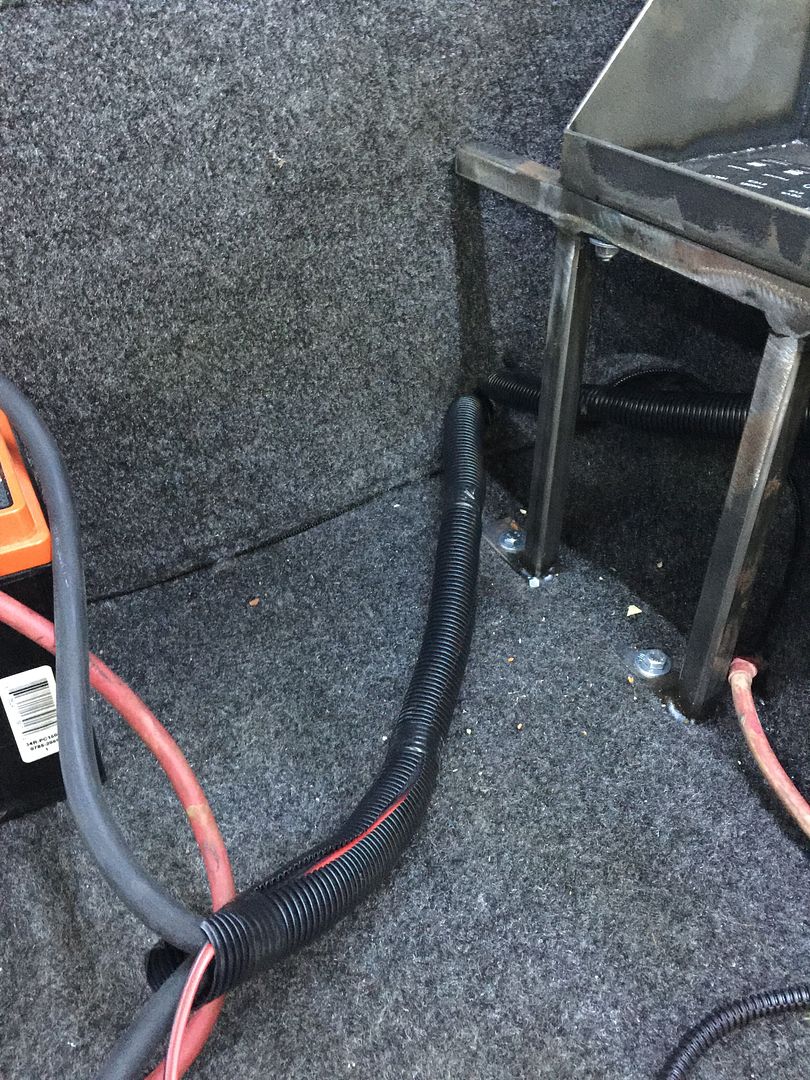
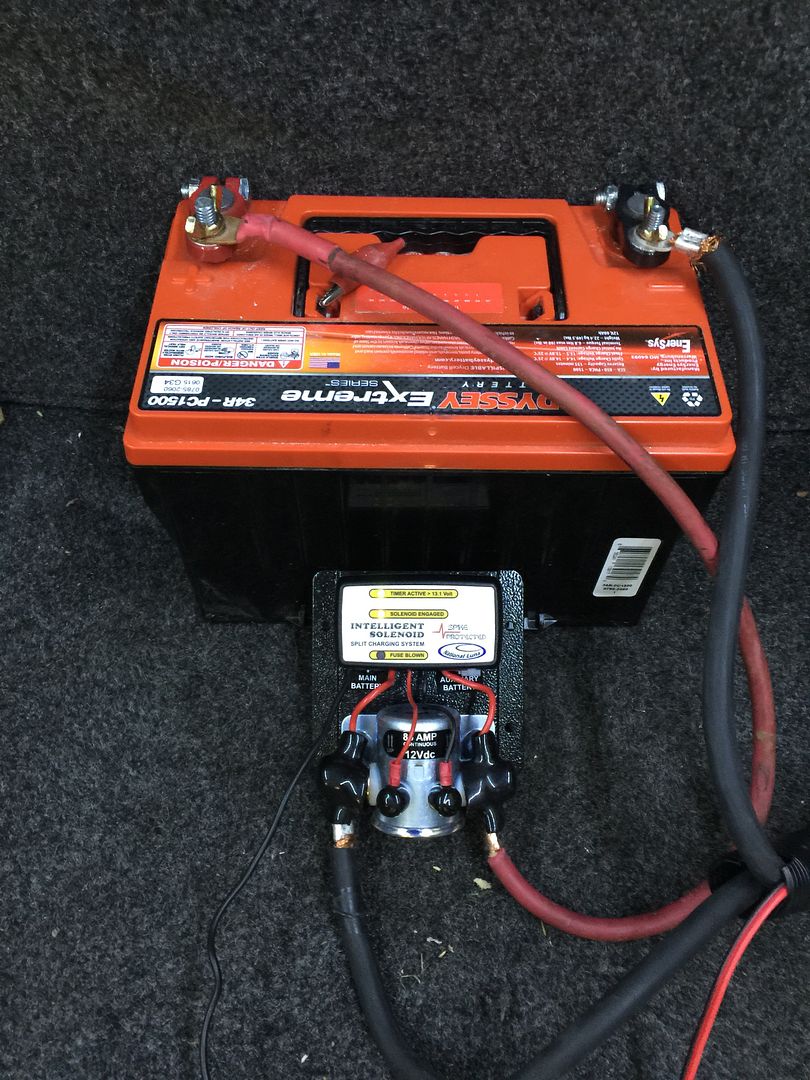
While I was still working in the rear, I decided to run the 1gauge, dual battery cable. I had it ran already, but decided to keep the dual battery controller in the back, so I needed to pull it back out and run both the cables to the rear. 25" more cable was needed of course
Nationa Luna Intelligent Solenoid
I hooked it up to test everything out. It works !! . Its all set to finish up the fab work on the cargo area .
Tomorrow, I will wire in the second harness and work on mounting the roof lights
First section will be the front harness
Chicken scratch, to map it all out.
I will actually created a laminated wiring diagram, so I can refer back. I relied on memory and (this is the way I also run wires, on my FJ) Each build I try to add another element, that makes life easier in the long run
I picked up some 8 conductor 12gauge cable for these runs, along with convoluted tubing, to protect the cable, so it will have to extra layers. This one worked out just right. I have a grounding bus for the engine compartment and the bed to make my grounds nice too .

Second drawing is the roof rack.
I may even split the circuits on the side lights. Since I have strobe abilities , this would also add some more flash, when I want to . Otherwise it will also give me the ability to pick and choose if I don't want as much light in the sides

The third section is for rock lights and under hood lights . No drawing for that one yet
Here is the harness I am wiring in
The pins/wires are numbered, so I just need to know how to count


The front harness is done on the Switch-Pro end. I still need to do a small wire run inside the truck, to get the switch harness and ignition trigger wire, to the correct place, but that means pulling rear seats, trim panels, fishing the harness through the headliner and the other through the center console. I will complete the rear harness and run both of these together
Switch Pros - Home

While I was still working in the rear, I decided to run the 1gauge, dual battery cable. I had it ran already, but decided to keep the dual battery controller in the back, so I needed to pull it back out and run both the cables to the rear. 25" more cable was needed of course
Nationa Luna Intelligent Solenoid

I hooked it up to test everything out. It works !! . Its all set to finish up the fab work on the cargo area .

Tomorrow, I will wire in the second harness and work on mounting the roof lights
wikid
Adventurer
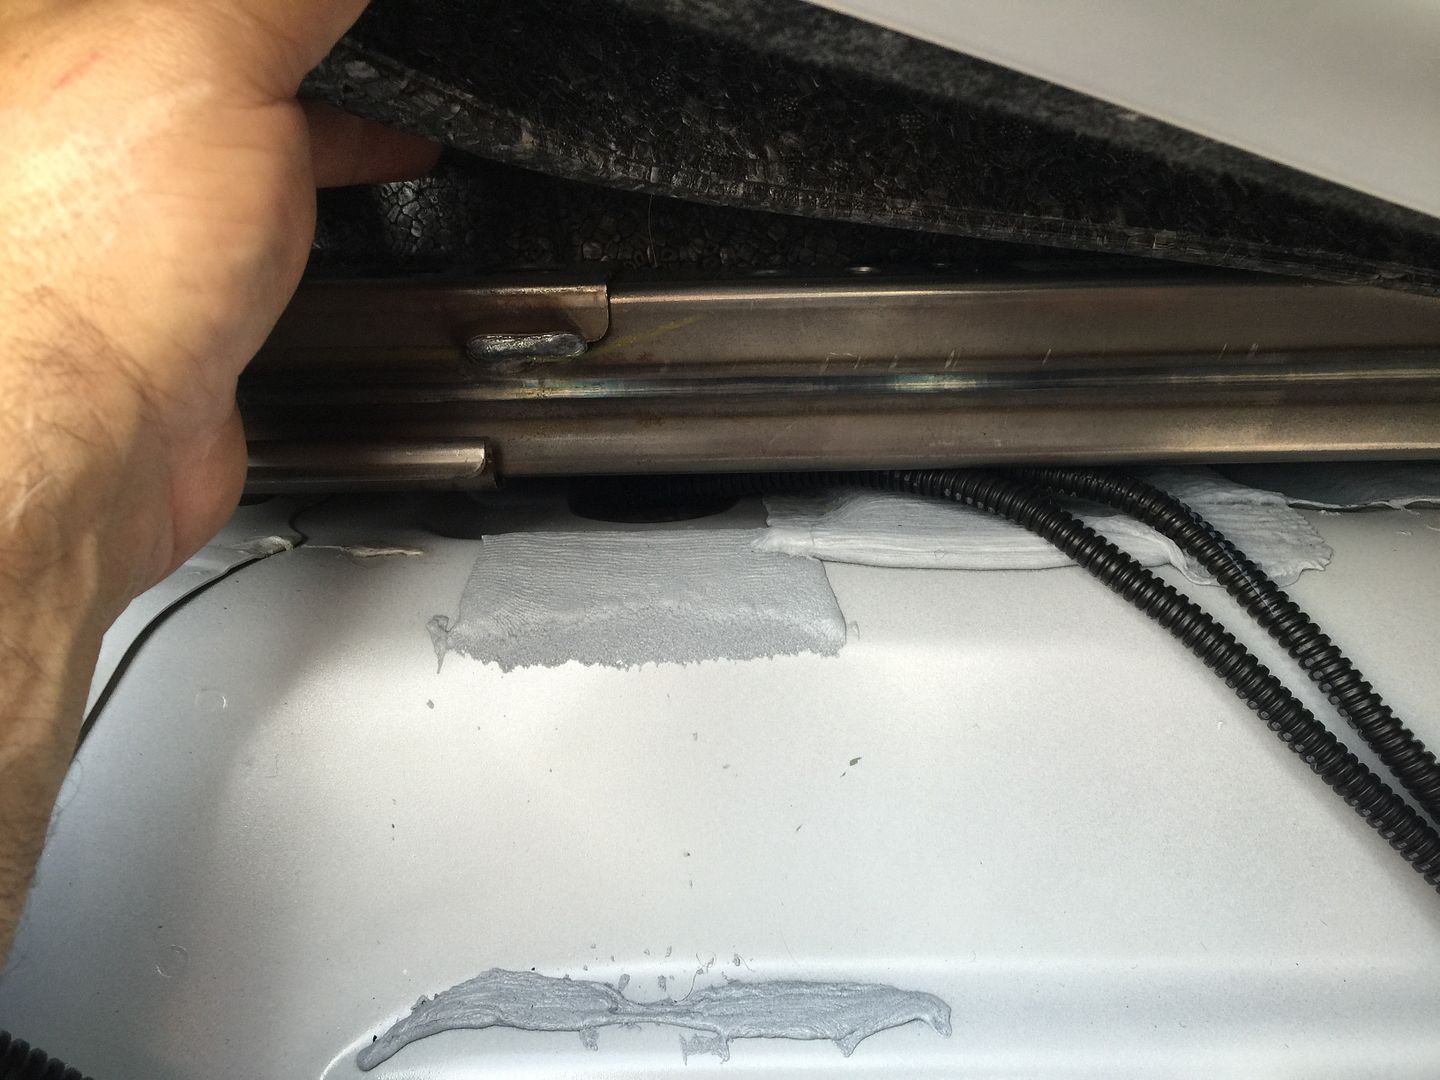
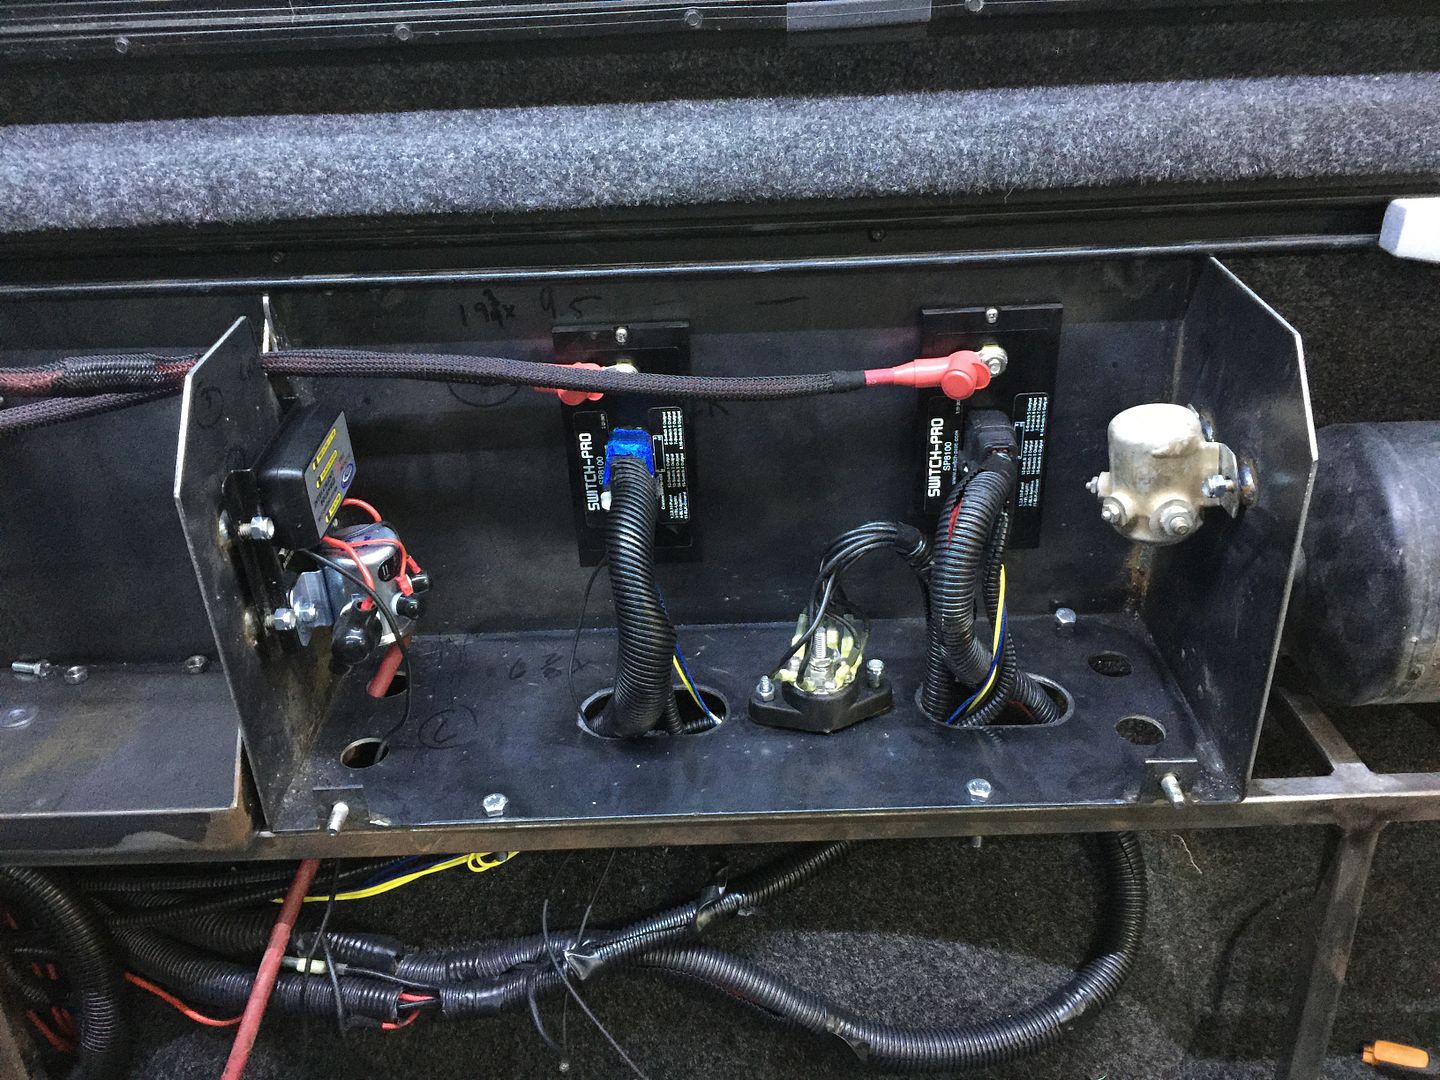
Most of the major wiring is complete. The two large plugs to the right, are the Switch-Pro harnesses. . Each of these branch off to different sections . The front takes up an entire Switch-Pro and that harness is in the engine bay already. The looped red/black 12 is set aside for the compressor. I still need to run one more open circuit for the train horn.
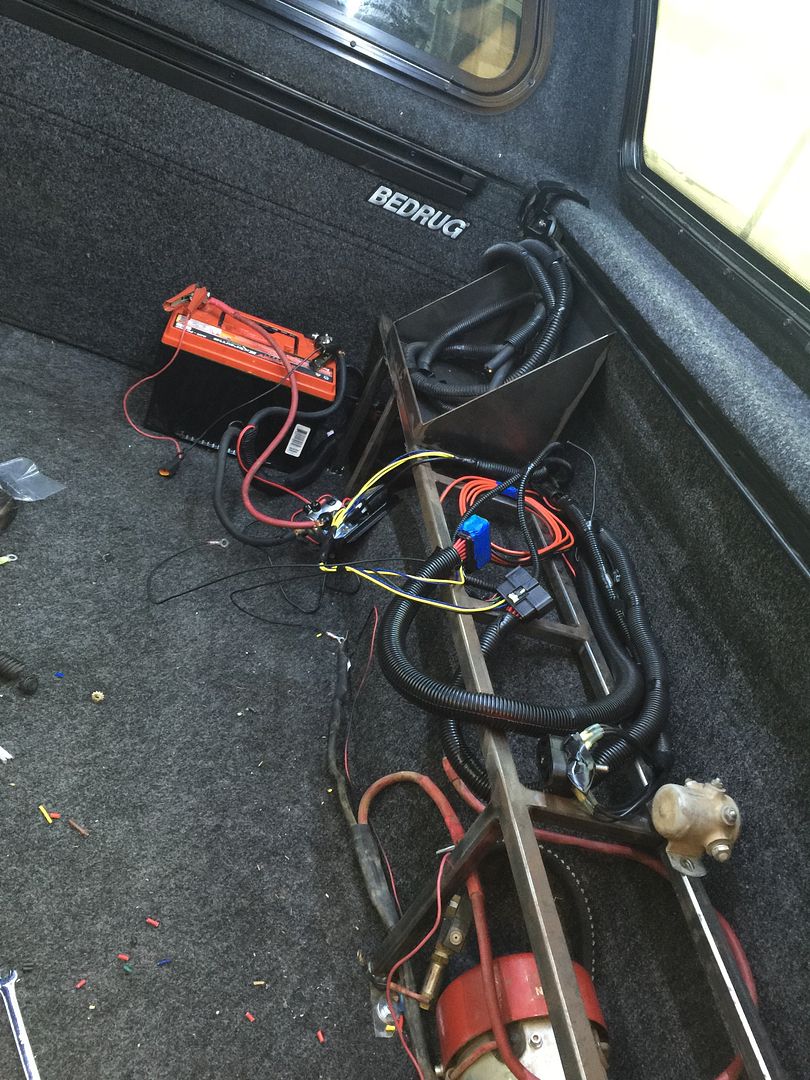
The two harnesses you see looped in the battery box are
Roof rear lighting and light bar with 6 lights, (3) separate circuits. To make it simple, I used a 8 conductor 12 gauge , then just marked a plus and minus conductor for each circuit. I have four actual circuits for each cable pull. I actually have 2 extra circuits off the second Switch-Pro
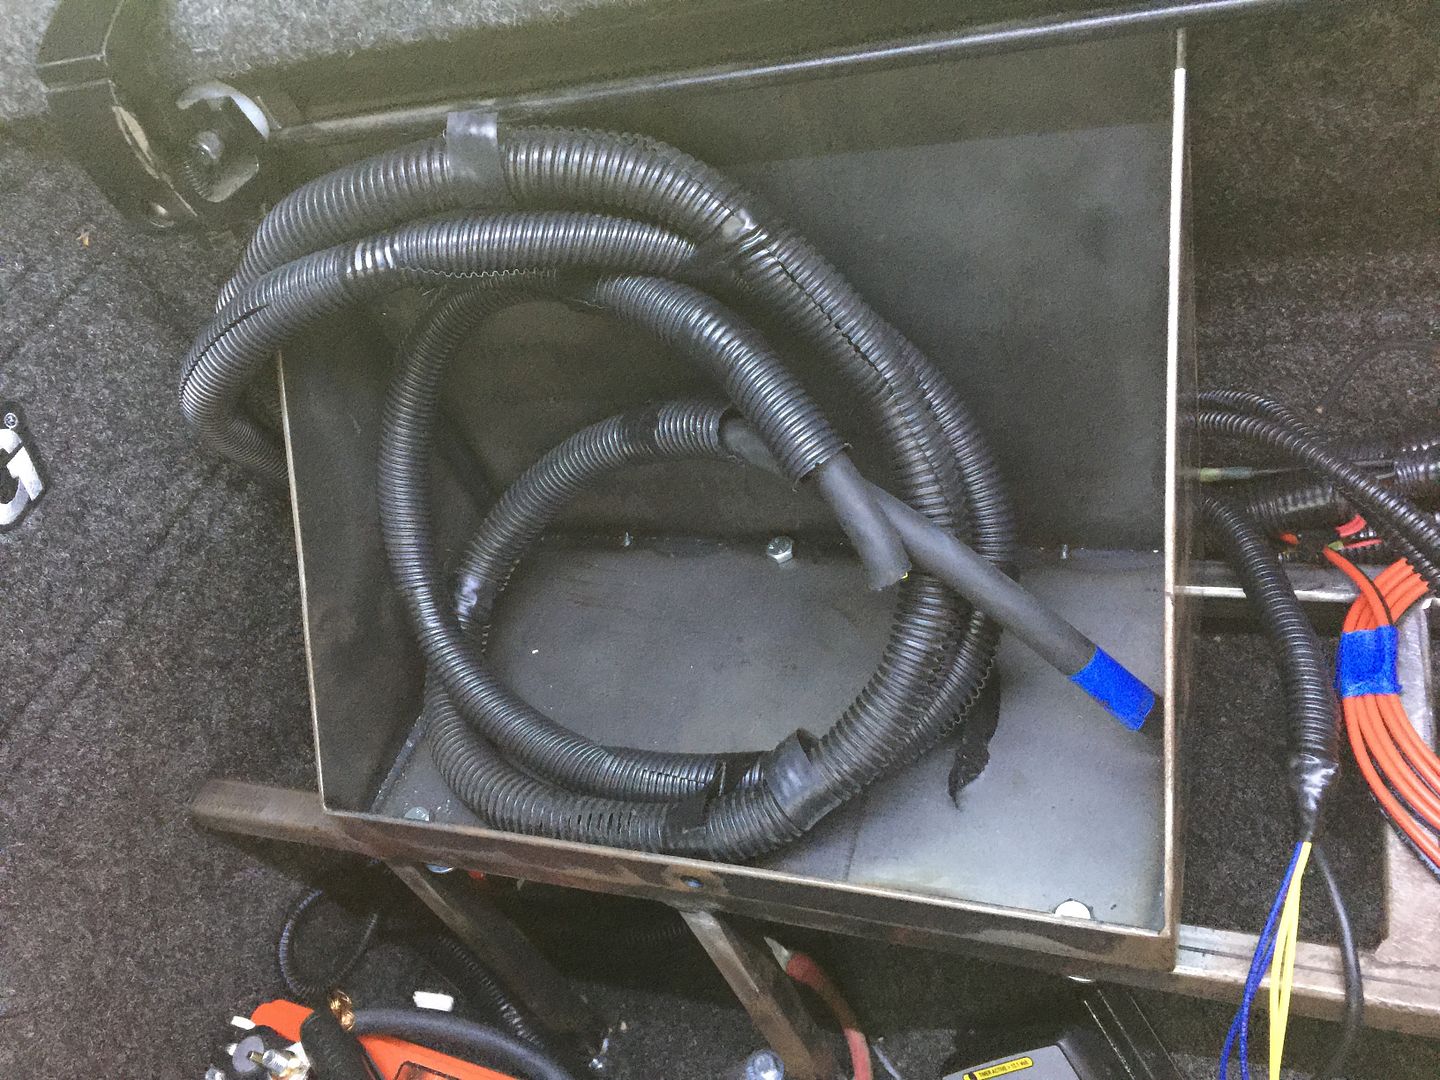
All this will be mounted and tucked, inside or behind the actual box. The goal is for it to be neat, trouble free and easy to access for changes and trouble shooting . This represents 3 days of wiring.
Here's what took up the rest of my time last evening.
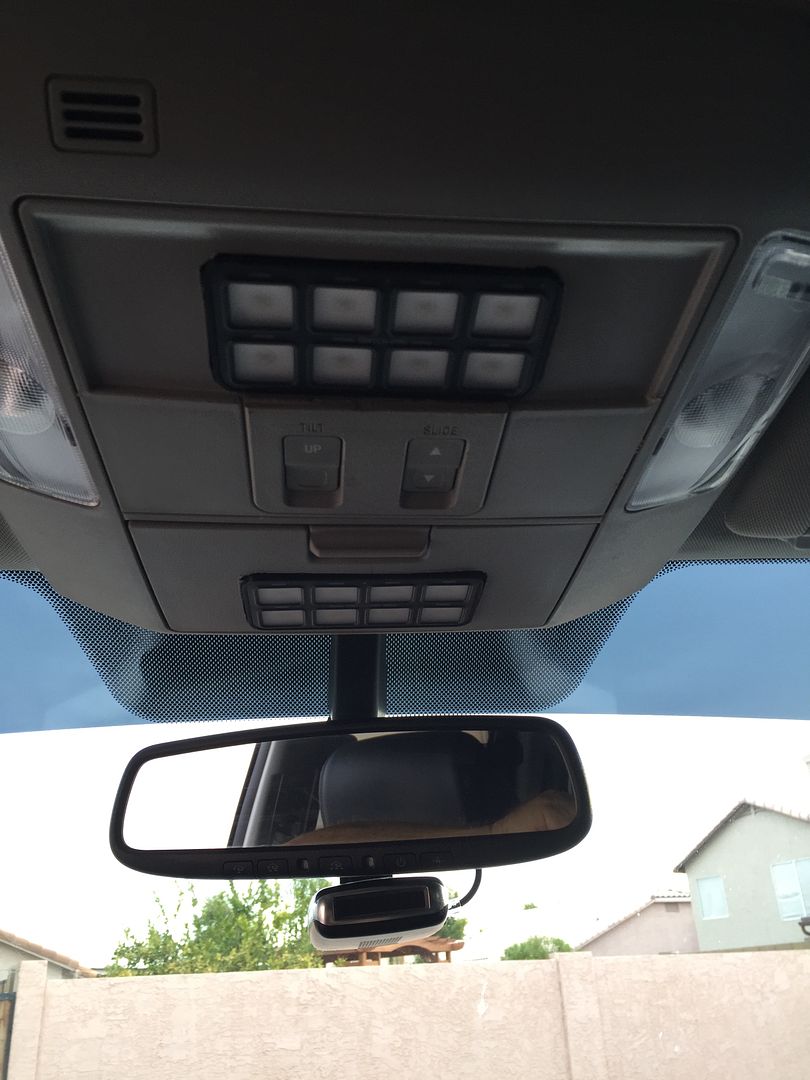
I fished the switch harnesses them self, through the access floor floor plug on the passenger side. after removing the seat and large pre-formed floor section. Then fished them up the B-pillar. Using a piece of cable I removed the upper console and fished the cable through the ceiling, above the air bags, to the console. It was painful, but now they are in the locations they will be mounted to.
I may carefully carve a hole in the stupid money clip area to flush mount, the switch panel . The space is literally open above it
I was going to mount this one inside the sun glass bay, but may consider flush mounting it to the face of the sun glass bay. I think having both switch plates up there in view would look good illuminated, it will be a great place to access controls of everything too . If you use the sun glass compartment, you still may be able to use it with the switches installed in the door . It may depend on how much pressure the switches take, to activate. They seems pretty easy to push, but i don't want the door opening , when I push a switch :|
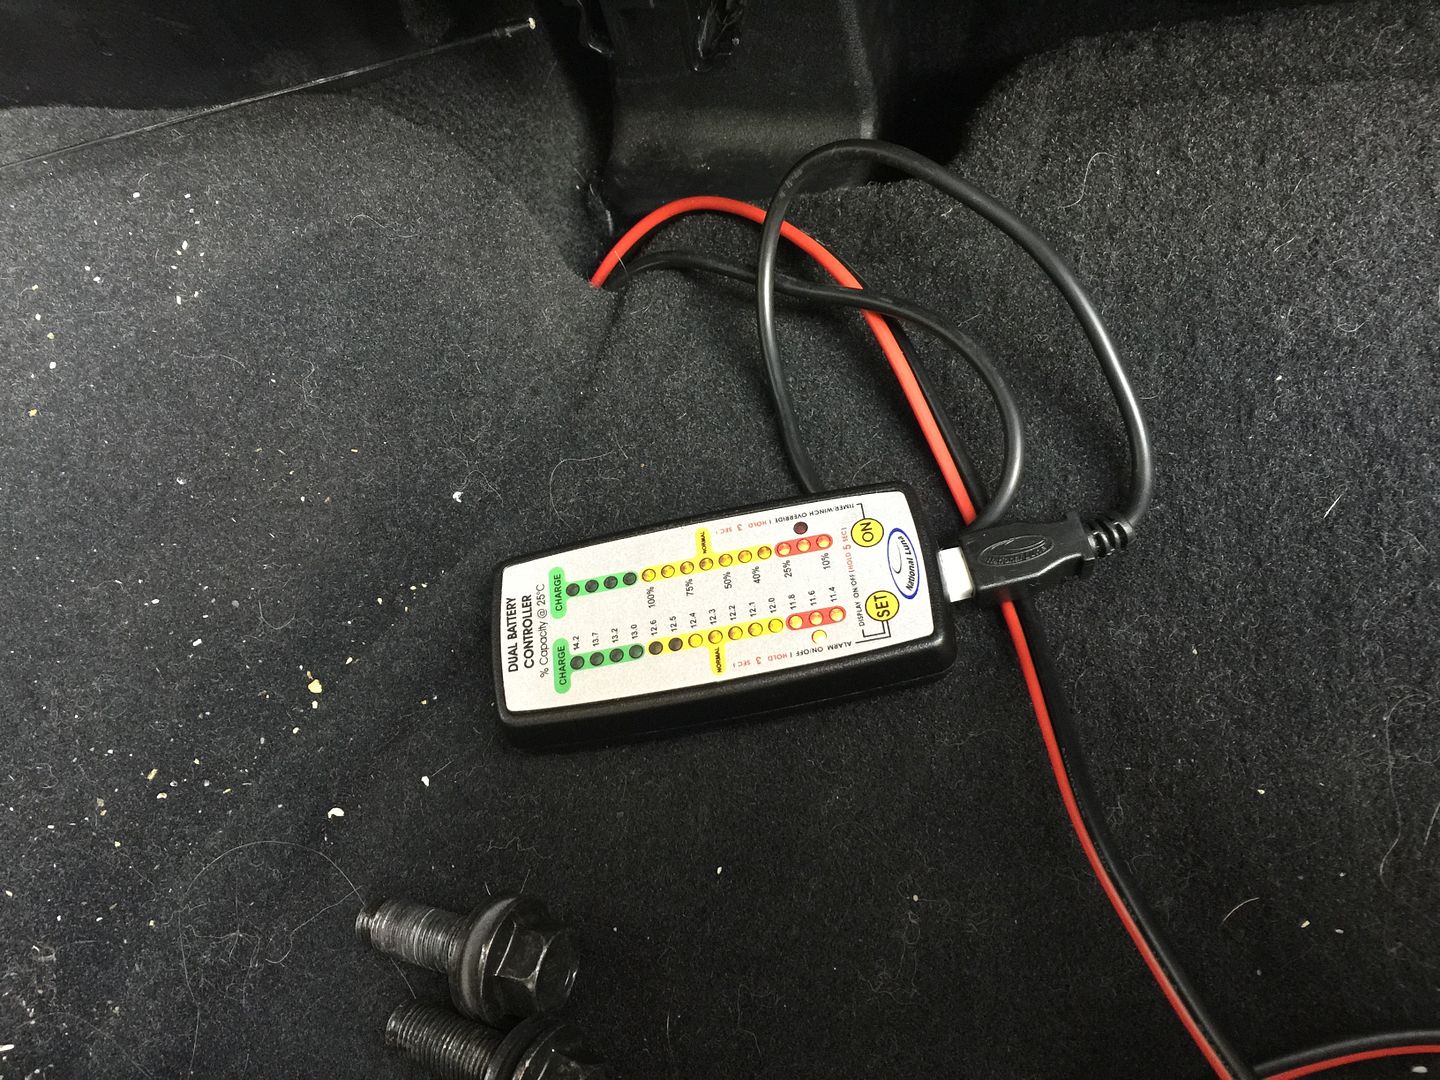
This is the controller for the National Luna dual battery system . It may be pushed into the center console, so its out of sight , but accessible for me to monitor it, or combine batteries, the extra wires are the trigger wire and illumination wire for the Switch-Pro's
http://www.equipt1.com/item/dual-battery-monitor-surface-mount
I pulled up the rug, so you could see where the wires came into the cab. Passenger side, between the seat rails, to the access hole. The two harnesses you see are the Switch -Pro, Switch cables

The two harnesses you see looped in the battery box are
Roof rear lighting and light bar with 6 lights, (3) separate circuits. To make it simple, I used a 8 conductor 12 gauge , then just marked a plus and minus conductor for each circuit. I have four actual circuits for each cable pull. I actually have 2 extra circuits off the second Switch-Pro

All this will be mounted and tucked, inside or behind the actual box. The goal is for it to be neat, trouble free and easy to access for changes and trouble shooting . This represents 3 days of wiring.
Here's what took up the rest of my time last evening.
I fished the switch harnesses them self, through the access floor floor plug on the passenger side. after removing the seat and large pre-formed floor section. Then fished them up the B-pillar. Using a piece of cable I removed the upper console and fished the cable through the ceiling, above the air bags, to the console. It was painful, but now they are in the locations they will be mounted to.
I may carefully carve a hole in the stupid money clip area to flush mount, the switch panel . The space is literally open above it

I was going to mount this one inside the sun glass bay, but may consider flush mounting it to the face of the sun glass bay. I think having both switch plates up there in view would look good illuminated, it will be a great place to access controls of everything too . If you use the sun glass compartment, you still may be able to use it with the switches installed in the door . It may depend on how much pressure the switches take, to activate. They seems pretty easy to push, but i don't want the door opening , when I push a switch :|

This is the controller for the National Luna dual battery system . It may be pushed into the center console, so its out of sight , but accessible for me to monitor it, or combine batteries, the extra wires are the trigger wire and illumination wire for the Switch-Pro's
http://www.equipt1.com/item/dual-battery-monitor-surface-mount

I pulled up the rug, so you could see where the wires came into the cab. Passenger side, between the seat rails, to the access hole. The two harnesses you see are the Switch -Pro, Switch cables

wikid
Adventurer
Here are a few pictures of the next task .
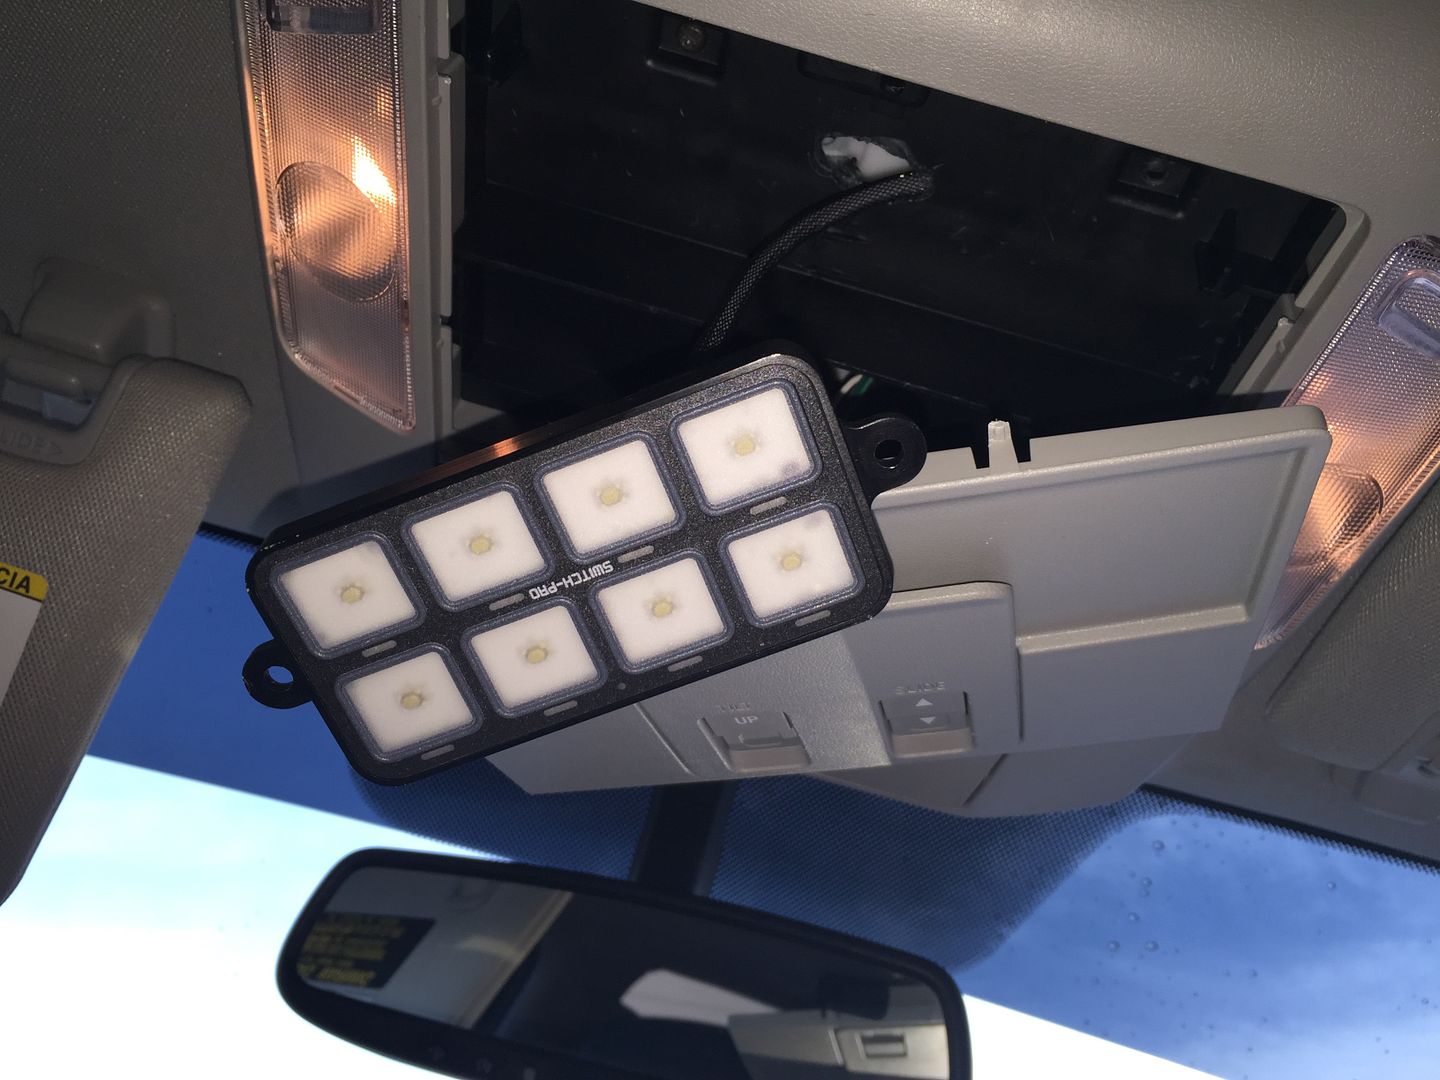
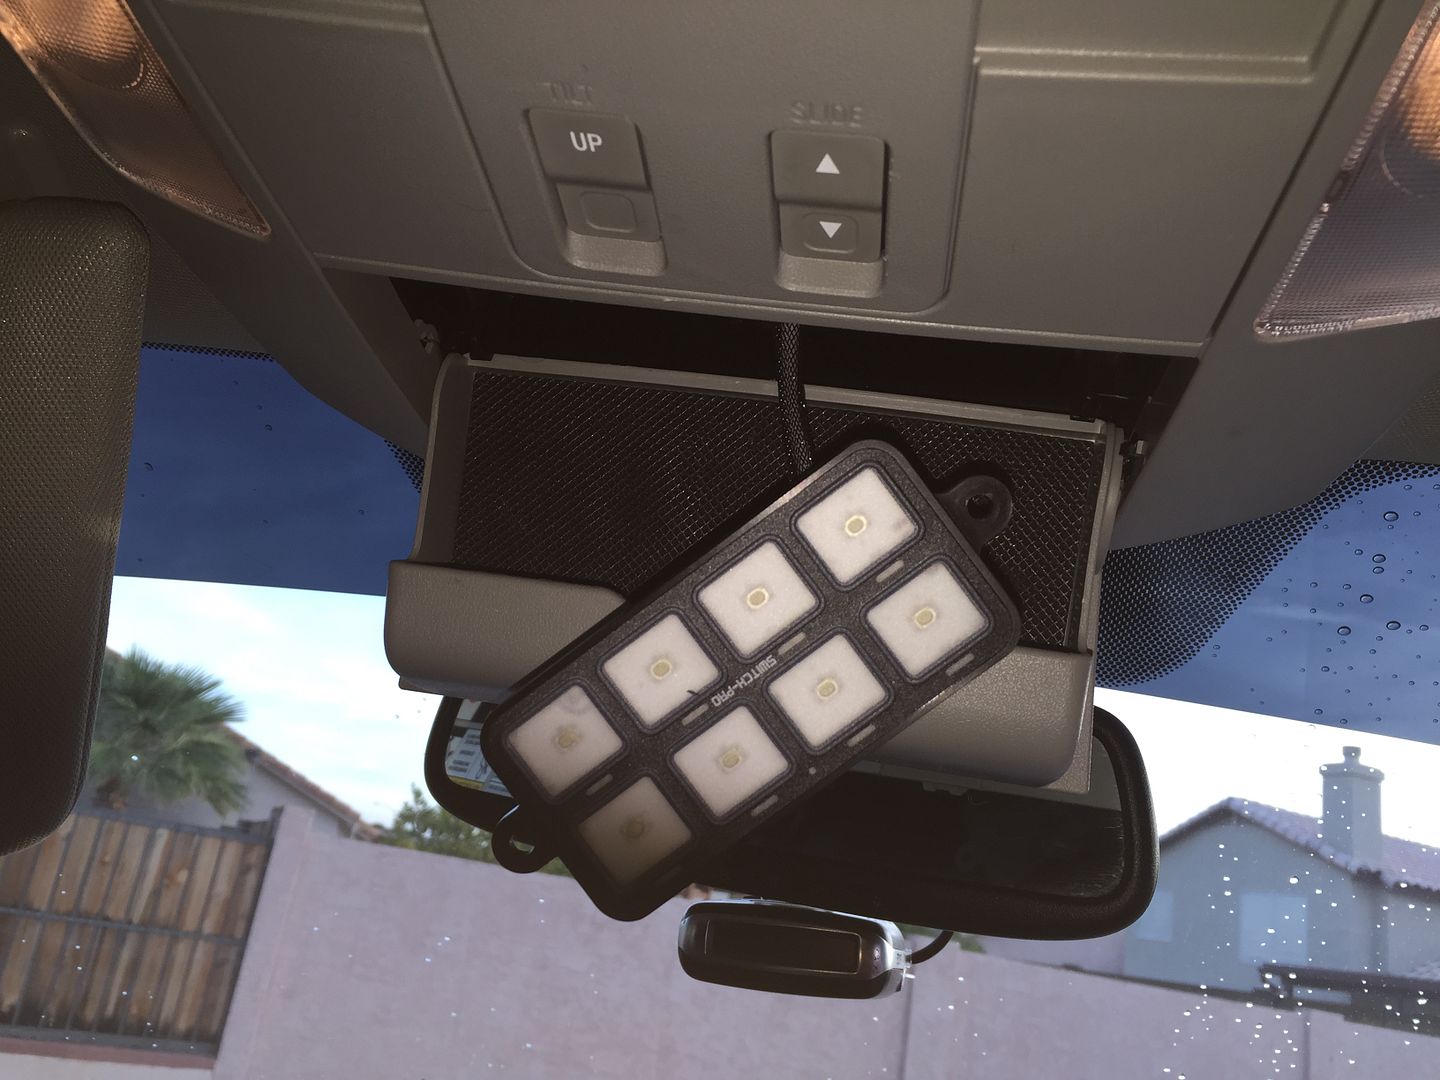
Who needs a paper clip overhead when you can have 8 switches ?
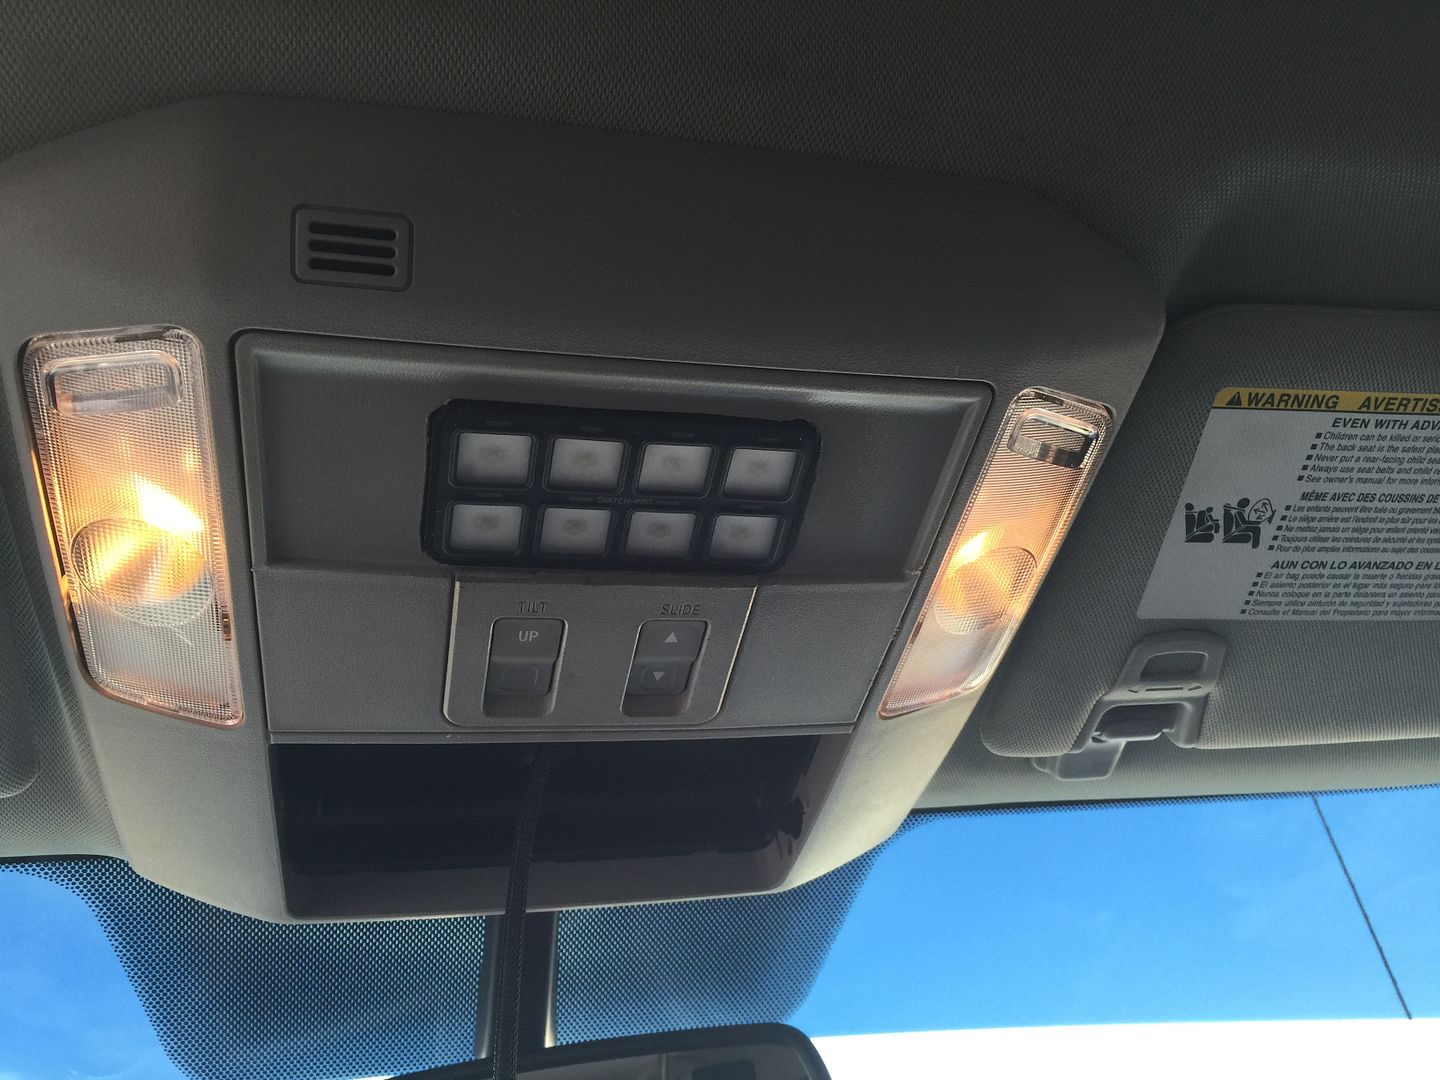
I popped the sun glass door off and parts went flying. I hope to find said parts before I re install the door . Just the stuff you deal with when you haven't taken something off before
I will be frenching in the other switch panel. in the door. The actual sun glass case should still work, if I have it figured right.
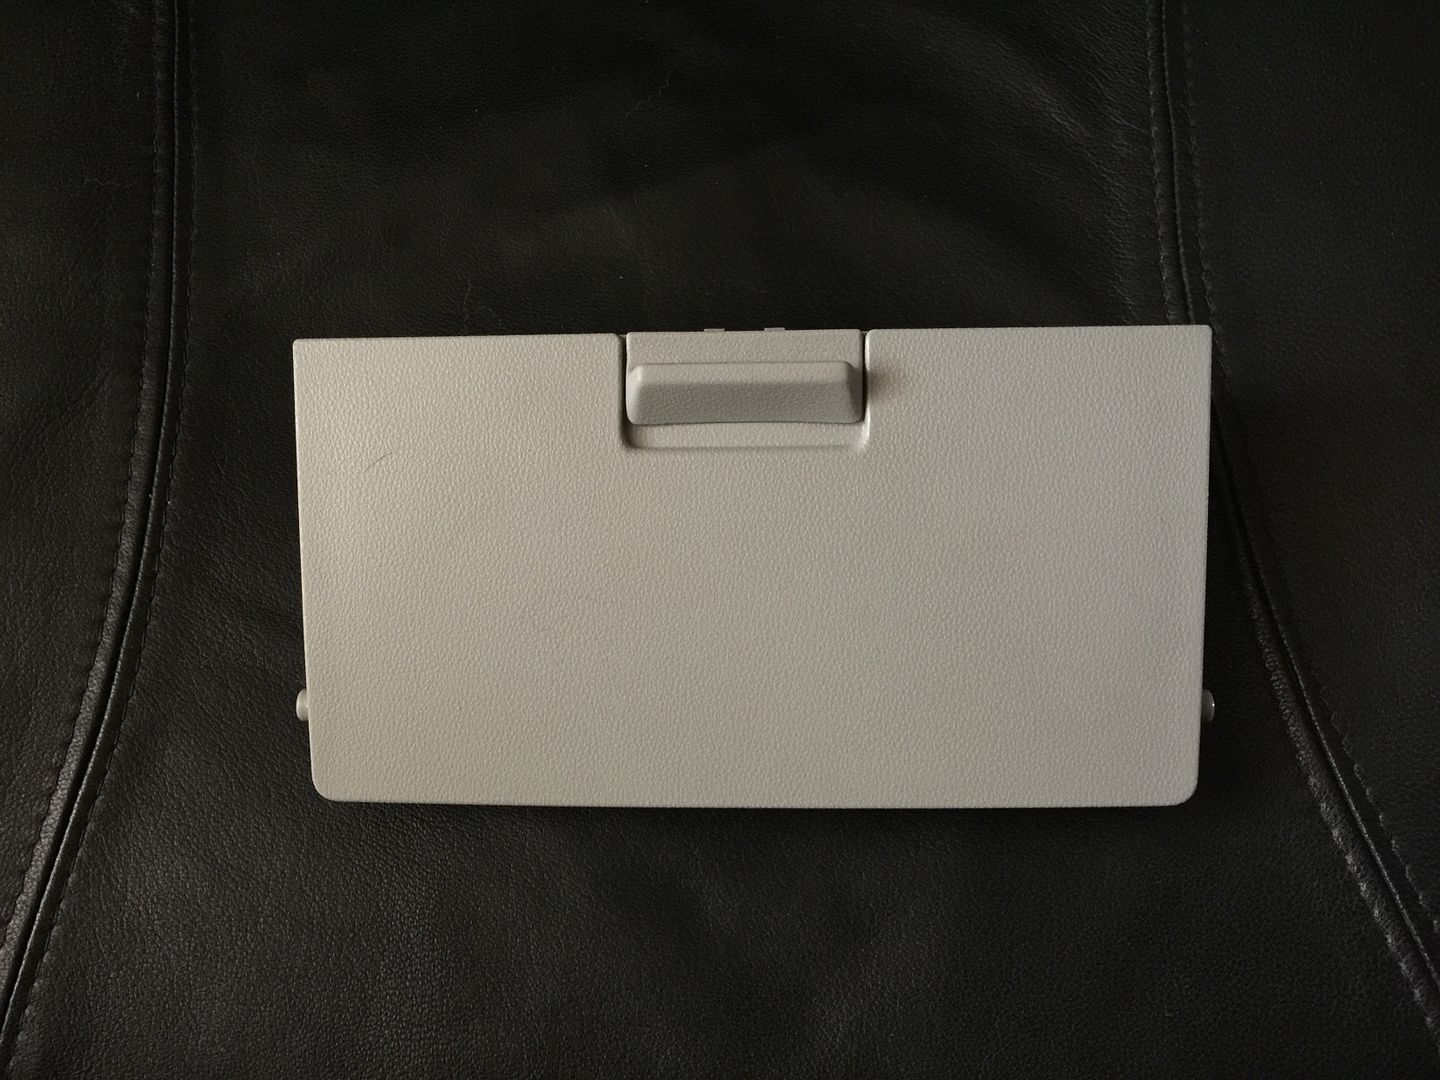
I need to find something clean to trim it out with then clean the plastic surfaces, score them and glue the tabs inside with 2 part epoxy. I don't want to have any screws coming through the other side. Hopefully it looks almost factory when its backlit.
As I thought , the switch panel is so thin, the sun glass holder, still fully functional
Joe, from GMG Fabrication test fitting the control box. He has been a trooper and done a great job, creating something from nothing
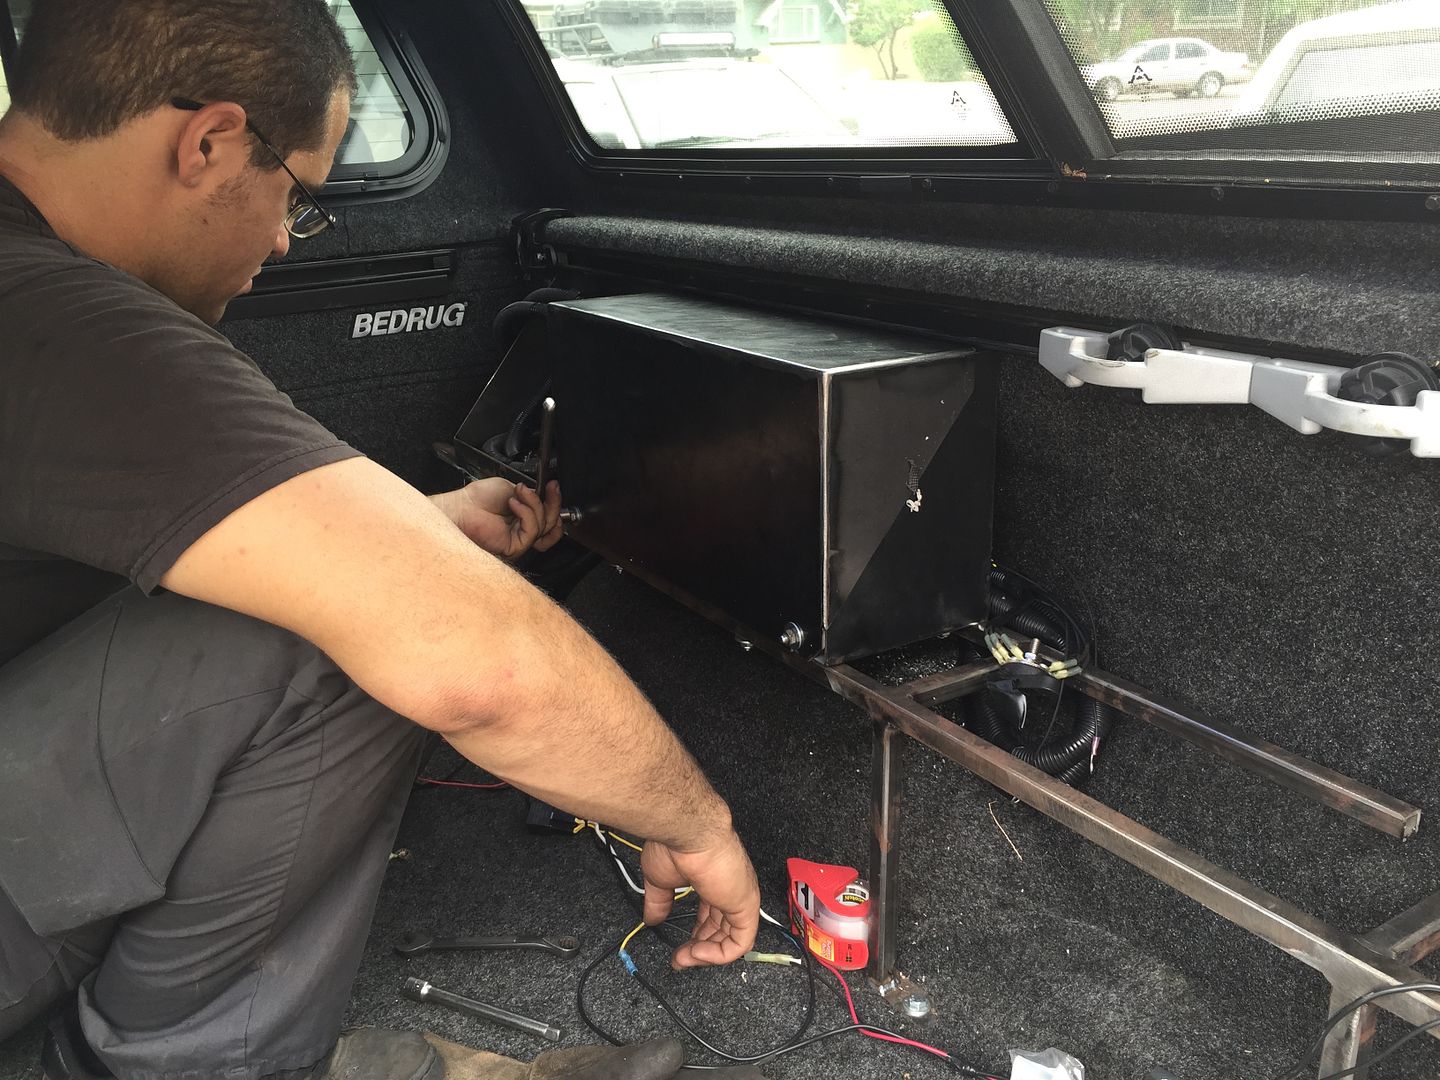
I just took a shot with both boxes and the air tank in place (kind of)
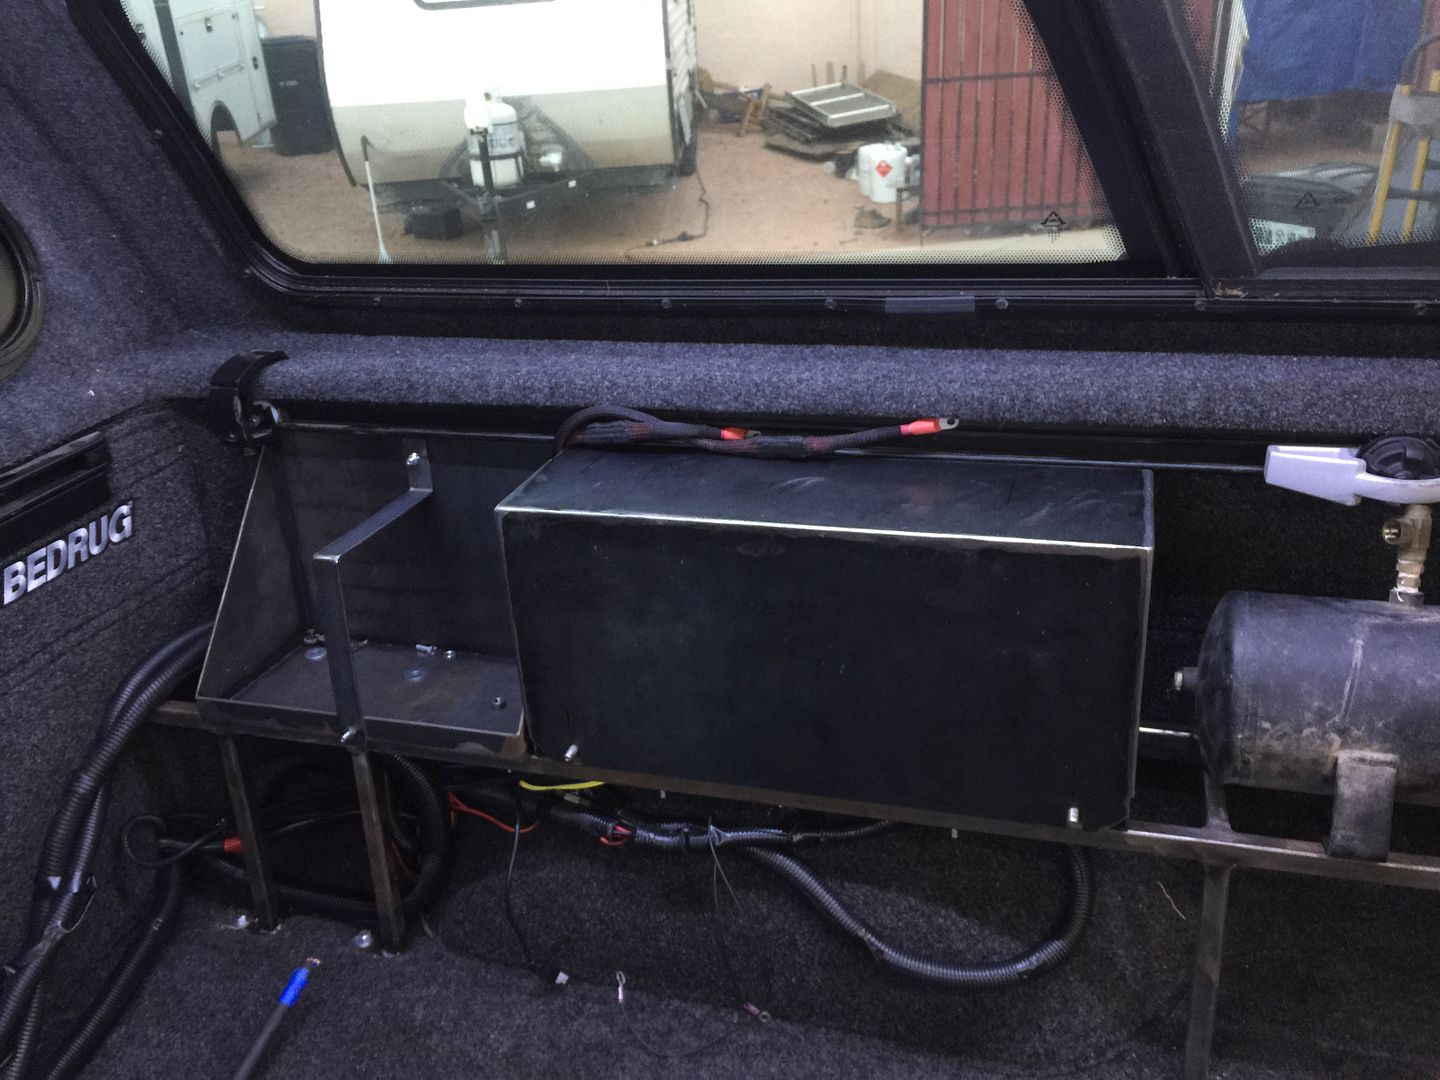
Most of the electronics were put in their proper place. Now its all removed, from the truck , so I can make the mount for the compressor, mount the tank and paint it all . Then it gets installed . I hope to have this phase of the project complete, by this weekend.
The Bedslide arrived today, so that will go in, right after this is all put together
Who needs a paper clip overhead when you can have 8 switches ?

I popped the sun glass door off and parts went flying. I hope to find said parts before I re install the door . Just the stuff you deal with when you haven't taken something off before
I will be frenching in the other switch panel. in the door. The actual sun glass case should still work, if I have it figured right.

I need to find something clean to trim it out with then clean the plastic surfaces, score them and glue the tabs inside with 2 part epoxy. I don't want to have any screws coming through the other side. Hopefully it looks almost factory when its backlit.
As I thought , the switch panel is so thin, the sun glass holder, still fully functional

Joe, from GMG Fabrication test fitting the control box. He has been a trooper and done a great job, creating something from nothing

I just took a shot with both boxes and the air tank in place (kind of)

Most of the electronics were put in their proper place. Now its all removed, from the truck , so I can make the mount for the compressor, mount the tank and paint it all . Then it gets installed . I hope to have this phase of the project complete, by this weekend.
The Bedslide arrived today, so that will go in, right after this is all put together

Last edited:
wikid
Adventurer
Since next week is suspension install week, I wanted to be sure most of the weight was in the truck. Better to set up the suspension to more like actual weight.
It's been a little hectic, trying to get this stuff done, but here it goes
The Bedslide was delivered, Wednesday, which took up a large portion of my work area, so that had to get put in , first thing this morning.
It's not bolted down yet, but it's not like it's going to move

Work area cleared out and the next project is the winch
Like everything else, its not just a "drop it in and fire it up", scenario.
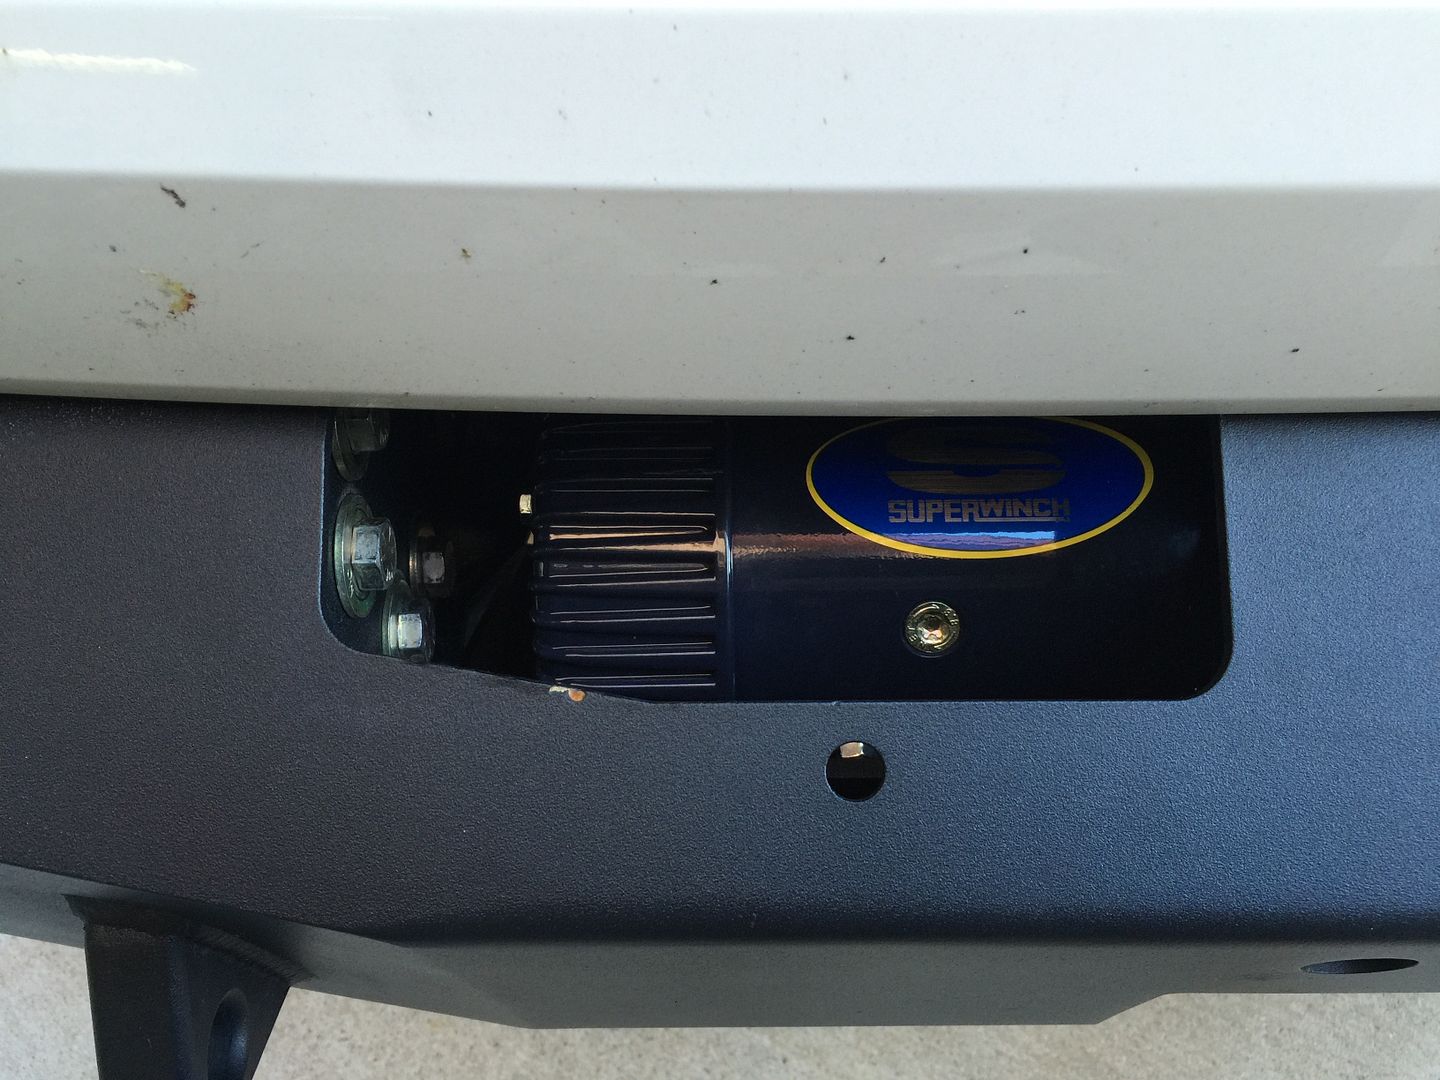
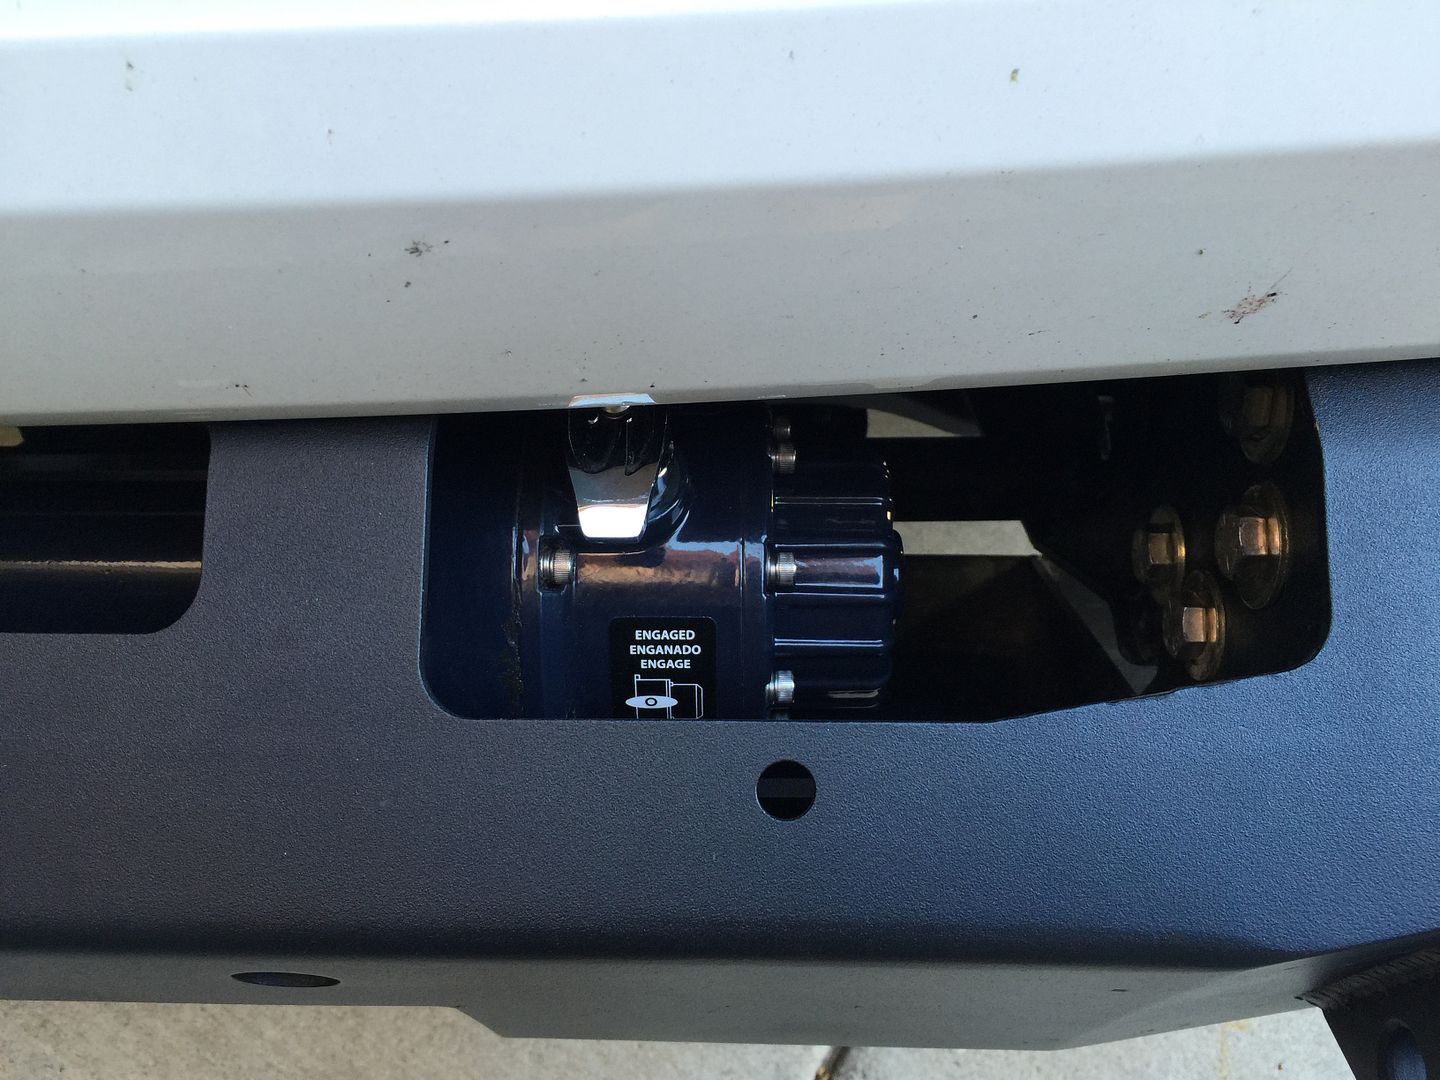
Pulled the bumper.
I was worried about the clearance, to the inner cooler pump, but it cleared by 3/4 of an inch. I had to divorce the solenoid, because that absolutely would not fit in the space. Then, I needed to clock the drive gear, so the engaqe handle, would be up top. Since the winch actually mounts to the inner face of the bumper. Re installed the bumper and here is the result
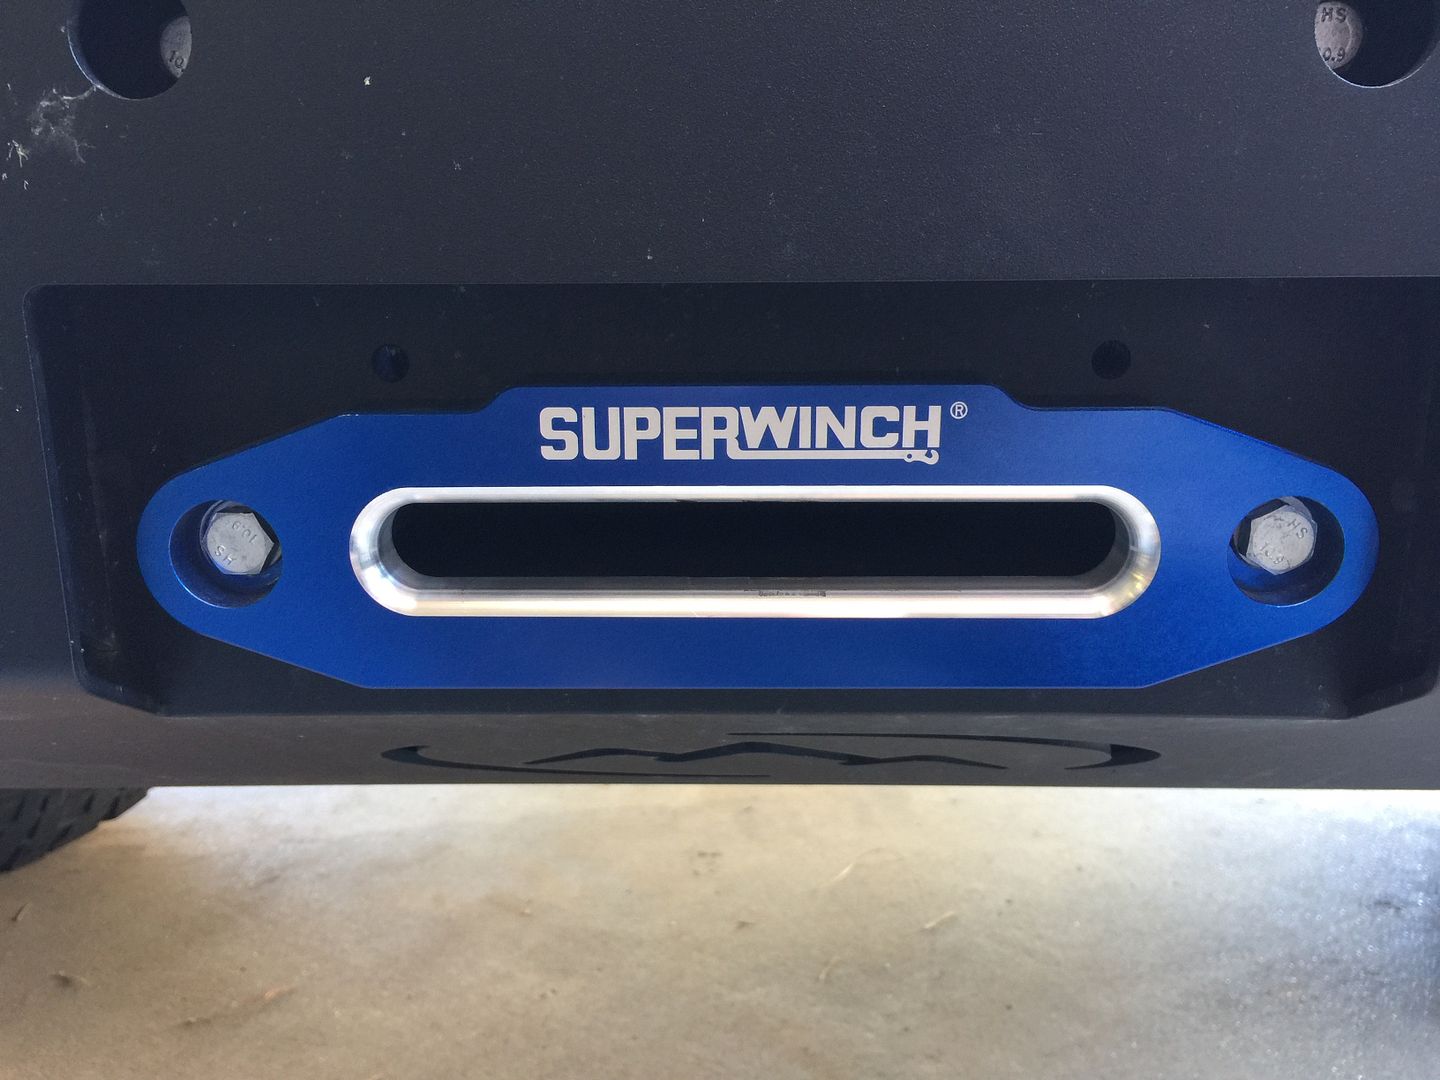
I think cover plates would make this install clean, so I will fab some up at some point.
I will need to run new winch cables, to the engine bay, where the solenoid will be mounted.
Next up is the lighting.
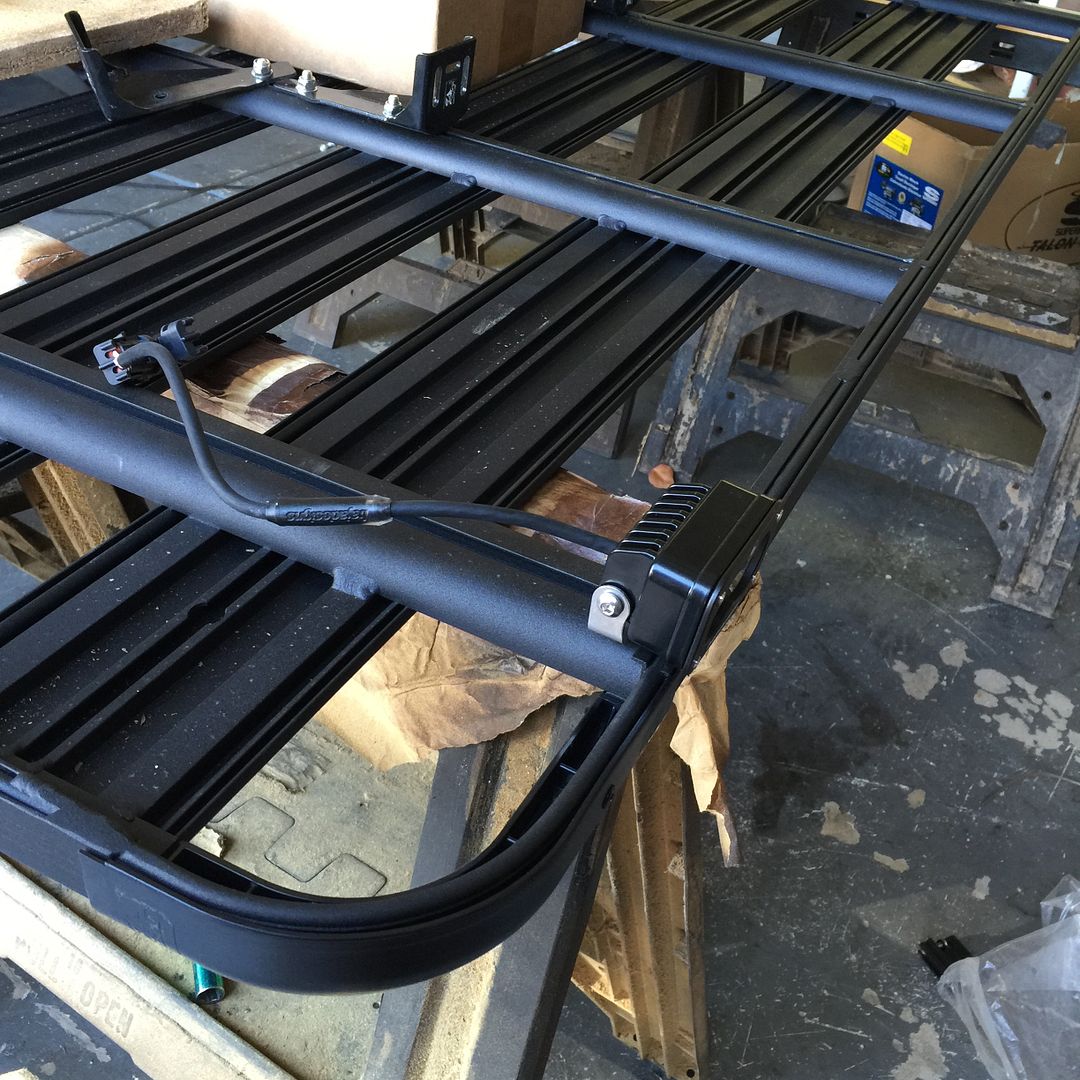
Had a friend help me pull the roof rack and turn it upside down, on a set of horses . The way this rack is set up, has made my wiring life so much easier
Mounting the lights, were a breeze , since I used the same mounting system, the rest of the rack is designed with
Here are a few step by step, tasks done
These slots have a place, where you can insert bolts, that can slide and be captured to mount stuff
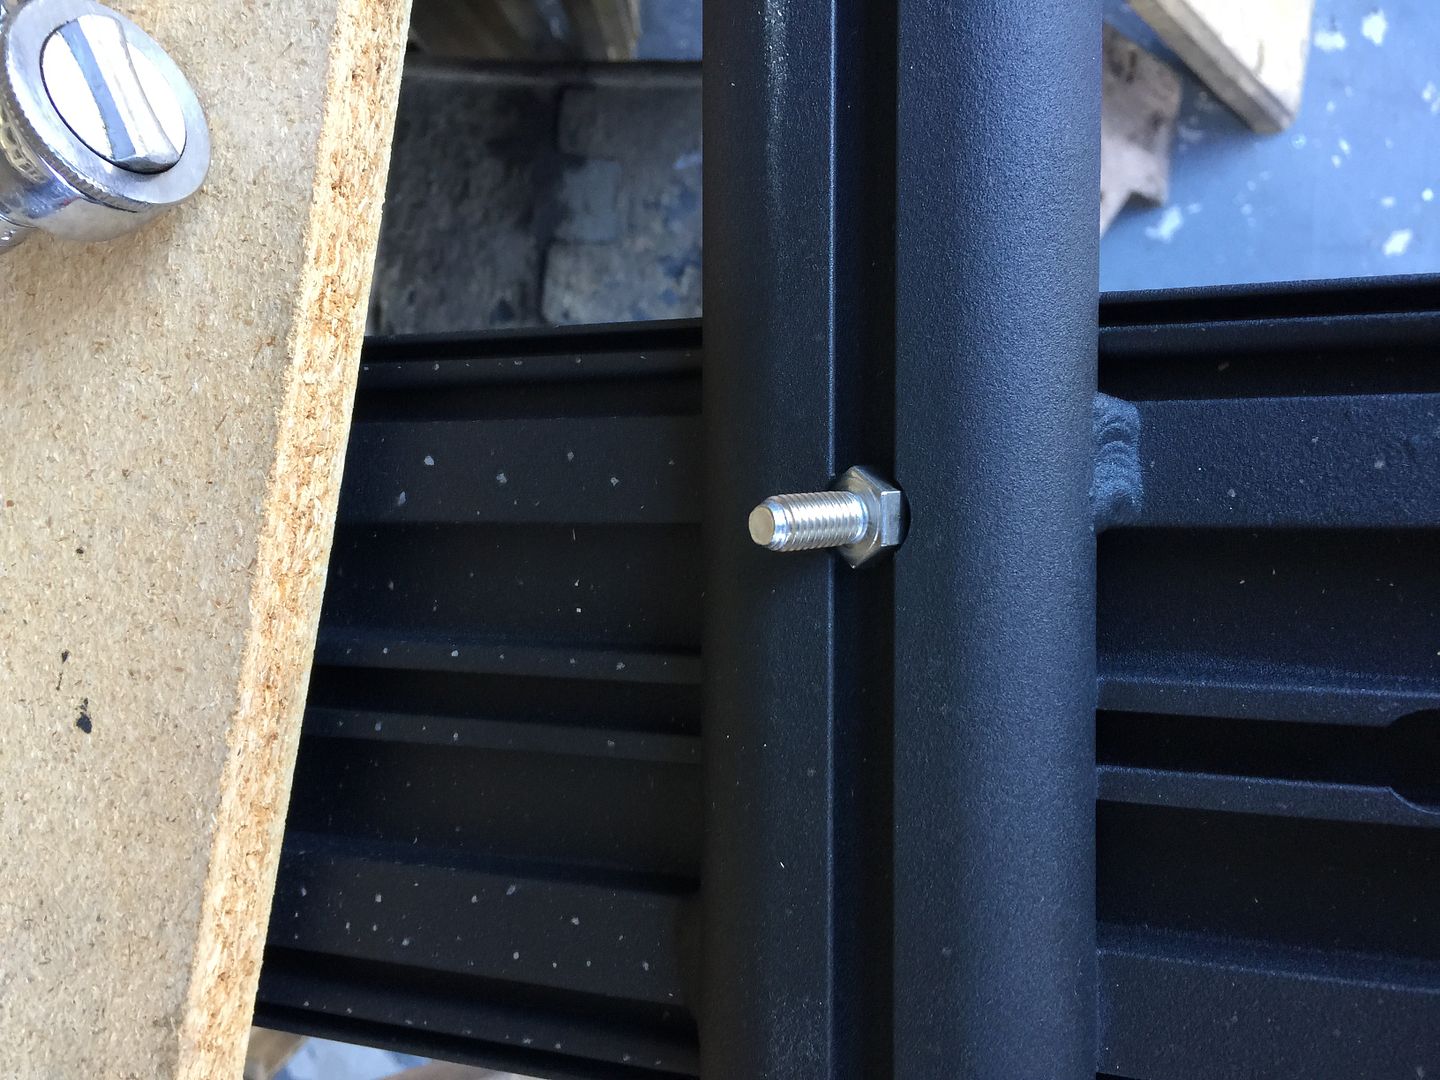
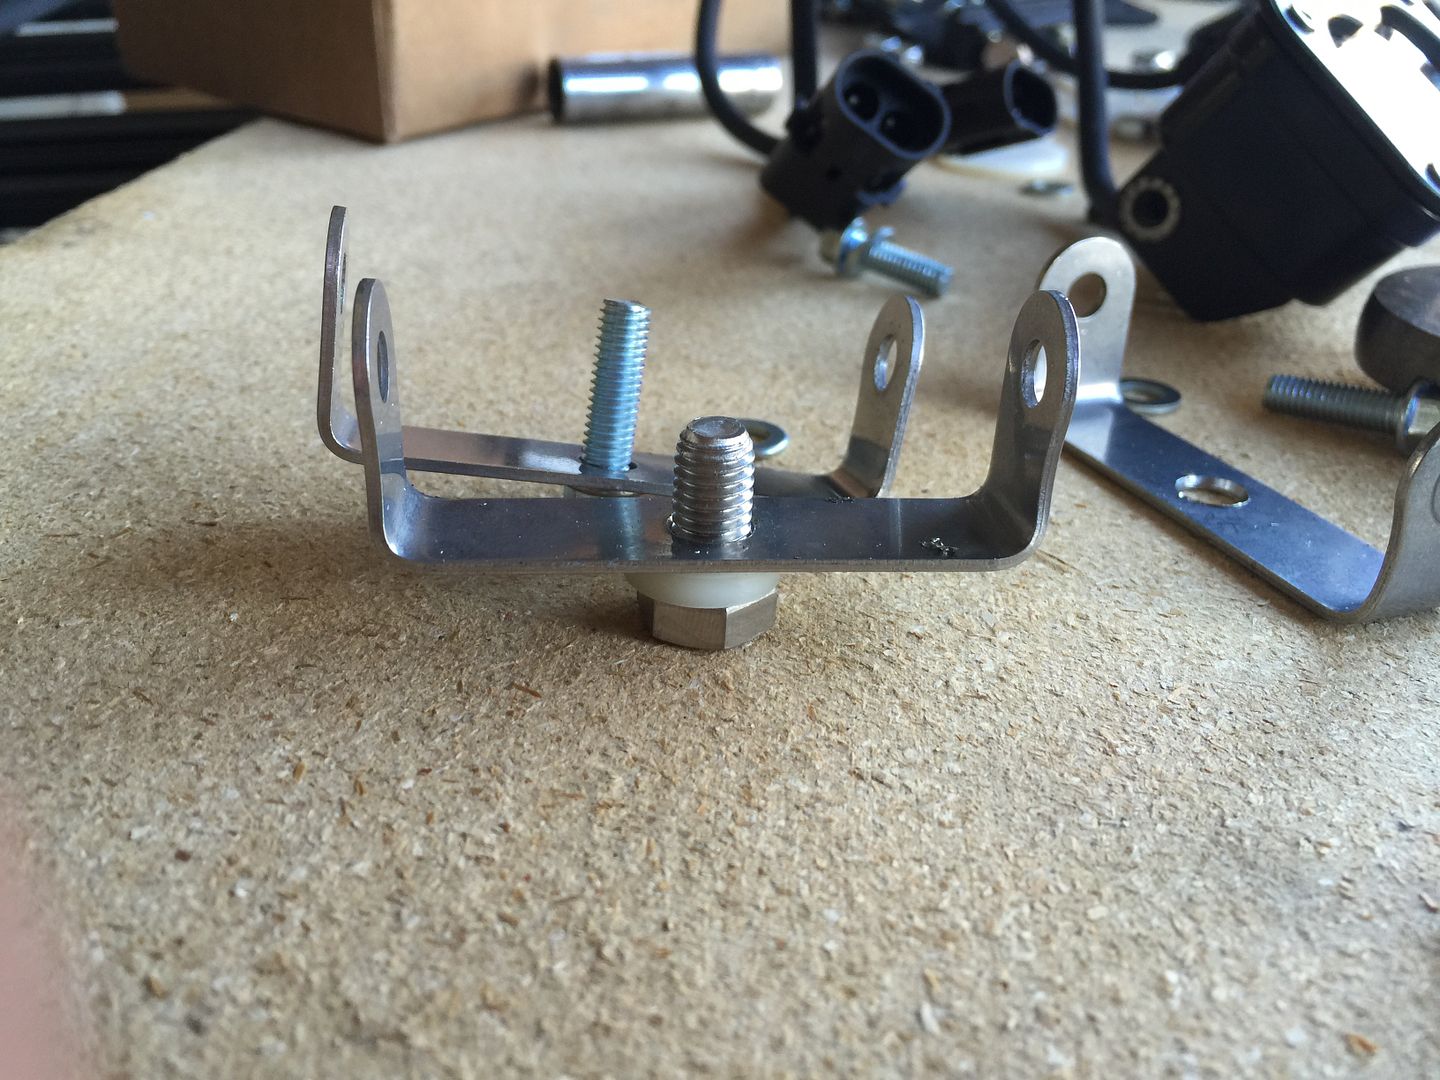
I had to change the mounting hardware and expand the bracket hole. Another trip to the hardware store, of course. I told them I would buy them out, one bag of bolts, at a time
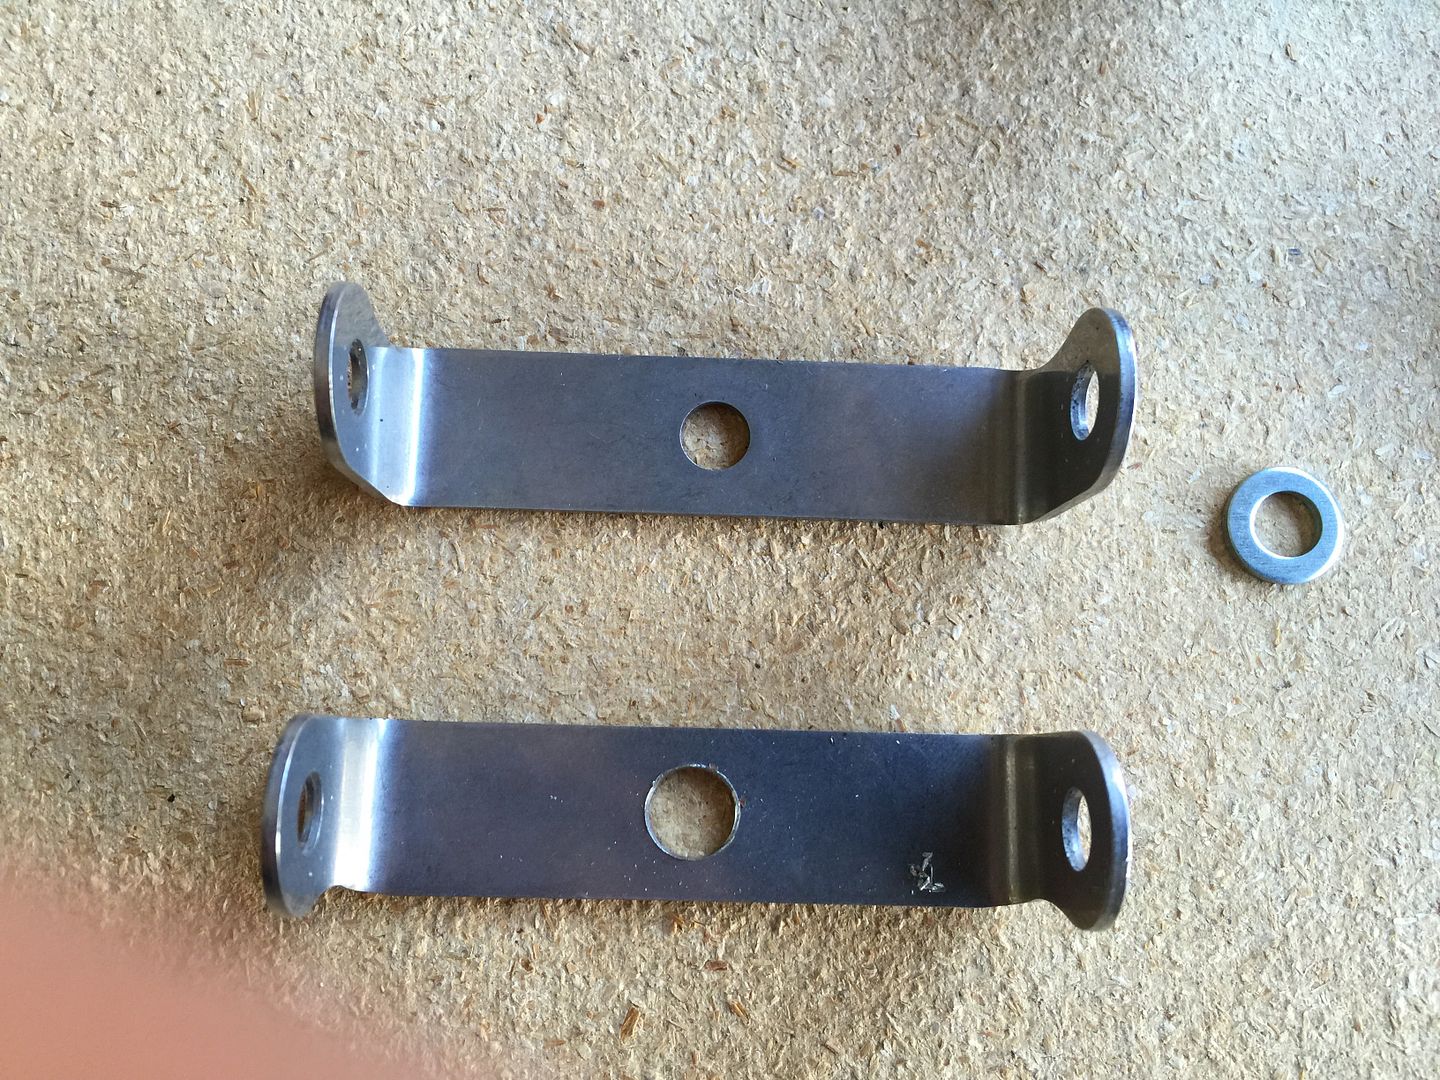
Old bolt in back. I also used a nylon spacer/washer, so I could swivel the lights. Nylocks, will just keep them in place
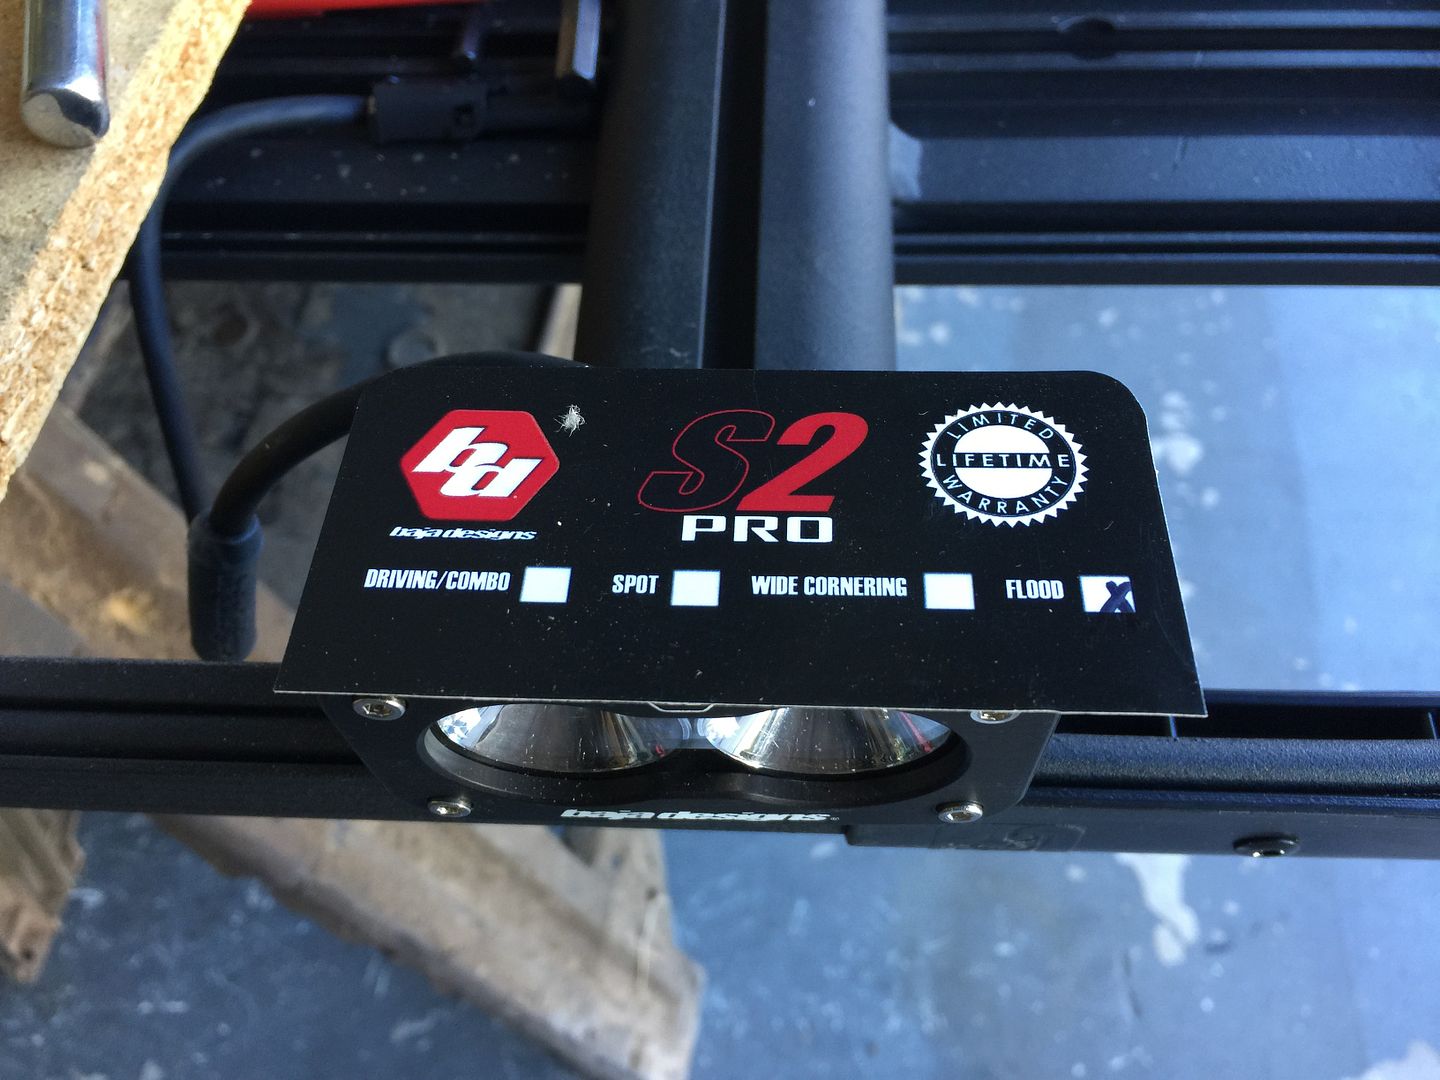
Presto. one light done in just a few minutes, with the really cool mounting system
(3) of these per side should light up the camp area. They are 2150 lumens each and all of them are in flood pattern
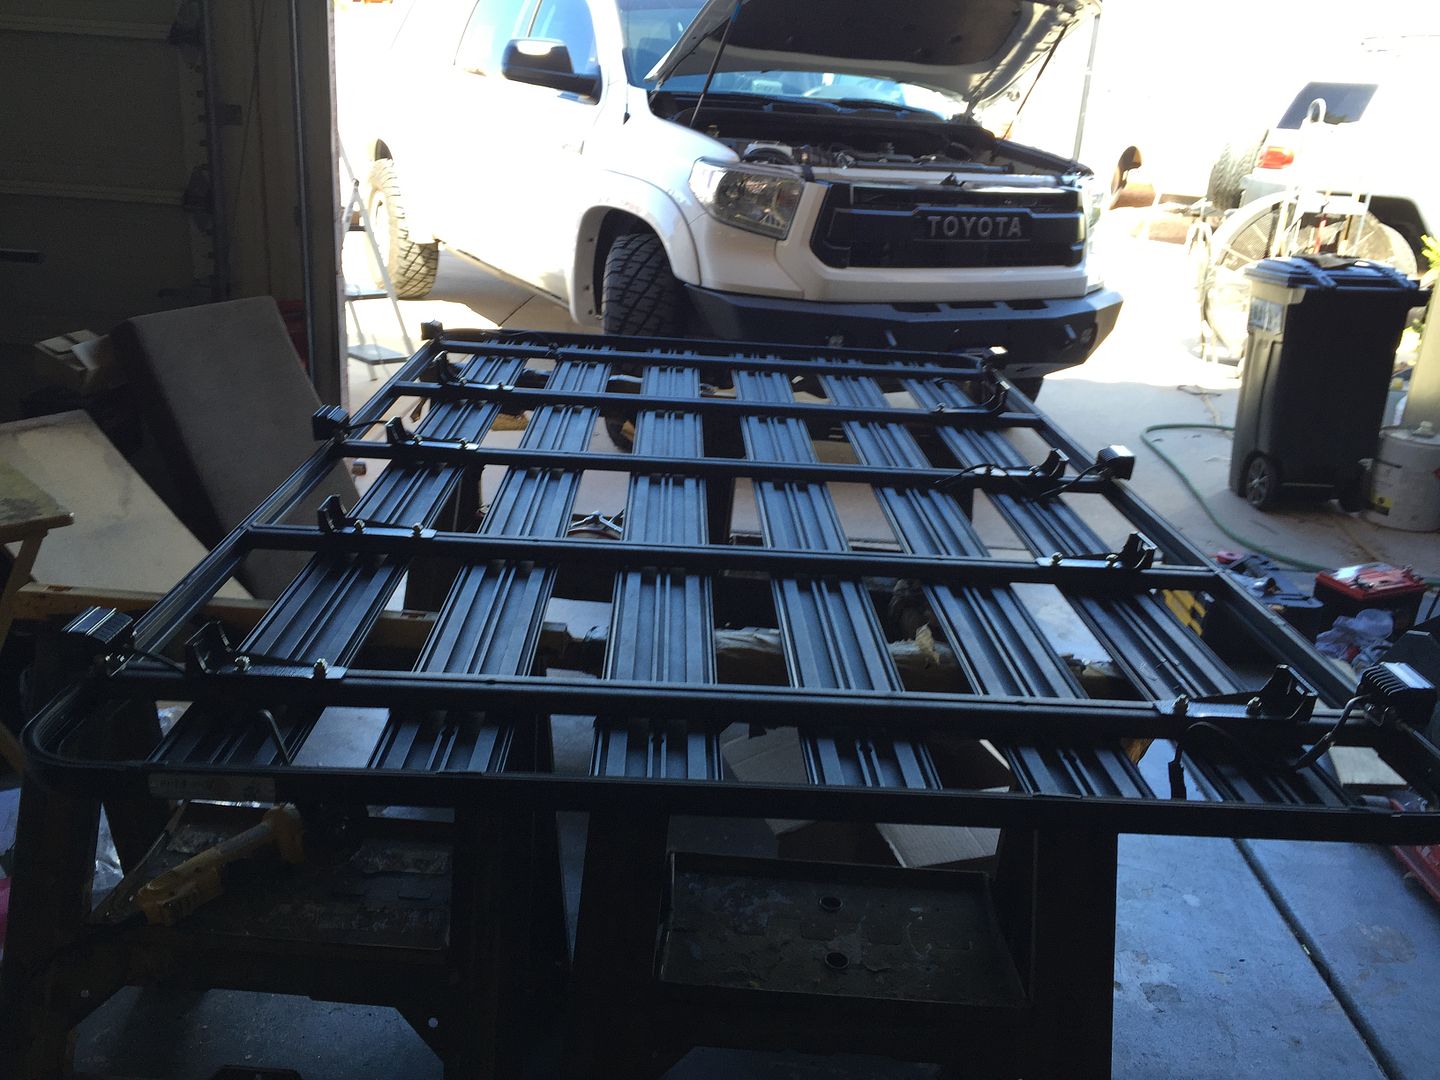
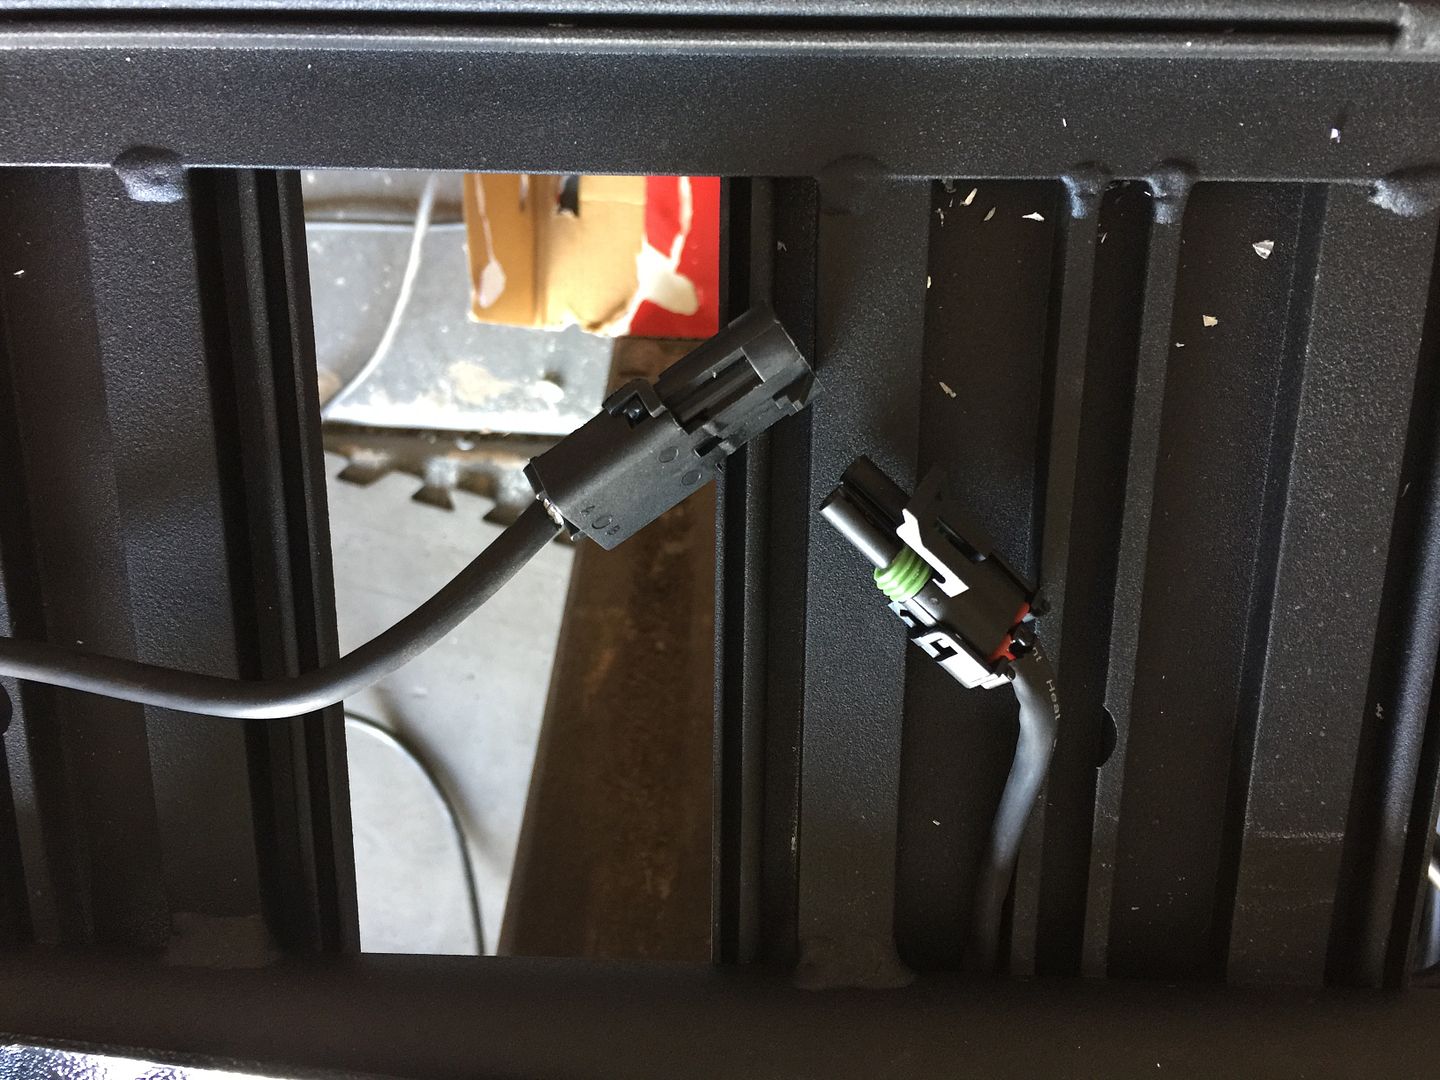
All six lights are installed. Tomorrow, will be "roof rack pre wire", day. Hidden wiring and Delphi connectors, will be all set.
The rear light that hasn't arrived yet, is the 20" S8 amber light, still in development. it will have a backlit feature, plus a combo pattern. When you are on a real dusty trail, the trucks behind you, love that they have a guiding light
It's been a little hectic, trying to get this stuff done, but here it goes
The Bedslide was delivered, Wednesday, which took up a large portion of my work area, so that had to get put in , first thing this morning.
It's not bolted down yet, but it's not like it's going to move

Work area cleared out and the next project is the winch
Like everything else, its not just a "drop it in and fire it up", scenario.
Pulled the bumper.
I was worried about the clearance, to the inner cooler pump, but it cleared by 3/4 of an inch. I had to divorce the solenoid, because that absolutely would not fit in the space. Then, I needed to clock the drive gear, so the engaqe handle, would be up top. Since the winch actually mounts to the inner face of the bumper. Re installed the bumper and here is the result

I think cover plates would make this install clean, so I will fab some up at some point.


I will need to run new winch cables, to the engine bay, where the solenoid will be mounted.
Next up is the lighting.
Had a friend help me pull the roof rack and turn it upside down, on a set of horses . The way this rack is set up, has made my wiring life so much easier
Mounting the lights, were a breeze , since I used the same mounting system, the rest of the rack is designed with
Here are a few step by step, tasks done
These slots have a place, where you can insert bolts, that can slide and be captured to mount stuff

I had to change the mounting hardware and expand the bracket hole. Another trip to the hardware store, of course. I told them I would buy them out, one bag of bolts, at a time

Old bolt in back. I also used a nylon spacer/washer, so I could swivel the lights. Nylocks, will just keep them in place

Presto. one light done in just a few minutes, with the really cool mounting system

(3) of these per side should light up the camp area. They are 2150 lumens each and all of them are in flood pattern

All six lights are installed. Tomorrow, will be "roof rack pre wire", day. Hidden wiring and Delphi connectors, will be all set.
The rear light that hasn't arrived yet, is the 20" S8 amber light, still in development. it will have a backlit feature, plus a combo pattern. When you are on a real dusty trail, the trucks behind you, love that they have a guiding light

wikid
Adventurer
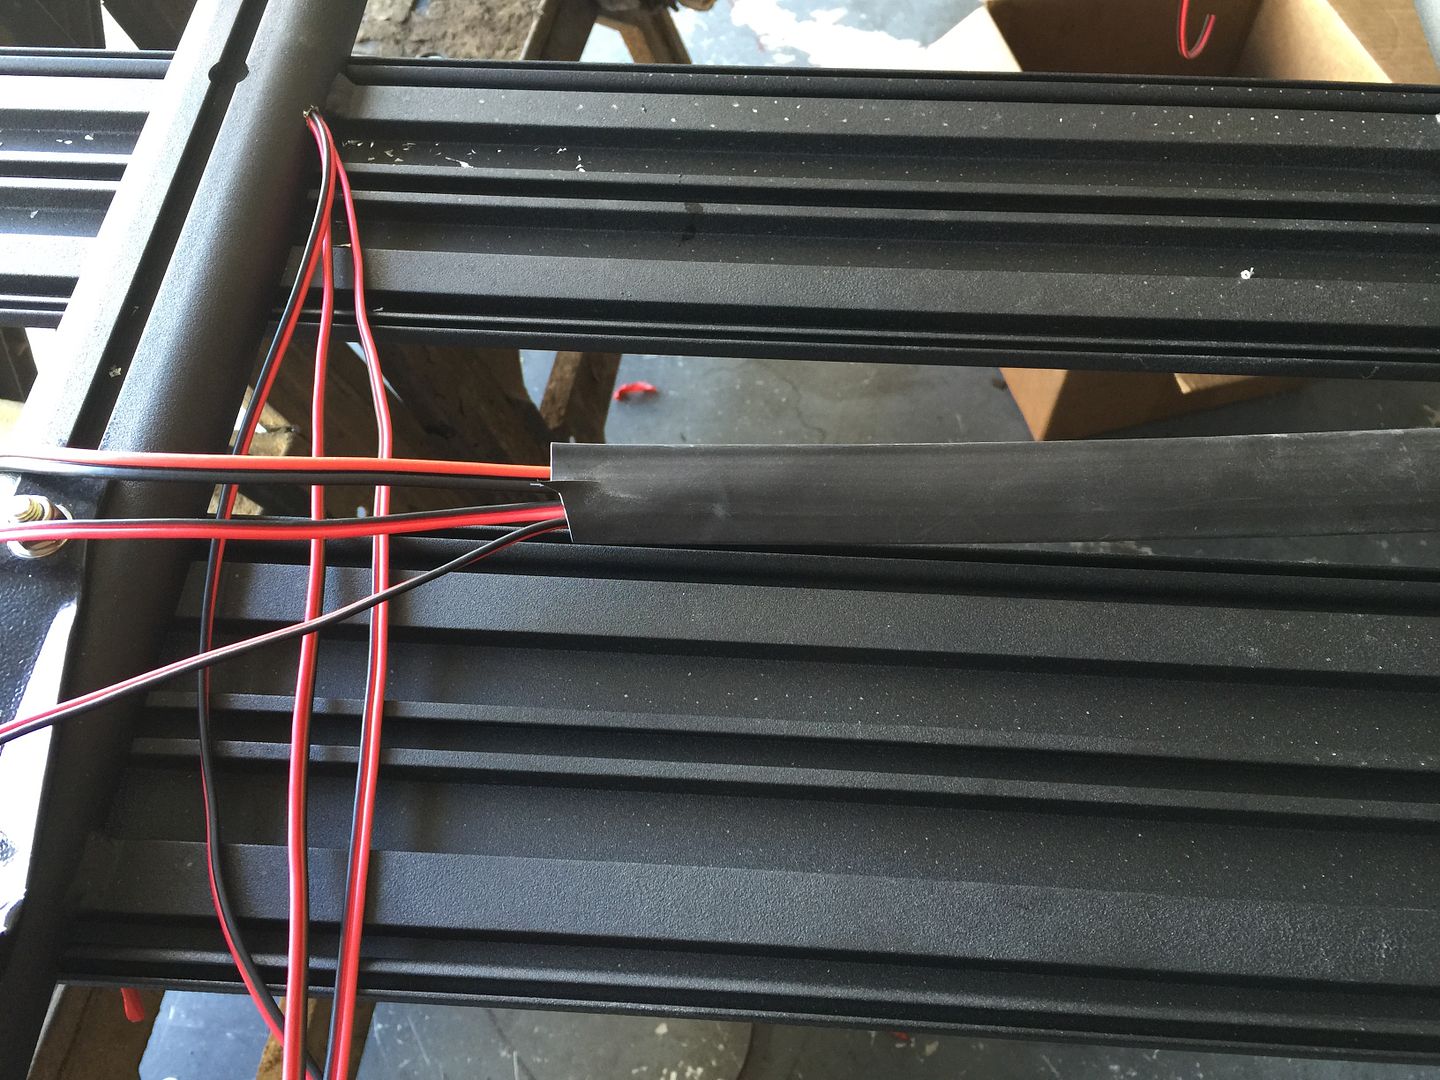
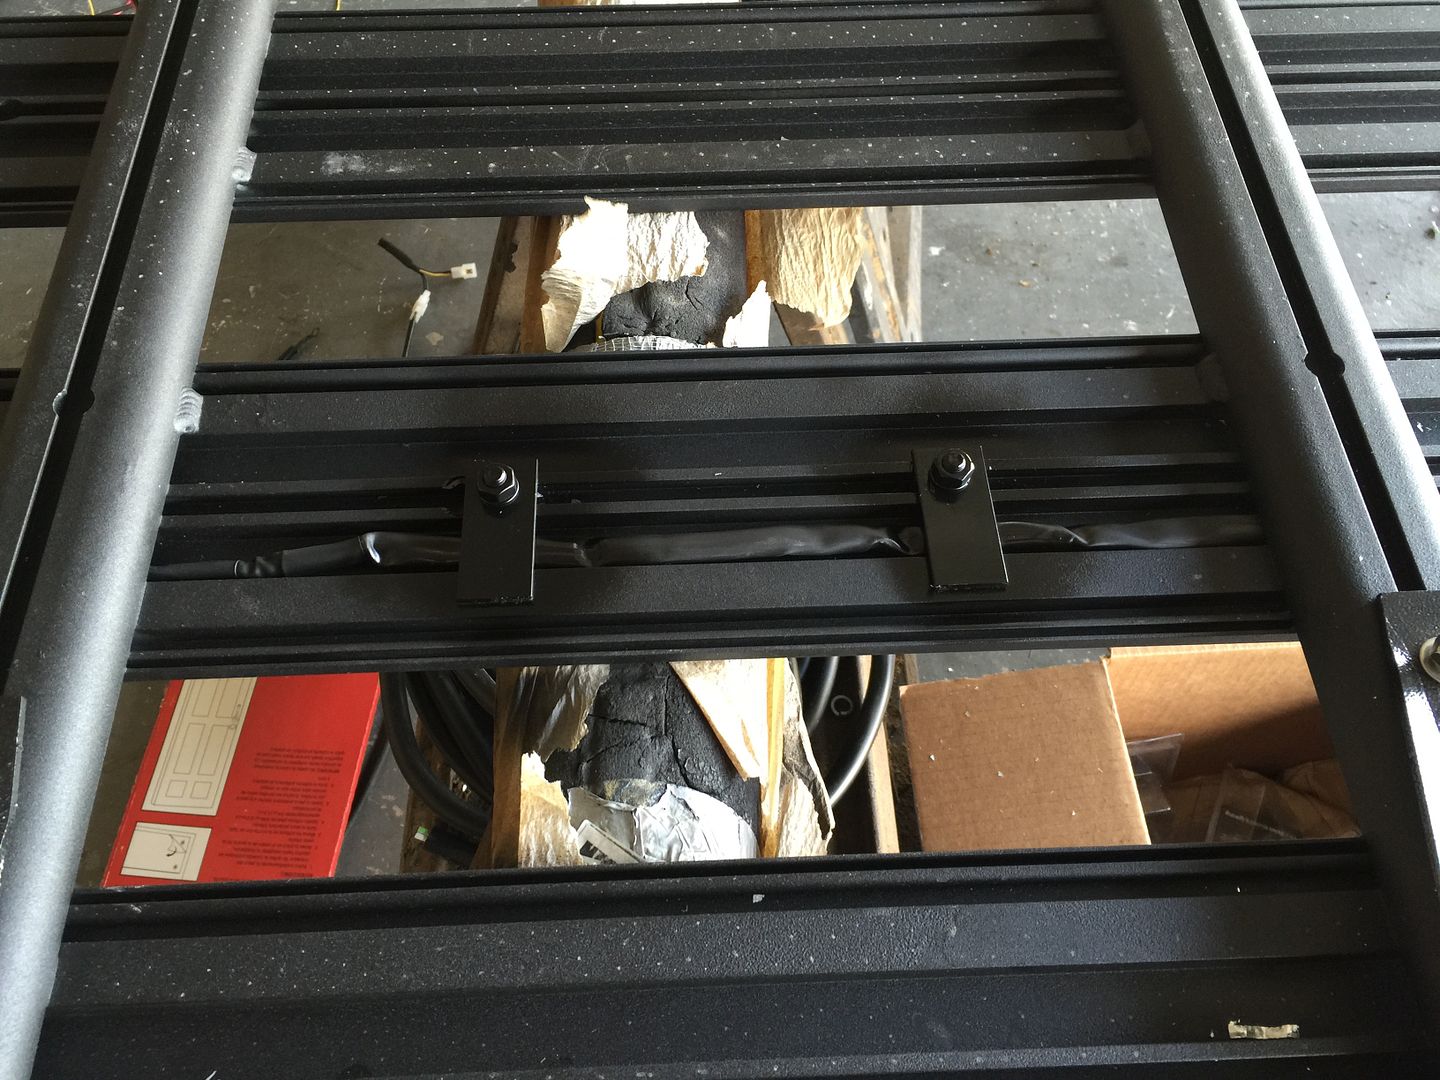
I was able to almost complete the roof rack pre wire.
3 runs of 2 conductor 18 gauge, for each light and brought to a central location, to meet the harness, inside the cap. I ran out of 2 conductor Delphi connectors, so I have 2 yet to crimp on. The roof rack is perfect for hiding wires and making everything look neat and tidy
Everything is sheath and heat wrapped. .
One extra wire run of 12/2 was ran from the central location to the rear of the rack, for the 20 inch bar.
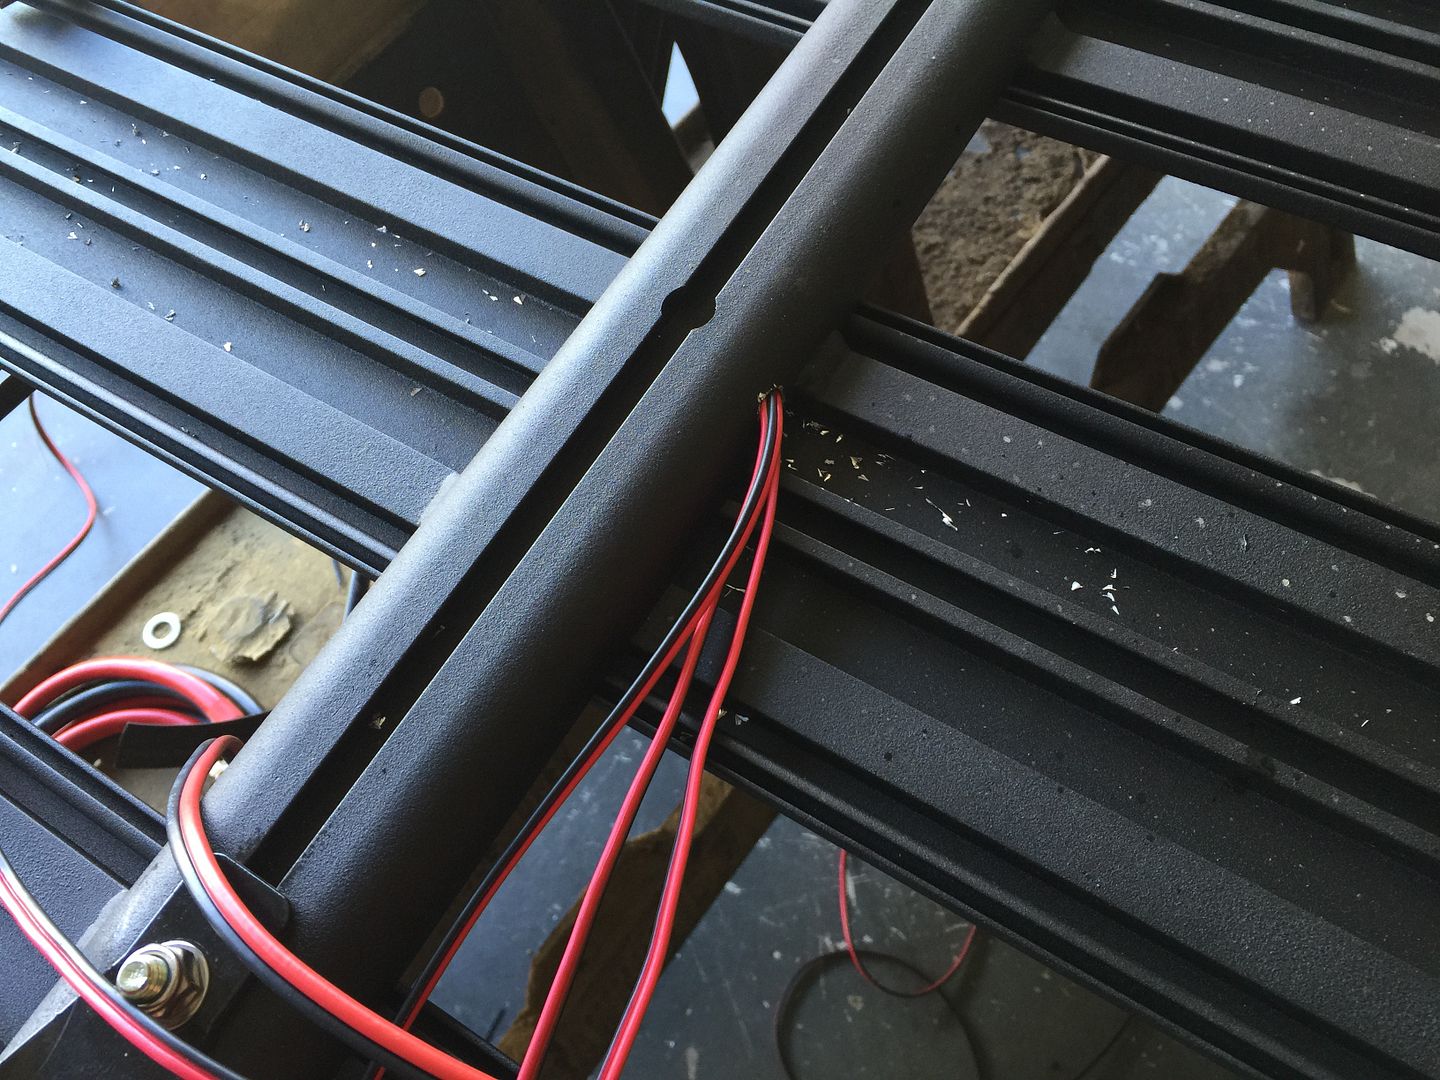
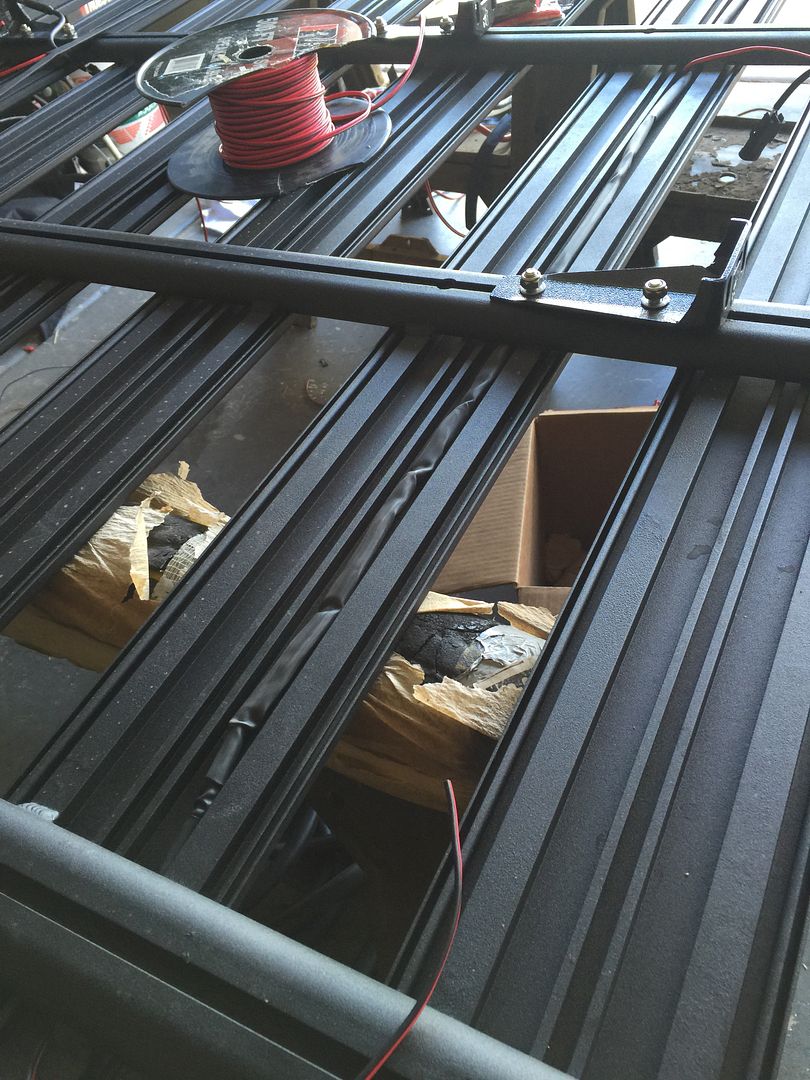
I made these brackets to keep the harness from drooping. Again using the fastening system built right into the rack
And the connectors.
When this is flipped over, all you should see is a small length of pigtail and possibly the connector. That's it
3 runs of 2 conductor 18 gauge, for each light and brought to a central location, to meet the harness, inside the cap. I ran out of 2 conductor Delphi connectors, so I have 2 yet to crimp on. The roof rack is perfect for hiding wires and making everything look neat and tidy
Everything is sheath and heat wrapped. .
One extra wire run of 12/2 was ran from the central location to the rear of the rack, for the 20 inch bar.


I made these brackets to keep the harness from drooping. Again using the fastening system built right into the rack

And the connectors.
When this is flipped over, all you should see is a small length of pigtail and possibly the connector. That's it

Adventurous
Explorer
Well this build is certainly moving along quickly! What's the goal for completion date?
Also, which Delphi crimpers are you using? I've been browsing around for a reasonably priced pair and have yet to come up with a good solution.
Also, which Delphi crimpers are you using? I've been browsing around for a reasonably priced pair and have yet to come up with a good solution.
wikid
Adventurer
Well this build is certainly moving along quickly! What's the goal for completion date?
Also, which Delphi crimpers are you using? I've been browsing around for a reasonably priced pair and have yet to come up with a good solution.
I wanted to get most of the weight in before I got the suspension installed . It will be good to try and set everything to actual weight I am rolling with. This will also tell me if something needs upgrading, but I hope not
I don't have the name of the crimpers, but here is a picture of them

Today was all about getting the frame done to the point where it can be painted and installed.
All the shiny metal is what I added.

Presto.. it all fits !!

Cleaned up the compressor and just situated everything for install

First box

Second box with most of the stuff installed


The air tank is just sitting on top. I think I'll clean iot and repainted it before install

The only thing left will be the trim piece I put where all the wiring runs are . Probably easily removable, for access

This was the idea I had to make a tire mount, but it will also sit flat, so I just don't know yet

I put the frig in and pulled the Bedslide out to the first stop point. You can actually pull it out 1/3rd more, but it still needs to be bolted down yet. Accessing the frig and things in the bed will be so much easier . None of the electronics interfere with the slide, so it worked out, just how it was designed

CaliMobber
Adventurer
Holy crap man, you must share some seeds from your money tree
Seriously cleanest most complete build. Love it!
Seriously cleanest most complete build. Love it!
wikid
Adventurer
Holy crap man, you must share some seeds from your money tree
Seriously cleanest most complete build. Love it!
Thank you .
If there is any impression I want to leave, it's that I try and think about everything, that's needed to complete the thought .
I do have sponsors, that have helped out in a big way. Even with that, I have lots of time and money invested in this project. I set goals and try to achieve them.
Last edited:
wikid
Adventurer
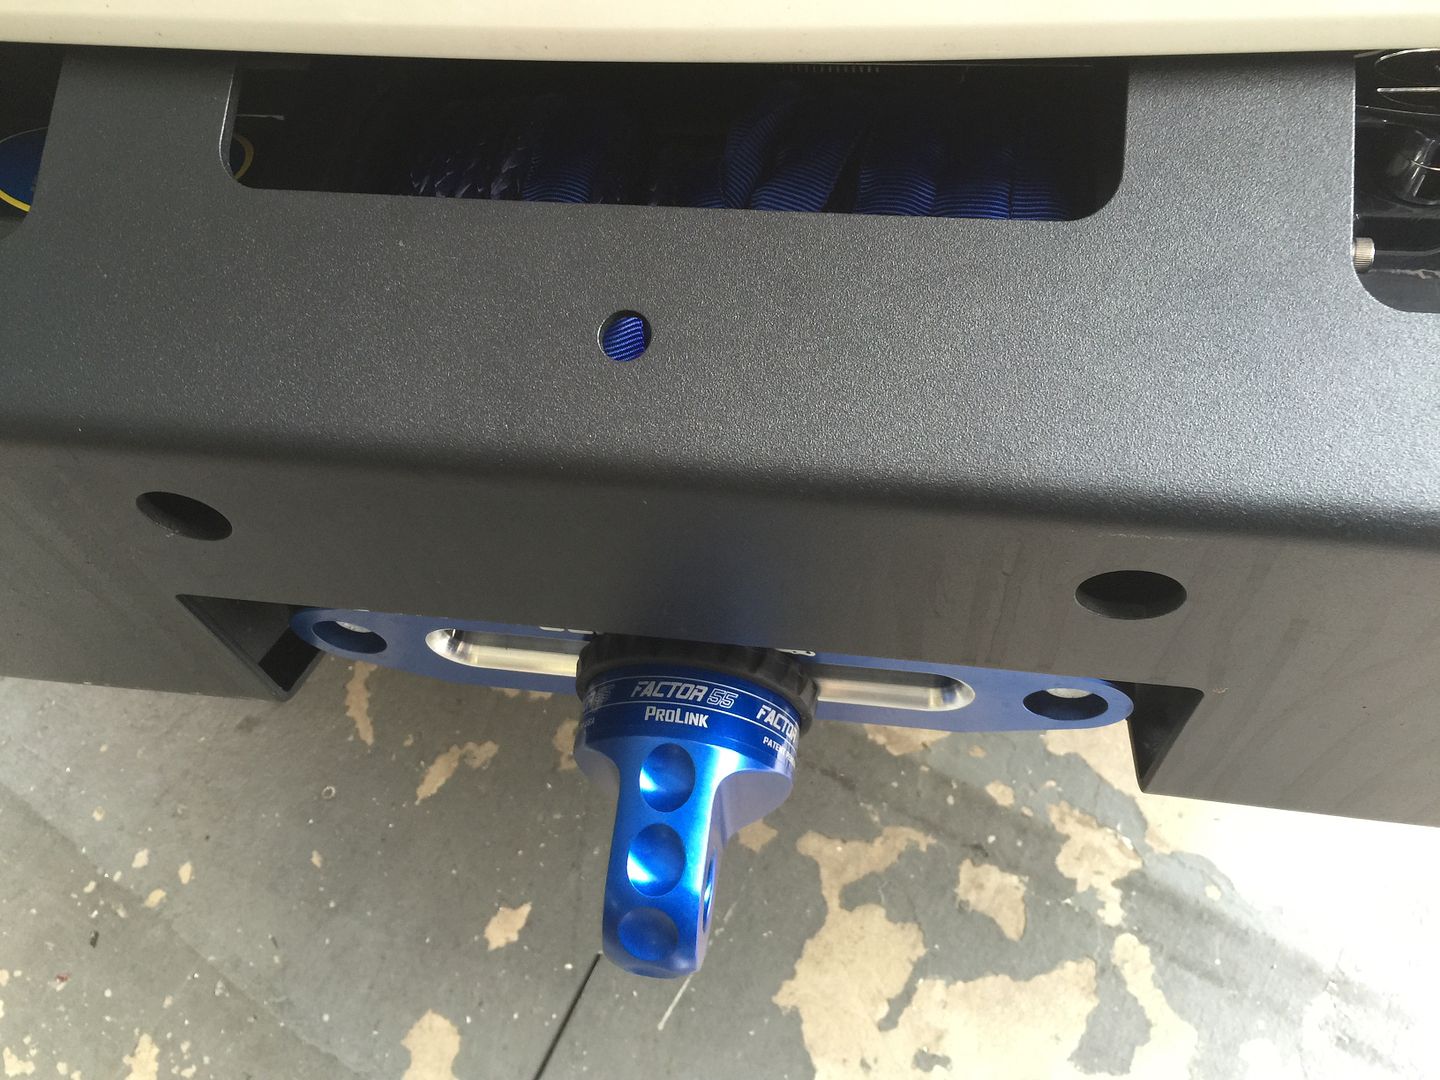
I took some time today to remote mount the winch Solenoid in the engine bay behind the, air box. I will need to fab an actual mount there, for now it is wire tied to the fuse box. I wanted to make the winch operational, so I could wind in the rope and put the Factor 55 thimble on.
My next informational post, will be post suspension install. Doing a road trip out to Total Chaos tomorrow. Drop the truck off and pick it up either Friday Evening, or Saturday. "FINALLY" I normally do all of my own installs, but this one is different. TC will be filming the entire install. I definitely trust them to do it all right. They know their business well

My next informational post, will be post suspension install. Doing a road trip out to Total Chaos tomorrow. Drop the truck off and pick it up either Friday Evening, or Saturday. "FINALLY" I normally do all of my own installs, but this one is different. TC will be filming the entire install. I definitely trust them to do it all right. They know their business well
wikid
Adventurer
ThanksReally great build. I check for updates every day. Can't wait to see the new suspension!
Here is the most recent news
Dropped off the truck. Within 2 hours, they had the rear done.

Then comes the phone call with a potentially big problem
The backspace for the Rock Warrior Wheels, worked well to stuff 35's under the truck stock, but with the new suspension, the bypasses would be in the way, at full lock. They are better than 6.5 inches backspace, even with the wheel spacers, they are still too deep Luckily I had a contact for Method Wheels and made the call. They will be sending 5 new wheels the (Meshed Machined) 17/4.75/9 , to TC, in the morning. They may have someone that can mount them , if not I will be picking them up for mounting. The plan is to go out to the desert, by the King Of the Hammers, to do a little filming and romping on Saturday afternoon.
More to follow
Adventurous
Explorer
I'll be curious to see if the new backspacing keeps the tires off of the resevoirs while not increasing your scrub radius enough to interfere with the fenders. That would certainly be another unpleasant surprise.
Forum statistics
Members online
- aythya
- pwal13
- runandcycle
- highwest
- al_burpe
- tano
- Samsoon
- ben4244
- DBOR
- Uncle Jeffy
- lolailando
- off piste
- goawaymore
- livemusic
- RocketIndi
- freedomproject
- JoeRidesBikes
- Campndad
- 2j_macrae_z
- jbtradingco
- MoreGooder
- Deleted Member 183
- JCDriller
- Bamagirlaz
- wrestler034
- wild1
- mark5280
- trailmalarkey
- RSSET
- Luke Duke
- Circleback
- grey_goat
- swigs91
- Rely
- Inline6
- sumnrfam
- smlobx
- Montero_cruz
- DiscoDave3
- jetbuilt
- ira.guy
- TexCo
- Cayenne-958-TDI
- SimplyAnAdventure
Total: 540 (members: 48, guests: 492)