building the Bullet XV

haven

Expedition Leader
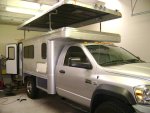
Great build, very useful to everyone thinking about constructing a
camper of our own design.

attachment.php


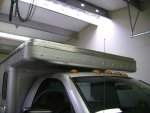
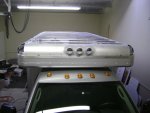
I'm a little worried about the clearance between the cab roof and the
camper overhead. This clearance may have worked fine for a UHaul
truck. The truck frame will twist more when you take it on uneven
ground. It might be enough to make the roof and the overhead touch.

Chip Haven
 

sarconcepts

Adventurer
a couple things here,
to the adam blaster, the length of the main body of the camper without the cabover is 11'-10", including the cabover is 14'-4" (hence a 2'-6" cabover). this length is straight from the uhaul box length as I didn't alter this.
the width is 7'-2 3/4" cut down 7" from the original box width.
& to haven, I resolved any concern I had regarding clearance above the cab by the design of my 3 point frame. The camper frame is attached firmly in two places right behind the cab to the main frame,(about 8" behind the rear cab mounting bolts) the rear has the pivot, so as the truck twists & torques, the camper always stays in exactly the same place in relation to the cab (minus vibrations) regardless of what the truck frame & axles below are doing. The only way the cab could come in contact with the camper is in vertical deflection, or lets say I hit a steep incline doing about 60 mph, the frame wants to bend down in the center of the axles. this truck has a full commercial chassis, so the frame at this location is 14" deep, greatly minimizing any deflection in the vertical plane.
With that said, this is my first & only vehicle build, so I can't say I've got test runs & trials behind me, but I have thought about this greatly.
the first pic shows the 2" pivot pin,
the second shows just how stout I designed the frame (1200 LBS worth)
the last shows how the frame stayed planar with the cab just while twisting in my driveway
 

Attachments

  • 3 point pivot frame 020.jpg
    3 point pivot frame 020.jpg
    143.4 KB · Views: 515
  • 3 point pivot frame 023.jpg
    3 point pivot frame 023.jpg
    142.9 KB · Views: 539
  • 3 point pivot frame 036.jpg
    3 point pivot frame 036.jpg
    139.1 KB · Views: 562
Last edited:

Ned B

New member
Incredible build. Thanks for sharing! Your attention to detail is excellent, can't wait to see the rig when you finally get it finished.
 

sarconcepts

Adventurer
the roof is now finished, all rivets & bolts in, all sealant cut clean, ready for the hydraulic lift system.
I'm also going to start running the main wires into the camper for some temporary power (for things like the steps, rear winch & the lift system) I'll set up a temporary power panel until the cabinets are made.
the exterior won't get painted until the cabinets & appliances are in,(so i know i have all the access doors & vents in).
http://bulletxv.wordpress.com/

wall cap & roof 026.jpg

wall cap & roof 029.jpg

wall cap & roof 027.jpg
 
Last edited:

sarconcepts

Adventurer
I started to assemble the hydraulic lifting system, this is just a test run to work out all the kinks, but for the first try, things seemed to fit & operate well. I remember reading somewhere on this forum about flow restricting hydraulic manifolds, to equal the flow of hydraulic fluid to each of the cylinders at the same speed, does anyone have any additional info?

http://bulletxv.wordpress.com
 

Attachments

  • hydraulic lift 006.jpg
    hydraulic lift 006.jpg
    94.1 KB · Views: 565
  • hydraulic lift 003.jpg
    hydraulic lift 003.jpg
    92.6 KB · Views: 661
  • hydraulic lift 001.jpg
    hydraulic lift 001.jpg
    90.3 KB · Views: 601

sarconcepts

Adventurer
Good question, I've designed the bend on the top of all four lifting posts to have slightly different frequencies when air blows past them (I've wind tunnel tested them) so while driving through the woods, the wind will harmonize a soothing tune to calm woodland creatures.
just kidding, these posts are so close to the exterior soft sides that i needed a place for the material to go when the roof lowers, how does the material get in there? simple, i'll try to explain it illustratively, a nylon rope will be attached up high on the wall panel just behind the lifting pipe, this rope will go down, around a track on the bottom of the lifting pipes & up into the inside of the pipe coming out the top of the pipe, then down attached to a point on the soft sides. as the pipe lowers, the rope will get pulled out of the bottom of the pipe (as it is attached to a fixed point) & pull in at the top of the wall, pulling up & in on the material gently nestling into the curving pocket in the lifting pipes out of the way of the roof as it lowers.
shortly put, it's a place for the cloth to get out of the way as the roof lowers, & I sure hope it works!

& thanks peter for the info, I must have read it on your thread, I'm calling around on the screw mechanism, & am hearing that I might just have more friction in some of the bearings if the weight is the same & as light as mine is. In-line restrictors are also an easy option, i'll wait to see just what i need after final assembly
 
Last edited:

Every Miles A Memory

Expedition Leader
You might want to give Dave from Aluminess Products a Call. He built an Air Actuatued cylinder for one of the Sportsmobiles that was for someone who was in a wheelchair and couldnt stand to raise the top up. ( I Think that's how the story went, but forgive me if I'm not remembering it correctly)

He could custom build you one that could be tied into the air system for the wheels on the truck.

He built one for me to raise our turbine off the back of the camper. Super sweet and so simple to use. It makes you wonder why more companies dont use them.

Super light weight and looks cool to boot
 

sarconcepts

Adventurer
All right gentleman (& the occasional lady who likes dirty boys)
I think I may have just validated my existence here on this thread,
last night I solved the inherent problem with getting more than one hydraulic cylinder to raise & lower at the same speed. Flow restrictors don't truly work, as lifting & retracting motions require opposite adjustments. Screw type manifolds aren't really designed for these low pressures, weights & speeds.
It's a simple cable connection between the cylinders that I've gone into great detail with diagrams on the bullet's site.
http://bulletxv.wordpress.com
(go to 'the roof lifting system' post)
It's an extremely simple concept, requiring so little space it can be hidden behind the interior wall, & is relatively foolproof & break proof.
 

UHAULER

Explorer
Nice work, I can't wait to see this truck finished.

Has anyone tried using 4 small pumps, one for each cylinder ? That way each cylinder gets the same volume of fluid ?

Hopefully all of you popup builders will have it perfected by the time I can start building one:wings:
 

sarconcepts

Adventurer
Four smaller pumps would create the same problem that four separate electric actuators have, even though they're designed to be identical, fluctuations in voltage & production differences don't actually mean they move at exactly the same rate, never mind different weights meaning different resistances on each one. Different lengths of wire also create different voltage drops to each pump. In total, they would not be designed or 'required' to operate as one. This is why I ended up choosing hydraulic over electric, with a hydraulic system, all four are at least tied together as one (through the manifold), they just need a little hand to help them operate in synchronicity.
The other little detail is, for hydraulics, the weights we are talking about are so small that we pretty much already are getting the smallest pumps out there (maybe the reservoir could be smaller) & you open yourself up to having one of the four go bad & possibly cause damage to the track system if the other three lift & one doesn't.
good to see your brain working though
 

sarconcepts

Adventurer
My cable hydraulic equalizing system is now in & works perfectly.The cables hide behind the lifting pipes & wall cap, one more major step accomplished. now onto the ceiling & softwalls.

http://bulletxv.wordpress.com
 

Attachments

  • hydraulic lift 009.jpg
    hydraulic lift 009.jpg
    142.3 KB · Views: 352
  • hydraulic lift 015.jpg
    hydraulic lift 015.jpg
    145.2 KB · Views: 308
  • hydraulic lift 017.jpg
    hydraulic lift 017.jpg
    145.3 KB · Views: 280

Forum statistics

Threads
186,054
Messages
2,881,473
Members
225,825
Latest member
JCCB1998
Top