Camper to a drop side truck....... and back again........

markbarnes

New member
Hi all,

This is the first time ive posted-ive been lurking for a while but i havent seen anyone on here with the same situation as i have, or plan to do what i want to do. I've been debating this for a long time and want to here your input.

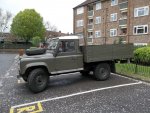
I have a landrover 110 which I use for work. It has a wood bodied drop side on it- I took it off of my last vehicle....the body had also been on a previous vehicle to that....a 1977 Ford transit!

It works well for my business, and fits the landrover-as its non standard it's larger than a normal landy tub.

I want to utilise the fact that I've got a great off road vehicle with a large floor space, but for starters I live in London, England in a tiny apartment, and have nowhere but my work garage to store a camper body....there is simply no room.....

the idea that ive come up with is having sections of ply that I slide into a framework, basically something that I can install and fit on simply and quickly for the occasional weekend/week away.

Does anyone here get my drift, or have experience or seen a simple DIY weekend type camper?

I've been looking on the net and I've come up with zilch!

Your help will be very appreciated!

Mark
 

Attachments

  • image.jpg
    image.jpg
    362.2 KB · Views: 31

wuntenn

Adventurer
Hi Mark - I get your drift!

If it were me I'd get some 19mm alloy box section, make four sides with an alloy exterior - say 1.2mm, the gap filled with dense insulation (expanded polystyrene which is rigid and 'structural', rather than glass wool which wont be 'structural'), and a 6mm ply lining. Stick it together with Tiger Seal and pop-rivets and you're all set. This would give a structure that is going to be strong and well insulated. Each section can have its own windows installed, and a door on the rear. Careful construction could keep most of the framing for the door/windows flush with the surface to allow them to be 'flat packed', or failing that offset the windows so that they don't 'clash' when stacked together.

The trick is to make two of the sections with U channel on the sides (or L section on the outside and another L section in the inside) into which the other panels slide and seal with simple rubber gasket. The whole of the top edges of each side section has a rubber gasket on them too and the top (roof) is made by the same method and simply placed on top of the gasket and then bolted down to the sides with internal fixings that do not compromise the roof watertightness. Careful consideration of the ways the side's U channel is oriented will prevent water blowing in as you drive.

Internal bracing for the rig is provided by a bed and other fixings which provide useful functions but provide the rigidity required. Again careful fabrication of this in 'panel' fashion will enable all of it flatpack.

I can provide details of alloy suppliers, gaskets and other bits you'll need if you want.

Bottom line - this is doable, will be functional and comfortable, warm and dry. Assembly would be fairly quick too.


PS One channel section that might suit you is on Page 22 herehttp://www.commercialbodybuilding.co.uk/pdfs/JA-Aluminium.pdf section RP20 although its not a 19mm section but 14.5 but you'll get the idea and if you look through the list you might find something thicker. Or just go thinner and lighter and more manageable. I'm doing my 110 roof just now and working on a 19mm box and 1.2mm sheet basis. (see the Land Rover section in this site.)
 

markbarnes

New member
Thanks wuntenn and papawheely- wuntenn, have read with great interest about your roof project. Very impressive. As I'm a novice, is there any example you can think of pictures wise? Also, I'm not very clear on how it would construct/deconstruct quickly; I can kinda visualise, but as a novice it's the actual nuts and bolts that are dazing me!
 

wuntenn

Adventurer
There's loads of ways of doing this - it all depends on the time/money/inclination you have. You can use all plywood and timber (like this), but for a robust and long-lasting job I'd use alloy box section for the frame, thin alloy sheet outside and ply lining, with insulation in between. Thats more likely to withstand the on/off/on/off and storage than anything else.

My choice would be something like this: the two sides have U channels on the vertical edges and the sides slip in against a gasket and stainless clips pull it all together. More clips on all the inside stuff will pull it all together, and then the roof clipped down tight with a lip protruding over and more gaskets give the seal and hold the box rigid. Clips are here.

sections.001.jpg

This is a plan view, looking down from above. (minus one side)

Each section is about 1" thick so four sides and a roof would need about 8 inches thickness to store including the clips.
 

markbarnes

New member
Wow, thanks so much wuntenn, that's very very inspiring and a great visual for me, thanks for taking the trouble of doing that.

Just looking at the diagram, it says the the front u channel is bolted on. Is that the only section that would have to have the link to the chassis? The rest via the clips will keep rigid? The back u channel will be structurally competent if held on both sides with clips?

Again, many thanks for this
 

wuntenn

Adventurer
Mind you're looking down in the drawing so its showing you three of the four walls. Two walls have U channel on each side, two dont. The ones that dont (yellow) slide into the ones that do and are all clipped together. The roof has a lip that goes over the 4 walls thus stiffening the whole thing and the clips will hold it together. The lower part of each side can simply be fastened to the existing flatbed using plates made of angle section, and a couple of bolts through your existing flatbed through the plates and ratcheted down.

Basically find a U channel thats thick enough wall section - 4mm and above would be good, I'd avoid anything less, and find some thats got a decent width - the 'slot' dimension into which your sides will slide. That gap needs to be about 20 - 25mm.

What you're doing is making a frame out of box section, with U channel bolted or riveted and glued on each side as a fixture.

You can be smart and have a couple of boards that drop inside once its assembled to make a nicer floor than your existing truckbed. You could even put electric underfloor heating in it so you can use a hookup at a campsite and have a toasty winter break!
 

gethewson

New member
Hi mark
where are you in london.
i'm attempting to build a camper in N1.
How did you get around the LEZ or is your 110 petrol.
regards james
 

Forum statistics

Threads
185,891
Messages
2,879,510
Members
225,497
Latest member
WonaWarrior
Top