asander1
New member
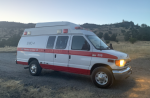
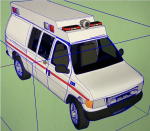
Full size American vans (Ford, Chevy etc.) make great campers, but very few used vans come with a pop top or a high top that you can actually sleep in.

Even with a high top like this Ambulance, most people can't even stand fully upright inside, let alone have a bed that isn't in the main living space.
There are pop tops and high tops available for these from several well respected vendors, but they are fairly expensive:


A pop top with a bed is hard to get for less than 9-12k - which for a budget build where you might start with a used van for 5k doesn't make a ton of sense.
You might get lucky and find a wrecked van and pull the top off, but these are rare as hens teeth:

Occasionally pop tops from Westfalias show up on the used market, but these are also hard to find and not super cheap either:

Likely to be 1/2 way across the country from you as well...
Either of these budget options are very hard to find and still involve a lot of work to actually install. So here is another option that has been done a handful of times before but you don't see very often... a roof top tent with the bottom cut out and incorporated into the van roof:

Cheers to David - @Abitibi and others before me for the inspiration... https://expeditionportal.com/forum/threads/ambuland-build-thread.103768/page-26
Most hard shell roof tents are still $3,000-4,000+, but at least we are getting somewhere budget wise...


Now, check this thing out:

$1,500 delivered to your door, now we are talking! And something we can cut into without freaking out! Keep an eye out for 10% off coupons at various sites on this thing as well. This thread will cover the install I did with this into my Type II Ambulance van. Stay tuned...!
Even with a high top like this Ambulance, most people can't even stand fully upright inside, let alone have a bed that isn't in the main living space.
There are pop tops and high tops available for these from several well respected vendors, but they are fairly expensive:
A pop top with a bed is hard to get for less than 9-12k - which for a budget build where you might start with a used van for 5k doesn't make a ton of sense.
You might get lucky and find a wrecked van and pull the top off, but these are rare as hens teeth:
Occasionally pop tops from Westfalias show up on the used market, but these are also hard to find and not super cheap either:
Likely to be 1/2 way across the country from you as well...
Either of these budget options are very hard to find and still involve a lot of work to actually install. So here is another option that has been done a handful of times before but you don't see very often... a roof top tent with the bottom cut out and incorporated into the van roof:
Cheers to David - @Abitibi and others before me for the inspiration... https://expeditionportal.com/forum/threads/ambuland-build-thread.103768/page-26
Most hard shell roof tents are still $3,000-4,000+, but at least we are getting somewhere budget wise...
Now, check this thing out:
$1,500 delivered to your door, now we are talking! And something we can cut into without freaking out! Keep an eye out for 10% off coupons at various sites on this thing as well. This thread will cover the install I did with this into my Type II Ambulance van. Stay tuned...!


")