Cub Camper Rebuild

uncleogre

New member
I have been looking at this site for quite a while, getting ideas etc about changing my camper into something a little user friendly. Some of the builds undertaken on these pages have been inspirational and have helped me greatly with my build.
I would like to share my build with the EP members.

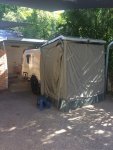
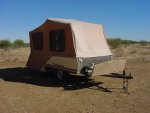
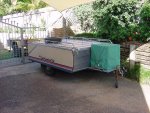
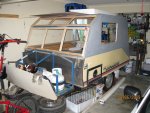
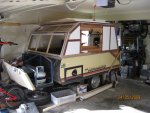
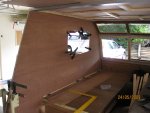
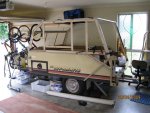
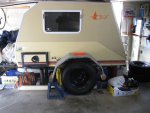
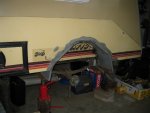
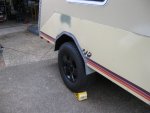
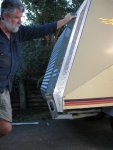
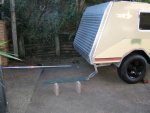
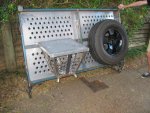
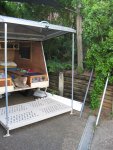
I started with a hard floor camper that I got from my brother many years ago. The floor hinges over and opens up a tent arrangement. This style of camper is common in Australia.
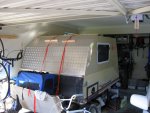
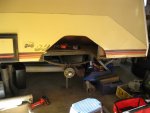
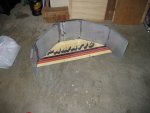
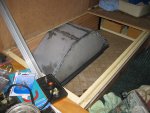
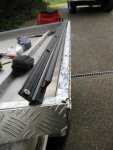
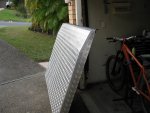
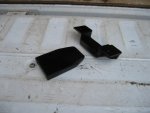
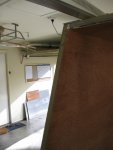
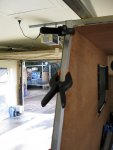
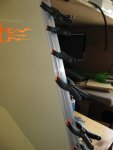
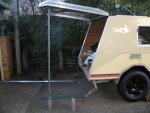
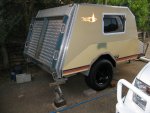
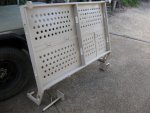
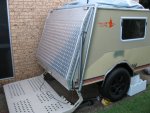
I did a few things to it such as putting the axle under the springs to get extra clearance and extending the drawbar, but was never happy with the flapping canvas. As the canvas was in need of replacement, I decided to convert it to a hard sided camper.
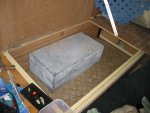
I'll just post a couple of photos to start with to see if I have the right picture format.

Stuart
 

Attachments

  • Canvas.jpg
    Canvas.jpg
    148.6 KB · Views: 40
  • Camper2.jpg
    Camper2.jpg
    38 KB · Views: 36
  • Camper1.jpg
    Camper1.jpg
    37.5 KB · Views: 33

uncleogre

New member
Framing the Hard Top

When I removed the old top (which becomes the floor when erected) and canvas, I built a 25mm RHS (steel) external frame that I infilled with pine studs. The standard sizes are 19mm x 42mm so I had to glue 6mm ply strips to the studs to make it the same thickness as the steel.
I then glued and nailed 3mm luan ply to the inside of the frame. On the outside, I infilled the cavity with 25mm foam glued to the luan ply. The outside was then covered with 0.55mm zinc anneal sheeting and trimmed to size.
This was repeated for the other side and the roof. The front wall was clad in aluminium checkerplate. All surfaces were glued with Sikaflex. The rear opening was to be filledd with a large door.
Before I put on the outer sheets, all the wiring was run through the framing.

Stuart
 

Attachments

  • Roof.jpg
    Roof.jpg
    291.5 KB · Views: 29
  • Cladding.jpg
    Cladding.jpg
    310.6 KB · Views: 29
  • Lining2.jpg
    Lining2.jpg
    501.3 KB · Views: 33
  • Lining1.jpg
    Lining1.jpg
    487.1 KB · Views: 30
  • Framing.jpg
    Framing.jpg
    287 KB · Views: 29

uncleogre

New member
Thanks Rbertalotto
Just wait for the description of the rear door which turns into a separate room.
As you say, there are heaps of old campers out there and can be modernised to suit your needs for not that much money. Building yourself is so satisfying.
Stuart
 

uncleogre

New member
Change of Wheels

The camper originally came with 14" wheels that sat inside the body. I decided to change them over to 16" rims to suit my tow vehicle and I had to open up the body to get the wheel in.
First thing was to fabricate some guards to suit the wheel and line them up on the body. I then removed the original internal mudguard box and the outer skin of the camper. The outer skin was then welded into the new guard and it is all welded in place on the camper. The rims in the last photo are the same rims as my Navara, powdercoated black.
 

Attachments

  • Wheel01.jpg
    Wheel01.jpg
    475.8 KB · Views: 22
  • Wheel02.jpg
    Wheel02.jpg
    288.6 KB · Views: 18
  • Wheel03.jpg
    Wheel03.jpg
    462.9 KB · Views: 18
  • Wheel04.jpg
    Wheel04.jpg
    234.1 KB · Views: 21
  • Wheel05.jpg
    Wheel05.jpg
    456.9 KB · Views: 20
  • Wheel06.jpg
    Wheel06.jpg
    332.4 KB · Views: 20
  • Wheel07.jpg
    Wheel07.jpg
    497.1 KB · Views: 20

uncleogre

New member
Rear Door

The entire back of the camper is covered by a rear door that elevates upwards to form a roof. I made a shallow box frame out 25mm RHS, braced it and covered it with aluminium checkerplate. The top hinge is a flexible plastic hinge that interlocks together when it is in the closed position. I put in nutserts into the top frame and the camper body and attached the hinge to the frame and the camper body with countersunk bolts.
Because it is such a large door, I was worried about flex in the door during travel so I made a tongue from 16mm steel (part of an old drawbar) and made a receiver for the camper body. The tongue is on the middle of the bottom of the door and locates in the receiver when closed, basically eliminating all flex between the door and camper.

Stuart
 

Attachments

  • Door01.jpg
    Door01.jpg
    304.8 KB · Views: 19
  • Door02.jpg
    Door02.jpg
    352.8 KB · Views: 18
  • Door03.jpg
    Door03.jpg
    256.6 KB · Views: 17
  • Door03a.jpg
    Door03a.jpg
    317.4 KB · Views: 18
  • Door04.jpg
    Door04.jpg
    454.8 KB · Views: 19

uncleogre

New member
Rear Door Seal

Again as this is such a large door, it is important to get good sealing around the edges.
To the basic frame I first glued and rivetted an aluminium T section to the camper body. Over the top of that I glued and rivetted an aluminum angle on the outside. This gave me a clean edge and the leg of the T section acted as a rain guide inside the door. On top of that I glued a rubber strip with a bellow in it to provide the sealing. I glued a similar seal, that other way around, on the door so they interlocked and formed a better seal.
Still to come....the rear deck......

Stuart
 

Attachments

  • Seal01.jpg
    Seal01.jpg
    461.9 KB · Views: 12
  • Seal02.jpg
    Seal02.jpg
    115.5 KB · Views: 13
  • Seal03.jpg
    Seal03.jpg
    458.9 KB · Views: 14
  • Seal04.jpg
    Seal04.jpg
    484.6 KB · Views: 12
  • Seal05.jpg
    Seal05.jpg
    345.7 KB · Views: 13

uncleogre

New member
Rear Deck

Thanks Rod, if only it was as clean as your build.

I wanted to put on a fold down rear deck to provide a clean area and also form the floor for my rear tent. I fabricated an arrangement that would fold down flat on the ground (on supports) but would also tuck into the rear door for travelling.

I originally covered it in wood for a trial run and then covered it with zinc anneal sheeting that I had drilled and dimpled each hole. The dimpling was not a lot of fun when done by hand. I have incorporated mounting points to carry a spare tyre and the fire brazier. I had the whole thing powdercoated and to assist in the opening I have fitted linear actuators to raise and lower the doors. The rear door and deck are held in place during transit with over centre latches.

So we have caught up to where I am currently with the build. As you can see from the dates on the first photos, it has taken a long time to get this far. The camper has been on a few trips during the build except with tarps slung up to cover the holes and it has performed well. The best was a 5000km trip out to the salt lakes in South Australia.

I am currently fitting the real tent arrangements that I am modifying from screens from an Oztent. I am also finishing off my pull out and wrap around kitchen. Borrowed the concept from the ROAM build!

Stuart
 

Attachments

  • Deck01.jpg
    Deck01.jpg
    276.2 KB · Views: 19
  • Deck02.jpg
    Deck02.jpg
    327.5 KB · Views: 17
  • Deck03.jpg
    Deck03.jpg
    301.5 KB · Views: 14
  • Deck04.jpg
    Deck04.jpg
    303.1 KB · Views: 15
  • Deck05.jpg
    Deck05.jpg
    358.8 KB · Views: 14
  • Deck06.jpg
    Deck06.jpg
    337.4 KB · Views: 16
  • Deck07.jpg
    Deck07.jpg
    442.7 KB · Views: 17
  • Deck08.jpg
    Deck08.jpg
    333.8 KB · Views: 14

uncleogre

New member
Springs

The camper still had its original leaf springs from when it was manufactured back in the 80s. so is seriously in need of an upgrade.
I bought a set of 5 leaf ALKO rebound springs rated at 1350kgs and had my trailer guy set them up on a piece of 50mm flat. I figured that it would be easier to put in place with the shackle angle already set.
Spring_01.jpg
I put the camper on stands this morning and pulled out the old set ready for me to crawl under with the grinder to clean up the chassis raile ready for the new setup to be welded in.Spring_02.jpg

Stuart
 

uncleogre

New member
Wiring

Semi-Hex
The wiring is pretty basic. The camper came with twin beds which I lengthened to form storage boxes at the end. On the drivers side (Right side) I put in a battery box with a 110 amp.hr gel battery. On the back side of the box I have mounted (from the left) an isolation switch direct to the battery, various plugs for chargers etc, switches for the roof light and water pump, fuse panel, voltage indicator and solar regulator. I have a 20w panel permanently mounted on the roof and a remote plug under the camper so that I can plug in a portable panel if I am parked under a tree.
I also have a heavy cable pair running to an Anderson plug at the front of the camper that allows me to connect to the second battery in the tow vehicle.
Elec_01.jpg
I have remote lighting in the headboard of the camper, roof lighting in the main body and another roof light in the raised roof section. I also have a stereo and four speakers.
Elec_02.jpg

Stuart
 

uncleogre

New member
Ready for Action

The camper has seen a few adventures while it is being personalised. My favourite is when we took it the Speedweek at Lake Gairdner Salt Lakes in South Australia. Sort of a down under version of Bonneville.
I didn't have the rear tent finished, had to use tarps, and the kitchen was also incomplete. But we did 5000kms without too much trouble. Got to drive on the salt which was great.
Gard_01.jpg
Gard_02.jpg

Stuart
 

Forum statistics

Threads
185,896
Messages
2,879,549
Members
225,583
Latest member
vertical.dan
Top