Dreaming of a Perentie Turning an ex ADF 6x6 into an expedition vehicle

carts

Adventurer
sound reduction in the cab step 1

Have you ever ridden around the bush in a tin can?
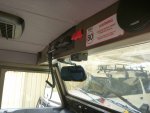
The landy is just like that it is no fun. To the point that the ADF have put a sticker inside that states 80 km/h MAX going over this will result in permanent hearing damage. Really the ADF have bombs and guns and one of their ex-landy's has a sticker warning about hearing damage!

So you know its got to be bad.

We have started to deal with this issue (well the adult supervision has).
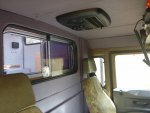
The first part was to strip out the inside of the landy, oh that's right all we did was remove the two seats. Did I mention that its rustic at all? I am sure I did

Then any and every panel was hand washed with soap and water, followed by methanol. Then she scrubbed all the panels with steel wool. yep I didn't have to do it at all isn't that grand ?
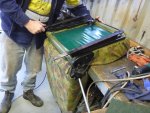
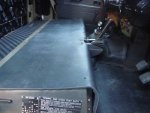
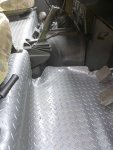
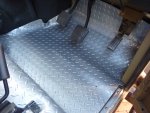
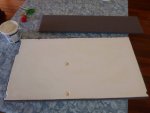
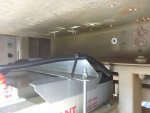
once that was completed she set about sticking the vibration dampener material on the panels.
she ensured it was adhered properly by using the supplied roller over all of the material

Whilst we understand this is not sound deadening, it does stop the tinning of the panels and as the name of the post suggests this is step 1.


cab sound 1.jpgcab sound 2.jpgcab sound 3jpg.jpg


I will up date as time and the adult supervision allows
cheers Carts from wa
 

carts

Adventurer
short legs

quick whilst she isn't looking a quick update

The adult supervision is just, like just over 5 feet tall and she can't reach the pedals or gear stick.
we had to extend the seat runners so that the seat moves further forward for her.

Also I had to strip out the rubbers from the surround of the gear stick and whilst we heated up the stick with the acetylene torch we bent the gear stick to a new position.

to keep the seals and ext cool we were tipping water on the bottom of the gear stick the whole time.

what you do for the person who pays the bills
 

Attachments

  • seat 1.jpg
    seat 1.jpg
    489.2 KB · Views: 39

Ozrockrat

Expedition Leader
what you do for the person who pays the bills

I know the feeling well. SWMBO provides the adult supervision to keep my Mad Max tendencies to a minimum. We also have an understanding or more a project guideline that if it comes to a decision between off road ability and long term comfort we go with long term comfort. But I did sort of sneak the 43" wheels that howl down the road under her radar.

It all comes to compromise for us. She has a porta potti and I have an espresso machine.

Keep up the great work. I am waiting see your results to see if I sell off my landcruisers in Oz and replace them with one of these. Or go the Troopy pop top with the one I have now.
 

carts

Adventurer
Noise reduction part two.

So the next stage of the sound deadening process was to install the mass noise liner on the fire wall and all the way through to the rear of the seats. At the reinforcing structure of the seat box we changed from the expensive mass noise liner to the cheaper egg crate style foam.
Over top of that we lay a vinyl layer that looks like check plate. This should provide a hard wearing layer as well as fitting in with the look of the truck.
The remaining panels were covered with ultra-high density polystyrene 25 mm thick with each panel shaped by saw then sanding to fit. Once each panel had a perfect fit it was covered with polar fleece and glued into place.
The one exception of this was around the rear window were a combination of 3 mm insulation and what is termed sign board was used this was so that the window did not have a 25 mm lip.
All of the work was done by the adult supervision and I must say for the record it looks magic. It also make the truck a lot quitter inside.
 

Attachments

  • mass laden.jpg
    mass laden.jpg
    400.8 KB · Views: 54
  • check plate inside.jpg
    check plate inside.jpg
    496.8 KB · Views: 55
  • P1040544.jpg
    P1040544.jpg
    437.3 KB · Views: 53
  • poly covered.jpg
    poly covered.jpg
    406.3 KB · Views: 57
  • finished product.jpg
    finished product.jpg
    501.7 KB · Views: 62

carts

Adventurer
not drinking beer

So I hear you asking what was I doing whilst all of this work was being done? Good question and whilst part of me wants to say sitting having a beer watching her work, that would be justa lie.
Well a list is easiest
• Driving lights light bar and HIV (complete)
• Max tracks on (complete)
• Radios installed, both CB and standard entertainment style (complete)
• Big *** door locks as recommended by POHMie overlanding sites for defender vehicles. (complete)
• Change out door locks or more correctly put them in (complete)
 

Attachments

  • driving lights.jpg
    driving lights.jpg
    579.1 KB · Views: 42
  • Radios.jpg
    Radios.jpg
    429.6 KB · Views: 44
  • max tracks.jpg
    max tracks.jpg
    562.4 KB · Views: 42
  • door locks.jpg
    door locks.jpg
    281.7 KB · Views: 71

carts

Adventurer
Solar power and batteries

So I have also been working on the solar power. My step dad made a battery box for two (2) 165 AH AGM batteries. He did a great job on that. In a post many moons ago I told you we had installed three (3) 100 W solar panels. These are now all connected to the batteries as are the remaining load. All is managed by a Dingo solar controller. For the main current draw items I have used solenoids and switches as isolator for things like the water heater and water pump. It all works well and seems to be rock solid.

The fridge/ freezer is connected direct to the batteries as per the advice on the solar controller. The fridge/freezer has its own low battery sensor and control system.

Oh if you’re wondering it is completely separate from the vehicle ignition system.

I am putting a lot of thought into connecting the alternator direct to the “house” batteries probably using a power solenoid relay and switch so we can recharge if we are traveling on a long drive, not sure on how that would affect the solar controller.
 

Attachments

  • bats 1.jpg
    bats 1.jpg
    365.2 KB · Views: 36
  • bats 2.jpg
    bats 2.jpg
    385.2 KB · Views: 36
  • dingo.jpg
    dingo.jpg
    267.1 KB · Views: 35

carts

Adventurer
you showed me yours now I will show you mine

Almost complete
some happy snaps showing off the work to date

A huge thanks to the team at Kalgoorlie tyerpower they have helped us a massive amount with 8 new rims and Coopers tyers.
absolutely brilliant staff and that is all I can say so if you are in WA and want tyres go see them here is there link

http://www.tyrepower.com.au/stores/80000282/kalgoorlie-tyrepower

oh and that ends the updates for the time being
will update more as time and the Adult supervision allows
cheers Carts from WA

quarter.jpg
Front passenger side view

side.jpg
Passenger side view

rear quarter.jpg
Rear passenger side view
 

Jitterbug

Adventurer
Looking good! I am thinking of having another go at sound deadening ours, at the moment we have the bitumen backed foil stuff to stop drumming and acoustic foam on the floors but thing i need to do more. Did you notice a big difference after you installed yours?

Also what size tyres did you end up going for? My muddies are wearing quite fast, I want to go to an AT but cant get one in 255/85 R16 and don't really want to go a smaller tyre....
 

carts

Adventurer
Looking good! I am thinking of having another go at sound deadening ours, at the moment we have the bitumen backed foil stuff to stop drumming and acoustic foam on the floors but thing i need to do more. Did you notice a big difference after you installed yours?

Also what size tyres did you end up going for? My muddies are wearing quite fast, I want to go to an AT but cant get one in 255/85 R16 and don't really want to go a smaller tyre....

Hi Jitterbug
We have put Coopers Discoverer S/T Maxx 265/75 R16 they look great and I have done around 500 km with them on and nothing untoward to report.

On the sound deadening we have added the mass laden rubber after the (dynamat like) material and it makes a huge difference. doesnt stop all the noise but its a land rover.
cheers mate and all the best
carts from WA
 

carts

Adventurer
side note AC gassed

just as a side note I had the AC (Red dot 6100) gassed it works well the condenser fan is a little noise but when its cool inside whats a little noise.
 

Matto

Observer
Great work Carts, as usual. She looks good.

I am putting a lot of thought into connecting the alternator direct to the “house” batteries probably using a power solenoid relay and switch so we can recharge if we are travelling on a long drive, not sure on how that would affect the solar controller.

If I've understood you correctly, this is the sort of electrical setup you've got:

h3igbgE.jpg


If so, that's basically exactly how I've had my car and camper configured for the past however many years. My solar controller is a Steca, but it should work roughly similar to you. I was also concerned that the controller might get confused if the batteries are getting topped up by something other than itself. But in reality, it doesn't matter - that setup works perfectly.

It does mean that the numbers the solar controller shows (power in, power out) don't line up to anything in reality, but you're already taking power out directly for the fridge, so no loss there.

With my Steca controller, it monitors the battery's state of charge via the voltage on the battery side, so it's graphical "80% full" meter is always correct regardless of whether the batteries get charged by solar or alternator. I would imagine your Dingo is the same.

For the VSR between the Start and House batteries, I personally use a Traxide SC80, and I love it. It's automatic, which suits me and my inability to remember things. But you could use anything from an old marine changeover switch from Whitworths (don't forget to isolate the Start if you connect them), through a basic dual battery VSR, to a fancy DC-DC charger. Anything that will de-couple the Start below a certain voltage will work.

Personally, I've wired in a marine switch in parallel to the Traxide unit, so that I can manually link all the batteries together. This has saved my bacon a couple of times when the Start battery got flattened (once when it just decided to fail randomly, like they do), and I needed to jump-start the motor from the house batteries. For an extra 10 mins of wiring, I recommend it. Other people just carry a set of jumper leads that are long enough to reach from the House batteries to the Start. That works, but can be tricky if you need to drive without a Start (although, being the basic diesel motor, you might be OK once you're running).

Anyway, that's my $0.02. Hope it's helpful.

Cheers,
Matt
 

Forum statistics

Threads
185,939
Messages
2,880,016
Members
225,627
Latest member
Deleman
Top