You are using an out of date browser. It may not display this or other websites correctly.
You should upgrade or use an alternative browser.
You should upgrade or use an alternative browser.
FlipPac Lid Repair 101 (or how to get in over your head in three easy steps...)
- Thread starter billy bee
- Start date
lx450landcruiser
Explorer
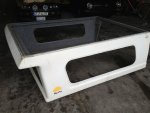
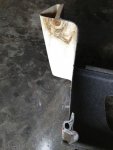
Just thought I would add some photos to this thread as it is turning out to be very helpful for flippac owners to see how a flippac is constructed.
Im just using some of the parts from mine (torsion bar, hinges ect..)
Im just using some of the parts from mine (torsion bar, hinges ect..)
Attachments
austintaco
Explorer
Just a thought and concern. What are signs that your flippac might be failing? Any odd creaks, rust spots? Prior to complete failure or to prevent failure, would a rust inhibitor be able to be sprayed on the metal channel? Thanks for posting up the photos and videos. Very informative.
Just a thought and concern. What are signs that your flippac might be failing? Any odd creaks, rust spots? Prior to complete failure or to prevent failure, would a rust inhibitor be able to be sprayed on the metal channel? Thanks for posting up the photos and videos. Very informative.
Looks for rust stains under the hinge arms... Otherwise, disassembly is the only real way to know.
bb
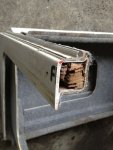
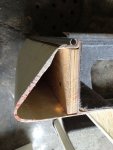
Looks like you scrapped that one. I appreciate the pics. Helps me to see whats going on in there. If you happen to open up the lid I would like to see what they did in between the inner and outer skins. I know there is some kind of foam in there from drilling through it.
I got the scope in between the inner and outer skins. Looks to my like the core is some kind of epoxy impregnated cardboard honeycomb. It appeared to have broken down considerably.
bb
ETAV8R
Founder of D.E.R.P.
Makes me want a four wheel camper even more.I got the scope in between the inner and outer skins. Looks to my like the core is some kind of epoxy impregnated cardboard honeycomb. It appeared to have broken down considerably.
bb
lx450landcruiser
Explorer
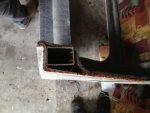
Hard to make out what is where in the pic on the lower right hand corner. What section is that?
That is in the midde of the top of the flippac fron the side. In other words that is the metal tube that runs the full length of the flippac that the torsion bar bolts inside of. They also run the wiring for the interior lights inside of it.
lx450landcruiser
Explorer
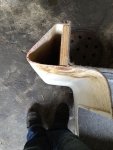
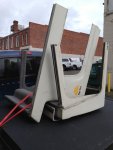
The sawed pics are from my old flippac not billybees I am building a new custom camper and only using the top section of the flippac
Looks like you scrapped that one. I appreciate the pics. Helps me to see whats going on in there. If you happen to open up the lid I would like to see what they did in between the inner and outer skins. I know there is some kind of foam in there from drilling through it.
You might want to re-read the thred more carefully.
bb
You might want to re-read the thred more carefully.
bb
Sorry about that! Any progress on the original, btw? My fiberglass guy gave me a firm and definite, "I guess it can be done, anything can be done"

Sorry about that! Any progress on the original, btw? My fiberglass guy gave me a firm and definite, "I guess it can be done, anything can be done"
We have a plan and much of the work is done. Just have not budgeted time to complete the job. Will update when we do. Hint: we are not re-glassing anything...
Bill
We have a plan and much of the work is done. Just have not budgeted time to complete the job. Will update when we do. Hint: we are not re-glassing anything...
Bill
very interesting...... I was thinking of a non-reglass approach. I was thinking of chopping the damaged area, reinforcing it with bolts and 3/4 inch ply, and having the unit supported when open using two poles on each side of the lid that rest on the ground. That way the weight of the bed is supported to the ground rather than relying on the tension mechanics.
Am planning on rigging that up "if all else fails". Interested to see what you come up with. I'll post pics when we get something going.
Thanks!
Forum statistics
Members online
- zackmold
- GirdlerFamilyOverland
- ramblinChet
- davidtzlu
- major80301
- NWLineman
- dragonbyu
- Roaming Robertsons
- rubonik
- Todd n Natalie
- nukeandjuke
- clift_d
- YukonMontanaTannerTrapper
- NOPEC
- Hoghead
- Flat Out
- Punisher1964
- Rovertrader
- plar
- Mikeythelumberjack
- 4runnerteq
- Long Rifle
- Skinhyfish
- T-Willy
- Geared4adventure
- Backyard Hotrods
- TouringSedan
- IdahoTider
- DCH109
- Savagenut
- txlonghorn
- wm6000
- NatersXJ6
- aikido73
- Victorian
- ITTOG
- JaSAn
- bartheil
- Power Wagon Family
- Fenderfour
- plh
- ClickClickBoom
- 180out
- Ringer419
- Atl-atl
- Mthompson2845
- SpacemanSpiff
- 3IMOH
- halseyt
- RealTruck
Total: 551 (members: 65, guests: 486)