You are using an out of date browser. It may not display this or other websites correctly.
You should upgrade or use an alternative browser.
You should upgrade or use an alternative browser.
Guess who's back!?! Atl-atl's K5 Blazer + Four Wheel Camper "The Crawlin Cabin" documentation thread!
- Thread starter Atl-atl
- Start date

Hillbilly Heaven
Explorer
Here in South Carolina a plate like that is only for limited use vehicles. I live in a rather small community and if I was spotted passing thru town several days in a row, it would be questioned. Not any 1979 Fullsize Broncos roaming the streets around here.
Atl-atl
Adventurer
Here in South Carolina a plate like that is only for limited use vehicles. I live in a rather small community and if I was spotted passing thru town several days in a row, it would be questioned. Not any 1979 Fullsize Broncos roaming the streets around here.
Car culture in Arizona is crazy. We have more vanity plates than anywhere else in the world. There are very few restrictions on what you can drive; ATVS, UTVs, packed out adventure motorcycles and all sorts of offroad vehicles drive down the road in Phoenix all day long. Feels like you're in Moab a lot of the time. Stuff lasts forever so you see all kinds of things on the road. We have over 70 different license plates available, most of which can be put on any vehicle, some with slight restrictions. The Historic plate that I got can go to anyone and be put on any vehicle older than 25 years. There is a similar plate called "Classic Car" which requires authentication of the vehicle based on the Classic Car Club of America list of approved classics.
Atl-atl
Adventurer
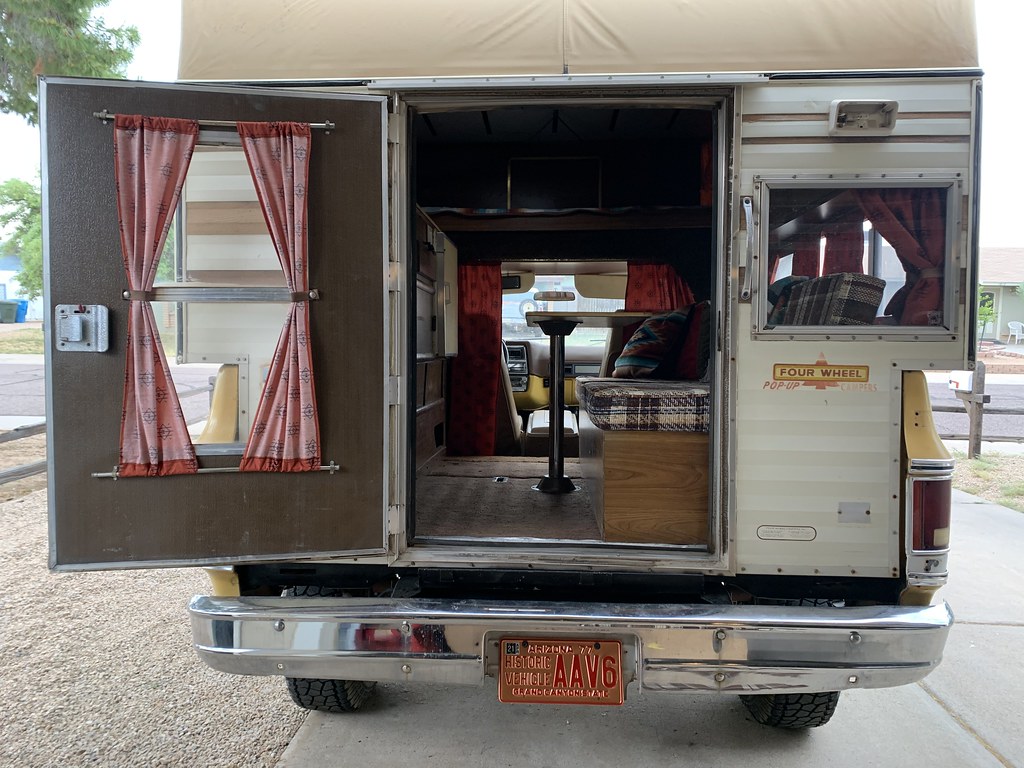
Finished up the sewing last night. Interior is really coming together, well...the camper interior. The truck is another story hahaha. I just need to tear into the water system but otherwise its basically done. I think Im going to keep the couch at least for a little while. The amount of storage underneath is great, I can fit almost everything I need, including my portable campfire, folding chairs, tools etc. I need to redo the mattress and couch cushions because the foam is literally disintegrating every time you touch it or sit on it but its useable and I need to finish some projects at the house because Its going up for sale in the next couple weeks. I cant go into any upholstery shops to pick out fabric right now anyway.


zoomad75
K5 Camper guy
The curtains came out great. I'd get to tinting the camper windows pronto if you want them to stay looking like that. My sisters made me some out of red/black plaid like the Woolrich models get now and the sun over the last year has started to bleach them. You get just as much sun down there in AZ as we do here in Southern CO so it's only a matter of time. I just tinted mine finally a couple of weeks ago. I may do it again because I went with 35% and should have gone 15-25% at least.
Atl-atl
Adventurer
So Ive been having a discussion about the water and propane systems over in the Four Wheel Campers forum. The one thing I hadnt gone through yet was the water system. I decided to tear into it, only to realize my tank was failing and its really hard to find this exact tank for a replacement. So the gears started turning...I gutted nearly everything under the counter, Im going to install an outdoor shower, electric water pump with new faucet, new larger water tank and all new flexible lines for the propane system. I think I have all the dimensions I need but Im going to have to get a blank tank and install the fittings myself to make sure they fit the locations of the existing holes in this camper. I definitely dont want to add new holes and seal up existing holes when a little measuring and math can make it work. Since Im going to wire in an electric pump I might as well take this opportunity to rewire the whole camper, which has been part of the plan all along. It just worked its way to the top of the is ha! Also I deleted the shore power wiring and outlets because I dont do camp sites.
Before

After

Before
After
Buddha.
Finally in expo white.
Did you give any though to using a gas heater instead of a propane furnace?
 expeditionportal.com
$200 5KW Portable Diesel Air Heater
( E-cigarette above, unit not smoking :ylsmoke: ) ( Hot air out is metal flange ) ---- Parts $200 eBay 5kw diesel air heater $38 Dewalt DS300 tool box $7 Spectre 8148 3" duct mounting plate (for the cool side) $15 Spectre 81413 3" maf sensor plate (metal, for the hot side) $0 Metal plate...
Atl-atl
Adventurer
Did you give any though to using a gas heater instead of a propane furnace?
$200 5KW Portable Diesel Air Heater
( E-cigarette above, unit not smoking :ylsmoke: ) ( Hot air out is metal flange ) ---- Parts $200 eBay 5kw diesel air heater $38 Dewalt DS300 tool box $7 Spectre 8148 3" duct mounting plate (for the cool side) $15 Spectre 81413 3" maf sensor plate (metal, for the hot side) $0 Metal plate...
I have not because this one works so ill run it until it doesnt.
Atl-atl
Adventurer
Ive been gone for a while. My house is under contract to sell so ive been doing work to get it ready for that and the Blazer has been neglected for a few weeks now. Today I picked up my new tank/shower/pump and a bunch of misc. water lines and fittings as well as some propane fittings to start rerouting. The good news is I am able to use a "stock" water tank from an RV supply place and reuse all existing holes in the camper except one. Im ok with filling one hole and making one new hole, especially because its on the horizontal wooden surface underneath the overhang of the camper that sticks out over the bedsides. Obviously I will have to cut a hole in the side of the camper for the outside shower enclosure but thats fine. Its going to fit on the exterior wall above the water tank sandwiched in between the tank and the sink. I didn't think it would fit there so Im super happy about it. This means Im getting twice the water capacity as the stock tank and basically not losing any storage under the counter.
New locations for everything. Just need to plumb it all now.

New locations for everything. Just need to plumb it all now.
Last edited:
Atl-atl
Adventurer
Well, I made a big hole in the driver side wall of the camper. It wasn't without some educated guessing, finger crossing, breath holding, lots of measuring, pushing, prodding etc. but in the end it worked! Since I have previously stripped the exterior skin of other Four Wheel Campers, I was relatively confident in the location of the vertical and horizontal aluminum structure in side the walls and after about an hour of figuring I went for it.

Here is a picture of the 80's Fleet(same generation as my Blazer camper) that I completely tore down which gave me the best guess as to how much room there would be between the structure of the camper in the area I was hoping to install the shower.

Turns out the measurement was exactly the same! I like when companies follow standard procedure/sizing. After framing out the newly cut opening with some extra 1" aluminum square stock, the shower I bought had 1/4" of wiggle room between the propane cabinet and the next vertical support of the camper wall.
Not a window...


I had to trim the shower enclosure to fit up against the propane cabinet. I have since packed it with butyl tape so its water tight.


Currently the shower head is at 5'6" when in the holder. After the lift/tires it should be above 6' which is great because Im 6' tall.

Dry fit everything except the fill line.

Got some shims to tilt the tank towards the drain and some perforated metal strap to fasten down the tank.


Bolted down tank, hose clamped lines, replaced the fill inlet and ran new hose for the fill.


Finished all the hookups, ran a temporary switch to the pump and filled it with water to pressure test the system and then ran out of daylight. womp womp. I flipped the switch and my faucet was leaking so water got everywhere. The good news is the pump works, the faucet gets pressure, the shower head works, the fill/drain work and all seems well.

Here is a picture of the 80's Fleet(same generation as my Blazer camper) that I completely tore down which gave me the best guess as to how much room there would be between the structure of the camper in the area I was hoping to install the shower.
Turns out the measurement was exactly the same! I like when companies follow standard procedure/sizing. After framing out the newly cut opening with some extra 1" aluminum square stock, the shower I bought had 1/4" of wiggle room between the propane cabinet and the next vertical support of the camper wall.
Not a window...
I had to trim the shower enclosure to fit up against the propane cabinet. I have since packed it with butyl tape so its water tight.
Currently the shower head is at 5'6" when in the holder. After the lift/tires it should be above 6' which is great because Im 6' tall.
Dry fit everything except the fill line.
Got some shims to tilt the tank towards the drain and some perforated metal strap to fasten down the tank.
Bolted down tank, hose clamped lines, replaced the fill inlet and ran new hose for the fill.
Finished all the hookups, ran a temporary switch to the pump and filled it with water to pressure test the system and then ran out of daylight. womp womp. I flipped the switch and my faucet was leaking so water got everywhere. The good news is the pump works, the faucet gets pressure, the shower head works, the fill/drain work and all seems well.
Atl-atl
Adventurer
Got hot again in AZ but I forced myself to continue on the camper for a bit this evening. Pulled the ice box and started the wiring harness for the camper. I'll be running a 6 circuit Blue Sea fuse box with negative. I have the wiring broken down with current and future fitting onto 6 circuits, since I don't plan on anything crazy like solar or shore power this is plenty. I'll be rewiring from the camper to the house battery/charging relay as well. My circuits are as follows:
This is the extent of the stock FWC fuse block for the camper...things were different back then. On the bottom right you can see the wiring which is coming in from the relay under the hood of the truck. Its just two 12 gauge wires black/white in a grey sheath. The black is the ground that goes from the house battery/AC compressor bracket straight to the furnace. There is a semi-modern bullet connector extending the(now larger) black wire to the furnace. The white wire powers the two fuses on the block which are; white to the interior ceiling lights and red to the furnace/thermostat/rear outside light all tapped off the single wire. When was the last time you saw flathead screws!?!

New wiring will have a separate fuse for each individual item in the camper which should make diagnosis of issues (as well as adding circuits for new stuff) much easier. The original wiring was literally stapled to the cabinetry. The new wiring is inside accordian loom that will be held in place with wire loom clamps.


- Furnace/Thermostat
- Water pump
- Rear "porch" light
- Interior lights
- LP/CO detector
- Fridge (*future)
This is the extent of the stock FWC fuse block for the camper...things were different back then. On the bottom right you can see the wiring which is coming in from the relay under the hood of the truck. Its just two 12 gauge wires black/white in a grey sheath. The black is the ground that goes from the house battery/AC compressor bracket straight to the furnace. There is a semi-modern bullet connector extending the(now larger) black wire to the furnace. The white wire powers the two fuses on the block which are; white to the interior ceiling lights and red to the furnace/thermostat/rear outside light all tapped off the single wire. When was the last time you saw flathead screws!?!
New wiring will have a separate fuse for each individual item in the camper which should make diagnosis of issues (as well as adding circuits for new stuff) much easier. The original wiring was literally stapled to the cabinetry. The new wiring is inside accordian loom that will be held in place with wire loom clamps.
Forum statistics
Members online
- g_m
- mattafact
- waveslider
- blkprl2004
- Gargermel
- dcad
- 94-RUNNER
- PDXSting
- BritKLR
- MonsoonPress
- StenchRV
- excellent_map_3613
- CanadianXJ
- Pacific Northwest yetti
- zfmrchnt
- mark5280
- cgtdm
- hugefeet
- JackW
- plh
- Phil Meredith
- Gabe357
- USMC Dude
- 2017Holden
- SOAZ_Dweller
- Riversdad
- ndaisyk
- mistermustard
- clemnation
- Easy
- callumcamp
- Stewy910
- Banzai Jimmy
- macleody
- Power Wagon Family
- midessa7
- JaSAn
- Kramerica1
- Michael Parker
- cmcd26
- Photomike
- Raul
- AmboFan
- squid14
- matttahoe53
- Asha'man
- gkieser92
- MKKRubi
- Dougnuts
- rruff
Total: 504 (members: 57, guests: 447)