I got a Ute Ltd bed for my Frontier!

adrenaline503

Explorer
I FINALLY got the bed mounted and bolted down the other day. The typical Seattle in November weather really slowed me down. The last 2 days were spent aligning and leveling the bed, wiring the lights, mounting the tie down rails and reinstalling my bumper. Everything considered I am very happy with how the tray is constructed, and if I were to do it again it would go much smoother. On the note I have never bled on a project as much as this one. Busted knuckles, smashed fingers, split nails and a dislocated joint rounded out the tally. Many hands would defiantly make this project a lot more simple and safe, but as usual my lack of patience came with a price. Well worth it.


So there it is all mounted and ready to go. Not the most stunning backdrop, just the alley behind my house. I am very pleased with the overall look and function of the truck, my only complaint is the tray is 8" higher than the stock bed. That is a significant increase when you're 5'7". You can see how the Ute bed is longer than my stock bed, before the bed ended right my rear bumper, but now it extends past that point be about 8". I am not too concerned as it does not impact me departure angle. Below is a before picture to compare.


The Frontier's frame dips down right behind the cab and the stock bed conforms to the contours. To level the bed I had to space the rear mounts to compensate. Below you can see the stack of fender washers I used to achieve the proper plane. I am considering having perches welded to the steel cross members, although that may not be necessary as the stock bed was leveled in a similar fashion.


One exciting possibility is using the space between the aluminum beams, measuring approx. 5"T x 36"W x 83"D. That equals approx. 103 square feet of storage space. See below:


Ute Ltd makes a "trundle drawer" that I may be able to use. I may just put in a floor and simple hinged door instead. Picture from uteltd.com .

02-trundle.gif


My wrap around bumper does not interfere with the bed at all, and does offer some great protection for the rear lights. One downside is that it does interfere with the fenders that came with the bed. I may shorten the wrap around portion of the bumper to clear the fenders, I haven’t decided yet.


adrenaline503

Explorer
So the question is now what? Tool boxes mounted on the top would provide some dry and secure storage. I could mount some crossbars across them and have a RTT and bike racks while retaining most of the bed space. Image from uteltd.com .

10-toolbox.gif


Another option would be to have a canvas cover made like this:
Images from uteltd.com .

21-trade.gif

53-trade.gif


I like the cover idea because it is lightweight and I could easily remove it and roll it up for hauling purposes. I am also considering combining the 2 options, have tool boxes mounted to the top, and have the cover extend to the top of the boxes. This would provide both the secure storage and the shelter. The bed measures 72" x 82.5" providing 41.25 square feet of space. If I were to mount 12" deep tool boxes on both sides that would cut my bed space down to 27.5 square feet. The sleeping area would only be 48" wide, so that might suck. I will have to measure the ground tent I have now to compare .Just for reference the medium size Maggiolina Grand Tour has 32.75 square feet available. One advantage to "my" design is that the top of the tool boxes would provide shelves down both sides on the sleeping area, so the deck could be totally devoted to bedding. I could also install watertight boat hatched to the top of the tool boxes providing access to the contents from inside the bed shelter. Being able to access everything from the inside would be a great option here in the PNW. Sort of a camper/RTT hybrid.

Any suggestions would be appreciated.
 

roscoFJ73

Adventurer
Hi the tray suits your Frontier really well. Was the tray made in the US?
Ive only seen them made in oz in big numbers before.
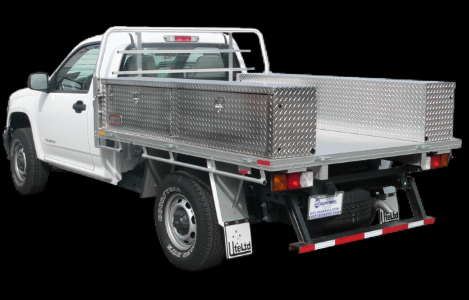
I like them for the same reasons you outlined,less metal to damage,more surface area as well as less to rust and easier for DIY mods and repairs.

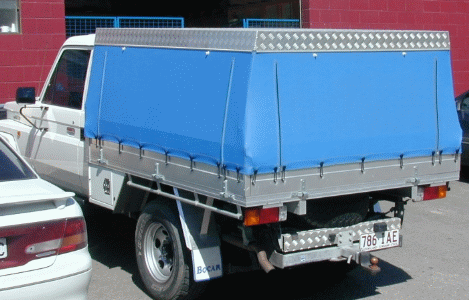
I have a 75 series landcruiser that had a steel tray. When I got it ,it had a canvass stratched over a steel frame.
It worked well but I kept ripping it under trees and occasionallly low carparks.

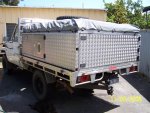
I ditched the steel tray for an alluminium type that weighed 200lbs less.
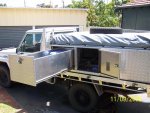
I wanted something for camping with the abilty to stow a fair amount of gear away out of sight and came across the camper in the local classifieds.

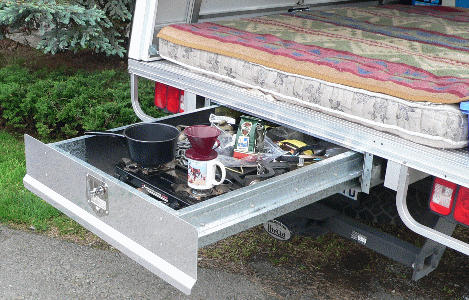
I was going to suggest you put a draw underneath the tray but I see you have already discovered that trick:Astrologist:
Under the tray is also a good place for a water tank as it keeps the centre of gravity low and lessens the effect of water rushing to one side on an incline.
I plan on using the space for 2 spare tyres

Another suggestion is to use 1/2 rubber blocks between tray and frame.

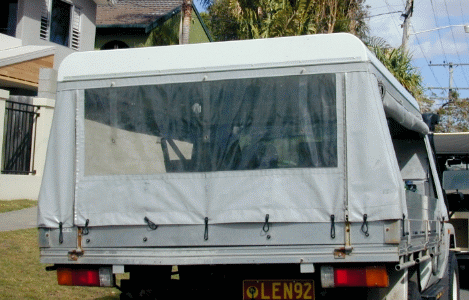
my landcruiser with tray and camper(has tent under grey vinyl)
 

Attachments

  • 79 series 001 (Small).jpg
    79 series 001 (Small).jpg
    80.1 KB · Views: 47
  • alloy camper 008 (Medium).jpg
    alloy camper 008 (Medium).jpg
    90.4 KB · Views: 50
  • alloy camper 003 (Medium).jpg
    alloy camper 003 (Medium).jpg
    100.3 KB · Views: 40
Last edited:

Forum statistics

Threads
190,114
Messages
2,924,088
Members
233,417
Latest member
dhuss

Members online

Top