InvisibleOne's OverANYLand Rockcrawler Conversion

InvisibleOne

OverANYlander
Alright fellas, You've inspired me. I've been an ExPo lurker for quite some time. I've harvested countless great ideas and very much enjoyed many of the builds and ingenious engineering found within this community. Recent interest in longer range, more self sufficiency, and overall camping enjoyment have prompted me to base this years modification season (yes, every year about this time, my wheeler gets some love preparing for an annual family offroad camping trip) around adding some of the ExPo-esque features you guys so cleverly contain within your overlanders.

My rig is a bit different from what you guys go after. For the last decade, my interest has been focused around getting there without breaking down. I feel like I pretty much have that handled, my rig is pretty reliable, durable, and capable. The problem is, one time I took my wife and then only one daughter out we flopped.
View attachment 108254
That didn't go over to well with the Missus. Or my little one that kept saying over and over that 'Daddys twuck fall down.."

So... After two years of refusing to get in the rig again, I've finally got them willing as I've got them convinced that the reason we flopped was due to our high center of gravity and that I have in fact got a solution figured out. Which begins the process of this years mod season. The lowering of my rig CG. As well as increasing the seating capacity from three to four and adding in the creature comforts that my rock crawler past has scoffed at. Heater...pffft. Heaters are for **************! As well as some of these nifty overlander trends like on board water and cooking abilities. Neat.

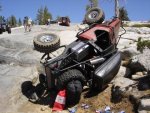
Now at first glance, I know your thoughts. Get rid of that cargo carrier on the top. Can't, three girls. Without being substituted with something else, like a rack, it isn't going away. Believe it or not, racks weigh more. We only pack the lightweight sleeping stuff up there. Its dustproof, holds a ton of stuff and handy as a leatherman. So it stays, until I build a trailer.

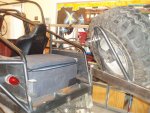
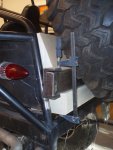
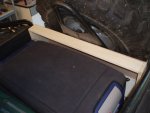
Everything else, therefore, must go lower. In the above pic, you'll notice two side mounted ice chests. Those are quite heavy and need to be moved to create the space needed for a bench seat back there for the ladies. I've decided to nix them in liew of an ARB fridge unit that will go behind that seat. If you look closely you'll see there is a tire there. My spare, which sits on top of a packrat roll out drawer toolbox, together weigh about 400 pounds. That stuff has to go to make room for the ARB. But I need it all, and more. In the posts to follow I'll show you what I've come up with, and hopefully, some of you overlanding gurus will have some insight to help me conquer some challenges that are sure to arise as I convert this dedicated rock crawler to an over-ANY-lander.

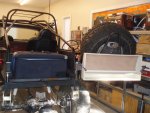
First project, move that spare.

Stay tuned...
 

Attachments

  • Tipped Side.jpg
    Tipped Side.jpg
    37.3 KB · Views: 700

Rab89

Observer
lol crazy project, I'd be buying a new tacoma double cab if you're hauling the family around all the time, but I guess it wouldn't go the places that thing will flop... oops, I mean go haha just kidding, this will be sweet!
 

p nut

butter
I'm interested to know what your current specs are. That thing looks awesome. Even sideways.
 

Clutch

<---Pass
What about tossing on a 4Runner body for the added seat and ability to close it up for the heater?

0308_4wd_01_z%2B1985_toyota_4runner%2Bfront_view.jpg
 

InvisibleOne

OverANYlander
All good points fellas, thanks for chiming in. Actually looked at selling the Toy and building something more 4-seat-ish, like a Runner. In fact, almost bought one but instead got the Suburban, thinking that would be my ExPo project, and may still be just not as extreme as the Toy. Problem with the Burb is that is so damn clean, it'd be a shame to molest it, so I'm back on the Toyota as I just can't bring myself to sell it. You know how these things are, I've been grinding and welding on this one for almost 20 years. This rig is a part of me. So, I'm going to add in a few bits this year for extending my days out and making it more comfy for the ladies.

As for selling it and replacing it with a Dbl cab Tacoma. I'd love to have one for a daily, or even an Expo rig, but not for a serious off road platform, I just don't feel they are all that durable with IFS. Actually spent a considerable amount of energy trying to import an early (79-83) hilux four door cab out of Australia before the Exo cage went on in about '99.

As for the specs on it. Its pretty hard to list, as its been a process over a very long time that continually evolves with every year. From memory here.. Bone Stock 22R with Marlin Crawler Double transfer cases. Curry Ent. Dana 44s turning 5:29s. Discs all around, Landcrusier master cylinder. ARB Air lockers front and rear. Tires are 35" Swampers. Chevrolet / Rancho 44044 springs front and rear. Rancho RS9000 shocks. All the usual crawler stuff, high steer, sliders, winch, ect. Rear half back began life as an AllPro flatbed kit. We doubled up the main bar and plated them together, added a few tubes here and there. The front bumper and sliders are AllPro units too that we tied together with the Exo that a friend and I worked on over a few years, my brother as well.

Now for what I have planned this year...

Swing away rear tire carrier
Under frame tool storage
ARB Fridge
Dual Battery Setup with solar charging abilities
Awning
Backseat

Maybe next year....
On-Board water and shower
Soft top enclosure tied into hardtop for the cab
4.3L V6 Swap

Enough dreaming...

I made some good progress on the swing away tire setup last night. I'll post up some pics later.
 
Last edited:

4Rescue

Expedition Leader
You sir need a first gen 4Runner... More passenger room (they really are just a standard cab P/U with no rear-bulkhead) and all the toughness of any Hilux out there. Plus you could Exo it and still be able to take the top on and off as needed. And again... they're early gen Hilux's... meaning they need more power but they're built like nothing else in their market segment. Just so long as you stick with a Toyota you can't go wrong. I'll be REALLY INTERSTED to see what you do...

Cheers

Dave
 
Just trying to get a handle on what you've got going......

Sounds like you already have the heater in, right? Seating for the missus and two girls, right?

What are your goals for trips with the fam? Day trips? Weekends? Longer......?

Also, just curious- how old are your girls? Mine are 2 and nearly 4...... makes for interesting (and short) trips.

Oh, and do you have a link to a build on your truck on another forum? I'd love to see a few other pics-
 

InvisibleOne

OverANYlander
And so it begins..

4Rescue.. Like I mentioned, I thought of just building a Runner, but they end up pretty small and I'd be starting from scratch, and I love this rig so I can't part with it. I got a Suburban for closed door adventures.

OTBP.. No build thread, sorry. This one will have to do... Yes, stock heater is in, new seat is not. Should have it any day though..and my girls are 3 and 8.

So I got to the rear tire carrier built. I used a kit from EMS offroad. Pretty nice machine work for $100. Saved me a ton of time and head scratching.

tirecarrier_kit[1].jpg

It was a bit challenging to to get it incorporated with my cage but a little grinding on the tubes allowed me to set the post of the pivot into the tube and get it where I wanted it.

EMS_Pivot.jpg

I used 1-1/2"x4" .120 box steel for the main bar, and for the hoop that the tire attaches too, I re-purposed and old pre-runner style bed mount I had. No pic, but you can see it here:

http://performancelifts.com/cgi-bin/cart/FTT10002.html

I just cut off the mounting feet and the front post and welded that to the box tubing at the angle I was looking for. Worked alright, will definately need additional support though. I'm thinking af running a tube under the tire so the bulk of the weight is carried on that and the hoop just holds the tire in place. I'm working on that tube now...

View attachment 108642

In the shot above you can also see the ARB chillin in it's new home. Remember the goal here is lowering the CG, so I set it as low as possible flush with the bottom of the frame rails. I used 3"x3" angle for the chassis. Overall, it will be less that half the weight of the dual ice chest setup and sits 7" (or 40%) lower centered inside the frame rails.

View attachment 108644

I'm pretty happy with the new setup, but I'm not too into the De-Stacto clamp. I've ordered something different for that (a push button release pin) so while I'm waiting for that to finish up the tire carrier, I thought I'd mock up my chuck box idea that is mouning on the inside of the carrier.

View attachment 108646

I have a few ideas going for this and spent a bit of time last night figuring all that needs to go into this thing. I want my whole camp kitchen setup in this one box, stove included. Not alot of space for all that, so I'm going to have to get creative.. Here's a shot all closed up. A bit tight, may have to reduce the depth and inch or so to give the ARB more room to breath..

View attachment 108647

You can also see how the closure end of the swing away tire carrier is mounted in the above shot. The next pic shows the top view of it all closed up. Pretty tight. I'll be building a removable rack/table setup that will slide in on top of the ARB to hold the backpacks and teddybears. That will limit on-trail access to the fridge, but that isn't the end of the world, shouldn't be in and out of fridges on the trail anyway. Will have to use a small icechest for that.

View attachment 108648

Next I'm hoping to get to mounting the seat that should be here any day. In the mean time, I'll keep tinkering with the chuck box.

Thanks for viewing.:beer:
 

Attachments

  • Rear_Tire_Open.jpg
    Rear_Tire_Open.jpg
    509.5 KB · Views: 5
  • ARB_Mounted.jpg
    ARB_Mounted.jpg
    457.5 KB · Views: 5
  • Chuck_Mock.jpg
    Chuck_Mock.jpg
    400.6 KB · Views: 3
  • Closed_Left.jpg
    Closed_Left.jpg
    409.7 KB · Views: 3
  • Closed_Top.jpg
    Closed_Top.jpg
    313.7 KB · Views: 4
Last edited:

InvisibleOne

OverANYlander
Before I update here I wanted to let the few of you that have already seen the first post, titled NEW MEMBER / NEW INTERESTS / NEW MODS / SAME TOYOTA that yes, I changed the name of my thread. Since I actuallly plan to document this years build, I thought I might give it a title more represetative of what will be found within.

Without further chatter lets get to the update.

I've gotten myself wrapped up in quite a project. Since my last update no less than 30 hours have been sunken into this beast. I'm beat, and nowhere near where I need to be in one weeks time. This making room for the girls and lowering the center of gravity stuff has created a chain reaction of changes to the vehicle that I can't seem to stop. One decision impacts something else, then that solution impacts something else and so on. First it was make room for a rear seat so both girls can ride along. To do that I have to move the spare, the icechests, and the tools. All must be relocated, all in locations that contribute to the secondary goal of lowering the center of gravity. First, I moved the spare off the toolbox in the back to a swing away setup. In the position the tire is in and it's size, it actually adds some rollover protection to the back as long as it is super secure. I didn't think the DeStacto clamp that came with the EMS kit met the definition of 'super secure', so I used a push button pin I got from MSC Industrial to through pin the crossbar that is the foundation of the mount.

http://www1.mscdirect.com/cgi/NNSRI...re=ItemDetail-_-ResultListing-_-SearchResults

Pin.jpg

Not cheap. $70 with shipping. Ouch. I looked long and hard at that DeStacto clamp but just didn't see it holding a 36" tire secure enough for me to sign off on it.

Heres a shot of it in place. Works pretty good, could still be better. Need some hard rubber for the bottom of the "C" mount. I imagine I'll tweek on it more but for now I'm moving on. Too much more to get too before the Jamboree...

Pin_In.jpg

I feel pretty good about the holding power of the pin through that heavy steel. Still have to beef up the tire mount inself to insure it will carry the weight of the spare under all conditions, but I'll get to that this week..

I posted earlier about a chuck box idea I had for the back of that swing away tire carrier and I've made a discovery. It won't work there. I simply can't make it big enough to hold all my kitchen essentials. Period. Might be perfect for a expeditionary watering hole though... So I gave up on that for the time being and started on the tool tray.

There is a nice space under the bed that equates to about 2.5 cubic feet. Its 30" X 18" X 8". Its right next to the fuel tank, between the frame rails, under the bed. Low weight. Only problem is that it's on top of the muffler.

P1010455.jpg

I see this as a perfect spot for tools and recovery gear. Easy outside the rig access, good weight to have down low my kit is at least 150 pounds, and tools can handle some heat. So I got to work. I started with something I already had, this ATV cargo carrier from our favorite importers of disposable tools, Harbor Freight...

http://www.harborfreight.com/150-lb-capacity-atv-cargo-carrier-67623.html

ATV_Cargo.jpg

When I saw this thing I thought....:Wow1: I can butcher that right up. Actually I bought it last year thinking I'd make a different rack out of it, but it's going to work great for this. At least I think it will. Its super lightweight steel. Like .055 wall. your typical Harbor Freight Chinese junk but I'm reinforcing it a bit to be sure it holds. I started by laying it out on my welding table..

P1010451.jpg

I marked out equal amounts from each side to section the two halves, then cut them with the Porta-band.

P1010461.jpg

Then I cut some short sections of small 1/2"X1/2" box tubing to slide inside the almost 3/4" x almost 3/4" Chinese imitation steel the Cargo carrier was made out of and welded them in one side first.

P1010463.jpg

You may notice the holes drilled in the cargo carrier bars. Those are only in the cargo carrier tubing, not the insert tubes. By drilling holes in the tubing and not the inner tubes, I create an extra weld point for a little more strength. That thin-*** metal is super hard weld, especially since I suck at welding. Its been a while, and it always takes me a good couple sessions to get dialed in again. Good thing I'm pretty good at grinding.

P1010464.jpg

Once I had it all welded up (and ground back down :smilies27 ), I clamped it into location to see how it all fit. I didn't get the best photo of that at the time, but you can see the toolboxes under the bed in this photo..

Rear_Tire_Closed.jpg

This shot shows the toolboxes and recovery gear that I intend to carry here. You'll also notice in this pic that I have a battery box in the tray as well. This is where I decided to mount the auxilliary battery for the fridge and lighting.

P1010500.jpg

I love the idea of having another 70 to 100 pounds under the bed, low weight again. But this spot is going to get hot, it's 2" above the muffler. Batteries don't like heat. Hear that? Yep, that there's a time vacuum that just ate another weekend day. I decided that the battery under the bed was worth shielding the heat and got to fabbing up a series of heat shields to protect the contents of the tool tray, primarily the battery that is going to cost a small fortune.
 
Last edited:

Treenail

Adventurer
I like scavenging and repurposing!

You wrote:

"That thin-*** metal is super hard weld, especially since I suck at welding....Good thing I'm pretty good at grinding."

You have good balance in your life after all!

Have fun :)

Tom
 

InvisibleOne

OverANYlander
It's Heatshield Sunday!

I started the heat shield project with a couple quick sketches faxed off to local fab shops that could fold me up what I was looking for out of some thin aluminum. The low bid near $400, the high bid over. Just a little too rich for a heat shield so I got to building them myself out of some aluminum sheet I realized I had 'in-stock'.

As luck would have it, I have some aluminum in the form of a retail display that I got from work a few years back. One hour of dissection and I had some 1/8 aluminum sheet to work with. Reduce - recycle - reuse. Who cares what it looks like. Its a tool tray for crying out load. Under the bed no less.

Note to self. When cutting aluminum on a table saw one is well advised to wear long heavy sleeves and a full face mask to prevent one from suffering the death of one million tiny cuts. Remembering this wisdom mid cut is just a tad to late. The jig saw is far kinder although not as fast or accurate. Decide for yourself, but consider yourself warned, the tablesaw is scary painful cutting aluminum.

I expect that muffler climbs above 200 degrees, so one shield won't be enough to protect that battery. I made templates out of cardboard first and figured how I wanted to go about creating layers of heat isolation. The first shield would be suspended below the tool tray/rack and above the muffler. I decided to allow a minimum of two inches clearance between the rack and the muffler, which made the battery space tight to the floor of the bed, but I figured two inches of seperation to be the minimum. I then divided that space in half with the first shield, 1" below the tray and 1" above the muffler. That shield would be suspended from the bottom of the rack by 5/8" OD aluminum tubing cut 3/4" long to create heat isolaters if you will. My thinking is that this will require the muffler to first heat the shield and conduct that energy up through the aluminum spacers before it can heat the the second shield mounted to the bottom of the frame of the rack. That's the theory anyway, as of yet untested. Heres a shot of the spacers and the countersunk bolts I used. I didn't use the washers or these nuts..

P1010497.jpg

In order to minimize the heat conducted from the first shield to the second, I opted not to through bolt the first shield to the frame. I figure those bolts will get hot and fast track heat to the frame. Instead I welded shouldered nuts to the underside of the rack/tray. I started by setting the heat shield in position where it would hang under the rack on the rack itself and clamped them together. Then I layed out my eight bolts and drilled the holes through the aluminum and only one side (the bottom) of the racks tubing in one drilling.

P1010486.jpg

Then I unclamped the two parts and threaded the bolts into the shouldered nuts about half way and placed them in the holes in the rack.

P1010488.jpg

Then welded those shouldered nuts to the frame. I discovered to be sure to spin the bolts a little while I'm welding to make sure they don't get welded in. I had to cut one off.

P1010494.jpg

Then I took a step bit and drilled out one end of the aluminum tube spacers so they would fit snug over the bolt head welded to the frame of the rack.

P1010498.jpg

Next I countersunk the heads of the bolts into the aluminum that will act as the first heat shield and bolted the whole lot together.

P1010499.jpg

So that finished up the first layer of heat defense, but I don't think that will be enough. Just to be sure the contents of the tool tray, primarily that golden battery that will ride there, stay unmelted I cut out another shield to fit inside the tool tray itself. This one has sides and almost closes up the tray, no pis on that yet but I may get something up soon.

Thanks for viewing! Your comments and suggestions are welcome. Any ideas to increase the insulation from the muffler?
 
Last edited:

InvisibleOne

OverANYlander
Boxes, a bbq, and BILLET !

Got a little tired of the tool tray, it's almost done, but man am I sick of grinding. I've been going to bed with the taste of metal in my mouth. Sick of that, glad I'm not a welder by trade. You'd think by now my welding skills would be picking up but no. So I'm a grind happy fool. Loving the Metabo grinder with the flapper wheel, so much better than the abrasive disk. So much better..

DSC00059.JPG

So being sick of grinding, I switched up to apply my daily occupation, woodworking, to this build to create some sort of storage solution that would utilize the space formerly held by the ice chests. They couldn't be as wide as the ice chests as the girls seat will be between them and that seat is the reason the ice chests had to go, but that still left a nice little pocket where a box could fit. I was able to get a box 36" X 11" X 13" deep. I mocked one up tonight after work. They're going to work out great, they offer alot of storage space that I was wondering where I was going to get, for cooking stuff, camping gear, ect. I even got lucky and my small propane bottle fits perfect. Although, I'm not sure how I feel about propane in an enclosed box. Anybody got input on that issue? I know a lot of adventure trailers have compartments with the bottles in them, but I still think I'd feel better if it was in a vented enclosure..

DSC00064.JPG

When I got home there was a small package I had been waiting for so I also got my hi-lift jack relocated. Here's a shot of the whole evenings progress. Pretty happy with tonight. I even cleaned the shop up.

DSC00067.JPG

Above you can see the box with the jack below, and to the rear is a nifty spot that I found my small Weber BBQ would fit nice and tight. I'm thinking about fabbing up some sort of swing down bracketry to lower it down to a usable position, or maybe just cut the stamped steel step its bungied up under and use it for the lid and weld up a bracket to hold the bottom half where it sits. Jurys out on that one, probably just leave it bungied for now, getting short on time. If you look to the end of the hi-lift you'll see what came in the box I recieved today. This super trick billit aluminum knurled turn knob from Mortons Machine Works. They've got tons of cool turn knobs, I had a hard time choosing one.

DSC00065.JPG

It was really inexpensive, like $12 bucks. That's a whole lot of machine work for $12. They have a $25 minimum so I got a few other little bits for stuff I'll post up as they get built. Here's a link, they make all kind of killer knobs.

http://workholdingcomponents.mortonmachine.com/category/metal-handknobs

Thats it for tonight, tomorrow I hope to get the matching box made for the other side, and possibly finish up the tool tray and install the floor back in the bed. I stood back and took a 'as it sits shot' so here's that one..

DSC00069.JPG

It's starting to shape up. Got a long way to go though...

Thanks for viewing.
 

InvisibleOne

OverANYlander
My you are a Foxy little Wing of an awning aren't you?

Wow, 1000 views and nobody has anything to say. You Toyota driving Expeditionaries are a tough bunch. Oh well, at least you guys don't muck up the thread talking a bunch of crap like some other forums I've lurked. This is really more for my own build documentation anyway. So, on with it then..

Got the saddlebox built for the passenger side last night and epoxy sealed the both of them today after work. Last night I spent some time figuring what was going in them and where. Driver side will definitely be the chuck box with the kitchen supplies as well as house the electrical components like the battery monitor, solar voltage regulator, and the inverter. The main bar of the cage creates a nice little space where all of those will fit inside the box out of the elements. You can see that spot in the pic looking into the box in the last update. I meant to do some wiring tonight, but everything came to a halt when the Foxwing arrived.

Had to get that mounted. Straight up awesome. Worth every penny. Well we'll see but so far I'm stoked on it.

Foxwing.JPG

My house mate Karl, another Toyota lover, is starting to come out and get real interested in whats going on in the shop. He's starting to talk about wanting to do this and that to his truck. I tell him to get to eBaying some of his very extensive toy collection (Just like the 40 year old virgin, not kidding) to put that money toward ordering some parts and we'll do it up. In the mean time I'm happy to have his help, I really needed it tonight mounting the awning, holding it in position on the cage was no easy feat as the tubes are all irregular angles up top. While we were pondering different mounting options, I started looking at the mounting accessories it came with for mounting to Thule and Yakima racks and said, "Man I wish I had an old Thule rack I could cut up." Karl goes rummaging through his garage and comes out with one.

DSC00074.JPG

I'm always amazed at the request he can fill out of that little garage of his. It's like he has a magic lamp in there or something.
 
Last edited:

Forum statistics

Threads
186,165
Messages
2,882,766
Members
225,984
Latest member
taunger
Top