Jsweezy's F150 Homebuilt Flatbed Truck Camper

Jsweezy

Explorer
Alright y'all. As much as I wasn't sure if I wanted to start this thread, I figured its always good to have for when everything is finished for the new owner... LOL, jk...sorta...you know how we are.

But seriously, I love seeing what others are doing/ have done to get inspiration from or just to feel like I have someone else going through the same headaches as myself.

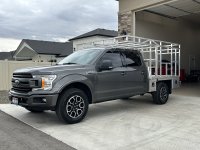
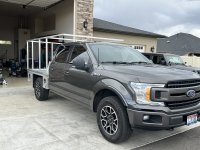
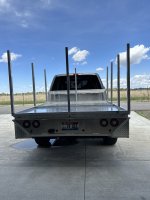
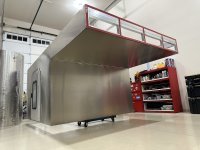
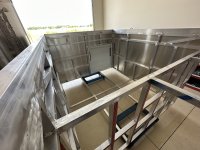
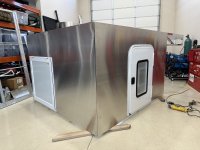
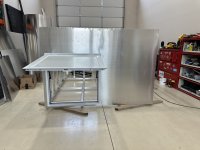
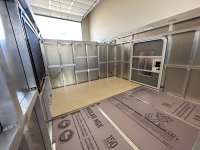
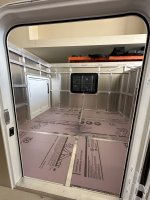
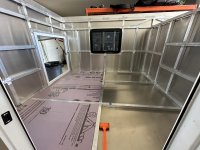
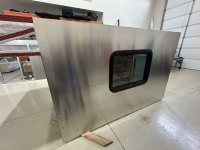
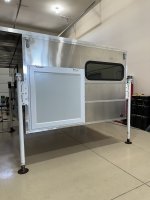
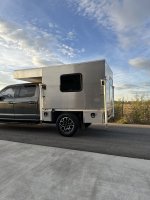
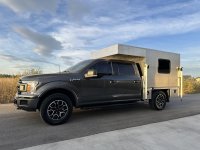
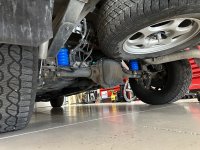
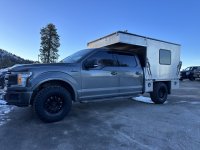
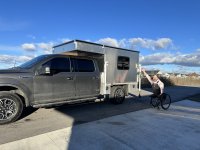
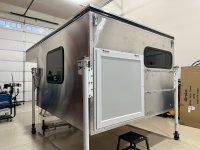
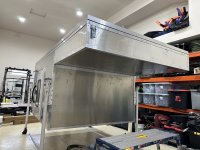
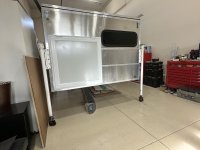
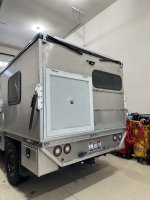
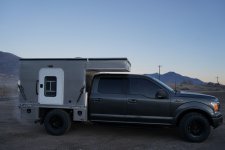
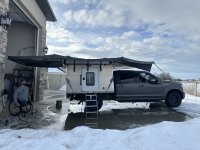
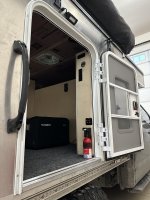
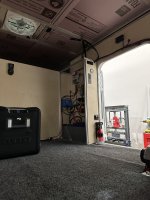
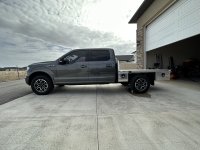
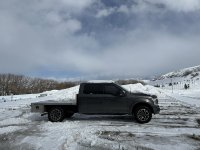
A year ish ago I decided I wanted something capable enough to be able to go through snow confidently, as I frequently enjoy going nordic skiing, that I could use on the weekends as a ski bum as well as in the summer with the family. I'll let the pictures do the talking. Oh and I chose the F150 platform because I love the IFS and eco boost engine and am not trying to haul my whole house when I go out.

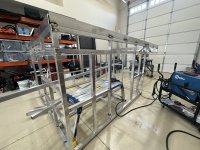
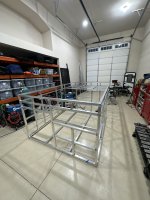
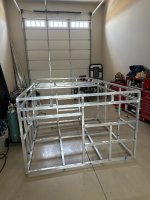
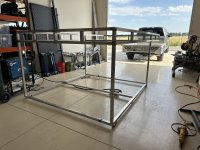
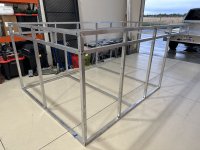
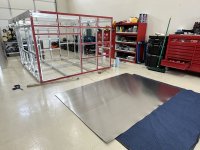
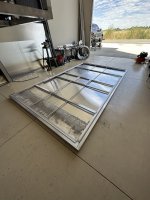
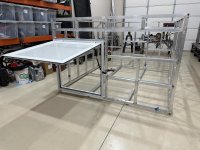
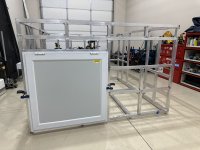
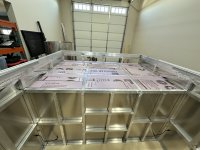
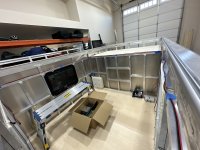
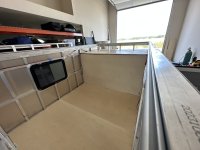
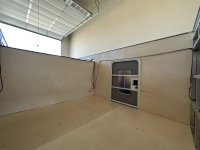
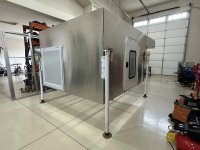
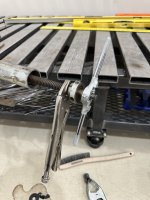
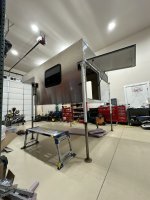
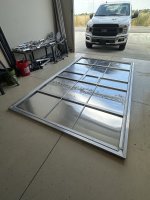
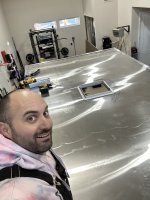
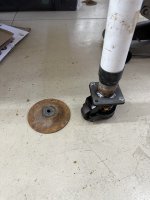
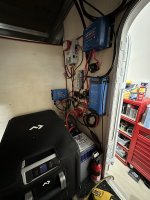
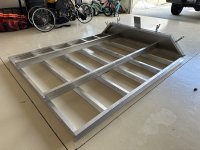
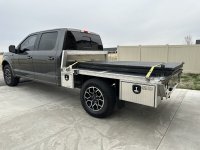
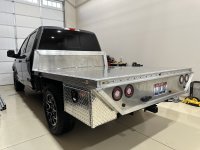
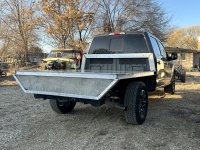
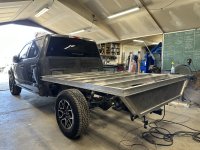
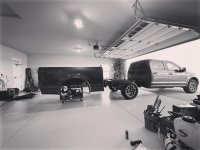
Lets start with the flatbed....
 

Attachments

  • IMG_0446.jpeg
    IMG_0446.jpeg
    2.6 MB · Views: 50
  • IMG_1358.jpeg
    IMG_1358.jpeg
    2.5 MB · Views: 47
  • IMG_1274.jpeg
    IMG_1274.jpeg
    2.6 MB · Views: 45
  • IMG_0873.jpeg
    IMG_0873.jpeg
    2.4 MB · Views: 46
  • 69906719050__0BAA5C77-5004-41F1-9392-8C7A92B879A3.jpeg
    69906719050__0BAA5C77-5004-41F1-9392-8C7A92B879A3.jpeg
    2.8 MB · Views: 46
  • IMG_0678.jpeg
    IMG_0678.jpeg
    2.5 MB · Views: 44
  • IMG_0642.jpeg
    IMG_0642.jpeg
    4.4 MB · Views: 43
  • IMG_0638.jpeg
    IMG_0638.jpeg
    3.2 MB · Views: 40
  • ED7D505C-DADD-420B-91F3-4F43A8E207C3.jpeg
    ED7D505C-DADD-420B-91F3-4F43A8E207C3.jpeg
    269.8 KB · Views: 45

Jsweezy

Explorer
Once the flatbed was done, I had to decide how to go about doing the pop top camper and whether or not I wanted to have it hang over the cab and if I did, how much. I just went ahead and measured to the seam in between the doors and started the framing...

Mistakes were made, cutting out and rewelding at a couple points but thankfully I have a spool gun and a grinder with a cutting wheel. Looking back I would have planned it a little better to make things a little more symmetrical or doing like 4wc does and stacking some lighter tubing instead of throwing the thicker 3x1.5" on the top. Thankfully that weight hit is minimal and the structural integrity to be able to mount an awning to helps me justify my oversight.
 

Attachments

  • IMG_2782.jpeg
    IMG_2782.jpeg
    2.6 MB · Views: 45
  • IMG_2742.jpeg
    IMG_2742.jpeg
    2.2 MB · Views: 42
  • 71402085714__4EE60C8B-FD30-421E-8073-F0250B5FCC82.jpeg
    71402085714__4EE60C8B-FD30-421E-8073-F0250B5FCC82.jpeg
    1.8 MB · Views: 41
  • 71399895241__65BDC7F7-459A-44E0-A03E-786CDB96A77C.jpeg
    71399895241__65BDC7F7-459A-44E0-A03E-786CDB96A77C.jpeg
    1.8 MB · Views: 42
  • 71061294767__0CB6115F-5297-4347-800C-45182644F667.jpeg
    71061294767__0CB6115F-5297-4347-800C-45182644F667.jpeg
    2.2 MB · Views: 42
  • IMG_2164.jpeg
    IMG_2164.jpeg
    3 MB · Views: 43
  • IMG_1506.jpeg
    IMG_1506.jpeg
    3.2 MB · Views: 40
  • IMG_1503.jpeg
    IMG_1503.jpeg
    2.4 MB · Views: 38
  • 70526508360__D50C5BA7-9A5D-488B-8FB1-76008F22D658.jpeg
    70526508360__D50C5BA7-9A5D-488B-8FB1-76008F22D658.jpeg
    1.6 MB · Views: 38
  • IMG_1505.jpeg
    IMG_1505.jpeg
    3.2 MB · Views: 44

Jsweezy

Explorer
Once the basic framing was done, I decided to get to work on the interior, while trying to figure out how I wanted to tackle the roof. I also had to choose materials and decide the best route for enclosing everything. While I was sure I wanted to stick with aluminum for the siding, I had considered some of the other options but ultimately went with thicker wall .065 aluminum. Looking back I could have chose thinner with the insulation I was putting on the inside, but I have kids and am clumsy and didnt want to worry about hitting it and tearing a hole in the side.

I really wanted the roof to be one solid piece of aluminum and got lucky that I found a local trucker supply place with a "roof sheet" in a roll that was dirty as hell and they sold me for too much money. I found the door off Ebay, it just happened to be the perfect size and came with a screen and all the fixins. Oh and the food service door on the back is the "garage door" that I use for loading and unloading ski equipment and hand cycles, etc.

Most of it was assembled with vhb tape as I knew I would be going around and riveting around the edges with the trim. I also liked thinking there would be something between most of the layers keeping water from coming into the camper as I drive in snowstorms.
 

Attachments

  • IMG_2879.jpeg
    IMG_2879.jpeg
    2.7 MB · Views: 35
  • IMG_2875.jpeg
    IMG_2875.jpeg
    2.5 MB · Views: 32
  • IMG_2852.jpeg
    IMG_2852.jpeg
    2.6 MB · Views: 33
  • IMG_2838.jpeg
    IMG_2838.jpeg
    2.5 MB · Views: 32
  • IMG_2834.jpeg
    IMG_2834.jpeg
    2.1 MB · Views: 29
  • IMG_2832.jpeg
    IMG_2832.jpeg
    1.9 MB · Views: 33
  • IMG_2820.jpeg
    IMG_2820.jpeg
    1.6 MB · Views: 31
  • IMG_2771.jpeg
    IMG_2771.jpeg
    3.3 MB · Views: 32
  • 71436523910__AA1DAC5D-8F5D-49D5-8E1B-4B44888EE236.jpeg
    71436523910__AA1DAC5D-8F5D-49D5-8E1B-4B44888EE236.jpeg
    2.7 MB · Views: 33
  • IMG_2903.jpeg
    6.4 MB · Views: 11
Last edited:

Jsweezy

Explorer
Next up was getting the insulation, flooring and walls on. This was challenging without the use of floor jacks at this point but I got lucky and found a set of electric jacks for cheap that clearly needed work but the price justified going and grabbing them to mount onto the camper.

I was also not sure how I wanted to attach the canvas but knew I wanted something clean and easy, enter keder track/rail. I used 1/4" baltic birch on the floor and bed area along with adhesive to make my own "sandwich" and 1/8" baltic birch on the walls to keep things light and easy to replace. I have kids and am in a wheelchair that gets thrown around so I didnt want to worry too much on aesthetics and then be dissapointed when I throw a handcycle into the wall on accident while loading it.
 

Attachments

  • IMG_2992.jpeg
    IMG_2992.jpeg
    2.4 MB · Views: 23
  • 71617386837__92CEED42-D90F-4640-88E8-94AC9BB999D7.jpeg
    71617386837__92CEED42-D90F-4640-88E8-94AC9BB999D7.jpeg
    2.8 MB · Views: 22
  • 71623375521__F6ADFEBD-62FA-46EB-84C8-42E68E064150.jpeg
    71623375521__F6ADFEBD-62FA-46EB-84C8-42E68E064150.jpeg
    2.4 MB · Views: 22
  • IMG_3033.jpeg
    IMG_3033.jpeg
    2 MB · Views: 25
  • IMG_2937.jpeg
    IMG_2937.jpeg
    2.5 MB · Views: 24
  • IMG_2927.jpeg
    IMG_2927.jpeg
    1.5 MB · Views: 22
  • IMG_2925.jpeg
    IMG_2925.jpeg
    2.1 MB · Views: 25
  • IMG_2907.jpeg
    IMG_2907.jpeg
    1.8 MB · Views: 25
  • IMG_2903.jpeg
    6.4 MB · Views: 7
  • IMG_2901.jpeg
    IMG_2901.jpeg
    1.7 MB · Views: 26

Jsweezy

Explorer
Once I finished the roof, I threw it on, added a seal along the lower lip, put a handle by the door that needed a 3d printed spacer to sit flush with nutserts in the wall, spent an entire day fixing one of the jacks I accidentally lowered too much and locked up, threw it on the truck so I could see what it looked like and finally began to add some trim. Once this was done, life got in the way and I took a much needed break.
 

Attachments

  • IMG_3257.jpeg
    IMG_3257.jpeg
    1 MB · Views: 23
  • IMG_3286.jpeg
    IMG_3286.jpeg
    1.9 MB · Views: 20
  • IMG_3292.jpeg
    IMG_3292.jpeg
    1.6 MB · Views: 20
  • IMG_3294.jpeg
    IMG_3294.jpeg
    1.7 MB · Views: 23
  • IMG_3211.jpeg
    IMG_3211.jpeg
    1.7 MB · Views: 27
  • IMG_3210.jpeg
    IMG_3210.jpeg
    2.4 MB · Views: 27
  • IMG_3206.jpeg
    IMG_3206.jpeg
    1.8 MB · Views: 25
  • IMG_3201.jpeg
    IMG_3201.jpeg
    1.8 MB · Views: 19
  • IMG_3200.jpeg
    IMG_3200.jpeg
    1.8 MB · Views: 23
  • IMG_3106.jpeg
    IMG_3106.jpeg
    1.7 MB · Views: 21

DirtWhiskey

Western Dirt Rat
Wow. Your fab skills are amazing, with the added complexity that you're in a wheelchair! Following along. Love how you just decided to go with it and get rocking! 👊
 

Jsweezy

Explorer
Wow. Your fab skills are amazing, with the added complexity that you're in a wheelchair! Following along. Love how you just decided to go with it and get rocking! 👊
Thanks! I still have a lot to learn but have had some amazing mentors that basically have told me to just go for it and fix whatever I break as thats the best way to learn. With everything ive done so far there always seems to be things I run into that need to be adjusted or I wasn't expecting, even if I planned it out correctly. So as of late I just try to do my best and let her rip.
 

Jsweezy

Explorer
So after my hiatus from the camper as I was feeling overwhelmed with the build process and figuring out the unknown. Amazingly, even though there are alot of different options to choose from in the world of pop top campers, I found there's only so many ways to do it and depending on how much you want to spend, dictates how you do it.

I also realized (like mentioned before by a special forum member) that I only had so much space in the garage and had some other projects to do, so while this massive paperweight was not fully in the way, I added rolling wheels to the legs so I can move it. This also came in handy when putting it on the truck so I dont have to backup and get it lined up exactly, I can just get it in the ballpark and then move this around and adjust as need be,

Then I got to work on more of the trim, adding latches to the roof and a garage seal around the top, and while in the process decided I would take the truck to Utah for a ski trip that would require a warm space from time to time. I also added some new black method wheels wrapped in BFG Ko2s like a basic overlanding instagramer cause ive always wanted them. Oh and finished up the electrical which eventually turned into a full Victron system because the redarc BCDC 1225d didnt appreciate the freezing temps and wouldn't charge despite having heated batteries (no wire to communicate that with the redarc charger). Something else I did was throw on some sumo spring bump stops in anticipation of the rear sagging due to the vehicle weight. They helped a ton and while I still want to get a custom leaf pack, these are doing an amazing job of making the truck feel like it always does when unloaded.

Last was figuring out how to attach the camper to the flatbed. While I initially wanted to use the cutouts in the flatbed and mirror those supports onto the camper and use a 1/2" bolt, it wasn't gonna happen. I also wasn't sure if it would be the smartest to do with no way for the camper to flex separate from the flatbed. So I searched and found some fastguns in the area and made mounts that attached to the camper jack mounts and the L track on the side of the flatbed. This turned out to be solid and makes it easy to remove as well.
 

Attachments

  • IMG_4046.jpeg
    IMG_4046.jpeg
    1.1 MB · Views: 22
  • IMG_4057.jpeg
    IMG_4057.jpeg
    2.5 MB · Views: 25
  • IMG_4060.jpeg
    IMG_4060.jpeg
    2.4 MB · Views: 20
  • IMG_4134.jpeg
    IMG_4134.jpeg
    2.7 MB · Views: 21
  • IMG_4042.jpeg
    IMG_4042.jpeg
    2.7 MB · Views: 22
  • IMG_4023.jpeg
    IMG_4023.jpeg
    2.6 MB · Views: 23
  • IMG_4022.jpeg
    IMG_4022.jpeg
    2.9 MB · Views: 20
  • IMG_4021.jpeg
    IMG_4021.jpeg
    2.6 MB · Views: 18
  • IMG_3715.jpeg
    IMG_3715.jpeg
    2.3 MB · Views: 18
  • IMG_3713.jpeg
    IMG_3713.jpeg
    2 MB · Views: 21

Jsweezy

Explorer
Aaaaand to finally get y'all up to date... I attached the struts to the front and back using lift struts depot 44" 40lb struts, drilled a hole and mounted the heater putting the fuel tank and toilet next to it (these will all be covered by a bench). This is going to be a minimalist build with only the necessities being mounted in the camper in order to retain an open concept that allows for it to be what I call a "Glorified Camper Shell".
 

Attachments

  • IMG_4214.jpeg
    IMG_4214.jpeg
    605.2 KB · Views: 16
  • IMG_4216.jpeg
    IMG_4216.jpeg
    1.8 MB · Views: 17
  • IMG_4211.jpeg
    IMG_4211.jpeg
    1.9 MB · Views: 17
  • DSC00640.jpeg
    DSC00640.jpeg
    285.9 KB · Views: 18
  • IMG_4201.jpeg
    IMG_4201.jpeg
    1.2 MB · Views: 14

Jsweezy

Explorer
Here's why things take so long/ cost as much as they do when it comes to these campers and why you find them almost finished and for sale...

So I started today telling myself I was going to work on the bench seat and the cover for the electrical... then I walked past my awning ive been trying to figure out how to mount and that was that...

IMG_4280.jpeg

I started by deciding to take the ovs nomadic 270 awning brackets that I got with the awning and bending them so that I could mount them to the camper wall, then I realized I couldn't fully bend it as close as I wanted because of clearance issues with my press brake... then I got It done thanks to some custom spacers (cut steel down to fit inside to drop the tooth) and realized I bent my press brake...

IMG_4284.jpegIMG_4281.jpeg

So I had to bend my press brake back to flat....

IMG_4282.jpeg


Then I was able to finish bending my brackets and after 9 holes, 9 riv nuts and some vhb tape I was able to mount my awning... yay!

IMG_4283.jpeg
IMG_4285.jpeg
 

Jsweezy

Explorer
Got some more work done this weekend on the interior and opened up the awning for the first time, holy moly its huge!
 

Attachments

  • IMG_4318.jpeg
    IMG_4318.jpeg
    2.5 MB · Views: 24
  • IMG_4297.jpeg
    IMG_4297.jpeg
    1.6 MB · Views: 23
  • IMG_4298.jpeg
    IMG_4298.jpeg
    1.7 MB · Views: 23

Forum statistics

Threads
185,888
Messages
2,879,477
Members
225,497
Latest member
WonaWarrior
Top