MBT Willy's Trailer Build Continues!

xaqori

New member
I'd say make it pivot forward. More stable, regardless of the stabilizers. It would only interfere with the vehicle's antenna's transmission when deployed...and even then, the interference would be near negligible. But how do you plan on stabilizing the tent when it is up? I think just sitting on the supports would not be ideally stable.
- Zac
 

slimtwo

Adventurer
I'd say make it pivot forward. More stable, regardless of the stabilizers. It would only interfere with the vehicle's antenna's transmission when deployed...and even then, the interference would be near negligible. But how do you plan on stabilizing the tent when it is up? I think just sitting on the supports would not be ideally stable.
- Zac

I'm not sure I understand your comment, but if you are talking about the trailer moving even with the legs in place, it will probably move a little, but it will be allot less than if I were just on the suspension only. The idea is just to minimize the movement.
 

slimtwo

Adventurer
Talking more about the tent itself when it is raised. What will stabilize it when it is pivoted "up"?

Oh I got ya, I'll make a brace that will lock the pivot bar into place in the up position. I haven't worked it all out yet, but I'll come up with something. I will want it locked in the down position as well, so I'm hoping the brace will serve both purposes.
 

xaqori

New member
All right. I was thinking of something more along the lines of a tailgate latch to lock it down, but I can't think of any simple yet effective way to lock it up
 

slimtwo

Adventurer
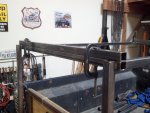
I've been working in the yard these past few days trying to take care of tree root problems, and decided I needed a diversion. So I spent the day at my friends shop working on the trailer. In order to make sure all four sides were the same length and all, I started by leveling the trailer, once I had that done I created a story pole to set up my max closed height (my garage door is only 79" high, so I have to be under that). Next I figured out where the uprights would be mounted and measured from there to my max height which ended up being 63.5". So I subtracted the height of the tent (in stowed configuration) and came up with 37.5 (for the rear). that being done, I clamped it in place, leveled it, then measured the total height from the floor (63.5") then tack welded it in place. Once that was done, I did the same for the other side. The front was done the same, except the length on the supports was a little shorter, however, the overall height was the same as the rear.

Tent supports 012.jpg

Once all four posts were in place and tack welded, I inserted the stabilizing legs, which look like they will work well for keeping the tent stable.

Tent supports 015.jpg
Tent supports 016.jpg

The next thing I need to work out is the tent lift mechanism. I have been working on some drawings, but I haven't finalized anything yet.

This is one of my ideas. Once the tent is in the upright position, I will use braces attached to the lower frame to secure it.

Untitled.jpg

As I mentioned before, I want to be able to walk under the tent when it is deployed, which means that the tent lift mechanism will need to lift the tent at least 18". I'll keep working on it.

Happy trails!
 

slimtwo

Adventurer
My "Anti-luce” latches came in the mail today for my tailgate. They are more heavy duty than the pictures let on, so they ought to wear well. I will post pictures as soon as I get them mounted.

Happy trails!
 

slimtwo

Adventurer
I finally picked up the steel for the tent support frames to day, and I went to Harbor Freight and bought a hand winch to raise and lower the tent. I hope to be able to go by the shop tomorrow and get the first frame pieces cut out. I still have to get the sleeves that will be welded in the frames and support legs, but I will do that tomorrow on my way to the shop.
 

slimtwo

Adventurer
I went down to the steel supplier and bought some DDO Chrome Molly tubing 3/4" OD by 1/2" ID, and 4' long, this is for the bushings for the hinge points. Once I got to the shop and got set up, I measured Rick’s tent frame for the width and cut the front and back cross pieces. Once I tack welded them in place I measured and cut the side pieces. Once these were fitted into place, I had to figure out where the bushings would be located; that done, I cut the holes. I cut 16 bushings at 1 3/4" which had to be ground down so they were all the same size (took an hour and a half). I welded in the bushings and tack welded the side pieces in place.

Tent supports 002.jpg
Tent supports 004.jpg
Tent supports 003.jpg

Next time I’ll cut the pieces for the second frame and the support arms. I figure I will cut the holes and weld in the bushing for the arms first, then lay out the second frame on top of the first, that way I can mark the bushing locations on the frame and weld them in place. I’m thinking I might have to cut the corners off of the upper part of the arms to clear the tent, but I’ll have to wait until I get the arms mounted; more tomorrow (or the next day).

Happy trails!
 

slimtwo

Adventurer
Today I worked on the support legs. Got all of the pieces cut out and sized, then I cut the holes for the bushings and welded them in. for the next step, I only had time to cut the front and rear pieces for the upper frame today, so I will continue to work on it tomorrow. I'm anxious to get it to the point of being fully assembled, I’m curious to see if it will work like I am picturing it. I may have to get more material; I don’t think I have enough for the winch point assembly to lift the tent.

Tent supports 001.jpg
Tent supports 002.jpg
Tent supports 003.jpg

The other issue is that it may work great with out the tent weight, but it might bind with the tent mounted on it? Will see, Bobby (CVT) contacted me to tell me that my tent should be on the next container, which means that I should see it in one (1) to two (2) weeks.
 

slimtwo

Adventurer
Today I got the upper frame pieces cut out, the bushing holes cut in the side frames, and the bushings welded in place. I trial fit everything, and with a few minor adjustments it all seems to work the way I had planned it. Next I tack welded the frame together and installed the support arms. After it was all tacked up, I lifted the front of the frame and pulled forward, it came up with less effort than I would have thought, however, I am very happy that it does. Once the tent is mounted, it will of course take allot more effort, but then that is why I bought the winch.

Tent supports 001.jpg
Tent supports 002.jpg
Tent supports 003.jpg
Tent supports 004.jpg
Tent supports 005.jpg
Tent supports 006.jpg

Next phase is the winch and docking frame. That will take a little more thinking. More later.

Happy trails!
 

slimtwo

Adventurer
Today I worked on the pulley's that will be part of the lifting mechanism for the tent. I still have to build the winch frame and dock platform, but I pretty much know what I want to do, I just have to build it.

Tent Lift Pulleys 001.jpg
Tent Lift Pulleys 002.jpg
Tent Lift Pulleys 003.jpg

More to do, later.

Happy trails!
 

slimtwo

Adventurer
Got the winch frame and docking struts tack welded together, and fabricated the winch mounting plate and got it tack welded in place. I ran out of time to actually test it out, but I will be getting an early start tomorrow. The pulleys are tacked in place, and it looks like it will work as expected.

Tent Lift Pulleys 001.jpg
Tent Lift Pulleys 002.jpg
Tent Lift Pulleys 003.jpg
Tent Lift Pulleys 004.jpg
Tent Lift Pulleys 005.jpg
Tent Lift Pulleys 006.jpg
Tent Lift Pulleys 007.jpg
Tent Lift Pulleys 008.jpg

More tomorrow.

Happy trails!
 

slimtwo

Adventurer
Got the tent lift platform done, and I have received my tent. The next thing I need to do is just clean up some welds and sand and primer the frame parts. then I can mount the tent. Here are some pictures of my progress to date.

Tent Lift Pulleys 001.jpg
004.jpg
005.jpg
007.jpg
008.jpg
006.jpg

Although I didn't take pictures, I mounted the "Anti-loose" latches for the tailgate, and I am in the process of welding on the skin for the TG. I will send more later.
 

Attachments

  • Tent supports 001.jpg
    Tent supports 001.jpg
    526.9 KB · Views: 23

slimtwo

Adventurer
Finished the tail gate and the latches today ( except for paint). The "anti-luce" latches are going to work out fine;

TG Lose Latches 001.jpg
TG Lose Latches 002.jpg
TG Lose Latches 004.jpg

I also modified the handle for the tent lift winch. I have walked by it a couple of times and got tagged by it, so I made it so it will come off. That way I won't kill myself.

TG Lose Latches 005.jpgTG Lose Latches 006.jpg

Tomorrow I start the top for the trailer box, which will be my new camp kitchen and extra storage. I went out today and bought three sheets of marine grade plywood and screws and glue. So tomorrow I'm in carpentry mode. Time is short for this part of the build, we are going to Cerro Gordo (the salt trams) up near Lone Pine next week, so I have no extra time to spare.
 

Forum statistics

Threads
186,181
Messages
2,882,995
Members
225,984
Latest member
taunger
Top