off-roader
Expedition Leader
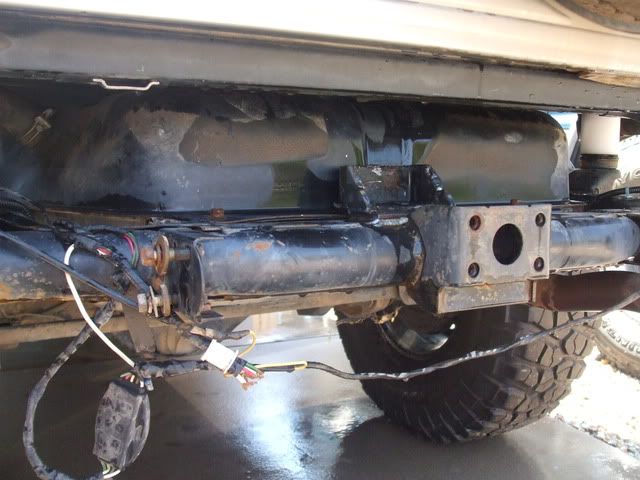
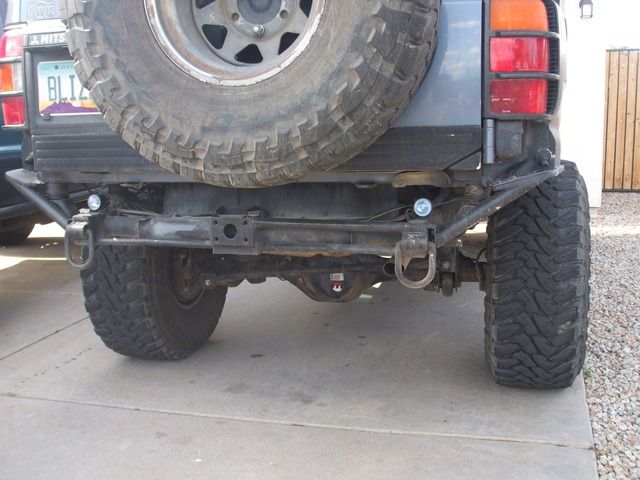
Before...

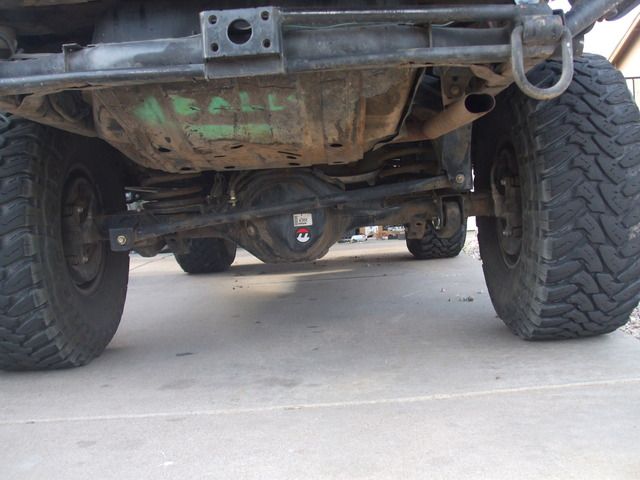
After...

It's a pretty simple process actually.
First and foremost, this mod raises the tank ~3" & can only be done if you have already done a 2" body lift or raised the floor of your cargo area.
Helpful Hint: There are plenty of varied small parts (nuts, bolts, etc.) that will be removed. I used my handy-dandy Hi-Lift base to hold the screws/nuts/bolts. It has a compartmentalized design that's perfect for this. It was especially convenient that I didn't need it for this mod.:kewl:
Remove the rear bumper: In my case I simply had to remove 4 bolts and my aftermarket bumper & it's adapter brackets were off.
Remove the gas tank: Hopefully it will be relatively empty since gas weighs ~6.25lbs/gall. If it isn't, either use a siphon to empty it into some jerry cans or unscrew the drain plug underneath to drain it.
I used my super siphon which I purchased from my local Bass Pro Shops. You can also find it at many dirt bike/boating/camping shops.
Disconnect both the filler & breather tube (next to the filler tube) This step is relatively simple.
In my case with a 2" body lift, and my rear bumper removed, it was pretty easy to simply reach in to unscrew the hose clamp on the tank end of the fuel filler tube and the breather tube. You can also access these hose clamps from underneath.
Disconnect the gas gauge sender & fuel pump: Raise the rear carpet to remove the access panel for the fuel pump in the rear floor. You'll need to remove the rear trim panel to raise the carpet. After removing the panel you'll have access to the fuel pump and fuel gauge sender unit. Remove the screws/nuts that attach the pump and sender to the gas tank. You will need to lower the tank to remove the pump so don't fear if you have difficulty accessing the nuts/screws. BE VERY CAREFUL YOU DONT LOOSE THEM!! If you do, you'll have to replace them or risk a fuel vapor leak which is far more dangerous than gas pouring out the bottom of your tank.
Drop the gas tank & remove it:Start by unbolting the front and rear bolts & lower the tank. We simply crawled underneath and supported it while our 'helper' (thanks Kirk & Russell) removed it out the back of your rig.
During this step, you also need to carefully remove the fuel pump and sender from the tank as it's lowered. Alternatively you can disconnect the fuel lines with the appropriate fitting wrenches but we didn't have those so we removed the pump from the tank as we dropped it. It seemed impossible to remove the pump while the tank was in place so we first unbolted the pump and removed it as we dropped the tank.
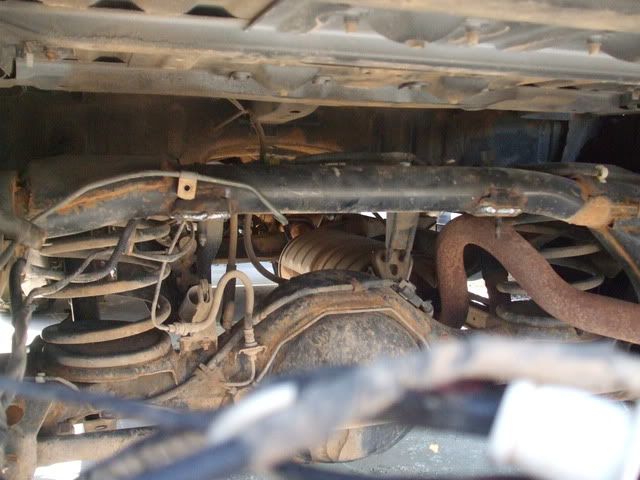
Modify the rig's tank mounts: Once the tank is out of the way, you'll need to modify the tanks mount points on the rig to raise them up.
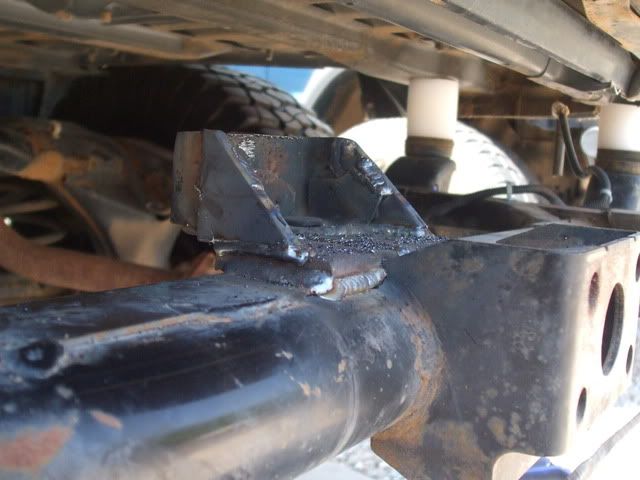
Front Mounts: In both cases, we carefully cut the front mounts (straight & level as possible) ~1" from top of the front of it.
On Russell's white 98(?) we shortened the bottom of the mount ~3-4" and welded it back in place.
On my gold 96 we instead opted to try a different technique. We of course cut down the front mounts like Russell's but instead of re-using a cut down bottom portion we welded on 2 pieces of 1/8" thick flat plate steel with a 5/16" dia galvanized bolt welded to it (galvanization first removed where it was welded) and welded this plate to the front mount. Note, be sure you check for any wires in and around the areas you're welding. On mine we accidentally melted the wiring loom for 3 wires on the left front tank mount. Luckily we didn't melt the actual wire insulation and I simply wrapped electrical tape around all 3 wires to temporarily protect them where we melted the loom. I'll be replacing it with new split loom.
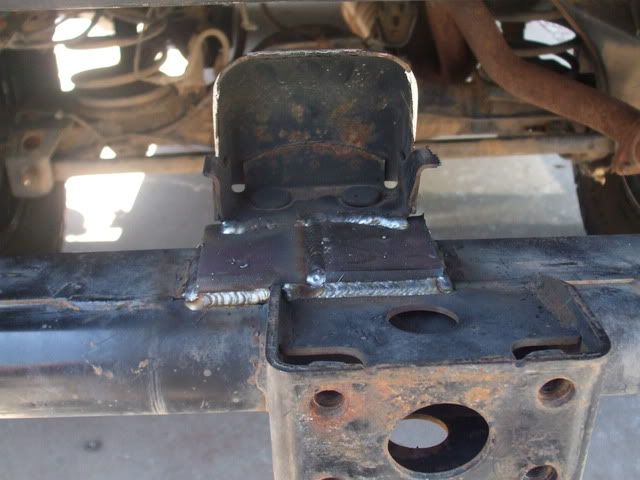
Rear Mounts: On the rear mounts we first cut out the original mounts & sanded the area smooth. We then put the tank back up (manually held in place) and marked the location of the mount holes on the rear most cross member.
We then used 1/8" thick 1" 'L' stock cut to 3" long pieces with 1/2" holes drilled in for the new rear mounts. We located them using the markings & welded them to the 'top' of the rear most frame cross member.
After the new primer & paint dried we simply re-installed everything in reverse order. Now, I kinda glossed over this last part. While a simple step, it was not an easy process due to the limited access especially of the fuel pump.
Oh, as for the after pic without the bumper, I'll have to do that later since it's too dark now to get a decent shot.
Pics from the install can be found at http://rides.webshots.com/album/578024022oLOdVJ
Note: With the 3 of us working on both rigs, it took from ~12:00noon until 1:00am to complete them. Yes, it was a heck of a process but absolutely worth it!!
After...
It's a pretty simple process actually.
First and foremost, this mod raises the tank ~3" & can only be done if you have already done a 2" body lift or raised the floor of your cargo area.
Helpful Hint: There are plenty of varied small parts (nuts, bolts, etc.) that will be removed. I used my handy-dandy Hi-Lift base to hold the screws/nuts/bolts. It has a compartmentalized design that's perfect for this. It was especially convenient that I didn't need it for this mod.:kewl:
Remove the rear bumper: In my case I simply had to remove 4 bolts and my aftermarket bumper & it's adapter brackets were off.
Remove the gas tank: Hopefully it will be relatively empty since gas weighs ~6.25lbs/gall. If it isn't, either use a siphon to empty it into some jerry cans or unscrew the drain plug underneath to drain it.
I used my super siphon which I purchased from my local Bass Pro Shops. You can also find it at many dirt bike/boating/camping shops.
Disconnect both the filler & breather tube (next to the filler tube) This step is relatively simple.
In my case with a 2" body lift, and my rear bumper removed, it was pretty easy to simply reach in to unscrew the hose clamp on the tank end of the fuel filler tube and the breather tube. You can also access these hose clamps from underneath.
Disconnect the gas gauge sender & fuel pump: Raise the rear carpet to remove the access panel for the fuel pump in the rear floor. You'll need to remove the rear trim panel to raise the carpet. After removing the panel you'll have access to the fuel pump and fuel gauge sender unit. Remove the screws/nuts that attach the pump and sender to the gas tank. You will need to lower the tank to remove the pump so don't fear if you have difficulty accessing the nuts/screws. BE VERY CAREFUL YOU DONT LOOSE THEM!! If you do, you'll have to replace them or risk a fuel vapor leak which is far more dangerous than gas pouring out the bottom of your tank.
Drop the gas tank & remove it:Start by unbolting the front and rear bolts & lower the tank. We simply crawled underneath and supported it while our 'helper' (thanks Kirk & Russell) removed it out the back of your rig.
During this step, you also need to carefully remove the fuel pump and sender from the tank as it's lowered. Alternatively you can disconnect the fuel lines with the appropriate fitting wrenches but we didn't have those so we removed the pump from the tank as we dropped it. It seemed impossible to remove the pump while the tank was in place so we first unbolted the pump and removed it as we dropped the tank.
Modify the rig's tank mounts: Once the tank is out of the way, you'll need to modify the tanks mount points on the rig to raise them up.
Front Mounts: In both cases, we carefully cut the front mounts (straight & level as possible) ~1" from top of the front of it.
On Russell's white 98(?) we shortened the bottom of the mount ~3-4" and welded it back in place.
On my gold 96 we instead opted to try a different technique. We of course cut down the front mounts like Russell's but instead of re-using a cut down bottom portion we welded on 2 pieces of 1/8" thick flat plate steel with a 5/16" dia galvanized bolt welded to it (galvanization first removed where it was welded) and welded this plate to the front mount. Note, be sure you check for any wires in and around the areas you're welding. On mine we accidentally melted the wiring loom for 3 wires on the left front tank mount. Luckily we didn't melt the actual wire insulation and I simply wrapped electrical tape around all 3 wires to temporarily protect them where we melted the loom. I'll be replacing it with new split loom.
Rear Mounts: On the rear mounts we first cut out the original mounts & sanded the area smooth. We then put the tank back up (manually held in place) and marked the location of the mount holes on the rear most cross member.
We then used 1/8" thick 1" 'L' stock cut to 3" long pieces with 1/2" holes drilled in for the new rear mounts. We located them using the markings & welded them to the 'top' of the rear most frame cross member.
After the new primer & paint dried we simply re-installed everything in reverse order. Now, I kinda glossed over this last part. While a simple step, it was not an easy process due to the limited access especially of the fuel pump.
Oh, as for the after pic without the bumper, I'll have to do that later since it's too dark now to get a decent shot.
Pics from the install can be found at http://rides.webshots.com/album/578024022oLOdVJ
Note: With the 3 of us working on both rigs, it took from ~12:00noon until 1:00am to complete them. Yes, it was a heck of a process but absolutely worth it!!