You are using an out of date browser. It may not display this or other websites correctly.
You should upgrade or use an alternative browser.
You should upgrade or use an alternative browser.
New Avalanche Bumper Build By Brute Force Fab
- Thread starter stevenboise
- Start date
stevenboise
Observer
")

stevenboise
Observer
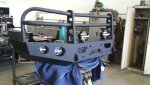
Here's a shot of the inside of the front bumper showing the light mounts, winch mount and overall construction of the inside of the bumper.
Billy had a graduation party to attend yesterday, so he's hanging the rear bumper today. Not sure I'll have any pictures or not. I fly down tomorrow to get the truck and start my drive back to Boise with a stop over in Reno. Hopefully I can get some overall pictures of the truck and bumpers up on this thread in the next couple days.
Billy had a graduation party to attend yesterday, so he's hanging the rear bumper today. Not sure I'll have any pictures or not. I fly down tomorrow to get the truck and start my drive back to Boise with a stop over in Reno. Hopefully I can get some overall pictures of the truck and bumpers up on this thread in the next couple days.
Attachments
stevenboise
Observer
Wow. Nice. I'll keep an eye out for seeing it in person since I am just across the border.
One reason I went with the WBH was that I could use the Silverado bumper.
Yours looks great. Nice to know there is an option for the cladded Avalanche now.
Thanks, but the compliment needs to go to Billy.
The cladding sure did make this project far more difficult. I wish I could have found a bolt on version, but just couldn't find one. I got lucky finding someone like Billy who was willing to do it for me. In our discussions he's expressed a desire to do more Avalanches. It's a love/hate relationship with him doing custom work. He loves doing it, but it's time consuming and takes away from his Toyota stuff. He saved all the data for this bumper so he can do others. Hopefully that works out for him with others.
stevenboise
Observer
I got home Tuesday afternoon after driving my truck back from Fresno. I split the drive by staying overnight in Reno this time instead of one long push back to Boise. I flew down first thing Monday morning with Billy picking me up at the airport at 10:30 am. His shop is about 5 minutes from the airport.
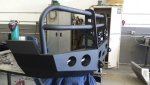
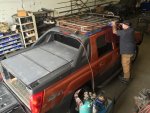
Originally, I only had plans for a front and rear bumper for the truck. But I added a custom roof basket to the plans after dropping the truck off and seeing the baskets Billy does for Toyotas. The plan was to install the basket in a similar fashion to how he does baskets for his Toyotas. But late last Thursday night, he discovered that wasn't possible due to the design of the Chevy door frame and how the doors close on the frame. He didn't realize this till he had the basket built. See, he had to build the basket first to get the points for the mounts lined up with the doors. Kind of backwards maybe, but he'd never done this on a Chevy before. Anyway, this screwed up getting the basket powder coated with the bumpers on Friday. So in all the pictures you'll see that the basket isn't powder coated and that's why. Ultimately, Billy knocked some money off the price of the basket since he didn't get it powder coated and I'll do that here in Boise.
Over the weekend I researched other options to mount the basket so it wouldn't go to waste. Billy wasn't going to charge me for the basket if I couldn't use it. I could have just walked away from it, no harm, but I really wanted this basket. With the height clearance being an issue for me, the truck and our garage, doing a Yakima/Thule mounting system wouldn't work. I didn't have the clearance. In researching other mounting options, I learned it is possible to use wellnuts (or other similar nuts) to mount the basket where the factory rails would normally go. Billy was okay with this as he does it to Toyotas, but he was reluctant to do it to my truck without me standing there giving an "okay." So we waited till I got into town, looked things over and gave the "okay."
This means the basket is not quite finished as we ran out of time to put a windscreen on the front before I had to leave to make it to Reno at a reasonable hour. When he found out the basket wasn't going to mount as expected last Thursday, we both gave up on it. This made for a loud drive home.
I guess this is just the trial and tribulations of doing a custom job for the first time.
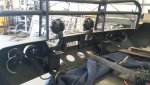
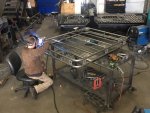
I'll start with some photos of the rear bumper construction first. This first picture shows the spindle mounts for the rear bumper's dual-swing out gates. Yes, I had to give up the steps in the rear bumper for this feature. No way around it. Those spindle mounts travel the height of the rear bumper and are welded into the inside of the bumper both at the bottom and top of the inside of the bumper. Just no way to keep the steps. With no swing out gates, I could have kept the steps. But I wanted to be able to take the spare tire out from under the truck and mount it somewhere accessible. The roof was out as I wouldn't fit in our garage. And the bed was out as I need the bed for storage and the bed covers for the bike racks. The only other option was a rear-gate spare tire mount.
You'll also notice I had to cut off the cladding there at the back end of the fenders. Billy then built a "plug" with sheet metal, had it powder coated like the bumpers and inserted those plugs into the cladding. Just need a bit of touch up paint on the rivet heads.
Also of note is the "wear plate" around the spindle mount that is screwed onto the bumper. This is a replaceable wear plate for those times when it gets so scratched up from use I can put a new one on. This way the bumper itself doesn't get scratched up from the gate's lock pin moving back and forth from opening and closing.
Originally, I only had plans for a front and rear bumper for the truck. But I added a custom roof basket to the plans after dropping the truck off and seeing the baskets Billy does for Toyotas. The plan was to install the basket in a similar fashion to how he does baskets for his Toyotas. But late last Thursday night, he discovered that wasn't possible due to the design of the Chevy door frame and how the doors close on the frame. He didn't realize this till he had the basket built. See, he had to build the basket first to get the points for the mounts lined up with the doors. Kind of backwards maybe, but he'd never done this on a Chevy before. Anyway, this screwed up getting the basket powder coated with the bumpers on Friday. So in all the pictures you'll see that the basket isn't powder coated and that's why. Ultimately, Billy knocked some money off the price of the basket since he didn't get it powder coated and I'll do that here in Boise.
Over the weekend I researched other options to mount the basket so it wouldn't go to waste. Billy wasn't going to charge me for the basket if I couldn't use it. I could have just walked away from it, no harm, but I really wanted this basket. With the height clearance being an issue for me, the truck and our garage, doing a Yakima/Thule mounting system wouldn't work. I didn't have the clearance. In researching other mounting options, I learned it is possible to use wellnuts (or other similar nuts) to mount the basket where the factory rails would normally go. Billy was okay with this as he does it to Toyotas, but he was reluctant to do it to my truck without me standing there giving an "okay." So we waited till I got into town, looked things over and gave the "okay."
This means the basket is not quite finished as we ran out of time to put a windscreen on the front before I had to leave to make it to Reno at a reasonable hour. When he found out the basket wasn't going to mount as expected last Thursday, we both gave up on it. This made for a loud drive home.
I guess this is just the trial and tribulations of doing a custom job for the first time.
I'll start with some photos of the rear bumper construction first. This first picture shows the spindle mounts for the rear bumper's dual-swing out gates. Yes, I had to give up the steps in the rear bumper for this feature. No way around it. Those spindle mounts travel the height of the rear bumper and are welded into the inside of the bumper both at the bottom and top of the inside of the bumper. Just no way to keep the steps. With no swing out gates, I could have kept the steps. But I wanted to be able to take the spare tire out from under the truck and mount it somewhere accessible. The roof was out as I wouldn't fit in our garage. And the bed was out as I need the bed for storage and the bed covers for the bike racks. The only other option was a rear-gate spare tire mount.
You'll also notice I had to cut off the cladding there at the back end of the fenders. Billy then built a "plug" with sheet metal, had it powder coated like the bumpers and inserted those plugs into the cladding. Just need a bit of touch up paint on the rivet heads.
Also of note is the "wear plate" around the spindle mount that is screwed onto the bumper. This is a replaceable wear plate for those times when it gets so scratched up from use I can put a new one on. This way the bumper itself doesn't get scratched up from the gate's lock pin moving back and forth from opening and closing.
Attachments
stevenboise
Observer
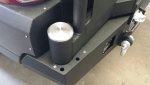
A view looking down on the finished spindle mount and a closer shot of the plug in the cladding. That silver cap on the spindle housing is removable. It just unscrews. Then a nut inside it can come off and the gate lifts off if I ever need to remove the gate for some reason.
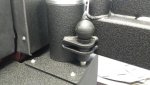
The pin hole on the right is the opening stop for the gate at 90 degrees, and the one to the left is the opening stop for 135 degrees.
The pin hole on the right is the opening stop for the gate at 90 degrees, and the one to the left is the opening stop for 135 degrees.
Attachments
stevenboise
Observer
With the gate open at 90 degrees, you can see the spring loaded pin here. There is no pin hole at the closed position as the gate is locked shut with a clasp when it's closed. The clasp also as the ability to have a padlock placed on it to keep anyone from opening the gates as well.
Attachments
stevenboise
Observer
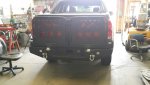
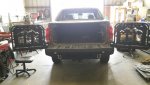
The completed rear bumper.
Both gates are mirror images of each other. This allows for a module design for whatever I want to put on the back gates. This photo shows no mounts on the back. With Billy's new plasma CNC machine he recently purchased for his shop, he was able to cut out any design I chose into those gate panels. I gave him about 8 designs to choose from, depending on what would fit with his mounting plan. In the end, we chose the Avalanche mountains. I thought that turned out great!
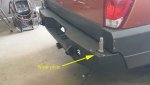
He re-used the rear bumper factory spare tire access door. The factory hitch was untouched by this installation as was the factory trailer plug-in. The only thing not re-used was the rear bumper license plate light. He put a new one one later as the license plate isn't in this photo.
The new rear lights are Rigid Dually flood lights. They do not come on in reverse. They will have their own on-off switch in the cab.
Both gates are mirror images of each other. This allows for a module design for whatever I want to put on the back gates. This photo shows no mounts on the back. With Billy's new plasma CNC machine he recently purchased for his shop, he was able to cut out any design I chose into those gate panels. I gave him about 8 designs to choose from, depending on what would fit with his mounting plan. In the end, we chose the Avalanche mountains. I thought that turned out great!
He re-used the rear bumper factory spare tire access door. The factory hitch was untouched by this installation as was the factory trailer plug-in. The only thing not re-used was the rear bumper license plate light. He put a new one one later as the license plate isn't in this photo.
The new rear lights are Rigid Dually flood lights. They do not come on in reverse. They will have their own on-off switch in the cab.
Attachments
stevenboise
Observer
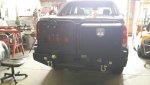
I chose two types of mounts for the back gates. On the driver side will be the spare tire mount. This is removable, if necessary. I probably won't take it off at all. Billy went out and got three Chevy lug bolts that are mounted on this. He only had Toyota lugs in his shop. On the passenger side will be an Aluminess Galley Box. I can mount either item item to either gate. I can also add whatever mounts later on that I would like. Two spare tires? No problem. Build my own mount for whatever specialty item I want? No problem.
The galley box has four mounting points fixed onto the box.....Billy added those as the box comes with no mounting points so you can do what you want with it. The galley box is also lockable.
I wanted the spare tire on the driver side since it will partially block the view in the rear view mirror and my blind spot is on the passenger side.
Attachments
stevenboise
Observer
stevenboise
Observer
stevenboise
Observer
stevenboise
Observer
Forum statistics
Members online
- Howard70
- danielhfranks
- sHills
- ledheplin
- clift_d
- mmth_ski_bum
- RunSupertrampRun
- Mfitz
- Fadeagray
- tractor_to_trail
- hoosier96
- qrohlf
- paj54
- mark5280
- Texoma
- Mrbad
- PhilP
- Peter_n_Margaret
- enve77
- SDDiver5
- Transit720
- Jsoboti
- CraigP92
- Red90
- McTJ
- Clankbang
- Colorado_Kid
- driver3
- Rube2K6
- dmjr
- mep1811
- ZONE ZERO
- Dreed32
- nckwltn
- jadmt
- Flettrich3
- g_hayduke
- Jasalvas
- RoverDude
- 1nt3rn3tc0wb0y
- Savagenut
- Titan_Bow
- 86scotty
- Iowa Rover
- MatttheHatt
- Imgoingonanadvencha
- bexpedition13
- ionyota
- gabrielef
- BeardedVermonter
Total: 623 (members: 59, guests: 564)