New Avalanche Bumper Build By Brute Force Fab

stevenboise

Observer
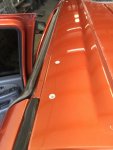
In theory, this should be fine. This area of the roof is double walled, no different then the area around the door seal. These are the same inserts Billy uses on Toyotas and he's had no issues with them. They aren't GM Wellnuts, but they function the same way. We inserted the nuts with silicon for added water proofing. When the basket is installed and finished, the legs will have a rubber pad under it to protect the paint (we put temporary rubber pads on for the drive home) and I'll lock-tite the screws in and apply silicon to the legs as well.

Functionally, it should be fine. The important thing is to keep the water out and not to overload the basket.

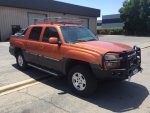
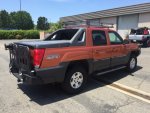
I'll put lighter items up there like folding chairs and bags. If I keep the weight under 200 lbs, I don't see an issue. Does anyone else notice anything I may have missed?

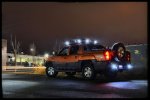
The basket will also have work lights up top as well. A 2-row, dual flood/spot light bar in front and cube lights on the side and rear.
 

Attachments

  • basket finished inserts.jpg
    basket finished inserts.jpg
    91.5 KB · Views: 27

stevenboise

Observer
Once everything was ready to go, we backed her out into the sunshine for some final shots.
 

Attachments

  • finished passenger front quarter.jpg
    finished passenger front quarter.jpg
    97 KB · Views: 32

stevenboise

Observer
Rear quarter shot. That's Billy's Tacoma in the background.
 

Attachments

  • finished passenger rear quarter.jpg
    finished passenger rear quarter.jpg
    88.9 KB · Views: 32

stevenboise

Observer
The front license plate bracket didn't arrive in time. Billy will ship that too me once it does. It will go over the winch opening and has two de-tent stops at 90 degrees and 180 degrees so the winch can be accessed. When closed, the plate covers the winch opening and keeps things legal. It mounts to the winch bracket in front.

The control pack for the winch is not yet mounted. I just haven't decided where to put it yet. Initially we thought of putting it between the two PIAA lights on the outside of the bumper, but it might interfere with air cooling the engine so we bagged that idea. I'll have to make a final choice on that later now that I have the truck and can play around with that idea a bit. The synthetic rope isn't yet on the spool either. The lights you see in the front are not connected. I guess you can say the bumpers are done, I just need to finish up the "furniture" that goes along with it.
 

Attachments

  • finished front.jpg
    finished front.jpg
    88.6 KB · Views: 28

stevenboise

Observer
I know this question may come up and I prepared for it on the drive down to Fresno.

What did all this do to my gas milage?

Here are two photos I made. One is the drive down to Fresno with all the stock bumpers and the other is my drive back from Fresno with the new bumpers and basket. Essentially, I lost 3 mpg with all the modifications. That translates to about 8 gallons of gas (as you can see in the photos) over a 720-ish mile trip. Or, about $26 in added fuel costs at today's gas prices for the areas I traveled.

Not sure why my speed was so much slower coming home as it was going to Fresno. My guess is it's due to driving down to Fresno on a Sunday with no rush-hour traffic and lighter traffic on the roadways. Coming back to Boise I hit Sacramento at rush hour (suck) and there were a lot more vehicles on the roads. That's my only guess. But who knows. There may be other environmental conditions that I'm not smart enough (not do I have the inclination to research) that played a part in that. After all, this was just a non-scientific experiment.
 

Attachments

  • trip to boise.jpg
    trip to boise.jpg
    45 KB · Views: 376
  • trip to fresno.jpg
    trip to fresno.jpg
    48.6 KB · Views: 377

stevenboise

Observer
I could not be more happy with how the bumpers and basket turned out. Pretty pleased with it all. It took a while....4 weeks....but that's to be expected when it's a custom job and the builder is used to working on Toyotas. Billy was great to work with and had great patience with me and my OCD......or, CDO since the letters have to be in the right order.

That's enough posting for one day. I'll continue to update this post as I get all the little things finished up on the bumper and basket. But all of those things make take some time. I still need to drive out to the Port of Entry and get the truck weighed to see how these modifications changed that aspect of things too.

I need to get the lights put on, the front bumper lights hooked up, the winch installed......yadda, yadda, yadda. Since a professional is no longer working on my truck, this make take some time.
 

Attachments

  • Billy and I.jpg
    Billy and I.jpg
    92.6 KB · Views: 50

stevenboise

Observer
Lights are done

I actually got the lights installed a couple months ago and neglected to update this thread. So here are some shots at the end of the install.
 

Attachments

  • lights 1.jpg
    lights 1.jpg
    74.9 KB · Views: 32
  • lights 3.jpg
    lights 3.jpg
    77.4 KB · Views: 36

Regcabguy

Oil eater.
Very col!

Ditto! I don't think I've ever seen an Avalanche with decent bumpers. Yours are off the chart looking and functional.:sombrero:
 
Great looking Avalanche! I've always wanted that burnt cherry color in a first gen. Really liking the swing out tire carrier as well! This is my 07, still wish I held onto my 02 also....image.jpg
 

Outdooraholic

Adventurer
Your bumpers look amazing! I especially love the mountain cutouts on the back carrier! I used to have a 2002 Z-71 and always wanted a similar setup but never made the leap.

IMG_1531.JPG
 

stevenboise

Observer
Wow! Everything looks great! Congrats!

Do you have a lift on your truck?

Thanks for the compliments. I was on another thread and realized that all my thread notifications were going to spam so I figured I'd catch up on my other threads.

Yes, I have a lift. Just a 2" Traxda lift for this truck.
 

Forum statistics

Threads
186,056
Messages
2,881,483
Members
225,825
Latest member
JCCB1998
Top