Overland XJ Build. Not my first Rodeo.....(video included)

Overland History

Wanderluster
Well I reckon it's time for an update, even if it's a fairly small one. ;)

I sent the cracked Mopar HD Radiator back to www.rockauto.com , and they gladly shipped me a new one on their dime. Excellent customer service after the inconvenience of missing a camping trip! :)

A small comparison of the stock radiator vs. the Mopar HD. By visual comparison, I would have to say that the Mopar HD is at least 3/4in thicker than the stock radiator.

image.jpg

image.jpg

image.jpg


Installed the new HD Radiator. Since this one is thicker, it's a lot easier to install it first before re-dressing the motor since you're now working with less room, rather than bash up the fins on the radiator.

image.jpg


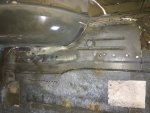
Next up was to bolt up the oil pan and new gasket....

image.jpg


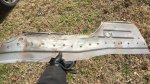
As you can see, out of habit and being anal/OCD, I use the box that the seal came in to keep the bolts in the same hole that they came out of using the new seal as a template. This also allows me to confirm that they're all cleaned/wire brushed properly. Organization is the key to success! ;)

image.jpg


I put a little bit of oil on the front crank seal as well as the crank pulley and bolted that back up, confirming 80ft/lbs of torque.

image.jpg

image.jpg
 
Last edited:

Overland History

Wanderluster
I hung the alternator and dressed the entire front of the engine again.

image.jpg

image.jpg

Also, one of my Valve Cover PCV 90* Elbows was cracked, so I decided to finish it off. As brittle as it was, it was time to replace them both as well as the breather tubes.(I'm still waiting on those to come in...)

image.jpg

image.jpg


I also removed the bottom portion of the valve cover breathers and gaskets for cleaning in the parts tank....

image.jpg


Once I popped the valve cover breather elbows out, I had to cut out the rubber grommets that hold them in. They were rock hard with 200K miles on them, so I had to be careful not to slice into the aluminum cover.....

image.jpg

image.jpg

image.jpg


The valve cover got a nice parts cleaner bath, wire brushing, and a couple coats of high temp paint.....

image.jpg
 
Last edited:

Overland History

Wanderluster
New grommets and PCV Elbows.

As you can see, the new grommets are of course, made in China. I'm pretty sure you can look at the butt of a new born baby these days and it'll say "Made in China". ;)

image.jpg

image.jpg


A little lube and they slide right in. (That's what she said...)

image.jpg

image.jpg


The lower(interior) portion of the breather in the valve cover gasket got cleaned as well. I re-used the metal gaskets that were in there with a little RTV and sealed them back up....

image.jpg

image.jpg

image.jpg
 
Last edited:

Overland History

Wanderluster
With the valve cover ready to go on, it was time to add oil and prime the new oil pump.

image.jpg

image.jpg


As most people do, I used the old trick of removing the distributor, chopping the handle off of a screwdriver and putting it into the end of a drill to turn the pump.

image.jpg


I turned the drill clockwise for about 20secs and it began to bog as the pressure came up. To make sure that I primed the entire system well, I kept it turning for another 30secs or so. Well, I don't think my electric drill liked that as it started to smoke a little. :campfire:

Regardless, I got nice clean oil up to the top of the motor from the high volume pump and reinstalled the valve cover.

image.jpg


I didn't have time for it, but next up is the rear axle installation, so to be continued....

image.jpg
 
Last edited:

Overland History

Wanderluster
Build is coming along nicely. I dig the fridge setup!


Wow, I really dig that fridge! I have had a Dometic in our camping trailer for the past 6 years, it was a 3 way and worked awesome. They are very reliable and work very well. I have a Dometic CF-35 for the XJ, and it is great.

Are you running a second battery for house power with an isolator (cant remember)? I am still only running one, need to put the second one in soon. I have some solar panels to keep the battery for the fridge topped up.

Cold beer and fresh fridge food is important!!

Thanks fellas!

The plan is to run a secondary aux battery, such as an Optima Yellowtop to run all of my accessories. I'll definitely have an isolator wired in, that way a solar panel as well as my alternator can recharge both batteries.

I haven't bought the battery or applicable wiring yet, but that will be soon before I begin the sleep platform build!
 

Overland History

Wanderluster
That fridge is neat! Since you mentioned a sleep platfom, does that mean you're ditching the RTT?

Nope, I'm keeping the RTT. The sleep platform is being built for a couple reasons:

1. In really bad weather, I'd rather not deploy the RTT and risk damage from wind/debris.

2. In sketchy areas of the U.S. or other countries, I would like the added security of being locked inside while asleep and able to depart quickly if necessary.

3. The sleep platform will force me to be super organized and also minimize my gear as much a possible. It would be useless if I piled a bunch of gear on top. The idea is to reduce and organize the necessities to keep the Jeep as light as possible.
 
Last edited:

Overland History

Wanderluster
That area usually rusts quicker from the Cat and muffler heating up the metal and allowing water to permeate through the paint. You can get some of those air back cookie sheets such as these and place them between the exhaust and floorboard to help combat the rust and keep the cab cooler.

http://www.amazon.com/gp/product/B0...269X1V7A6V8I8&psc=1&ref_=wl_it_dp_o_pC_nS_ttl

I like the idea of the cookie sheets and I will definitely consider that, thank you! I'm still looking into a few options for heat deflection within the race car world to see if they're financially feasible or even worth it.

I may just end up pulling a heat shield for the muffler off of one of the newer XJ's in the junkyard and bolting that in....


Nice build! kinda make's me want a XJ again! :)

Thanks! You should pick up another. They only made almost 3 million of them. ;)
 
Last edited:

homebrwd

New member
Nice build! Wish I had some of the knowledge and experience you have, plus a place to do all the work you are. Pretty awesome stuff.
 

Overland History

Wanderluster
Well, I reckon it's about time for an update, as I've been busy as hell with work and school lately. Sleep has been a bit of a luxury. :rolleyes:


I got the rear axle with 4.10 gears and a Locker installed. As many times as I've done axle swaps on the ground, the lift sure does make it easy!

I unbolted all of the necessary bits, dropped the old axle on the ground and used the rolling table to position the new axle up to bolt in.

image.jpg

image.jpg


Finally back on all four's.....

image.jpg


Somewhere along the line of sorting out my drum brake parts for the axle, someone in the shop threw a few vital pieces of hardware away. :mad: :mad: :mad: I've got the parts that I need on order, which should be in by Wednesday.

Since the race team needed their lift and the room in their shop back, it was time to button up the XJ and get her back home.

Since I wasn't able to install the rear brakes, I had her towed home.

First time she's seen daylight in over a month....

image.jpg


With my AAA membership, I get 3 free tow's per year of up to 100miles. Totally worth the $75/yr that I pay. :D

image.jpg

image.jpg


Finally back home. Behind door #1 are a bunch of goodies to be installed soon! ;)

image.jpg
 

Overland History

Wanderluster
While I had a little time the other day, I decided to test fit my Dometic Drawer Refrigerator, and take some measurements to figure out what size Dual Burner Propane Range I need to buy, as well as which size stainless steel mini sink I need to buy to build into the sliding drawer setup that I'm gonna build to the right of the Drawer Refrigerator. All of this is going to be built into the back hatch area, underneath of the sleep platform.

The size of the Fridge is perfect for what I want, and actually may leave me enough room in the middle for an additional drawer in the center. We'll see! :D

image.jpg


As you can see to the right of the Refrigerator, I've still got rust holes to deal with. Here are a few pics of the current rust holes that I cut open back during Thanksgiving. Most of it runs along the rear passenger "frame" rail, just above the exhaust...

image.jpg

image.jpg


Also, this is the rust in my rear passenger floorboard, just above the muffler.

image.jpg

image.jpg


As I mentioned before, a good friend of mine has a '90 parts XJ sitting on his property out in the country that we've been stripping parts off of.

It has the good metal that I need in the rear hatch area, so I went to work cutting out the pieces that I need.

The first thing that I did was pull the fuel tank for safety. It still had a few gallons of gas in it when I dropped it. Better safe than BOOOOOM!!! ;)

image.jpg


Next, I used a sharpie to mark the pieces that I needed out of the scrap XJ....

image.jpg


And got to cutting....

image.jpg
 

Attachments

  • image.jpg
    image.jpg
    543.3 KB · Views: 48
  • image.jpg
    image.jpg
    668.2 KB · Views: 48
Last edited:

Overland History

Wanderluster
As you can see, I had to drill out all(15ish) of the spot welds along the "frame" rail to remove the patch panel. It was a complete hassle, but will be worth it to have a holeless(unholy?) Jeep. ;)

image.jpg

image.jpg

image.jpg


I also cut a large piece out of the cargo area just above where the fuel tank mounts, to be able to patch up my rear passenger floorboard....

image.jpg


Anyways, I also helped my buddy pull the rest of the drivetrain out of the scrap '90 XJ for a possible future project of his.

This is how you pull a drivetrain out of an XJ out in the country....:agree:

image.jpg


Stripped to the bone....(Thats an all original, numbers matching, 1 owner 1965 Corvette Stingray L84 sitting under that cover, a very special car that will see restoration next year!)

image.jpg


Since he planned on having a scrap metal guy come pick it up, we drug it out of his garage with his tractor. I couldn't help but record it. :D

http://youtu.be/FoVC89JWr9c


Anyways, that's all of the progress for now. I'm planning on cutting down the scrap pieces and doing all of the prep work to have a friend of mine tack weld them all in within the next week or so. :D
 
Last edited:

Overland History

Wanderluster
Nice build! Wish I had some of the knowledge and experience you have, plus a place to do all the work you are. Pretty awesome stuff.

Thank you! Having the shop is a bit of a luxury, but after working for the Race Team for 3yrs and spending many 20 hour days at the track, its nice to reap a few benefits. ;)


I was told they aren't available anymore. Where did you order them? Rockauto?

Thanks and greets,
Markus

Hey Markus, I got them from O'Reilly's Auto Parts, which is a local parts store chain in my area of Virginia.

http://www.oreillyauto.com/site/c/home.oap

If you can't find the parts where you live, send me a message and maybe we can figure out a way for me to send them to you in Germany. :)
 
Last edited:

Forum statistics

Threads
186,143
Messages
2,882,537
Members
225,875
Latest member
Mitch Bears
Top