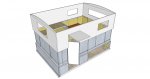
Yeah computer design is nice for quickly laying out dimensions and ideas but eventually if you want real perspective it needs to be mocked up. Grab your computer dimensions and card board and it comes together quick. Doesn't need to be pretty, just shows how much space is taken up or not.
You are using an out of date browser. It may not display this or other websites correctly.
You should upgrade or use an alternative browser.
You should upgrade or use an alternative browser.
POD: Custom camper - design stage
- Thread starter pods8
- Start date
Hi Pods8,
Have been watching this thread, and the build over at HUF.
Was reading about all the decision making involved regarding attaching things to the walls, door hardware, attaching jacks, and getting the seals sorted for the pop top part.
I really like the look of the test pieces you have done. HUF talked about maybe laying the fiberglass down on all the panels in a horozontal position, then putting the pieces together. I have no experiance at all with f/glass but thought the edges of the sheets would need to be 'lower' to allow for the additional thickness of the corner layups. (So the overall sheet was one level surface when finished). Anyway.
I wonder if another way for you would be to build a partial (or full) exo skeleton (Turtle V for example). You could quickly do full sheets in a easy working position, then glue them into the skeleton. The skeleton solves alot of the attachment issues, and would be pretty basic on a flat deck like yours.
I am currently armpit deep in the build of my truck ('72 K2500 longbox) and had sworn off building a camper. Until I saw Sönke's build. Now even though I have months left of truck build (and paying for it!) I am dreaming up my ultimate hard sided pop top. (New Zealand summers you see !?!). I personally believe this style of camper is completely under done, and we will only see more and more great designs come up in due course (like Yves Fuso and the HUF build)
Anyway just wanted to chip in about the exo deal. Have some ideas about the multistage popup deal, or not but will leave that for another time.
Bill.
Last edited:
I was pretty much planning doing the panels in flat all along, not sure if I mentioned it to HUF prior to him coming to the conclusion of it being likely easier as well or not. I'm not planning to recess the edges of the pieces I'll just feather in the seams. The pieces would get joined with structural filler and strips of glass in the seams but all those plys would be different thicknesses verse all the same which will step contour things (widest goes down first). Then when I do my fill work to fill in the fabric weave those "steps" will be filled and then everything sanded smooth to make a smooth transition. Have to remember that a ply of fiberglass is only ~0.01" thick.
I'm not sure doing an exoskeleton in aluminum does much for me verse just keeping it skin/core construction. I'd have to deal with aluminum welding, bonding panels to the aluminum, etc. And have less "at home" flexibility in modifying things since I can't weld aluminum. I plan to build a non-structural skeleton of plywood strips and the rest of the core will be foam. The strips will help tie the inside/outside skins together but will be placed to help pick up contact points (there will be some hard wood blocking in places too). Also I'll have skeleton strips on the edges which will be screwed together while mocking up the panels, then taken apart for glassing and then screwed together while things are being bonded back together in final assembly (at least that is my current thought).
Visual progress has been a little slow on my end, need to work around my 9mo old to get physical time in the garage for test pieces. I'm making up a 3 ply sample this weekend to "destruct". However I've been stewing a bunch on windows, pop-stages, doors, etc. to try and come to some final decisions there. If you've got some ideas I'm all ears. Need to get that stage of design wrapped up before I can ever go full tilt.
I think I have my seals sorted out. Frost king makes a vinyl garage side/top garage door seal that seems like it'd seal well and wear well. Note this is different than the rubber bottom seal they also make, this is the vinyl side/top seal. [ame="http://www.amazon.com/Frost-SG30WH-Plastic-Weather-strip-4-Inch-b-30-Foot/dp/B000B4IWN2"]Amazon.com: Frost King SG30WH Frost King Plastic Garage Door Side and Top Weather-strip Kit 13/4-Inch-b-30-Foot, White: Home Improvement[/ame]
Ok, I can see you have already sorted alot of these issues. As I said I don't have fiberglass experience, and just wondered how it would come together. Obviously with no real problems. I completely understand losing the ability to do it "at home", and can see again you are well advanced with your plywood and hardwood deal. I'm a welder and can see the benefits of some alloy for me. (I think the bonding panel deal has been sorted with Silaflex 252). If you are happy with what you are working with, fantastic.
Your seals look good. Will you run two (top edge of main body, bottom edge of popup), and are you going to use draw runners to guide the popup, or something like UHMWPE in the corners more like Sönke?
After stewing on my own design (multistage/single popup) I have come full circle back to single stage with fold up walls like an Alaskan. I had wondered for a while about a two stage deal for the cab over that was just a weather stopper before you stood the main walls up. Made out of 3mm plastic sheet it would drop in two stages as the roof lifted. Disadvantages were blocking windows in the fold up walls, and noise (rattling) in windy conditions. I understand the problems with rain/dust at set up with fold up walls. But I do wonder for the rest of the days, the ability to leave the walls down would have many more advantages. Depending on weather/bugs you could have great natural light, and depending on location, a very large window!
Looking forward to seeing how you sort these issues for your build.
One of the things I really like about this Foamular stuff is I can actually buy it down here (well the 250 anyway). Understand about pressure on time. I'm a single Dad with two (now) teenage daughters who may well have left home before camper is finally on truck. At 9 months old, you have time on your side!
Have fun.
If I could weld aluminum I might consider its use more, I wouldn't want to use steel. I have decent faith in what I'm up to though.
I'd run seals on both sides. Right now I'm thinking stainless draw runners as they'd also provide alignment as well so the lift system (still TBD, working a variety of angles) just needs to lift and not guide.
I pin ball between but I'm leaning towards the multistage right now with the short door I posted before. I don't mind it too much in my FWC and it solves issues of trying to deal with a full size overlapping door.
I'll have some foamular 250 in mine but will be trying to use 600 as much as I can (ie where having 2" panels works).
I just laid up a 3ply test piece and a 2ply piece with 1/8" plywood between the foam and plys. Once those cure I'll see how they react to impact and post up results of all three (the 2ply I did before).
9mo old (and likely another soon) is the big driver it trying to make a more family friendly design verse my FWC hawk.
Steel exoskel would be interesting. Could go much thinner (than alloy) with less fatigue issues, and I guess you could spray galv it when done.
With your population base the products you can buy (compared to a couple small islands in the South Pacific) is quite eye watering at times. I priced 2" Foamular250 at USD$76.25 for an 8X4 sheet. How does that compare?
Interesting to see how your test pieces go. And your design.
With your population base the products you can buy (compared to a couple small islands in the South Pacific) is quite eye watering at times. I priced 2" Foamular250 at USD$76.25 for an 8X4 sheet. How does that compare?
Interesting to see how your test pieces go. And your design.
With your population base the products you can buy (compared to a couple small islands in the South Pacific) is quite eye watering at times. I priced 2" Foamular250 at USD$76.25 for an 8X4 sheet. How does that compare?
Ouch! That would be ~$32-34 here.
Heifer Boy
Adventurer
With your population base the products you can buy (compared to a couple small islands in the South Pacific) is quite eye watering at times.
Kia Ora Billhilly. Ex-Kiwi here living in Oz.
I agree with your statement above. It almost makes me cry to see the prices the guys in the US pay for stuff. For my build 12mm marine ply is about AUD$160-$180 per sheet - about USD$40, the bulb door seal I was recommended - USD$2.50 per foot, $14 per metre in Oz.
It makes it hard to experiment and play. You have to get it right first time.
Okay here is my non-scientific test piece summary.
Three parts were tested, the corner piece made of 2 plys (all the way around). Then a piece with 3 plys and a piece with 1/8" plywood with 2 plys over that. Note on the last two pieces I didn't bother to laminate the backside, more on that below. All made from 1" foamular 250.
Here are the 3ply and 1/8" plywood with 2 ply sample pre-test.

Okay here is the 2 ply corner piece.
1A: Medium hammer hit, localized matrix failure and a spur out to the edge, don't think that spur would have shown if this was a bigger piece. This generally intact, not really any foam damage, could be repaired fairly easy.
1B: Hard hammer hit, punched into foam, no damage on other side. Would require a foam patch as well, and more extensive surface repair.
1C: Same as 1A
1D: I put the piece on the ground with the corner up and was jumping on it. In shoes my 200lb didn't do anything in terms or surface damage or flexing the part (reassuring!). I put a board over it and jumped again. It didn't do any wide spread structural damage but the stress concentration of where the board was making contact failed the matrix partially. Overall still fairly rigid though and holding together fine. Would need to be repaired for weather ability and to regain strength to full potential.

3A: Medium hammer hit, only a tiny bit of matrix failure, nothing really to be concerned about.
3B: Hard hammer hit, matrix and some glass failure, dented but not a punch through. Might not require going all the way to foam for a repair.
3C: Hammer hit with everything I had, punched through a bit. Damage was fairly minimal considering (no deformation on backside) but would require going down to foam for repair I'd say.

2A, C, E, H: Medium hammer hit, some localized failure. Some running cracks but I'm thinking more so a function of being closer to the edge.
2B, I: Hard hammer hits. Localized and runner cracks, but no punch through. Doubled foam might factor in some but I'm thinking the close vertical planes might have dispersed some of the load.
2D, F: Hard hammer hits. Punch through and some cracking, 2F showed worse damage but see picture below, the foam failed through. I don't think that would have happened with the other side laminated.


My take away is I wish I would have taken the time to laminate the backside of the 3 ply piece to really compare now. In general though the stuff takes a decent hit, the same kind of hits would punch through thin aluminum siding I'm sure. All are repairable, some just requiring varying degrees. However even with all the hits on them the pieces are still darn solid feeling.
This didn't clearly answer to myself in regards to a path forward for a layup schedule but I have some things I can consider as I look at my design, surface area, weight/cost of each ply.
Three parts were tested, the corner piece made of 2 plys (all the way around). Then a piece with 3 plys and a piece with 1/8" plywood with 2 plys over that. Note on the last two pieces I didn't bother to laminate the backside, more on that below. All made from 1" foamular 250.
Here are the 3ply and 1/8" plywood with 2 ply sample pre-test.
Okay here is the 2 ply corner piece.
1A: Medium hammer hit, localized matrix failure and a spur out to the edge, don't think that spur would have shown if this was a bigger piece. This generally intact, not really any foam damage, could be repaired fairly easy.
1B: Hard hammer hit, punched into foam, no damage on other side. Would require a foam patch as well, and more extensive surface repair.
1C: Same as 1A
1D: I put the piece on the ground with the corner up and was jumping on it. In shoes my 200lb didn't do anything in terms or surface damage or flexing the part (reassuring!). I put a board over it and jumped again. It didn't do any wide spread structural damage but the stress concentration of where the board was making contact failed the matrix partially. Overall still fairly rigid though and holding together fine. Would need to be repaired for weather ability and to regain strength to full potential.
3A: Medium hammer hit, only a tiny bit of matrix failure, nothing really to be concerned about.
3B: Hard hammer hit, matrix and some glass failure, dented but not a punch through. Might not require going all the way to foam for a repair.
3C: Hammer hit with everything I had, punched through a bit. Damage was fairly minimal considering (no deformation on backside) but would require going down to foam for repair I'd say.
2A, C, E, H: Medium hammer hit, some localized failure. Some running cracks but I'm thinking more so a function of being closer to the edge.
2B, I: Hard hammer hits. Localized and runner cracks, but no punch through. Doubled foam might factor in some but I'm thinking the close vertical planes might have dispersed some of the load.
2D, F: Hard hammer hits. Punch through and some cracking, 2F showed worse damage but see picture below, the foam failed through. I don't think that would have happened with the other side laminated.
My take away is I wish I would have taken the time to laminate the backside of the 3 ply piece to really compare now. In general though the stuff takes a decent hit, the same kind of hits would punch through thin aluminum siding I'm sure. All are repairable, some just requiring varying degrees. However even with all the hits on them the pieces are still darn solid feeling.
This didn't clearly answer to myself in regards to a path forward for a layup schedule but I have some things I can consider as I look at my design, surface area, weight/cost of each ply.
Last edited:
dare2go
Observer
I would:
1) install a shower in the entrance (sunken tray = good wet buffer when coming in muddy during heavy rain). if interested I can send you maybe some links to photos
2) raise the dinette a fair bit to install water tanks, and possibly camper batteries under the floor - good low point of gravity for heavy weights
3) I'm a big fan of North-South-beds, but that's a question of space and alkove size (+ side bracing)
4) plan for a removable stove, and an outside gas connection - nothing heats up a camper like cooking inside on a hot day
I would:
1) install a shower in the entrance (sunken tray = good wet buffer when coming in muddy during heavy rain). if interested I can send you maybe some links to photos
2) raise the dinette a fair bit to install water tanks, and possibly camper batteries under the floor - good low point of gravity for heavy weights
3) I'm a big fan of North-South-beds, but that's a question of space and alkove size (+ side bracing)
4) plan for a removable stove, and an outside gas connection - nothing heats up a camper like cooking inside on a hot day
1) Since I'm not planning on a basement the idea of building in a permanent shower pan still hasn't really grown on me. However I can always build a custom pan for the doorway area that can be installed when desired and removed when not, I could drain it out the side of the camper to either ground, an under bed holding tank, or tank on the ground.
2)I'm trying to keep the tanks and batteries on the floor against the front wall to keep the bulk weight forward of the rear axle. It will still be low. As for building a compartment under the dinette that one has crossed my mind and will likely depend on the final internal height with the top down and if I think it'll be comfortable. That also makes for a raised lip in regards the the main floor that wouldn't allow smooth motion around the camper when the table was removed which is a negative to me.
3) I do definitely like north/south facing main bed (I have that in my FWC hawk with a pullout) but then I either need to really extend the cabover and/or take away internal room in the camper for a fixed bed. Neither of those are really appealing. I'd rather avoid a slide out bed and the associated hassles of loosing camper space, storing cushions, breaking the bed down, etc. I THINK I can live with an east/west bed in a hardwall camper since I won't be as concerned about brushing up against the walls with feet/blankets/pillows.
4) The removable stove did cross my mind, something like a partner or something of that nature (You have any brands I should check out?). I need to make a call to find out how the emission levels are, how much clearance they need to the side vents, etc. Right now I'm thinking about moving the stove over top of where the fridge would be (I'll shield the bottom to throw away the heat as much as possible). This is would move the stove away from ducking into/out of the dinette and avoid potential problems with someone knocking a pan/pot off the stove. It'd free up space around the sink for more working area. And as an added benefit it would be near the door so extra ventilation would be easily available in nice weather.
Hey Pods8,
So maybe no definative answers, but like you say, all part of the learning process. Two things convinced me I could learn to do this (method). One was to get a decent insulation value (without massive thermal bridges etc). The second thing was damage repairability. Can you imagine a heavy blow on an aluminium skinned camper. On a large flat panel (side) the implications are massive. Trying to get the skin off, repair structural damage etc. I just think, if built properly, this system has many benefits.
I too won't have a basement but am hopeing to incorparate enough depth in the floor to allow for a pan to be built in, in the entry door, with a wooden slat deal sitting in it. Like dare2go says, great for dirty boots, entry zone, and possible plumbing to under deck tank long term. Easier to build it in as you go?
I had just yesterday looked at the Alaskan floor plans with the raised floor under the dinette, but with the roof down I want to be able to sit comfortably at the table, so it rules out any 'step up'.
I think the outside stove/bbq deal is a great idea. Something like Yves is planning is high on my list.
So whats the next step for you Pods?
Hey Heifer Boy. Yeah, I feel your pain! The cost of living in paradise huh!?!
So whats the next step for you Pods?
Finalize and detail out the design. Haven't decided on the pop up style or door yet, need to figure out window placements, need to figure out what the deck height for the flatbed will be so I can set the cabover height, need to figure out a lift system, etc. All these are pretty big issues to know be for I go.
After all that it will be the dramatic gladiator thumbs up or down on the project when a good cost estimate is available. However my enthusiasm is high so that will weigh in strong I'm sure. But I don't want to order up $2k worth of foam, fiberglass, and epoxy only to bail on this for one reason or another so I'm trying to due my homework as much as possible to avoid unpleasant surprises.
Once those "little things", haha, are ironed out I'll probably detail out plans for where the wood strips, hard point blocking, and other internal stuff will be. Then some thought about as much wire routing as possible ahead of time. That way I can make physically progress on building the shell as quickly as possible rather than fumbling along the way.
Speaking of wiring. Stuff that is in the cabinets I'm not worried about. I'll do what I can to embed other wiring in that I can but I'm sure I'll need to surface mount some stuff. I figured a combination of corner and surface mount raceways (minimized as much as possible) might be the easy route there. Thoughts on aesthetics? I think the corner ones along the floor if needed (most of the floor will have cabinets so not really much need) would be fine. Its the surface mount stuff that I'm a little leary on in terms of looks if I needed to use any.


Last edited:
So lots to sort and plan huh.
You've seen this lift system - http://hydromechusa.com/ ? Don't know anything about their quality, how the price compares to other options, but it certainly is a pretty clean sort of a deal.
As far as wiring in the raised roof section, there is general lighting (along both sides, entire length. Bed lighting. Front (external) spot lights, Back and side lights (external for camp site, door way illumination). High mount stop/indicator lights, and then extras. Possibly speaker wires , reversing camera etc. The right sized pvc ducting could be run in the sides with draw wires installed for all these wires. One thing to remember is ordinary polystyrene (white/soft) reacts with electical wire coatings and will eventually 'rot' the insulation off. Not sure how this extruded polystyrene would react but possibly in a similar way so all wiring would need to be ducted.
As far as the rest goes, with your layout you have cabinets/underseat area's almost all the way around, and possibly some floor level raceways will cover your needs.
Door style is an intersting one for sure. No 'right' answer, ultimately what suits you. Could go inward opening. If you did the small (under slide up) door opening out/down, it could 'lock' open at say 15 degrees and have steps on the inside of it to assist entry. Then when the top was raised you could open top section out/up which gives a small veranda area. Lots of options.
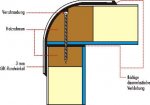
Enough unsolicited thoughts, a couple of photos from my collection to inform/confuse!
You've seen this lift system - http://hydromechusa.com/ ? Don't know anything about their quality, how the price compares to other options, but it certainly is a pretty clean sort of a deal.
As far as wiring in the raised roof section, there is general lighting (along both sides, entire length. Bed lighting. Front (external) spot lights, Back and side lights (external for camp site, door way illumination). High mount stop/indicator lights, and then extras. Possibly speaker wires , reversing camera etc. The right sized pvc ducting could be run in the sides with draw wires installed for all these wires. One thing to remember is ordinary polystyrene (white/soft) reacts with electical wire coatings and will eventually 'rot' the insulation off. Not sure how this extruded polystyrene would react but possibly in a similar way so all wiring would need to be ducted.
As far as the rest goes, with your layout you have cabinets/underseat area's almost all the way around, and possibly some floor level raceways will cover your needs.
Door style is an intersting one for sure. No 'right' answer, ultimately what suits you. Could go inward opening. If you did the small (under slide up) door opening out/down, it could 'lock' open at say 15 degrees and have steps on the inside of it to assist entry. Then when the top was raised you could open top section out/up which gives a small veranda area. Lots of options.
Enough unsolicited thoughts, a couple of photos from my collection to inform/confuse!
Attachments


Forum statistics
Members online
- Gifu
- Keith W
- MB92750
- Knwayalife
- Jonnyo
- kidphc
- D-Wreck
- IdaSHO
- customsmith
- pinevalley
- smb
- Ozarker
- spinlock
- Robert Bills
- cr500taco
- Megan_dfw
- Macdadmorgan
- FJess
- Theshwed
- LordExplorer
- Team360
- kwhitham
- LeeGro
- Savagenut
- redthies
- caryt
- mark5280
- mike morrison
- danneskjold
- Pntyrmvr
- marvjmoto
- drlee
- Blowby
- Art Vandalay
- tc275
- MarcusG
- retiredruralmailman
- RealTruck
- asafk
- shortbus4x4
- Reefry
Total: 915 (members: 47, guests: 868)