You are using an out of date browser. It may not display this or other websites correctly.
You should upgrade or use an alternative browser.
You should upgrade or use an alternative browser.
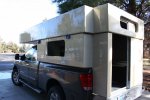
POD: Homebuilt foam core fiberglass skin pop-up camper build thread
- Thread starter pods8
- Start date
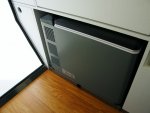
I'm curious what thoughts folks have on a muted orange peel surface finish? I'm contemplating coatings again and giving thought to a liner type material. The surface roughness can be muted down but there will definitely still be some. Cons off hand are a more work surface appearance and more prone to hold dirt on the surface (however this is a camper, how fancy does it need to be honestly). Pros are less critical fairing prep work and scratches would blend into the texture. The above is just referencing the surface aspect not the coating itself. Even using an industrial urethane type paint it would be nice to just put it down with a slight texture to it in some regards.
If you are personally happy with 'the look', then I think the pros far out way the cons. Small scratch's, bumps and dent's won't show as much. Far less finishing work (?). Will still clean up and look sharp.
Attachments


Overland Hadley
on a journey
If you are personally happy with 'the look', then I think the pros far out way the cons. Small scratch's, bumps and dent's won't show as much. Far less finishing work (?). Will still clean up and look sharp.
x2
Unless you are willing to put in a huge amount of time to get everything mirror smooth, I would go with a textured finish.
Last edited:
Yeah I'd likely have to do a lot of long boarding to get it mirror smooth, and that isn't even a look I'm going for its just glossy paint (which is also durable) slaps you in the face if you don't. If there is one thing I'm short on these days its time...
I was planning on light grey for the camper, but I might make the very top white like on toyota FJ's.
I was planning on light grey for the camper, but I might make the very top white like on toyota FJ's.
monkeyshowpictures
Observer
I like the more industrial look of the mat and orange peel type finishes. They also hide scratches and dings better.
http://www.industrialpolymers.com/category/product-list/styrospray-product-list/
Pods8,
Saw this coating product mentioned in the teardrop trailer forum under the Foamies section and thought of your project. Apparently the primary benefits versus fiberglass and epoxy are the speed of application and that the product gives a smooth hard coat. It is polyurea that can be sprayed, rolled or painted designed to be applied over foam. The video in the upper right talks about making a 14ft tall fake foam bottle of vodka for outdoor advertising. The whole point was that the bottle could have been done with foam, covered with fiberglass and epoxy but not with a two week deadline. This StyroSpray coating allowed it to be made in two weeks.
Has a price of 2gal for $119.06. Spec says 2200psi tensile strength and a hardness of 65 Shore D. Checking on the hardness measurement said a golf ball has a hardness of about 60 Shore D, if I got that comparison correct.
Anyway the videos are interesting.
Didn't realize you were leaving south Everett. Good luck with your move to Denver
I was looking back in my thread for something and realized I never saw this post. Just looked at the stuff, main issue I have with that is very little flexibility. I think in a camper structure it would crack. Now polyurea can have flexibility up to 400% though. Most of the time its shot out of a gun and cures right away. If these folks could develop a flexible formula that had brush able times like that they'd be onto something I think.
That is something I've been researching heavily lately and I'm giving it a very high consideration. Will be a more costly (in terms of product) paint job but will save me a crap ton of work in fairing verse trying to get things smooth to make a couple mil thick paint look good. Also the texture should blend any repairs well. Being a DIY product is good for that part as well. Thinking white top with light grey body. Once the top of my camper is off it side again so I can get a good side profile view I'm going to use some white and grey duct tape to play around with the color cut over line. Off hand the two points of consideration would be on the top just after the radius ends, really wouldn't see that its white all the much visually but I'd get the benefits of less head adsorption. The other would be to come down the sides 1"-2" so you see it has a white cap like a toyota FJ.
I intend to use the white on the roof of my Trooper this summer Ala fj40. The old Troopers are like green houses in the sun.
Here are a couple of threads that might help. I have no affiliation just a genuine interest in the product. I've been looking for something like this for a long time. Seems like a lot of these folks have been very pleased with it.
http://www.jeepforum.com/forum/f43/introducing-monstaliner-uv-permanent-diy-roll-bed-liner-875162/
http://www.jeepforum.com/forum/f59/monstaliner-interiors-exteriors-1376308/
Looks like you are doing a great job on your camper! So many times I've read about how quick and easy it is to epoxy over foam. But you have shown that as usual there is more to it than we might be led to beleive. Looks like you will have a great finished product though. Kudo's to you for sticking with it. I know myself how long projects can ebb and flow as the rest of life gets in the way!
I've actually read that entire monolithic thread in your first link (look at the last few posts, I posted some clarification questions for my application and I'm chatting on the side with the manufacturer and the moment).
Well epoxy over foam isn't really hard but in large surface areas it can be time consuming relatively speaking. The whole family life thing is what is really slowing this project down verse projects of years past. I would have obsessively attacked it before.
 But keep chipping away and try to work smart is all I'm doing now.
Just came across this forum and thread. I'm looking at doing a full sized caravan using these techniques.
One question I have is about the plywood stringers (apologies if it's been discussed - it's a very long and interesting thread). Are they mostly for protection, or for structural reasons? I'd imagined that the foam sandwich would have been stiff enough for most parts? For thin structures like the cantilever sides, I can see how the foam keeps the stiff outer ply separated, forming a thick skinned sandwich, but was wondering how much stronger that is than a straight foam layup? My knowledge of composite structures is a but thin, but I'd read that the skin stiffness in something like that is not that important, it's the strength in tension/compression of the outer ply that's important. On the flip side, I guess with very thick/stiff skins, you might change the nature of the structure completely, and if you have point loadings, you need to distribute that evenly into the foam, so it doesn't shear or crush (don't bend the foam under load).
I read the bit about the floor flexing. Did that pan out OK in the end? I'm lucky with the caravan, in that I have a closed box, with small openings, and the internal furniture structure makes an almost continuous box beam up each side of the body, so there are no really nasty situations like that.
Anyway, thanks for the inspiration and giving me the confidence that I'm on track. For a while, I thought I was going to need to use some fancy structural cores that cost 5-10x what these foams do, but with a bit of lateral thinking, and working within the limits of the material, you can do a lot with these lower strength foams.
Cheers
Darren
OK - read some more - plenty of info answering my questions, please ignore (except for compliments).
One more question - I've seen reports of foam damage caused by the exothermic heating of the epoxy. Have you experienced that? I suspect it's mostly an issue when using resin infusion and the like, where you have a single large mass of epoxy on the go, rather than a problem with layer by layer hand lamination. I'm keen to explore the infusion option, if I can keep costs down, as I've got some very large panels to do. They will want vacuum bagging at least I think.
Cheers
Last edited:
One more question - I've seen reports of foam damage caused by the exothermic heating of the epoxy. Have you experienced that? I suspect it's mostly an issue when using resin infusion and the like, where you have a single large mass of epoxy on the go, rather than a problem with layer by layer hand lamination. I'm keen to explore the infusion option, if I can keep costs down, as I've got some very large panels to do. They will want vacuum bagging at least I think.
Cheers
XPS foam can melt with the right amount of heat, that's why I was able to hot wire cut it to make thinner panels for my cabover floor. A large pool of epoxy that overheats I would highly suspect would melt the stuff, it can get HOT. I have never had a single issue on the foam as I'm pouring and spreading stuff around. Normally I'm only mixing up 5-10oz batches for small work unless I'm doing a large lamination and then I might mix up 20oz but when I do that I mix and spread it all out right away. Once I had 1" or so of resin sitting in a solo cup for too long (mixed too much up while doing detailed work that didn't allow me to spread quickly) and it started melting down the cup though so exotherm can most certainly happen if you allow it but it takes a fairly big pool, far bigger that you should be leaving around on foam. I've left 1/4" worth of leftover resin in cups w/o issue.
For small work I usually pour/measure into paint cups (starting with the more flowing resin), then scrap the stuff into a solo cup to mix up and pitch that when I'm done for the night. The paint cup usually just has a skim of resin w/o mixed hardener in it (since the hardner just floats in the middle prior to mixing) that cleans out with some solvent wet paper towels pretty quickly. This allows a paint cup to last a while since I spread my work over multiple shorter periods due to family life. When I'm doing larger work and will be mixing 20oz I just get some quart sized paint cups, mix directly, and pitch when done for the day.