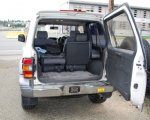
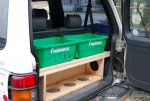
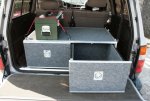
Here's my setup for my XJ. Still have to put on the finishing touches and finish my sub enclosure on the passenger side, but so far I'm pretty happy with it as a work truck/dog hauler/camping rig.
The box is a seperate piece from the dog platform. (The dog platform is where the rear seats used to be). I can still easily take out the dog platform and reinstall the rear seats in about 20minutes. Still have to build an expanded metal divider to keep the dog from trying to climb in the front with me")
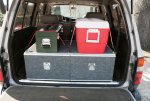
The space beside the drawer is for my amps (4channel and mono) and for my inverter and a small fuse block and whatever else I want to build in there in the future.
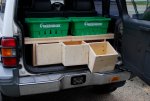
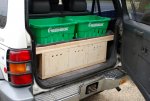
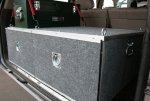
The handles to lift the front two storage lids are just plain old black webbing that are screwed on. You will also see the same webbing screwed down to the top of the drawer box. I wanted the handles to be flat so my dog doesn't have them digging into him when he's laying back there and the webbing on the drawer box lid is for tying down coolers/bags/etc so that in a rollover I don't have crap flying everywhere.


The box is a seperate piece from the dog platform. (The dog platform is where the rear seats used to be). I can still easily take out the dog platform and reinstall the rear seats in about 20minutes. Still have to build an expanded metal divider to keep the dog from trying to climb in the front with me
The space beside the drawer is for my amps (4channel and mono) and for my inverter and a small fuse block and whatever else I want to build in there in the future.
The handles to lift the front two storage lids are just plain old black webbing that are screwed on. You will also see the same webbing screwed down to the top of the drawer box. I wanted the handles to be flat so my dog doesn't have them digging into him when he's laying back there and the webbing on the drawer box lid is for tying down coolers/bags/etc so that in a rollover I don't have crap flying everywhere.