BruceTS
Observer
Re-building aftermarket shocks is quite easy, but it does require a way to re-pressurize them after completion. Either taking them down to a motorcycle shop or having your own nitrogen system. Since I plan to fine tune the valving in my shocks during the next few months, I picked up a nitrogen setup.
The lower heim joint on each shock were worn out. The old one is to the left and the new bearing is to the right of the shock. The upper one's were just fine, but since I bought new one's those were replaced as well.

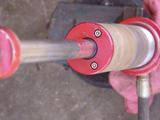
Next step is to discharge the nitrogen, then remove the 3 allen bolts. Slide the dust cover up and depress the seal retainer to remove the retainning clip. Afterwards pull the piston assembly out and discard the oil.
Here's a shot with the parts dissassembled

To remove the hose from the reservoir, I used a strap wrench. You may need to heat the parts up with a propane torch if loctite was used. This step can be bypassed if you don't plan to replace the hose. I have a new 90 degree hose to install, so off they came....

I used the same strap wrench around the piston to loosen the nut holding the valving. Afterwards I separated the shims and took measurments since I had no clue what the stock valving was.
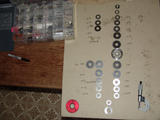
In the picture above, I have the old valving to the right and the new valving to the left. My rebound was ok so I'm only changing 3 of the shims and retainning the 2 largest, just gonna stiffin it a bit.
Now for the compression, that's another story, it bottoms out too quickly on the ruts bigger than 1 1/2 feet, so I need to stiffin it up quite a bit. Problem is you end up losing some of the slow speed stuff and the smaller bumps you end up feeling. So I decided to set up a flutter stack and give it a try. Basically the you stack 2 shims of the same size, but thinner for the first 2, then use thicker one's afterwards. I went up quite a bit from the original valving, but I need to start somewhere. This is pretty much a guessing game, adjust, drive, re-adjust til you finally get the feel you like. There is no set valving that is perfect for all situations, so you need to decide what is the happy medium you can live with.
Now that the valving is done, I can proceed to reassemble everything. Did a good cleaning and replaced all the seals, even though there were no leaks.

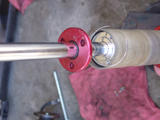
In the picture above I'm setting the floating piston in the reservoir. Note the bolt comming out.... Sway-A-Way has a threaded hole in the middle of the piston that I noticed during dissassembly and wondered what it was for. Well I found a use for it... Attach a bolt and when your filling the shock body, you simply pump the piston back a forth to expell any air pockets in the line. Once this is done, slowly slide the piston assembly back into the body, so you don't produce too many bubbles. Slide the piston all the way down and refill the body about 1" from the top. Check the piston in the reservoir, since this will move during assembly. Using a ruler press the piston into the reservoir body 3 3/4", this should push fluid out of the shock body and expell any remaining air. Press the seal retainer down into the oil and make sure the shock shaft is compress all the way. Now check the depth of the piston in the reservoir body. It needs to measure 3 1/4"(note this is for the 6" long reservoir body) for the outer lip to the piston, if not add or subtract from the 3 3/4" measurment I mentioned earlier and repeat the process. Once this is done, install the retaining clip and attach dust cover with 3 allen bolts.

Once complete add a few pounds of nitrogen, then cycle the shock to insure there is no air bubbles trapped, if so take it apart an repeat. Too much oil and you can get fluid lock. Once everything cycles fine, charge the shock to 200 psi. and your done...
The lower heim joint on each shock were worn out. The old one is to the left and the new bearing is to the right of the shock. The upper one's were just fine, but since I bought new one's those were replaced as well.

Next step is to discharge the nitrogen, then remove the 3 allen bolts. Slide the dust cover up and depress the seal retainer to remove the retainning clip. Afterwards pull the piston assembly out and discard the oil.


Here's a shot with the parts dissassembled

To remove the hose from the reservoir, I used a strap wrench. You may need to heat the parts up with a propane torch if loctite was used. This step can be bypassed if you don't plan to replace the hose. I have a new 90 degree hose to install, so off they came....

I used the same strap wrench around the piston to loosen the nut holding the valving. Afterwards I separated the shims and took measurments since I had no clue what the stock valving was.

In the picture above, I have the old valving to the right and the new valving to the left. My rebound was ok so I'm only changing 3 of the shims and retainning the 2 largest, just gonna stiffin it a bit.
Now for the compression, that's another story, it bottoms out too quickly on the ruts bigger than 1 1/2 feet, so I need to stiffin it up quite a bit. Problem is you end up losing some of the slow speed stuff and the smaller bumps you end up feeling. So I decided to set up a flutter stack and give it a try. Basically the you stack 2 shims of the same size, but thinner for the first 2, then use thicker one's afterwards. I went up quite a bit from the original valving, but I need to start somewhere. This is pretty much a guessing game, adjust, drive, re-adjust til you finally get the feel you like. There is no set valving that is perfect for all situations, so you need to decide what is the happy medium you can live with.
Now that the valving is done, I can proceed to reassemble everything. Did a good cleaning and replaced all the seals, even though there were no leaks.

In the picture above I'm setting the floating piston in the reservoir. Note the bolt comming out.... Sway-A-Way has a threaded hole in the middle of the piston that I noticed during dissassembly and wondered what it was for. Well I found a use for it... Attach a bolt and when your filling the shock body, you simply pump the piston back a forth to expell any air pockets in the line. Once this is done, slowly slide the piston assembly back into the body, so you don't produce too many bubbles. Slide the piston all the way down and refill the body about 1" from the top. Check the piston in the reservoir, since this will move during assembly. Using a ruler press the piston into the reservoir body 3 3/4", this should push fluid out of the shock body and expell any remaining air. Press the seal retainer down into the oil and make sure the shock shaft is compress all the way. Now check the depth of the piston in the reservoir body. It needs to measure 3 1/4"(note this is for the 6" long reservoir body) for the outer lip to the piston, if not add or subtract from the 3 3/4" measurment I mentioned earlier and repeat the process. Once this is done, install the retaining clip and attach dust cover with 3 allen bolts.

Once complete add a few pounds of nitrogen, then cycle the shock to insure there is no air bubbles trapped, if so take it apart an repeat. Too much oil and you can get fluid lock. Once everything cycles fine, charge the shock to 200 psi. and your done...