Rolling Studio - FG Camper Conversion

john lovett

Observer
Box On Truck

Working in an open garage facing the street encourages a lot of curiosity. I think every retired bloke driving past eventually stops to see whats going on. They generally get around to the question of “How are you going to get that onto the back of the truck?” after which suggestions are offered. There have been some interesting solutions.


Dig a hole in the front lawn, back the truck in and push the box on.

Take the back wheels off the truck and push the box up a ramp on PVC pipes

Gradually jack up each corner and support the box on timber blocks – back the truck under.

My favorite solution came from some Seventh Day Adventist ladies. They invited me to their church, plied me with brochures and told me how the world could still be saved. As they were leaving one lady asked how I was going to get the box on the back of the truck. I said I hoped I might find an answer in the literature they left me. She looked me in the eye and said “You never know”

After considering all the above solutions I decided to hire a crane.

imgp6263.jpg


These guys turned up, tangled the box in slings and ropes and placed it precisely where it needed to be – all in about 45 minutes.


imgp6270.jpg


imgp6284.jpg


imgp6304.jpg


imgp6290.jpg


imgp6295.jpg


imgp6321.jpg


imgp6421.jpg


Once the box was bolted to the subframe the door and hatches were installed and I took it for a run to the local weighbridge. All up weight at the moment is 3560kgs. Still to add is a rear wheel carrier and 2 spares, roof rack, bullbar and winch, solar panels, 200litres of water and all our personal gear. We still have 940kgs but will have to watch carefully what we add.
 

Ford Prefect

Expedition Leader
Yes, that is certainly going to get tight on you pretty darn fast. All that heavy equipment still to add, not to mention you will need the weight of all of your liquids.


If I recall you are looking at about a 1 to 1 ratio, ie one Liter equals about 1Kg, right? So you are looking at 200+kg just for your watter, and I'll bet that bull bar is going to ring in at another 100-150kg no?

Well, an absolutely brilliant job on this build, and it sure is coming along very fast too!

Cheers again for sharing!

Brian
 

mog

Kodiak Buckaroo
Drop dead gorgeous ! Like they say in aviation, if it looks great, it will fly great. So from the looks of your build and truck, you will be having outstanding ‘expeditions’.
Thanks for sharing your build, and keep those write-ups and photos coming.
They inspire us mortal builders :)
 

john lovett

Observer
Thanks guys for the feedback.

Spare Wheel Carrier

The next job is to make somewhere to carry a couple of spare wheels. All that weight dangling off the back of the chassis required someone with better welding skills than me, so it was up the road to Daryl, the mig master's shed.

For three days we were grinding, welding and cutting until we finally ended up with a robust, corrugation proof attachment that allows for larger diameter tires if I decide to go that way. We also incorporated a rack for a coupe of fold up bicycles.

wheel-carrier-1.jpg


imgp6429.jpg


daryls-shed.jpg


daryls-shed-2.jpg


The horizontal 150 x 75mm box sections slip into the end of the chassis. The forward facing plates bolt to the subframe, stopping any forward movement. The top horizontal cross member will bolt through a plate on the rear wall of the box.

wheel-carrier.jpg


Larger images on New Rolling studio Blog
 
Last edited:
D

Deleted member 9101

Guest
Now that is one beefy spare tire rack, but one suggestion..... mount a work light or two on the bottom of the rack above the tires, that way when you have to use the rack at night you will not have to hold a flashlight.
 

Ford Prefect

Expedition Leader
Now that is one beefy spare tire rack, but one suggestion..... mount a work light or two on the bottom of the rack above the tires, that way when you have to use the rack at night you will not have to hold a flashlight.

That is a great idea! If you set it up so that it can pivot in the vertical plain about 90 degrees, you can use it for a simple lighting of the area on any occasion, and pivot it down for use when needed as a work light. For that matter if you put one on either end, then the curbside light can also be made to rotate 90 degrees allowing it to help light the area when you are just sitting under the awning, or building your campfires.

Super construction thus, thanks for the updates!

I am not sure if I missed it, but how did you mount the camper to the frame of the truck? I know you did the wood sub-frame the length of the truck, but what after that?

Brian
 

john lovett

Observer
Thanks for the comments and suggestions. I like the idea of a work light on the back. I have a pair of heavy power cables there to run a small winch so hooking it up would be a simple matter. Being able to swing it around to light up the camp area is a great idea. Will let you know when the job is done.

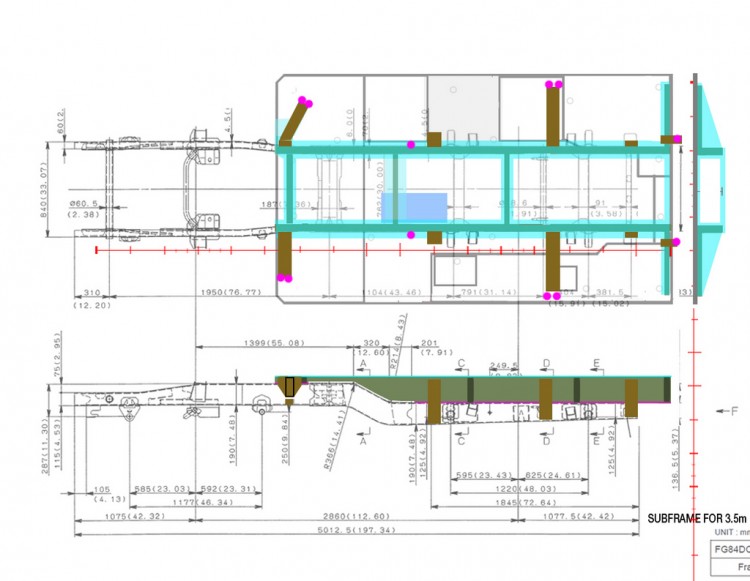
Mounting the box to the subframe was done with 12 high tensile bolts

mounts4-e1306282114965.jpg

The pink dots show the location of the bolts.


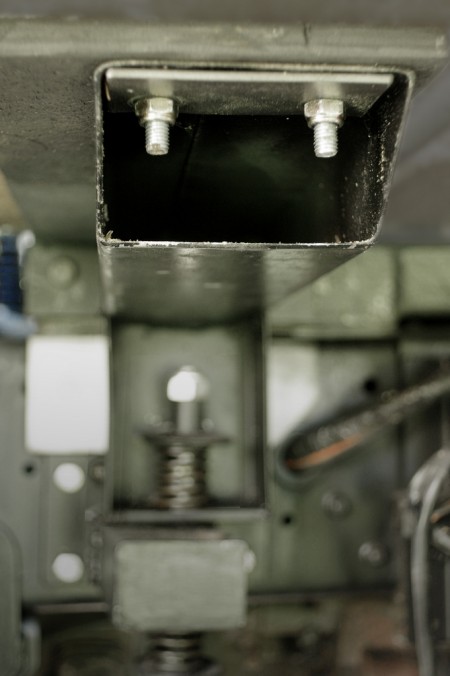
front-mount-e1306282144761.jpg

This shows the front mount.


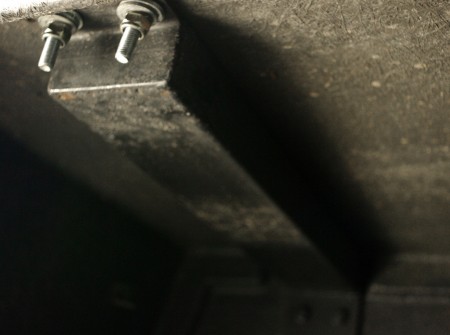
wheel-arch-mount-e1306282170981.jpg

This is looking up into the wheel arch.


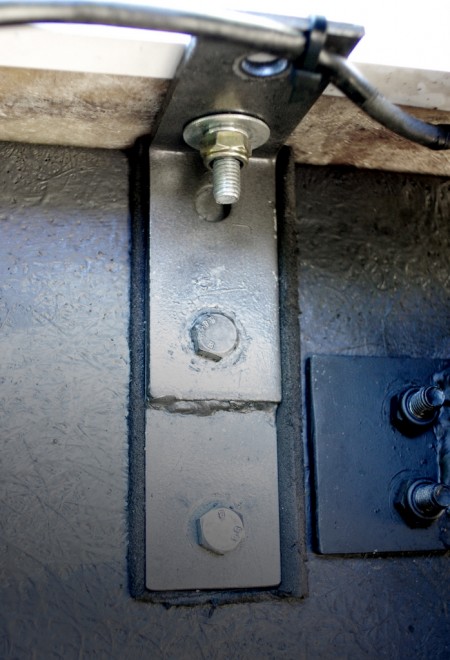
rear-mount-e1306281884928.jpg

...and this is the rear mount
 

Ford Prefect

Expedition Leader
So I guess yall are off using this, and thus no time for Interior photos??? PLEASE???

I would love to see some details on the interior set up. What does it look like inside with the top down as well please?

Thanks!
 

john lovett

Observer
Hi Brian,
Sorry about the lack of posts, we have been in the US for a while. Back home now though, and nearing completion with this truck.. We took it for a run last week (away only 6 nights. Every thing worked well except a frozen transfer case cable saw us buried up to the back diff in soft sand. Half a cup of WD40 and an hour wrestling with the transfer case lever saw the problem solved.
We found the ride pretty comfortable. We traveled over some badly pot holed dirt, freeways and patchy, undulating bitumen. Hitting a deep rut will cause the front to bottom out, loosening teeth and compacting backbones, but otherwise, the ride is good. An extra leaf with more arc and better bump stops might be the answer. Sitting on around 95kph we averaged 17 litres/100 kilometers.
At 80kph a resonating, low frequency hum can be heard. It disappears around 85kph. Could be exhaust hangers. I'd be interested to hear if anyone else has noticed this.
Here are some interior shots. I'll post some more with the roof down soon.

Interior Shots larger images here
Most things are nearing completion now. Still some bits of trim to add and a storage locker in the floor between the chassis rails.

int1.jpg


int2.jpg


int5.jpg


Directly behind the cab are two bunks. The hatch in the floor, above the entry step, gives access to the two house batteries.

int3.jpg


Except for a modified shower base and aluminium floor grate, the bathroom is unchanged from the original caravan. At some stage I plan to get rid of the useless narrow basin and install a corner unit.

We considered putting in a gas water heater, but decided to stick with heating water on the stove and pouring it into the shower tank via the pipe near the top of the photo. We don’t often camp near water and this method gives complete control over the amount of water being used. It’s also one less thing to go wrong!The floor covering is industrial vinyl laid over 8mm high density closed cell foam for insulation.

int4.jpg


The original plan was to keep the 55 litre Engel fridge and supplement it with a 30 litre Waeco draw fridge installed under the bottom bunk. We discovered Waeco make an 80 litre fridge the same width as the original Engel, so it was a simple matter to lower the enclosure floor to accommodate the 80 litre Waeco.

The Waeco is quieter than the Engel. Current draw is slightly higher in the Waeco, but less than running two fridges. The Engel was better quality construction than the Waeco – gal steel external cladding rather than taped together hollow core plastic. They are both supposed to be very reliable – we will see.
 

whatcharterboat

Supporting Sponsor, Overland Certified OC0018
Well done John.

Thanks for posting the pics.

Not sure about the noise........not a transfercase whine is it? Guess that would be more high pitched. Have heard them resonate back out the aircleaner before......sort of a low humm. Is it louder on the driver's side? Are all the exhaust hangers stock? Haven't ever heard them being a problem before. It is a turbo 649 isn't it?

John
 

bptp7270

Adventurer
Hi there,

the interior looks great and very functional. I am interested to know how you mix the hot water for the shower via the pvc pipe? My previous truck was a 649 turbo and it had a real whine at exactly 80kmh and then it would dissapear at 85kmh. I assumed it was either the transfer or rear diff.

Anthony
 

Forum statistics

Threads
186,087
Messages
2,881,817
Members
225,874
Latest member
Mitch Bears
Top