'Ruby' the big red GMC Savana!

86cj

Explorer
The stock wheels are +31mm offset so a -12mm offset wheel center is 43mm (1.69") further out than stock. So the tire only moves out 1.69". The outside wheel lip is further out, but the inside lip doesn't move out as much, the tire is still centered on the wheel regardless of width. I find it better to compare using offset for tire clearance rather than backspace.

You are right about the offset but when you change wheel width that gets added into the math also, so adding half (.75) of the 1.5" wider wheel is your 1.69 + .75 = 2.44" and if your tire is wider add half of that to. Speaking in offset is proper, it is what the important suspension angles are based on such as wheel bearing load being more now and suspension settings being a little different with the change. I was trying to simplify the fitment subject for some people by talking in old school backspacing, your skills are well proven to be at the top of the class..

striker101
I have been leaving the rearmost drivers side window shade in but remove the rest most of the time, we mix and match due to location and use. It is super easy to swap the shades in or out and storage goes under the mattress, they just plain solve the issue. BTW Explorer conversion vans make some nice shades for the factory windows but they are pricey.
 
Last edited:

TeleSteve

Adventurer
You are right about the offset but when you change wheel width that gets added into the math also, so adding half (.75) of the 1.5" wider wheel is your 1.69 + .75 = 2.44" and if your tire is wider add half of that to. Speaking in offset is proper, it is what the important suspension angles are based on such as wheel bearing load being more now and suspension settings being a little different with the change. I was trying to simplify the fitment subject for some people by talking in old school backspacing, your skills are well proven to be at the top of the class.
My point is that -12mm offset wheel in any width will still center a tire 1.69" further out. So in your case a 265 width tire on 8" wide -12mm offset wheel would sit in the exact same location as it would on a 7" -12mm offset wheel. The side walls may pinch a little on the narrower wheel but the tread would still be centered 12mm outside of the wheel mounting surface (WMS). So the outside edge of 265mm wide tire, 20mm wider than the stock 245, will only be 43mm (1.69") +10mm (.39")=53mm(2.08") further out. So even though the outside wheel lip moves out 2.44" the outside edge of the tire only moves 2.08" from stock
I mainly brought this up because a 4.5" backspace 7" wide wheel places the tire in a very different location than a 4.5" backspace 9" wide wheel. Backspace is a good reference when considering brake and knuckle clearance to the back of the wheel. Comparing different wheels by offset is just easier to do IMO.

By the way straker101 the van is looking good!
 

86cj

Explorer
TeleSteve,
I am glad you weighed in on the O/S details it gives people a great example of O/S and fitment, and in the absence of a spec sheet you can still flip a rim over grab a piece of scrap straight edge and ruler and get pretty close with old school B/S measurements too.

With my original comment I kind of wanted to bring attention to why people who don't understand O/S mm's liked the stance of stryker101's van, the aesthetic look of the wheel face being About 2.5" further out to the eye, my wife included. If we are going to sweat the details of fitment here we would be remiss not to be clear that moving the designed O/S 1.69" Did add load to the unit bearing and may lead to early wear issues in my experience. straker101 did say he choose the -12 O/S because of the good deal and understood the change, and now everybody understands it better too..........

straker101,
You are right you can't see the fender trimming in the pic's, the install looks great. BTW I think the red GM Van's look the most aggressive when outfitted...
 

Oregonic

New member
Welcome to this forum! I'm pretty new too.
1. My entire system (audio, camera and remote start) ran me around $2500 Canadian. The dealer was having a huge sale so I probably saved at least $1500. That price included install as well.
2. I used the Thule Gutter Foot Pack 300, which pinches the rain gutters. They are made for rain gutter so I don't think you need to worry about any damage. Is this what you got?...

Thanks for the response - apparently I wasn't getting notifications on the thread. Yep, those are the feet I got, and they mounted right up. Mine are inside of the putty strip in the gutter, but the clamp down without gouging into it, so I think I'm set up correctly.
 

straker101

Observer
You are right about the offset but when you change wheel width that gets added into the math also, so adding half (.75) of the 1.5" wider wheel is your 1.69 + .75 = 2.44" and if your tire is wider add half of that to. Speaking in offset is proper, it is what the important suspension angles are based on such as wheel bearing load being more now and suspension settings being a little different with the change. I was trying to simplify the fitment subject for some people by talking in old school backspacing, your skills are well proven to be at the top of the class..

striker101
I have been leaving the rearmost drivers side window shade in but remove the rest most of the time, we mix and match due to location and use. It is super easy to swap the shades in or out and storage goes under the mattress, they just plain solve the issue. BTW Explorer conversion vans make some nice shades for the factory windows but they are pricey.

Thanks for the tip, I'll check out those shades!
 

Slapmackie

Observer
Part 2: Storage/Camping Platform
For platform supports on the box side, I just wrapped a 2x4 in carpet and fastened at the appropriate height to the box. For the drivers side, I used some awesome adjustable supports that my neighbor gave me (she found them at a yard sale). My plan was to use them as board rack arms for my stand up paddle business, but when I became stumped on how I'd support the platform on the van, they were the best solution possible. Just spray painted them flat black and boom! Low profile, easy to remove and super light but very strong.
The platform itself is just two pieces of 3/4 in ply with some 1x4 stringers on the bottom side for added strength. The front section can be removed in second if I want to install the 2nd bench seat. Otherwise, the platform goes right up to the back of the first bench seat. Each metal support is screwed to the floor in 2 spots and one fastener to the bottom of the platform to keep it from bouncing. So far it is rock solid and the whole thing is easily removed in a few minutes. The drivers side of the platform rests with no pressure on the stock trim just under the drivers side windows. I used a strip of foam (pipe insulation) just to keep the rubbing and/or squeaking to a minimum. So far there is no noise or rubbing so its probably not even needed.

View attachment 368733
View attachment 368734
View attachment 368735

Part 3: Roof Racks, Hood, Rock Deflector and Window Vents
As this was all going on, my roof racks came in. I went with a 3 bar Thule system with gutter mounts and wind deflector. 78" load bars.
I also black plasti-dipped the hood (for protection, AND I like the 'murdered out' look!), and installed a hood rock deflector and window vents by Lund. I also plasti-dipped all of the 'GMC' and 'Savana' badging/emblems.

View attachment 368736
View attachment 368737

What size wind fairing did you go with, 52"?
 
Thanks for the kudos 86cj! This was a fun project and I'm stoked how its turning out so far!

Do you leave your reflectix panels on the windows all the time or just put them up when sleeping in the van? I'd like to find an easy in/out solution for shading when camping, but don't want something that is left covering windows all the time. Would like something I can throw on the windows in a couple of minutes.

As for my wheels, the -12 offset did cause a bit of rubbing at full lock. I had to trim back approximately 3" of the inner fender metal and about 1.5" of the inside fiberglass directly behind the tires. Metal look about 5 minutes with tin snips and for the fiberglass I just used a mini fine-tooth hacksaw. Was super simple and took no time at all. There is absolutely no cosmetic difference unless you get right in the wheel well to check it out.

I have reflectix panels that I cut to the shape of my windows and glued to a sheet of .030" Lexan. I stick them to the windows with velcro tape. I'm still working on some for the intermediate windows and side doors. I have headliner material that will be glued to the inside so I'm not looking at that foil pattern when inside. Install or remove in less than 2 minutes. I stow them along the driver's side wall while driving.
 
Part 6: Ladder and Future!
My drivers side ladder from Aluminess came in the other day so I installed on the weekend. Very happy with how it turned out. The thing is feather light and rock solid!

~snip~

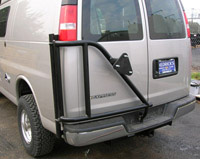
The only thing left (for now) on my wish list is a rear tire carrier. I have a full size spare on matching rim that I don't want to mount under the van, but I can't seem to find anyone that makes a rear carrier for this van. Aluminess used to but discontinued manufacturing of it because there wasn't enough demand. I did talk to them and they said if I could find a group of 10 willing to purchase, they would do a custom run. So let me know if you want in!! The only other options that I can find is a complete new rear bumper with tire rack (way out of my budget right now), or the hitch-mounted 'Hitchgate' by Wilco that actually does look pretty sweet as it is a swing-away like the bumper mount carriers. Anyway, I'd prefer to go with Aluminess if they would make me one so hit me up if you're interested!!!

What would an Aluminess carrier cost? Do you have a link that shows what they look like? I'm going to need one for my van when I get 33's installed.
 

TeleSteve

Adventurer
They are different than the ford carriers
sm__alum_210057.jpg

Aluminess is no longer making them unless there is a large order.
 

Aluminess

Observer
Part 6: Ladder and Future!
My drivers side ladder from Aluminess came in the other day so I installed on the weekend. Very happy with how it turned out. The thing is feather light and rock solid!

View attachment 368744
View attachment 368745
View attachment 368746

The only thing left (for now) on my wish list is a rear tire carrier. I have a full size spare on matching rim that I don't want to mount under the van, but I can't seem to find anyone that makes a rear carrier for this van. Aluminess used to but discontinued manufacturing of it because there wasn't enough demand. I did talk to them and they said if I could find a group of 10 willing to purchase, they would do a custom run. So let me know if you want in!! The only other options that I can find is a complete new rear bumper with tire rack (way out of my budget right now), or the hitch-mounted 'Hitchgate' by Wilco that actually does look pretty sweet as it is a swing-away like the bumper mount carriers. Anyway, I'd prefer to go with Aluminess if they would make me one so hit me up if you're interested!!!

Sooo...it seems as though as soon as we discontinued, we got a flood of requests! We are going to start offering them again and gauge the demand! Give us a call to order! 619-449-9930
 

Forum statistics

Threads
186,170
Messages
2,882,837
Members
225,984
Latest member
taunger
Top