So I wanted to contribute back to the community since I have received tons of help to this point from this forum. The idea came a while back when me and the girlfriend went on a trip to Tn, and spent 800+ in hotels over 4 days. We were not particularly happy with the hotels, and when I mentioned a trailer she lit up light a Christmas tree. I just bought a 2016 Tacoma TRD Sport so a large heavy trailer was not an option, and I wanted it to be able to go down some dirt roads/ trails without falling apart. Popups were too poorly built, utility trailers didn't have the clearance or design I wanted so I took it to the drawing board.
Step one was figuring out my design so I started with my known variables, and built from there. The truck is 71" high, 74" wide, and hub to hub is 65". I also wanted to skin with Aluminum, and since I only had access to 48" sheets I needed the roof to be 48". With 2 adults and a full size dog I wanted as much interior room as possible (Approx 65") . I also wanted to run the same tire and wheel as the truck. 265/70/17.
I looked at multiple axle options and opted for the Timbren Axle less 2000HD with long spindles. This put the inner frame and fender well 8" from the hub which cut the interior width down to 47 after the thickness of the walls. 47" wasn't wide enough for my liking so I decided to extend the walls/ recess the fender wells into the cabin. This gave me 64" of width up top around the arms and 47" around the torso area. The dog will sleep above our heads in the Vnose.
Frame material was set at 3x3 3/16 for main tongue with a 2.5"x2.5" 3/16 removable tongue for lock N roll, and 2" ball, and the main frame is 2x3" .120. The cabin will be 1"x1" .120 with aluminum skin .090 that will attach with 3m tape to prevent corrosion.
18 Gallon water tank under the trailer, tankless hot water heater for galley sink and external shower, 12v system for the lights/water pump/ vent fan, 110 shore power for AC/ Heat. I already have a Honda 2000 generator to run everything off of.
I spent countless hours mocking up various things, and getting the dims to workout for what I wanted. Figuring out the trailer tongue height compared to the truck height, axle placement, and various dimensions took forever it felt like. I will go a walk through on the axle placement in a couple days since I had some engineer buddies guide me on that to make it perfect.
Ok so enough of the rambling now onto the fun stuff! Time to build!
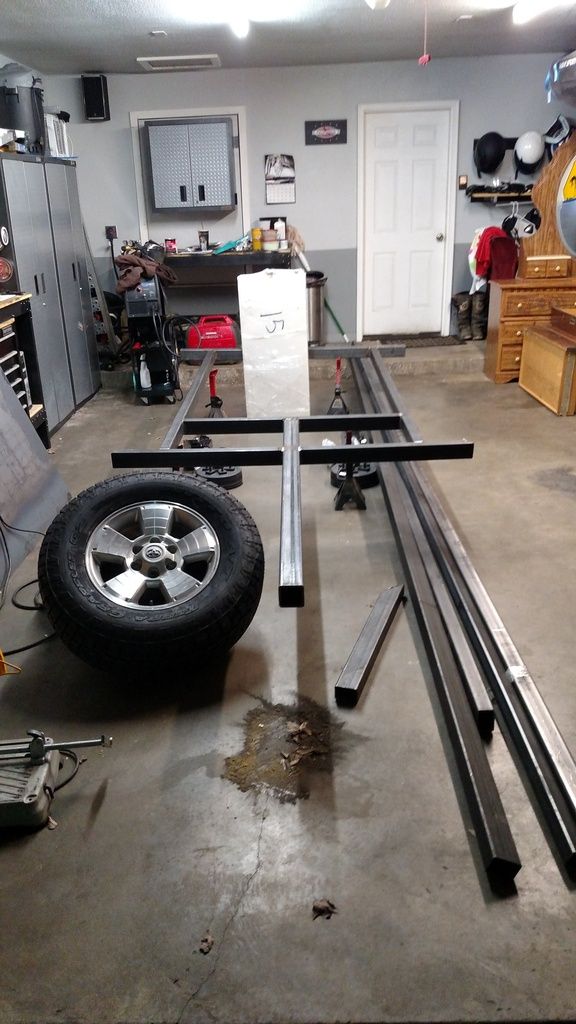
We started the frame build last night. We managed to get it within a 1/8" square with some persuasion. The Timbren setup allows for some adjustability so I am pretty confident that I can have it towing great. I am very happy with the outcome and it seems to be solid. I have bracing for the tongue to add and the outrigers for the wall to ride on. My goal this week is to get the axles mounted and the trailer rolling.
Step one was figuring out my design so I started with my known variables, and built from there. The truck is 71" high, 74" wide, and hub to hub is 65". I also wanted to skin with Aluminum, and since I only had access to 48" sheets I needed the roof to be 48". With 2 adults and a full size dog I wanted as much interior room as possible (Approx 65") . I also wanted to run the same tire and wheel as the truck. 265/70/17.
I looked at multiple axle options and opted for the Timbren Axle less 2000HD with long spindles. This put the inner frame and fender well 8" from the hub which cut the interior width down to 47 after the thickness of the walls. 47" wasn't wide enough for my liking so I decided to extend the walls/ recess the fender wells into the cabin. This gave me 64" of width up top around the arms and 47" around the torso area. The dog will sleep above our heads in the Vnose.
Frame material was set at 3x3 3/16 for main tongue with a 2.5"x2.5" 3/16 removable tongue for lock N roll, and 2" ball, and the main frame is 2x3" .120. The cabin will be 1"x1" .120 with aluminum skin .090 that will attach with 3m tape to prevent corrosion.
18 Gallon water tank under the trailer, tankless hot water heater for galley sink and external shower, 12v system for the lights/water pump/ vent fan, 110 shore power for AC/ Heat. I already have a Honda 2000 generator to run everything off of.
I spent countless hours mocking up various things, and getting the dims to workout for what I wanted. Figuring out the trailer tongue height compared to the truck height, axle placement, and various dimensions took forever it felt like. I will go a walk through on the axle placement in a couple days since I had some engineer buddies guide me on that to make it perfect.
Ok so enough of the rambling now onto the fun stuff! Time to build!
We started the frame build last night. We managed to get it within a 1/8" square with some persuasion. The Timbren setup allows for some adjustability so I am pretty confident that I can have it towing great. I am very happy with the outcome and it seems to be solid. I have bracing for the tongue to add and the outrigers for the wall to ride on. My goal this week is to get the axles mounted and the trailer rolling.

Last edited:


