Skamper 100S questions

dfrank

Observer
The vinyl moulding that covers the screws should be at most rv shops. I thought mine needed to be replaced, but it went back in pretty easily after cleaning. Heat is your friend. I installed directly from a bucket of hot water and it pushed in like butter. it even stretched further than the original install and overlapped almost a foot.

The gasket that goes under the rail to seal the lid when down, was $2 a foot and I passed, but the stuff you need should be about a 1/4 of that, maybe $15 for a 50' roll?

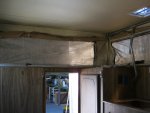
Reinstall of the canvas at the upper side is pretty back breaking. Lower the camper damn near to the ground, then prop the roof up only half way. you'll still need a small ladder and lots of patience. I'd get square or torx drive screws, as they don't strip as easily as philips heads.

I think you will need to unbolt the bars, or maybe consider cutting the canvas at each of those spots, depending on how hard the bolts are to get at. i never saw how they went on originally, but I could see them not being worth unbolting to avoid a small cut to the PVC tent walls.

I've spent the last 3 weekends slope-side in my 100S. that furnace is loud, but it keeps it warmer than needed, even in single digit negative temps.

Dave
 

lefty

New member
Thanks for the information. The promblem w/ the vinly moulding, is that there was a couple piece's that were already cut or missing a 2' section in the center, how that happened I don't know. Couple of the screws had some obvious rot on them, so I'll inspect it while the canvas is being made, suppose to have a 4-6 week turn around. Altough the new canvas is going to cost more than I paid for the whole camper, I'm a little excited about getting it.

I don't have to worry about a loud furance, cause that's already gone.

Congratulations on actual using it, have any photo's?
 

SLO_F-250

Explorer
I've spent the last 3 weekends slope-side in my 100S. that furnace is loud, but it keeps it warmer than needed, even in single digit negative temps.

Dave

Dave,
I completely took apart my furnace, greased the motor bearings, etc and it is much quieter. Thought you might be interested. Link to my post on the furnace project. If you backtrack a bit, it documents some more work I did overall on the furnace.

Good luck with your skamper's guys!
Paul
 

lefty

New member
Added some pictures to show what I'm working on, enjoy.
pictures 008.jpgpictures 001.jpgpictures 002.jpgpictures 003.jpgpictures 006.jpgpictures 007.jpg
 

Attachments

  • pictures 008.jpg
    pictures 008.jpg
    394.8 KB · Views: 34

lefty

New member
Shipped the old canvas yesterday, was suprised that it only weighted 26lbs, including the box it was in. Inspected the wood at the front corners that hang over the cab, they have been wet, but are not soft or rotted. I'm going to dry them out & find something to coat them with, any suggestions?
 

rangerdogg

Adventurer
Hi lefty who is making new canvas for you .Also i have been looking into a truck camper for awhile .I found one for my ranger which is hard to find around here but i was thinking of buying it and maybe in afew years getting a new canvas so i was just wondering what it cost . I am a carpenter by trade so im going to make a few changes so me and the wife can use it to travel around us . Canvas is pretty god but i would like a new one like i said .Thanks alot .
 

lefty

New member
http://www.bearcreekcanvas.com/

This is who I'm using, mostly because when I called him, he offered tips on how to prolong using/mending the orginal one. I thought that was great. Reviews on his site are great, so I'm busy trying to get everything else done, before the new canvas arrives.
 

SLO_F-250

Explorer
Shipped the old canvas yesterday, was suprised that it only weighted 26lbs, including the box it was in. Inspected the wood at the front corners that hang over the cab, they have been wet, but are not soft or rotted. I'm going to dry them out & find something to coat them with, any suggestions?

Congrats Lefty! Looking forward to seeing your progress! Keep the good work!
 

lefty

New member
Had a good day working on the old Skamper. A friend helped out (alot) on Saturday & we rebuilt the right rear corner. The hold down clasp had been letting water in & the two 1"x4" at the corner were completely rotted. So we pulled back the tin & completely rebuilt it. Then started making new cabinet & drawer doors. Got them all cut out & primed. Figure by the time the new canvas is here I should everything else finished up.
 

lefty

New member
Been working on the camper some & starting to see a difference in it.
pictures 001.jpg
Friend cut this circle out w/ a grinder to cover the furance exhaust that is no longer there. I think he done a great job w/ it. My plan's are to just add a stand alone heater like the Mr. Buddy heater.
pictures 002.jpg
I added the diamond plate to cover up the holes in the back form some damages & where there had been two different sets of lights attached at some point. Not bad for a $35 piece of scrap diamond plate. Then I added the new tail lights & finished wiring them in.
pictures 003.jpg
Almost finished up the new cabinet doors, just need to do some touch up painting. We made a new door to cover the holes of the furance & what use to be maybe the radio? Also made some new doors for the bottom ports. I screwed the forward two shut & left the back hinged so that I can pug up the lights.
pictures 004.jpg
Took the old cook top out & covered the hole up, I plan to cover the plywood in the same 12" stick on tiles that I redo the floor with. I plan to use the Coleman camping stove that I have, since this is not going to be an Expo rig & really just used for camping while 4 wheeling.
pictures 005.jpg
Redid all the plumbing lines for the water & added a switch for the sink.
pictures 006.jpg
This is the corner that we had to replace, still need to add the insluation back & then some paneling.

I need to start on the fridge repairs. Anyone have a good link for that, I really don't have any idea if it works at all. Are clearance lights requried? These are really the last two things, except for the new top, that I will be tackling for now. I actual finished up the floor last night, just no pictures yet.
 
Last edited:

SLO_F-250

Explorer
Great work Lefty!!!! Keep it up! You are totally giving some life back to the ole' girl. Makes me want to go work on mine! Been too busy lately to do anything camper/ing related. :drool:
 

lefty

New member
Anyone have a link to fridge repairs? I have taken all the clearence lights off, does anyone know if they are required? Does it depend on the overall height?
 

dfrank

Observer
Lefty, this is second, maybe even third hand info, but I think clearance lighting requirements are a state by state rule. Not required in CO, but i heard they are in NV and CA.

The Aluminum plate looks sweet. I cut in door that I got from an RV salvage yard into the larger passenger side on mine. I then cut through the back of my closet so skis and kayak paddles can fit into the wheel well space.

I like the idea of a portable stove instead of built in. I'd usually rather cook on a table if the weather is nice.

Dave
 

lefty

New member
Whats the best way to install the insert molding in all of the exterior trim? I've read to leave it in the sun or use a bucket of hot water. I think that this insert may end of being the worst part of the rebuild.

By the way, new top installed, pictures to come...
 

Forum statistics

Threads
189,922
Messages
2,922,209
Members
233,083
Latest member
Off Road Vagabond
Top