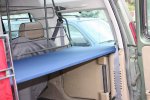
Sleeping Platform, not your typical one

Chazz Layne

Administrator
Now that I think about it, since the box you have in mind is shorter you'd probably be fine going the easy route and just doing a 2-part floor with a gap for that spot. Since you're going with drawers you wouldn't see it anyhow, and it would be plenty strong enough. I probably would have done the same if I didn't need the extra rigidity for spanning the passenger foot well (mine almost touches the center console up front). That, and one side doesn't get a drawer...
 

Paladin

Banned
The original intent was to not have drawers. I was just going to have a flat floor, and the shelf, for simple two-level storage. It was after seeing what the floor looked like, and how cut-up the plywod would be I thought... meh.

If I do drawers, I won't put plywood on the floor. No point. Just sound matting and bedliner.

Here's my hoop.

IMG_7288.jpg
 

Paladin

Banned
The main roll is a cargo barrier. Will be have 2" mesh applied. It will also support the front edge of the cargo shelf. And be some additional roll-over protection for the back seat, or at the least not make matters worse (collapse). It still needs backstays for strength. It will be a serious cargo barrier. Dog Guards are just false security.
 

Chazz Layne

Administrator
Wow! :Wow1:

With a hoop like you have there, then tied into the reinforced seat brackets discussed above, I'd have no reservations loading up a shelf/storage system based on that. Bolt the assembly down to the rear cargo tie-downs and it would be BEEFY to say the least.

Oh not good, now you have me reconsidering putting the upper-rear trim back in and maybe doing a flip-down cargo barrier instead. :coffeedrink:
 

Paladin

Banned
Wow! :Wow1:

With a hoop like you have there, then tied into the reinforced seat brackets discussed above, I'd have no reservations loading up a shelf/storage system based on that. Bolt the assembly down to the rear cargo tie-downs and it would be BEEFY to say the least.

Oh not good, now you have me reconsidering putting the upper-rear trim back in and maybe doing a flip-down cargo barrier instead. :coffeedrink:

Not quite. The feet of the main hoop will be bolted to the floor and the wheel well, but no exactly as you see. Those feet are too small. Will be making them bigger, few more bolts. I couldn't line the feet up with the mounts for the tie-down points unless I put a "kink" in the vertical section of the hoop, which would make it weaker. Would probably work if you had no intention of making the hoop act as roll-over protection. You could make a barrier out of 1" or 1.5" tube and do that.

I will use the rear bolt holes to secure the legs at the back of my shelf.

I'm planning on using the headrest mounting points above the rear door to fasten the backstays for the hoop that will run along the roof.
 

Paladin

Banned
Well, I decided not to build drawers, this will just be a shelf and the barrier. So I removed those "bumps" from the floor. First, carefully drill the spot welds.

IMG_7334.jpg


Then, using a cold chisel, remove the metal. I have a few new holes in the floor, but given how many are there already, no big deal. Just seal them up.

IMG_7344.jpg


Welded up the shelf support. This will bolt on to the main hoop. I was thinking about using the factory tie down points to bolt the feet but... after having a good look, it's pointless. Those mounts are so pathetic. Anybody thinks they are going to hold a few hundred pounds of Pelican cases in a crash will be sorely disappointed.

IMG_7354.jpg


Welded up the backstays. This was the hardest part, getting the fit right.

IMG_7361.jpg


Bolted to the rear headrest points. Not sure, but I think I'll weld them. 2 M6 bolts per side... probably not enough.

IMG_7366.jpg


Was pretty hard to get this back out for finish welding.
 

College Kid

Adventurer
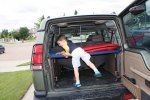
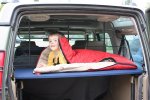
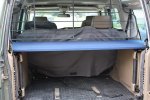
Well I finally got around to building this..........

After a little test fitting and having my son crawl around on a rough piece of plywood to see how the weight would be I decide against the need to renforce the design for the momment. If I decide to sleep on it myself much I will probably re look into it.
 

Attachments

  • IMG_6878.JPG
    IMG_6878.JPG
    92.4 KB · Views: 86
  • IMG_6880.JPG
    IMG_6880.JPG
    80.5 KB · Views: 92
  • IMG_6875.JPG
    IMG_6875.JPG
    79 KB · Views: 73
  • IMG_6876.JPG
    IMG_6876.JPG
    53.8 KB · Views: 64
  • IMG_6877.JPG
    IMG_6877.JPG
    70.4 KB · Views: 68
Last edited:

4Rescue

Expedition Leader
Hey when you close the rear door it's like a "kid cage" back there aye ;) That would be so cool if you were a kid, I'd have LOVED that platform when I was young.

Cheers

Dave
 

JeffRRC

Adventurer
That reminds me of sleeping in the hammock setup in the front of my parents 1964 VW Westfalia sub hatch camper when I was a kid. I loved that vehicle!
 

College Kid

Adventurer
This setup works awsome, it wieghs under 10 lbs I would guess. It is only the weight of a sheet of 3/4 inch plywood with one of those blue camping mats on it. Unfortunatly my son was still a little young to sleep on his own this summer. He liked it for playing on and taking naps but didn't like the idea of sleeping all night in the "kid cage".

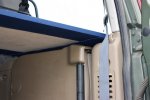
The platform did serve an even better purpose thou. It is the purfect size to hold rubbermaids. So I was able to stack up a couple of them on top which kept everything much more organized. For next season I will be making a couple of changes, namely a removable support leg in the middle to take a bit of weight.
 

Forum statistics

Threads
190,121
Messages
2,924,184
Members
233,417
Latest member
dhuss

Members online

Top