The replacement - 2004 HDJ100R Landcruiser

p1michaud

Expedition Leader
Final update for today...

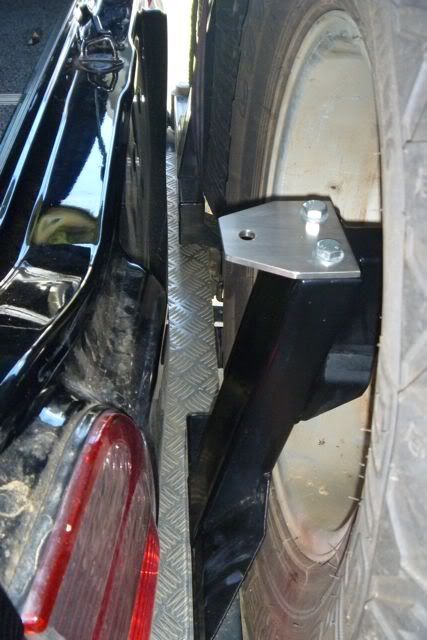
I wanted a solid mounting location for the sand flag and I don't like them on the bull bar (personal choice) so I came up with this little idea. The rear wheel carrier comes drilled and tapped for mounting accessories such as HF antennas, camp light mounts, shovel or jack holders so I took advantage of that design feature to add this:

P1010720.jpg


Cheers,
P
 

p1michaud

Expedition Leader
Manar Park - Proston Queensland Australia

What do you do when you need a bit of a 4WD fix? Well you head out to a local off road park to test out your new vehicle. With that in mind, we left on a Thursday morning and pointed the cruiser with trailer in tow due south for a bit of 4WD fun. We met up with 6 other friends from Brisbane at a place called Manar Park near Proston QLD Australia.

I put the cruiser up on some rocks for the first time. Performed well.

IMG_4024.jpg


A nice line up of cruisers right back to the early models. Both the 40 and 80 in this photo are serious off road weapons. I really enjoyed following them except for the really tight tracks...

IMG_4035.jpg


But no adventure is complete without a bit of bush mechanics. On the way home I picked up a piece of metal in the rear left side tyre (yes tyre in Oz, not tire :ylsmoke:).

Can you spot the offending piece?

IMG_4179.jpg


Fortunately I had a proper repair kit in the Landcruiser. The piece of metal is lying on the case.

IMG_4180.jpg


Who said you can't have fun when you are fixing things?

IMG_4186.jpg


All fixed and time for some more air for the trip home.

IMG_4187.jpg


Note: I've had the tyre properly repaired given it was brand new.

Cheers,
P
 

p1michaud

Expedition Leader
A bit out of sequence given the updates to the cruiser but I'll start with some fun stuff.

Can anyone guess where this photos was taken?
P1020324.jpg


Hint in second photo...
IMG_4299.jpg
 

Redline

Likes to Drive and Ride
I love your new turbo-diesel 100!

Black would be my last choice due to heat and appearance (dirty, scratches) but I agree with you Pierre, the mechanicals come first.

Sorry I missed this thread until today, but happy to catch up and follow along.

Are any of these nice Aussie toys traveling back to North America with you when you return?

James
 

p1michaud

Expedition Leader
I love your new turbo-diesel 100!

Black would be my last choice due to heat and appearance (dirty, scratches) but I agree with you Pierre, the mechanicals come first.

Sorry I missed this thread until today, but happy to catch up and follow along.

Are any of these nice Aussie toys traveling back to North America with you when you return?

James

Yes Black was a compromise however the drivetrain was spot on and the aftermarket accessories were tasteful so it got the nod. As for returning to NA that will all depend on return date...

Cheers,
P
 

p1michaud

Expedition Leader
Addressing the weaknesses of the 100 for serious off road travel.

For those who don't know, the 100 series has two major areas that need to be addressed prior to serious off road use especially on the Australian Outback corrugations :safari-rig:

  • The front differential
  • The front lower control arms

This was also discussed here: Top 10 Used Overland Vehicles

The front differential has been replaced by an ARB air locking differential and that should alleviate any concerns for the front diff.

So for those who don't know, here is what can happen. Due to the design of these lower control arms but more importantly the location of the bump stop on full compression it forces the two pressed parts of the lower control arm apart. The lower control arms are made of two pieces pressed and welded together. Here are a few photos compliments of some of the crew over on LCOOL.org.

The crack starting to form:
Aframerepairs4.jpg


Another example where they used dye penetrant to find it:
100crackedifsarm.jpg


These speak for themselves...
100crackedifsarm3.jpg


100crackedifsarm2.jpg


100crackedifsarm4.jpg


ifs100lift-30.jpg


Before our last adventure (Cape York QLD Australia) I set about correcting the lower control arm issue.

In Australia, a few aftermarket suspension companies offer a strengthening bracket for the 100 series IFS lower control arm. The issue is that they bolt on and only serve to hide the issue until total failure. The best solution is to weld the bracket on as well as reweld the interior of the lower control arm where it should have been done at the factory.

Picture to follow.
 

p1michaud

Expedition Leader
Lower control arm strengthening

Here is the final product:

P1020121.jpg


P1020123.jpg


P1020124.jpg


P1020125.jpg


I can travel without concern for the lower control arms now. :sombrero:

There are a few other items to be addressed before an arduous trip to Cape York but that will be the next instalment.
 

Redline

Likes to Drive and Ride
Nice Pierre. I assume one could also replace the LCA with an aftermarket unit, or are there none offered?
 

p1michaud

Expedition Leader
Nice Pierre. I assume one could also replace the LCA with an aftermarket unit, or are there none offered?

To be honest, I have not researched aftermarket units. That being said, of all the reading I have done aftermarket units were never discussed (Aussie forums). Another thing to remember is that in Australia the laws governing vehicle modifications are strict and do vary from state to state. This was the most factory looking and bomb proof repair method. It also helps that I had access to licensed welder for the repair.
 

Redline

Likes to Drive and Ride
snip...This was the most factory looking and bomb proof repair method. It also helps that I had access to licensed welder for the repair.

Sounds like a great choice. Probably less expensive than an aftermarket option if there is/was one.
 

p1michaud

Expedition Leader
Tackling the suspension

As with most of our vehicles, the factory suspension was not up to the task of carrying all the extra weight as well as handle the corrugations dished out by the Australian outback. So my research for suspension started.

My criteria was roughly as follows:

The vehicle’s primary use is a touring vehicle. It does not get driven daily but we still want a comfortable ride on the road. We had a trip up to Cape York planned for July 2012 (significant corrugations) that would stress the suspension. We were looking for a lift in 50 mm range (2") with the ability to fit 285.75R16 tires.

Aftermarket accessories that add weight currently fitted to the vehicle include:

Up front:
  • Front steel bull bar
  • Warn Winch (XP9.5 with synthetic line and aluminium hawse fairlead)
  • IPF spot lights
  • Dual batteries (N70Z case size larger than OEM)
  • 50% of the skid plate - built with a mix of steel and aluminium
  • 50% of the slider/brush rails

In the rear:
  • Outback Accessories steel dual wheel carrier
  • Long range fuel tank
  • 50% of the skid plate
  • 50% of the slider/brush rails
  • Roller drawers with tools and recovery gear
  • Fridge and fridge slide
  • Towing a Kimberley Kamper off road trailer (varies between 100 to 220 Kg ball weight)

Up top
  • Front runner roof rack
  • Max Trax
  • ARB awning
  • Hi-Lift Jack
  • Shovel

As you can see, the weight over stock was significant. Just to make the job that more complicated I wanted to have better than average articulation and variable weight carrying capability for the times when we are not towing the trailer.

The solution: enter Auto-Craft and Darren McRae. I first stumbled across some of the vehicles that Darren as he's known on some of the local forums in Australian 4WD Action magazines, the best part is that he has a severe penchant for Toyota Landcruisers in particular the 80 and 100 series. Although he's recently been playing with the FJ Cruiser. After noticing that Darren had built a very cool 80 Series known as "Project Rooby" that was sporting some Slee Off-Road goods I noticed that he was the only official international dealer for Slee. More in the next post.
 
Last edited:

p1michaud

Expedition Leader
Bilstein shocks and slinky coils

The research I've put together outlined some key points regarding the 100 suspension setup. Most of this was thanks to Darren and goes like this:

For a vehicle on 16" rims, the maximum height should be no more than 750 mm from bottom of rim to fender edge (for stock length front shocks and no diff drop).

Add a diff drop and proper length front shocks the target height with 16" rims is 775 mm bottom of rim to fender edge includes diff drop for the front.


Check:

  1. Once set up correctly, up to 60mm of lift should be available with no adverse wear on components over standard, or shock damage, and the vehicle should have aprox 30mm of rake from front to rear difference, rather than the 70mm + they have standard.
  2. Minimum 70mm droop in the front required from ride height. [difference between ride height measurement and when wheel hanging off the ground is the amount of droop]
  3. You should also have stone shields for the rear shocks.
  4. Check the tops of the rears shocks and you have to be very specific about how they are installed, because the washers and rubbers are so large, so as to not overlaod the shock with side loading, for the very durable rubbers and washers fitted to them to suit the 100 units.
  5. When adjusting the torsion bars, on a Turbo Diesel 5 turns of the adjuster will raise or lower the vehicles front 20mm, or part there of [2.5 turns = 10mm] and, 10 turns wont be 40mm of adjustment.
  6. Ensure that the Polyairs are correctly installed. Plenty of available hose over the top for travel to not pull tight, convoluted tube over the air lines to prevent stone damage and Superglue the hose onto the barbs to prevent any slow leaks from fittings.

The hardware came in the form of: Custom length and valved Bilstein schocks front and rear. Custom slinky coils for the rear along with some Polyair air bags do the variability in load between towing and not towing. A final but vital component is a heavy duty sway bar.

A few shots of the hardware:
P1020159.jpg


P1020161.jpg


P1020162.jpg


P1020168.jpg


The end result....

:wings:

Seriously stable, handled all the corrugations I could throw at it and no shock fade. What else can I say. For those looking for a similar package, go the Auto-Craft route. You will not be disappointed. :sombrero:
 

Bulldust

New member
Nice looking 100 series mate, good to see that it's getting out there and enjoying the bush.

How did you mount your ARB awning to the Windcheetah rack? I'm looking to do the same thing but can't get a straight answer out of ARB as to how they can do it, whether a mounting bracket has to be fabricated or there's a standard part that can be used.

Cheers,
Jeff
 

p1michaud

Expedition Leader
Nice looking 100 series mate, good to see that it's getting out there and enjoying the bush.

How did you mount your ARB awning to the Windcheetah rack? I'm looking to do the same thing but can't get a straight answer out of ARB as to how they can do it, whether a mounting bracket has to be fabricated or there's a standard part that can be used.

Cheers,
Jeff

Thanks, it's a nice vehicle for sure.

For the awning I made up a simple bracket. It's 30 mm by 30 mm square, cut on an angle with two holes drilled in it to mount to the roof rack then a flat piece welded on at 90 degrees with two holes for the awning. Not an off the shelf job but a few scrap pieces of metal cut and welded together. Not an off the shelf job. Probably took 2 hours to fabricate and paint. I'll try and get some close up photos.

Cheers,
P
 

Forum statistics

Threads
185,888
Messages
2,879,485
Members
225,497
Latest member
WonaWarrior
Top