You are using an out of date browser. It may not display this or other websites correctly.
You should upgrade or use an alternative browser.
You should upgrade or use an alternative browser.
Trailer in Design stage
- Thread starter RJ Howell
- Start date
RJ Howell
Active member
Posting to watch the build.
I have a 6 x 12 v-nose cargo trailer that I would like to make a pop-top to lower the profile while towing. May be some things I can learn.
LOL, me too. This will be a huge learning curve for me.
RJ Howell
Active member
Mr. Howell Would you like me to send you a few inches of that fiberglass trailtop to look at. If you decide to use something like this. I will be easer to take down to your local glass shop and talk about it
Appreciate that!
RJ Howell
Active member
Okay, my expectance to TNTT has gone through and started up a thread to get a decent understanding of this Foam Build they do. I will do a fairly simple build to work my way through this and learn if and how I could incorporate this build technique.
Here's what I'll be building first.
First curve is to learn about attaching panels to each other, then attaching other materials (wood and metals). And see if I can build my simple window design (windows will not have square corners).
I purposely designed with angled sides, believing it will help with over-all integrity. How to apply this to my 'full' build? Yet to be determined, though I already have the roof that way.
Here's what I'll be building first.

First curve is to learn about attaching panels to each other, then attaching other materials (wood and metals). And see if I can build my simple window design (windows will not have square corners).
I purposely designed with angled sides, believing it will help with over-all integrity. How to apply this to my 'full' build? Yet to be determined, though I already have the roof that way.
Last edited:
RJ Howell
Active member
Here's the curved roof version which I hope to achieve:

This is just a Cap, not a full camper. I consider it a Sleeper. A raised platform for the bed (to get full width) and over-cab is just for weekend storage of clothes. Under the platform will be an area for cooking gear, bug tent, etc.. That part later..
I have purchased the 1 1/2" styro board from HD and the Gorilla Glue. Starting to draw it out.
I have researched the deflection rate of the panel.. The math is way beyond my simple mind, so I put it on the horses and tested. I like up to 3" over 8ft. Don't like the crackling sound so much, so I won't push beyond that. I'm not yet a fan of kerfing this material, I want the added strength in this panel for the roof. Adding some stress (curve) makes sense to me.
So, my journey of learning begins!
RJ Howell
Active member
I'll be marking out the roof curve and making the initial cuts today. Joining the foam panels is now become a question mark for me. I read most use Gorilla Glue, yet just read about another using Great Stuff spray. I see benefits of either.. I will probably stay with Gorilla Glue mainly because it will be easier to work with on long seams.
I'll post pictures of the days progress later.
I'll post pictures of the days progress later.
RJ Howell
Active member
Layout done! Used a section of PVC tubing I have around to mark-out the roof curve.
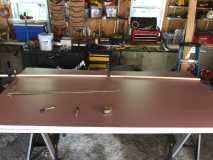
That of course lead to the cutting. Used my saber saw for the rough in cut. And see how close I got it?
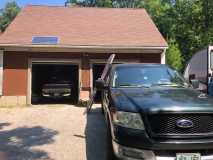
Funny, I didn't notice my Camper in the background and how it lined up on the cap.. Cute, but too long... LOL, that wasn't planned.
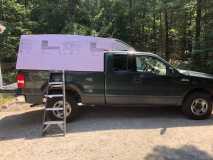
Checking the angle I hope for and how it will look. I like! Used the back hatch on the existing cap as my baseline. 20 degrees.
Now for my first attempt at joining two pieces of foam.. A full piece of duck tape underneath, un-fold, Gorilla glue on one half, spritz of water on the other, fold together, tape and await the result. Waiting is the hardest part..
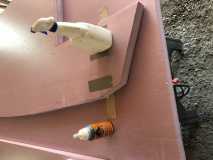
I see my first mistake already.. I told myself 'no' square inside corners! I'm also seeing I want to angle the panel as it comes to the cab of the truck. May be able to fix that square I.S. cut then, or just add a piece of foam and go at it again. Really like that you can do that!
I'm going to try the skill saw for cutting the 20 degree angle on the bottom and top. Figure I need a 12 or less toothed blade. Curious if anyone has attempted flipping the blade as we used to with vinyl siding?
Hey, what's some experimenting...
That of course lead to the cutting. Used my saber saw for the rough in cut. And see how close I got it?
Funny, I didn't notice my Camper in the background and how it lined up on the cap.. Cute, but too long... LOL, that wasn't planned.
Checking the angle I hope for and how it will look. I like! Used the back hatch on the existing cap as my baseline. 20 degrees.
Now for my first attempt at joining two pieces of foam.. A full piece of duck tape underneath, un-fold, Gorilla glue on one half, spritz of water on the other, fold together, tape and await the result. Waiting is the hardest part..
I see my first mistake already.. I told myself 'no' square inside corners! I'm also seeing I want to angle the panel as it comes to the cab of the truck. May be able to fix that square I.S. cut then, or just add a piece of foam and go at it again. Really like that you can do that!
I'm going to try the skill saw for cutting the 20 degree angle on the bottom and top. Figure I need a 12 or less toothed blade. Curious if anyone has attempted flipping the blade as we used to with vinyl siding?
Hey, what's some experimenting...
The Artisan
Adventurer
If you are using liquid gorilla glue you need to put it under vacuume table for hours as the glue foams up. It needs pressure to get good overall bonding
Kevin
Kevin
RJ Howell
Active member
If you are using liquid gorilla glue you need to put it under vacuume table for hours as the glue foams up. It needs pressure to get good overall bonding
Kevin
Pressure I can apply. As far as a vacuum table, not going to happen. It will be too big! Now strap clamps I do see happening. I did a sample piece to see I=how, how clamped, it would break. Yes the joint is still the weakest point. Here's 'my' conclusion of the test: The gorilla glue absorbed into the foam actually making the foam in that area weaker. The Gorilla glue stuck firmly to the foam, the foam attached to the gorilla glue broke. Was it just that the gorilla flex's differently.. maybe. There is another step involved here I haven't reached yet and going through several thoughts of how to do this step. This step adds strength to foam (much like fiberglassing over). That's much further up the road for me.
Think of it as a Poor Man's SIP...
Thank you for your response! All are welcomed and studied. I'm learning as I go here.
RJ Howell
Active member
Last for today and I think final on the roof curve. I was reaching critical height and needed to lower a bit. I do like this better.
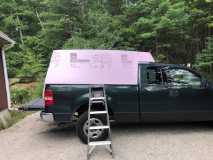
A little tweaking on the front edge, yet back I'm good with. Getting close and should be able to cut the other side tomorrow.
Best part is: I'm approaching a 4ft wide roof! With the side angles it's real close. We shall see..
A little tweaking on the front edge, yet back I'm good with. Getting close and should be able to cut the other side tomorrow.
Best part is: I'm approaching a 4ft wide roof! With the side angles it's real close. We shall see..
RJ Howell
Active member
Pictures of todays progress. A bit less than I thought but a few changes (and that takes time).
I set this up at my first choice of 20 degrees (which matches the F-150 cab.. Didn't like it! Adjusted back to 12 degrees and it looked boxy.. Didn't like it. Finally settled as you see it at 15 degrees. Not too far off the F-150's slope yet better to 'my eye' (just that's what really counts, aye?).
I did even up the curve a bit, then traced out the other side. Clamping both together, sanding until they matched.
Bevel time!
For this I did go to the Skill saw. Worked great! Since this is just an edge cut, no burning, sticking, no issues whatever. For the record (and others safety), I am using a jig saw to rough in all my sections.
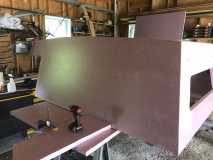
I used several pieces to make up the back area that you see. Also marked out where I believe I'll but cutting it for the hatch/entry (hard to see unless you click on the image). When I laid out my top arch/curve I set both ends equal, so that when I get to this point (back in place) I can take dimensions to cut the front sections.
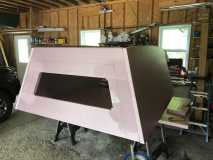
Nope, no roof yet.. Yet now I can rough in the size and make up my sections for the front. They will need to be glued up. Waste not, want not (and it's so easy to glue-up!).
I hoped to have the sections glued up today for the front, yet so much time was used up just getting it where I'm happy with what I see. Hopes tomorrow is to get those pieces cut, get the utility cap off the truck and do a dry fit. Then start all over.. LOL..
Side note: I did try the table saw on a couple of items. Be very careful when doing so! I am a believer that your limbs are much more important than the cost of material. Let the piece fly across the shop! Nope, didn't like that at all.
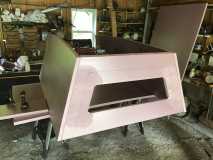
I set this up at my first choice of 20 degrees (which matches the F-150 cab.. Didn't like it! Adjusted back to 12 degrees and it looked boxy.. Didn't like it. Finally settled as you see it at 15 degrees. Not too far off the F-150's slope yet better to 'my eye' (just that's what really counts, aye?).
I did even up the curve a bit, then traced out the other side. Clamping both together, sanding until they matched.
Bevel time!
For this I did go to the Skill saw. Worked great! Since this is just an edge cut, no burning, sticking, no issues whatever. For the record (and others safety), I am using a jig saw to rough in all my sections.
I used several pieces to make up the back area that you see. Also marked out where I believe I'll but cutting it for the hatch/entry (hard to see unless you click on the image). When I laid out my top arch/curve I set both ends equal, so that when I get to this point (back in place) I can take dimensions to cut the front sections.
Nope, no roof yet.. Yet now I can rough in the size and make up my sections for the front. They will need to be glued up. Waste not, want not (and it's so easy to glue-up!).
I hoped to have the sections glued up today for the front, yet so much time was used up just getting it where I'm happy with what I see. Hopes tomorrow is to get those pieces cut, get the utility cap off the truck and do a dry fit. Then start all over.. LOL..
Side note: I did try the table saw on a couple of items. Be very careful when doing so! I am a believer that your limbs are much more important than the cost of material. Let the piece fly across the shop! Nope, didn't like that at all.
RJ Howell
Active member
went out today
Looking forward to seeing it!
opp
Observer
You should get your box today. Look hard for it. bet you did not know they made boxes that small.
The outside rail is a light one that get used on trailers that get blown up with foam. Like a football.
All so when you layup your glass you are better off using polyester resin . Any places you can lay press something flat before cure will help with the fill and sand .
outer rail, spacer, floating cross piece
Last edited:
