Vandit - A Build Thread - 2013 E-Series Camper Van/4x4 Build

aarcaris94

Active member
Small Update : (Pulled from another Forum Post from a few months ago).
- About a month ago we placed an order for window covers through Van Made Gear We decided to go with Van Made Gear. after seeing their products in person at the Adventure van Expo in Redmond Oregon in the fall of 2021. They use a nice high-quality fabric on both sides of the cover with a thin semi-rigid insulation layer sandwiched between the fabric. They are mounted using sewn-in magnets that allow for quick and easy setup with no additional mounting hardware needed. Plus they fold up nicely for easy storage. Unfortunately, they only offer cab window covers (windshield, driver & passenger doors) unless you have the cargo doors with no window surround. After failing to convince them to make some custom covers for our side and rear doors we decided to buy the matching material we needed for those doors and place our order for the cab windows covers. After about 4 weeks they showed up in the mail and they look great! The fit and finish are very nice and high quality. I have a local upholster lined up to make our other 4 window covers and hope that if I can make good templates they will be able to knock out the other 4 quickly.

14991-albums1480-picture46145.jpg


14991-albums1480-picture46144.jpg


14991-albums1480-picture46143.jpg


14991-albums1480-picture46142.jpg


14991-albums1480-picture46141.jpg


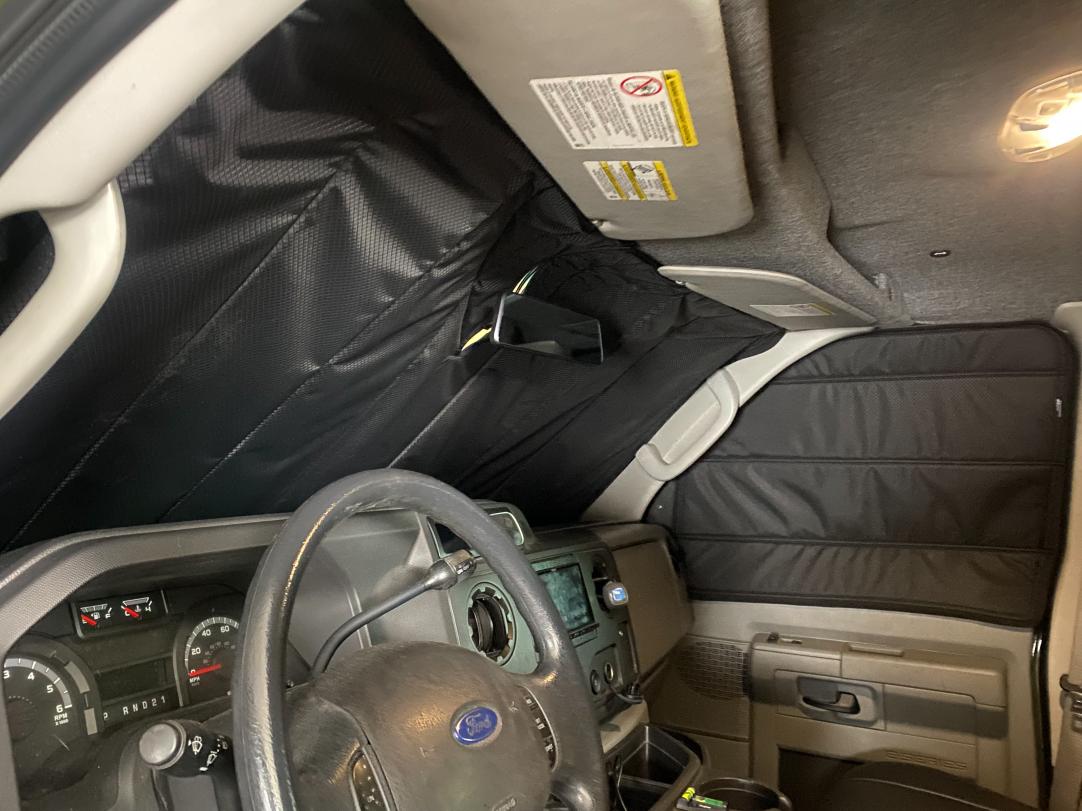
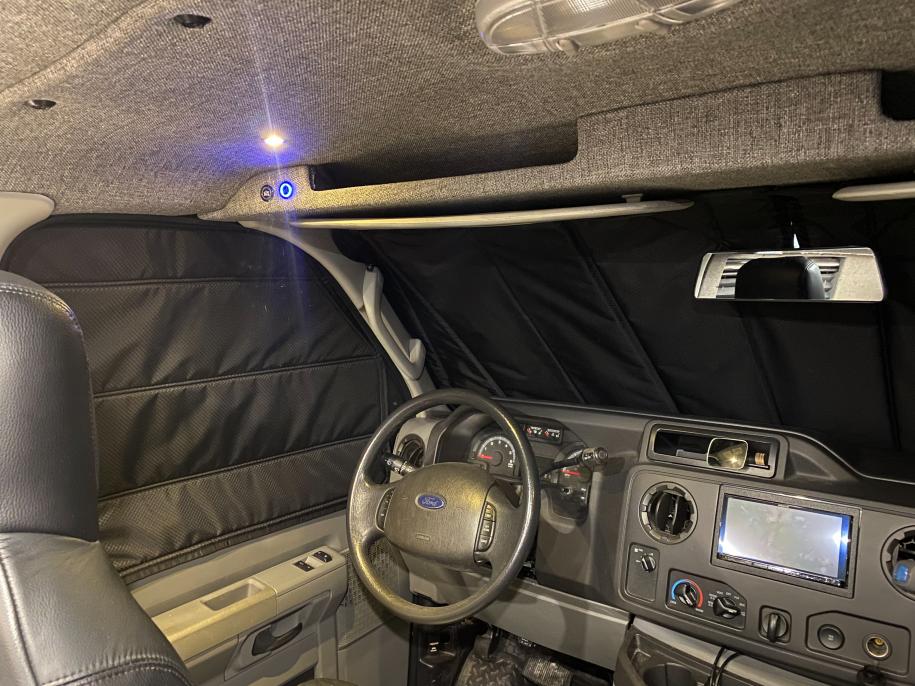
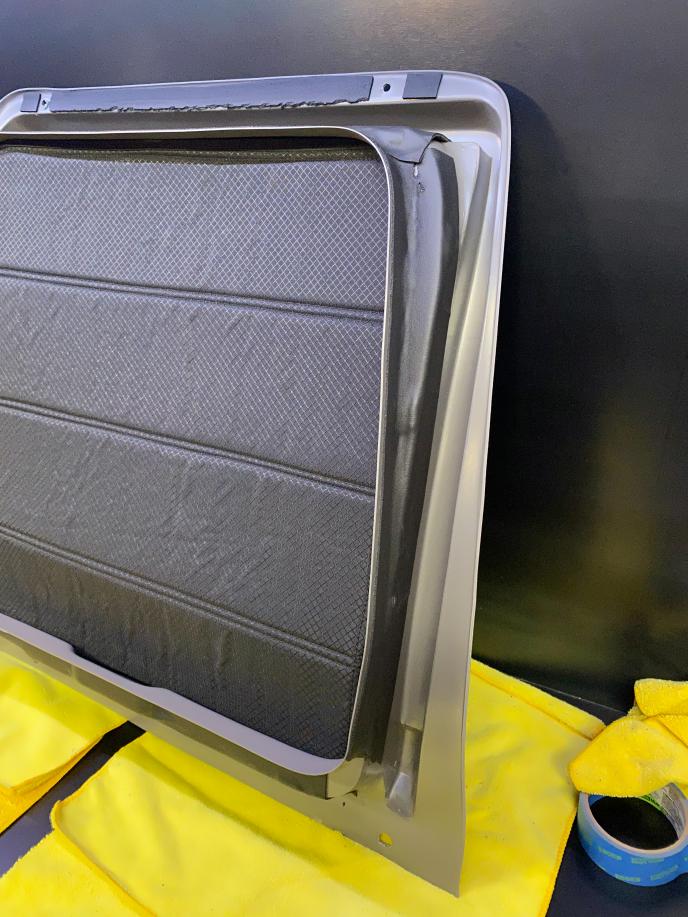
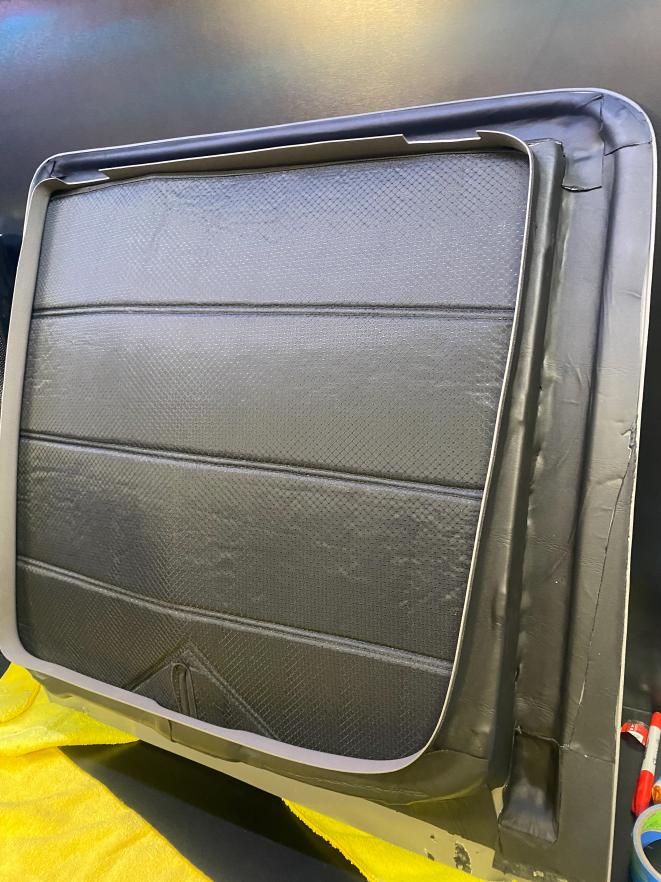
-After only about a week after we dropped off the material we got our other custom window covers back from the local upholstery shop and they turned out great! I supplied them with the material (Fabric, Bias Banding, Insulation, and Magnets), window templates, plans for stitch layouts and magnet locations, and one of the Vanmade gear covers for reference. They really knocked it out of the park. Super stoked to have all matching covers that are water-resistant, foldable/stowable, attach with magnets, fully block out all light from inside or outside, and are insulated. It seems like a pretty small thing to have completed, but feels like a huge win for us! I still need to pull off the window shroud and glue in magnets to the backside of the plastic to ensure a perfect fit, but as you can see in the pictures they are already fitting great without the magnets installed and should only get better.

14991-albums1480-picture46199.jpg

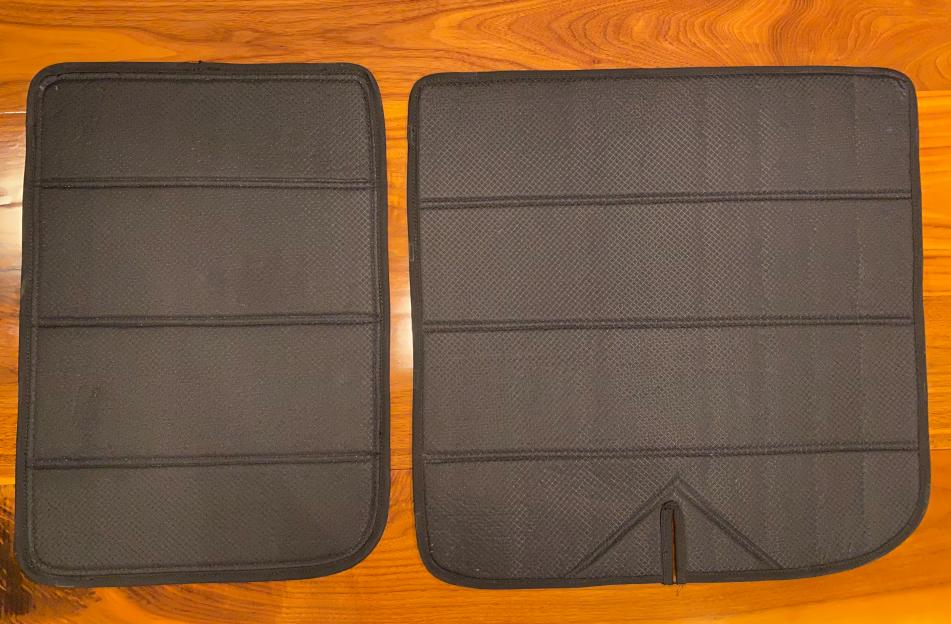
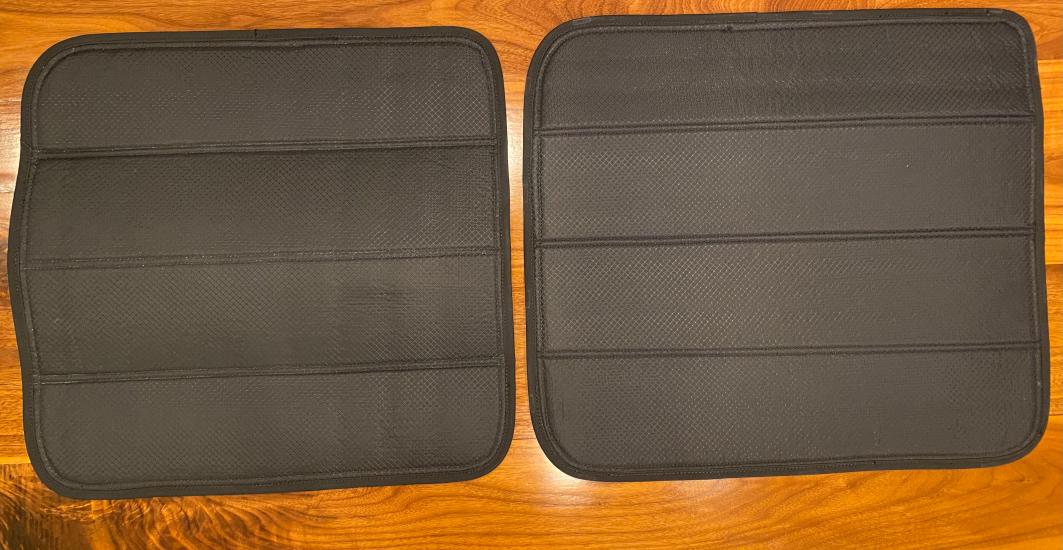
Side 60/40 Door Window Covers

14991-albums1480-picture46200.jpg

Rear Passenger & Driver Window Covers

14991-albums1480-picture46201.jpg

14991-albums1480-picture46202.jpg

Comparison of Custom cover to Vanmdae Driver Door Cover

14991-albums1480-picture46203.jpg

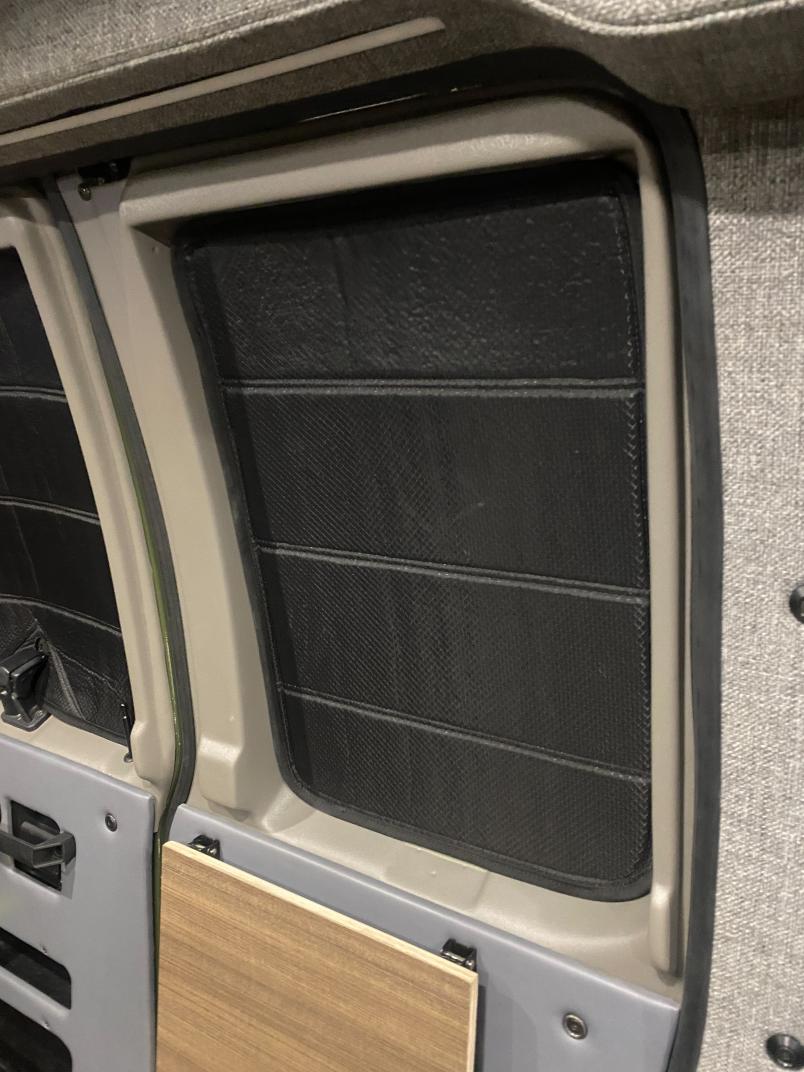
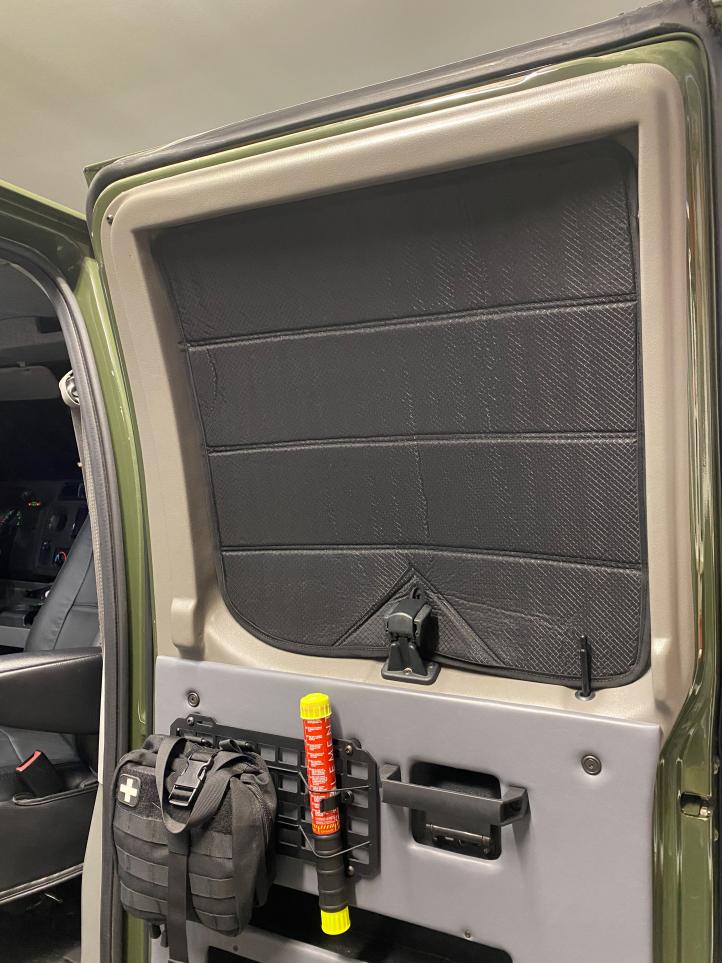
Side Pop Out 60 Door Window Cover In place. No Magnets Installed In Door

14991-albums1480-picture46205.jpg

Side Door Window Covers 40 Door No Magnets Installed In Door

14991-albums1480-picture46204.jpg

14991-albums1480-picture46207.jpg

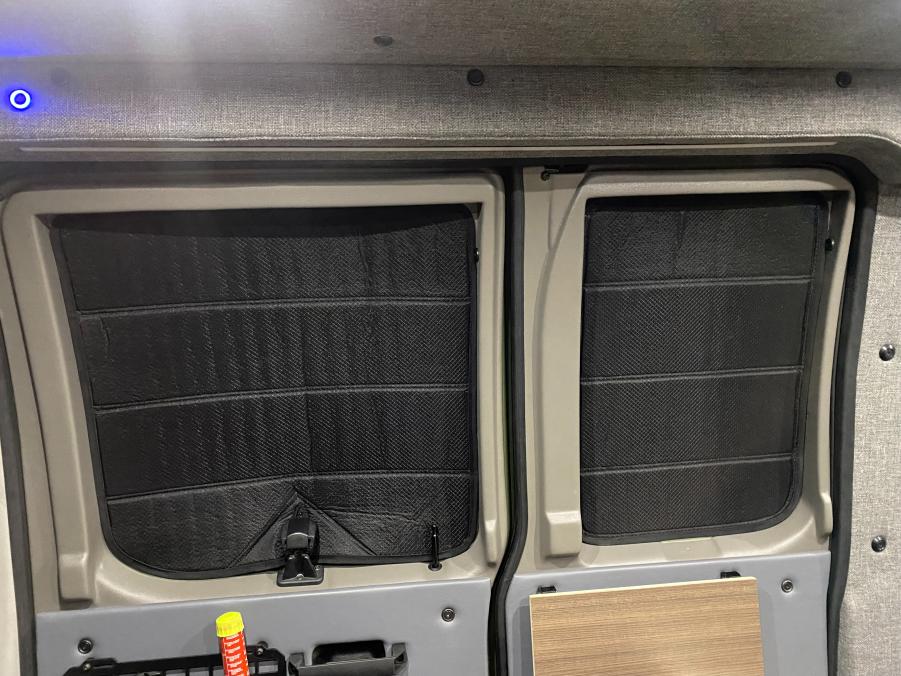
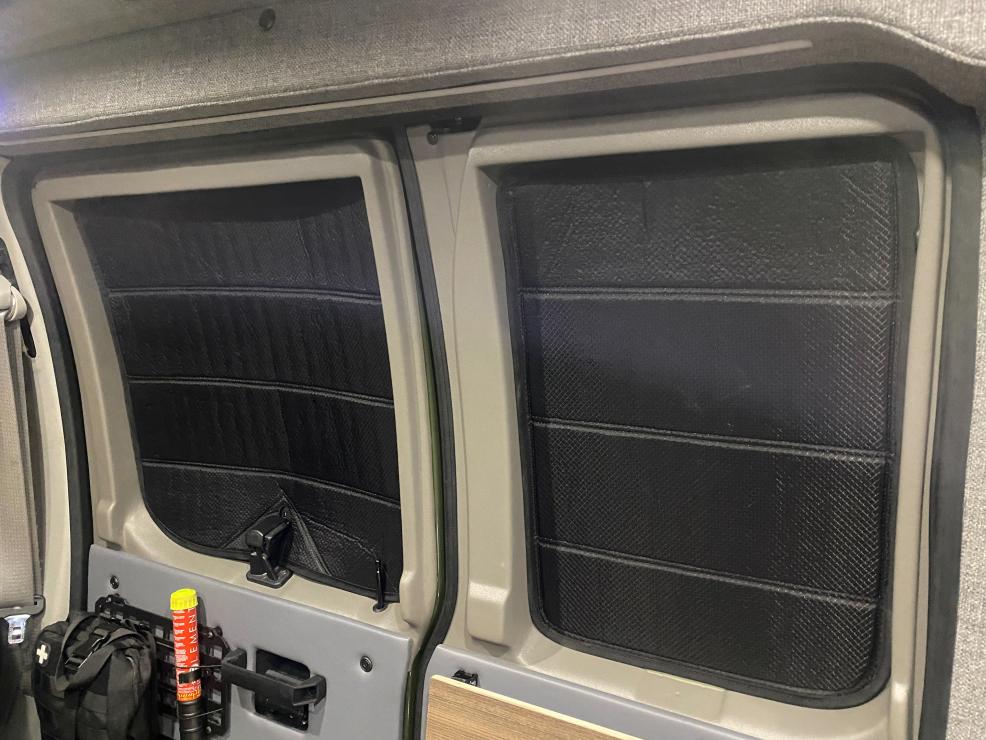
Side Door Window Covers 60/40 Doors No Magnets Installed In Doors

14991-albums1480-picture46208.jpg

Rear Door Window Covers Passenger and Driver No Magnets Installed In Door

14991-albums1480-picture46209.jpg

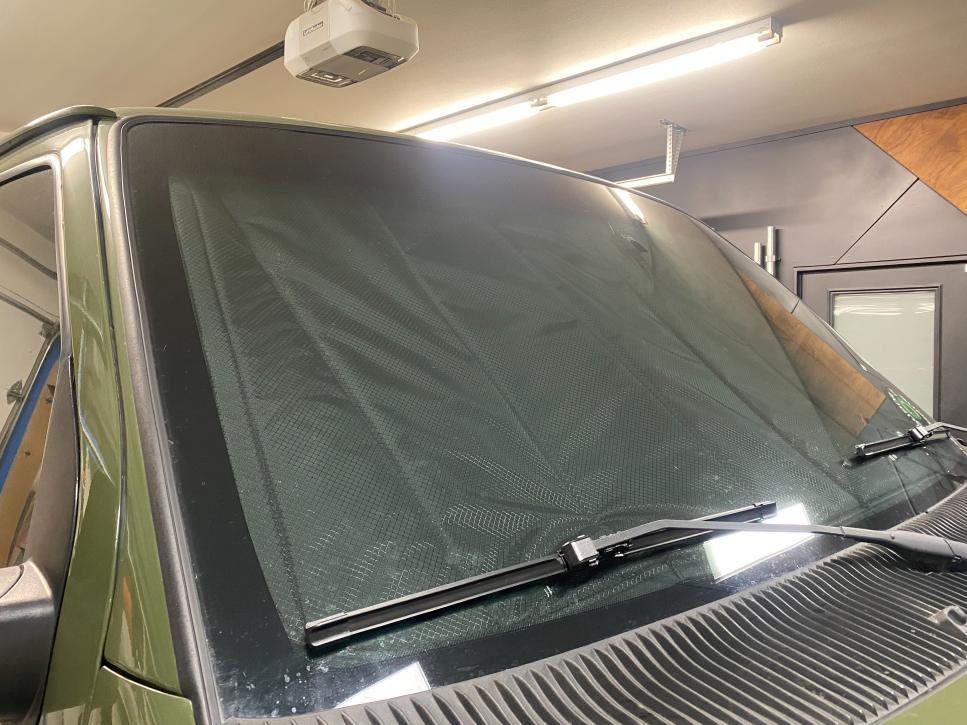
Front Cab Doors Vanmade Window Covers For Reference

14991-albums1480-picture46210.jpg

Window Covers From outside

14991-albums1480-picture46211.jpg

14991-albums1480-picture46212.jpg

Side 60/40 Doors Window Covers​
 

aarcaris94

Active member
Small Update:

-Few small updates for Vandit before we headed out on a trip along the Oregon coast.

-Added in an AMI billet locking fuel door. Thanks to a fellow forum member for passing on a link for it. It seems like they are getting harder to find now! I did make a slight modification of pulling the bolts out and painting them black that way it blends in a little more with the van.

14991-albums1480-picture46299.jpg

-Then I started the process of adding magnets for my windows covers. I pulled each shroud off, placed the window cover inside the shroud, and let the magnets locate themselves on the backside. After some slight adjusting, I was able to get them to fit very nicely. I then marked the location with a sharpie and glued them in place. After the glue dried I covered the entire backside of the window shroud with some ⅛” foam I found on Amazon in hopes that it would help deaden some of the plastic sounds of the shroud. After using them for one full trip it seems like not only did the window covers work great so did the foam and stopping some of the creaking sounds we heard from the shrouds.

14991-albums1480-picture46300.jpg


14991-albums1480-picture46301.jpg


14991-albums1480-picture46302.jpg


14991-albums1480-picture46303.jpg


-Next thing I did was add a 4” cleanout port to my freshwater tank. Still need to find the best solution to getting rid of the plastic taste, but it’s much better now that I can get inside the tank to clean it as well as had any cleaning solutions.

14991-albums1480-picture46304.jpg

Before (view of the tank without fill panel behind the seat)

14991-albums1480-picture46305.jpg

After​

-I was having problems with GPS location while using wireless Apple Carplay with the new head unit, so I decided to replace the GPS antenna and relocate it to the center of the dash. Since I had to take apart the entire dash to do this I also decided to add a few USB charging ports to the dash. The two on the far passenger side are directly plugged into the head unit for wired Apple Carplay/USB functions and the other two are just your standard Blue Sea Fast Charge USB ports. They worked great on the trip and the antenna swap fixed the problems I was having.

14991-albums1480-picture46309.jpg

-I took a chance on a random Amazon find for a Bluetooth controller as I have missed being able to switch songs quickly like in my Tacoma. It connects to my phone Via Bluetooth and runs off batteries. So far it works great for Pause/play and next and previous songs but can't get the volume control to work while the phone is in Carplay mode. Overall I am super happy with it. It is installed with double-sided tape behind the wheel so everything looks factory and it stays out of the way until I want to use it.

14991-albums1480-picture46310.jpg

-The last main thing I did before the trip was to pull some Trek-Paks material that I had in my truck bed drawers and did a test repurpose in the van drawers. I only had enough to do one of the rear drawers and my main galley drawers, but I am very pleased with the result and will be ordering more for the other drawers.

14991-albums1480-picture46311.jpg


14991-albums1480-picture46306.jpg


14991-albums1480-picture46307.jpg


-We had a great trip along the coast, the van worked great and like I said the window shades worked perfectly. Van stayed nice and even for temperatures. They were easy to deploy and stow and blocked out all the light outside. Ace our dog is very pleased with our camping setup!

14991-albums1480-picture46313.jpg
 

aarcaris94

Active member
Update:

-Still no big update on the 4x4 front but I have started to receive some parts which is exciting! So far I have received my rear shocks from Accutune, rear 4.88 Yukon Gears, Sterling 10.5 OX locker, and Apex RPV valve stems. Still waiting on some of the bigger parts, but everything is slowly coming in!


14991-albums1480-picture46511.jpg


Fox 2.0 Resi with Compression adjuster Custom Tuned by AccuTune Offroad


14991-albums1480-picture46534.jpg


This thing is super stout


14991-albums1480-picture46535.jpg


Curious to see how well these work. Build Quality on them are great!


- One bigger update is that I received my Front Aluminess Bumper! I was surprised that it was delivered about 4 weeks after ordering which seems very fast compared to some of the reported timelines I have seen over the last couple of years. They recently did a slight redesign on the bumper since being bought by Bestop. The things that I am aware of that have changed are the light pockets, powder coating finish and the addition of the Aluminess logo cut out on the side. For the light pockets, there are now two of them and they are now sized to fit Baja Design Squadron lights as they are also owned by Bestop. This is a great change in my opinion as I wanted to run all Baja Design lights if possible and now I can run dedicated fog lights as well as some more High powered driving lights at the same time. The powder coating is more of a textured finish which reportedly helps with scratches so that is also a positive in my book. I was very impressed with how perfectly packaged it was and at first, a little shocked by how big the box was.


14991-albums1480-picture46624.jpg


14991-albums1480-picture46625.jpg


14991-albums1480-picture46626.jpg


14991-albums1480-picture46627.jpg


(Our Dog Ace for Scale)​


I was curious what the exact difference in weight would be between the two bumpers, so I pulled out the scale and got some rough weights. Stock steel bumper came in around +- 42lbs and the Aluminess bumper around +- 92lbs. Not too bad considering how much bigger the Aluminess bumper is and how much more protection it will provide.


14991-albums1480-picture46628.jpg


14991-albums1480-picture46629.jpg


Somehow it looks better with no bumper than the stock Bumper!


14991-albums1480-picture46630.jpg


Stock Bumper


14991-albums1480-picture46631.jpg


Aluminess Bumper​


With the help of my wife, we got it all installed in about an hour from start to finish. It will be coming back off for the 4x4 conversion so I will likely wait to do any of the additions of lights and winch till then. Super happy with the bumper! Now I just need to get the rest of the outside up to the level of this bumper!


14991-albums1480-picture46632.jpg


14991-albums1480-picture46633.jpg


14991-albums1480-picture46634.jpg


14991-albums1480-picture46635.jpg


14991-albums1480-picture46636.jpg
 

aarcaris94

Active member
DIY 4x4 Conversion Begins:​


-Last time I updated this thread I had just gotten word that my kit was getting loaded up on the pallet and on its way to me. It's been some time since then, so I figured it was time for an update. This update starts around the end of August and takes you to the current date of 10/5/22.


Exterior:

-After going back and forth on whether or not to do fender flares we ended up deciding that it would be worth it to do it not only for the functionality since the track width should be wider but also for the aesthetics of it. At the time Amazon had a $50 coupon for bush wacker products, so when split into two orders it ended up being $100 less than the already discounted price so it was a decent deal!​


14991-albums1610-picture46890.jpg


14991-albums1610-picture46891.jpg


14991-albums1610-picture46892.jpg


14991-albums1610-picture46893.jpg


Rear Axle:

-A few days after my last post my rear sterling 10.5” out of 2016 F250 showed up. It was a bit rougher than I would have hoped, but it was a decent deal and only had 60k miles on it. The first challenge I had was moving this thing around. These axles are heavy! Luckily I found an engine hoist on Craigslist for cheap, so with that, it's pretty easy to move around. I ended up stripping down the axle just to make sure everything internally looked good. Everything was good and boy do these axle shafts look beefy!


14991-albums1610-picture46894.jpg


14991-albums1610-picture46895.jpg


U-Joint order:

-About a day later my order from U Joint showed up! Unfortunately, Ujoint won't ship to a residential address but I found a super nice shop in town that was willing to accept the delivery of it just to help me out and stop me from having to drive out of my way to the local shipping depot. Technique Vehicle Outfitters were super nice and will for sure need to go back to their shop to give them some actual business for helping me out. I ended up renting a U-Haul van which was just big enough to get the pallet in, which was easy with the forklift, but a bit more challenging once it was home. I was able to unload everything off the pallet inside the van except the axle. Fortunately, that made the job much easier. I then used my new to me engine hoist to reach into the van and lift the axle out by itself. I then lowered it onto some furniture dollies and bolted it down so I could easily move it around the garage.​


14991-albums1610-picture46896.jpg


14991-albums1610-picture46897.jpg
14991-albums1610-picture46898.jpg


14991-albums1610-picture46899.jpg


-Once everything was reorganized in the garage things sat still for a few weeks as I had family that came into town over Labor Day weekend and then the following weekend was my wife's birthday. We ended up going to Mt Rainier NP for her birthday and had a great few days in the van till we got smoked out of the park cutting our trip a day short.​


14991-albums1610-picture46900.jpg


So it begins: 9/13/22

DIY 4x4 Conversion:

-After getting back home and the van all clean I started on the tear down process. The first thing I did was take the Sterling to a shop to have the locker and gears installed. I would have preferred to get everything cleaned up and new shock mounts installed, but unfortunately, this was the time slot that worked for both me and the shop. Then it was time to get the van up on jack stands and the wheels off so I could take them to discount tire so they could remove the TPMS sensors for the new wheels and tires.


14991-albums1610-picture46902.jpg


-What I thought would be a relatively quick process at Discount turned into a multi-trip ordeal to get everything situated for the new wheels and tires. The existing tires needed to be unmounted and the TPMS sensors removed so that they could be installed into the new wheels, but because I am using the Apex RPV valve stems discount said they could not touch them or install them. So this required me to drop off the existing wheels for them to pull the sensors. I then had to install the Apex valve stems myself at home, drive back to discount and install the TMPS sensors to the valve stems, and then go back on more time to pick up the new wheels. So for anyone who is thinking of doing these valves I would recommend going into the process expecting you will have to do the installation and be ready with tools to do it while you're at the tire shop and save yourself some back and forth. In the end, I have super happy about the wheel and tire combo I went with.


14991-albums1610-picture46905.jpg


14991-albums1610-picture46903.jpg


14991-albums1610-picture46904.jpg


-The tires I landed on were Falken Wildpeak AT3W in 35x12.5 R17. I went back and forth on tire sizes a lot, but for now, I think I made the right call. I went with the Falkens because it's what I have on my truck as well as what I had on our old 4runner and they seem to be a great all-around tire. They work well in the snow and ice during the winter and are relatively quiet while still working well off road. Plus I do like the side wall and more square profile style.


14991-albums1610-picture46906.jpg
 

aarcaris94

Active member
-I was pretty nervous to drop the transmission since that is a job that I haven't done before. It was for sure a slower process than what a shop could do but overall I think it went well!


14991-albums1610-picture46907.jpg


14991-albums1610-picture46908.jpg


14991-albums1610-picture46909.jpg


-Next up was mocking up and drilling the front spring hangers. This was a much slower job than I would have liked. This involved stepping from ³/₁₆”- ⅜”- ½” -⅝” -¾” for each hole. I decided to just buy the bits from Ujoint to save me some time in sourcing some longer bolts. From watching their install video it seems like they have changed this process slightly by using a hole saw for the first side of the hanger/ frame which in hindsight probably would have been faster and easier.


14991-albums1610-picture46911.jpg


14991-albums1610-picture46912.jpg


14991-albums1610-picture46913.jpg


14991-albums1610-picture46914.jpg


-After getting the front spring hangers on it was time to remove all the stock front suspension. For the most part, everything went smoothly and I was able to get it all removed relatively quickly. I was surprised at how heavy each beam was! This is when it started to seem like things were really happening.


14991-albums1610-picture46915.jpg


14991-albums1610-picture46919.jpg


-After the front suspension was out it was time to start on the rear shackle sleeve mounts. Using the jig supplied from U-Joint I was able to locate the center of the holes and then used a hole saw to cut the holes for the rear shackle sleeves. I had to use a right-angle drill on the outside hole as there just isn't enough space between the body and frame in this area. This would have been much simpler if I had a plasma cutter as they suggest for this part.


14991-albums1610-picture46916.jpg


14991-albums1610-picture46917.jpg


14991-albums1610-picture46918.jpg


-I then moved on to cutting my engine cross member. Using the Jig supplied by U-Joint I marked out my cut and then spent a while switching between a cut-off wheel, grinder, and flap disk to get my cut right. I’m pretty sure I went a little high on the cut, but I am sure that will be fine. In addition to cutting the cross member, I spent some time cutting and drilling out the required rivets


14991-albums1610-picture46920.jpg


14991-albums1610-picture46921.jpg
[/INDENT]
 

aarcaris94

Active member
DIY 4x4 Conversion continued:

-Then it was time to weld the shock mounts and the rear shackle sleeves. I haven't welded in years and picked up a new welder for this job since I didn't have one of my own before this. I can confidently say that I am not happy with how my welds looks but at least they seem to be strong and hey you can always grind them down. So that is exactly what I did on most of them! Don't judge me too much for the ungly welds. To give myself some more practice I started with adding some additional welds to the front bumper mounting plates. I have heard these can break, so figured it wouldn't hurt. Hopefully, I can get some more practice in and get some nice-looking welds down before I start on the Rear bumper project.


14991-albums1610-picture46922.jpg


14991-albums1610-picture46923.jpg


14991-albums1610-picture46924.jpg


14991-albums1610-picture46926.jpg


14991-albums1610-picture46927.jpg


-After getting everything welded (and ground) I moved on to paint prep. I wanted to get everything looking the best I could so I decided that I would paint the full frame of the van. This later turned into painting the full undercarriage of the van. Using a wire wheel, flap disk, sanding disks, and scotch Brite pads I was able to get the frame fairly clean on both sides of the frame. There were a few areas where I left components in place, mainly anything to do with hardlines like fuel, or brake lines. Everything that was easily removable was removed and everything else was taped or wrapped in paper or foil to prep for paint.


I guess I forgot to take any pictures of this step​


-One additional item I took out during this time of paint prep was my steering box. As you can see in the picture the stock box was oddly very rusty in comparison to the rest of the vehicle and there was some play in the steering wheel, so I figured it might as well replace it while it's in this stage of torn apart. I ended up going with a Redhead box part number 2770WF which was developed in partnership with White Feather to have better valving and set up for heavier 4x4 vans. I know some have had issues with Redhead boxes in the past but I am hoping I land more on the side of people who swear by them and if not at least they have a good warranty.


14991-albums1610-picture46928.jpg


-I had originally planned on just doing some small sections of the frame that were visible from the wheel wells, but as I started to paint I realized that I was silly to think that my OCD wouldn't let me do the minimum. So I ended up prepping and painting the entire undercarriage of the van. I tested a few different types of spray paints but ended up going with what Chris at U-Joint recommended which was a Semi-Flat spray paint. I had a hard time finding a Semi-Flat locally but did end up finding a Krylon Semi-Flat Rust Tough enamel that worked really well. Unfortunately, not many places carry it. So I cleaned out my local Orileys and Napa for a total of 6 cans. Still, didn't have enough so I had to have my Napa order some more (way underestimated). It's nice to see more and more of the original white body color disappearing!


14991-albums1610-picture46929.jpg


14991-albums1610-picture46930.jpg


14991-albums1610-picture46931.jpg


14991-albums1610-picture46932.jpg


14991-albums1610-picture46943.jpg


This picture was taken a few days later. Sorry for it being slightly out of order.

14991-albums1610-picture46944.jpg


This picture was taken a few days later. Sorry for it being slightly out of order.

14991-albums1610-picture46945.jpg


This picture was taken a few days later. Sorry for it being slightly out of order.

14991-albums1610-picture46946.jpg


This picture was taken a few days later. Sorry for it being slightly out of order.​


-After running out of paint I decided it was time to continue on with the front-end install. I figured the first thing that would be easiest to get to would be my steering box, plus my upper track bar mount needed to go in as well and it shares 2 mounting bolts.


I guess I forgot to take any pictures of this step​
 

aarcaris94

Active member
-Not sure if it was the paint fumes or me being tired, but at the start of my front-end install, I made the crucial mistake of grabbing the wrong leaf packs. This was a mistake that I wouldn't realize till the following day after spending most of the night thinking I made a huge mistake by going with a 6” kit. So anyways enjoy the commecial look of my failure with the rear leaf pack mounted on the front axle.


14991-albums1610-picture46933.jpg


14991-albums1610-picture46934.jpg


-I knew something was wrong as soon as I got the springs on the frame but figured I was just being paranoid and needed to trust the process. Mistake number one. So I continued to get the axle under the springs and felt even more uneasy about it. Nothing was looking right, So I made my final move of the night and decided to throw the wheels on it, In hopes that it would ease my worry… It did not. As you can see it's sitting way too high the shackle angle was way off and then I knew for sure my worry was warranted and something was majorly wrong.


14991-albums1610-picture46935.jpg


-I’m going to blame this mistake and lack of being able to tell what was wrong immediately on the fumes. After stopping there for the night and leaving the garage somewhat dejected I spent the evening and next morning avoiding the garage thinking about the possible reasons for the wonky setup. I am not happy to admit it, but it took me till mid-morning to think maybe I have the leafs swapped front to rear. After a few quick searches through U-Joints youtube videos, U-Joint Colorado Instagram, and their expedition portal build threads I finally felt like I had the answer. I then went and confronted my mistake in the garage and realized I missed one of the most obvious things right at the start of all of this there is an F written on the underside of the leafs sitting on my bench which means there must have been an R on the ones on the van! So I am a bit ashamed I did this, but at least it was a relatively “easy” fix.


14991-albums1610-picture46936.jpg


-So getting back on track went ahead and uninstalled one leaf pack at a time and thankfully was able to keep the axle in place when doing this, which made it much easier the second time around! After getting the correct leafs I was feeling much better so I figured it was time to get going on the other smaller parts of the install. First up were the shocks. If you have been following along with this thread you will remember that these shocks are only temporary as I am still waiting on my final shocks for the front.


14991-albums1610-picture46937.jpg


-Then I moved on to the brake line install which required some slight modification to the hole in the shock tower.


14991-albums1610-picture46947.jpg


14991-albums1610-picture46948.jpg


14991-albums1610-picture46949.jpg


-Then I went ahead and started shorting the oil filter lines. I am not sure if one of the heat shrink fittings had already shrunk some, but I had some trouble getting it on, but eventually was able to work them both on and get it all cleaned up.


14991-albums1610-picture46939.jpg


14991-albums1610-picture46942.jpg


-After that, I went ahead and started on the sway bar. This was pretty easy with it only needing two holes drilled through the frame and then everything bolted up.


14991-albums1610-picture46940.jpg


14991-albums1610-picture46941.jpg


-Then I assembled and painted the steering arm and did a rough install. Then I mounted the tires just to get a better idea of how it was going to look.


14991-albums1610-picture46950.jpg


14991-albums1610-picture46951.jpg


14991-albums1610-picture46952.jpg


14991-albums1610-picture46953.jpg
[/INDENT]
 

aarcaris94

Active member
DIY 4x4 Conversion continued:

-At this point, the front end is essentially done and it was time to start on the rear end. Since I wasn't sure when I was going to get my rear axle back from the shop from getting the locker and gears installed I figured I would start on the frame paint prep. First thing was to start to remove things that I didn't need under the van like the stock leafs.I know I went further than what was needed, but there was quite a bit of overspray from what I think was either the factory coating in the wheel wells or from the Bedliner when the lower body panels were painted. So to get it to be a clean surface for paint I ended up sanding it down to basically bare metal.


14991-albums1610-picture46955.jpg


14991-albums1610-picture46956.jpg


-To my surprise the next day the shop that had my axle called and said the axle was ready for pick up. So the following day I grabbed it and got it back to my house. Again every time I move one of these axles I am shocked at how heavy they are especially when you're working by yourself.


14991-albums1610-picture46966.jpg


-We had some friends coming into town for a night so I tried to get things cleaned up some in the garage just so it wasn't as bad as I had let it become over the last couple of weeks. Since the front end was done I figured I might as well get the front bumper back on just so it was out of the way. It still needs to be adjusted, but at least I got to see a little more of what it was going to look like.


14991-albums1610-picture46967.jpg


-After two days off it was time to get back into it. I started by continuing the paint prep for the rear end of the van. I figured it would be easiest if the rear axle was out of the way so I started by removing the stock axle and shocks. Then I taped, papered, and wrapped everything I could in foil and started on the painting process. I have underestimated every time just how much paint everything is going to take, but after a few additional trips to the store, I got everything under the van painted. It's not perfect, but it's better than what it was and not too bad for it being done on jack stands in my garage.


14991-albums1610-picture46957.jpg


14991-albums1610-picture46958.jpg


14991-albums1610-picture46959.jpg


14991-albums1610-picture46960.jpg


14991-albums1610-picture46961.jpg


14991-albums1610-picture46962.jpg


14991-albums1610-picture46963.jpg


14991-albums1610-picture46964.jpg


-Then it was time to start cutting off the stock leaf spring perches and shock mounts from the axle. Using a grinder I was able to slowly cut away these things. Obviously, it would have been more ideal to do this before dropping it off for regearing and locker install, but due to the shop's timing, this was the best way to do it. After getting everything cut off the rear axle I went through and cleaned up the rest of the axle. Using wire wheels, flap disk, and grinder wheels I was able to get top mostly bare metal.


14991-albums1610-picture46965.jpg


-Then I started on getting the rear leafs bolted up to the van now that the paint was all dry. This was actually way more challenging than I thought it would be. Chris mentions in his install video that the springs can close up some and might need to be opened up some with a prybar. This was definitely the case for mine. Trying to jack the spring up, pry it apart, get the holes lined up and hammer in the shackle by myself was quite challenging. Might have been easier if I had some more weight on my side, but at only about 150LBS those springs did not want to budge with my long prybar. I ended up having to use a 4’ piece of pipe and basically rest all my weight on it while simultaneously doing all other tasks. After some fighting with it, I finally was able to get both sides in.


14991-albums1610-picture46968.jpg


-As you can see in the last picture the van was now not high enough to get the rear axle under the leafs. I was in a bit of a pickle as now there was no good low point that my jack could reach to get the jack stands up higher. Fortunately for me, I was able to do a quick google search and found out that 911 motorsports is local to me in Bend. I swung by their shop and picked up a Floor Jack extension so I could get the van up higher. Once that was done I was able to get started on the axle install. Using a line laser I found the center of the axle and van and started on the process of getting everything lined up and the initial setup of the pinion angle. Later today I will double-check my measurements and fitment before moving on to the shocks.


14991-albums1610-picture46969.jpg


14991-albums1610-picture46970.jpg


14991-albums1610-picture46971.jpg


14991-albums1610-picture46972.jpg


14991-albums1610-picture46973.jpg


aarcaris94

Active member
DIY 4x4 Conversion continued:

It's finally done! Now it's time to get the build thread all caught up. The pictures started to dwindle as I got closer to the finish line, so I'm sorry if it's not super well documented. Might take me a few days to get everything organized into posts but for now, let's dive into the first round!


-The next thing I did was start on the shocks. Unfortunately, since I didn't buy the shocks from U-Joint they didn't send their stem eliminators which meant I had to buy my own. Chris had sent me a link to some Pro Comp stem eliminators which almost worked fine. They might be fine on their standard shocks, but with the shocks, I went with there was some binding on the shoulder of the shock. I realized this after getting them installed, so I carefully ground down the mount o allow for some extra clearance for the shocks to move freely. I will probably take these back out and paint them when I uninstall the rear axle for final welding.


14991-albums1610-picture46980.jpg


-Once the tops were installed I was going to move onto the shocks, but before doing that I figured I should check my pinion angle one more time. I am glad I did because I realized that at this point I had it set incorrectly. I had set it using the standard method of matching the angle of the output of the motor/transmission to the flange on the axle but this is incorrect for the driveshaft setup that is required for the lift. From the instructions from U-Joint, this setup needs a double cardan or CV style driveshaft This means that the flange should be rotated so that it is as much of a straight line from the axle flange to the transfer case flange as possible. So the bummer of figuring this out was one I had already tacked the spring perches in place (so now they need to be cut loose again) and two I still didn't have the transmission back from the shop. This threw my plan off slightly


-So after readjusting I figured I could move on to starting on my brakes. The calipers seemed to be in decent condition from the donor axle, so I figured with some cleanup and paint they would probably be fine. So I started on the process of cleaning the calipers, caliper mounts, and everything on the axle side of things. The dust shields had been pretty badly bent when I got the axle (probably from shipping) so I had to spend some time trying to straighten them and stop the binding on the rotors. Once everything was spinning smoothly I was able to move on top mocking up the brakes just to make sure everything was fitting. This was well worth it as I realized that although my axle was centered on the van the passenger side leaf pack was slightly askew. This meant that the caliper mounting bolts couldn't fit between the mount and the leafs. Luckily I hadn't fully welded the perches in yet. With a prybar, I was able to pry them back into the correct spot easily and get things all lined up!


-After getting the brakes mocked up I moved on the brake lines. Using the supplied hardlines/soft lines I worked on getting it laid out on the axle. The hardlines were prebent for the older style Sterling 10.5 which meant they needed some adjustment to make them work. Not entirely thrilled with how they look, but I think I was able to make them work. This might be something I come back to. After getting them mocked up I tacked the brackets into place and then got a full weld on the brackets. I also decided that I would go ahead and replace the frame to axle brake lines as I feel like they are too short in their current orientation. So I called Crown Performance brake lines and placed an order for some extended brake lines.


14991-albums1548-picture47066.jpg


–Once I got that stuff situated I pulled everything apart, masked off the important parts, and started painting everything. I used brake caliper paint for all the brake components and then the same semi flat black paint for anything else.


14991-albums1610-picture46981.jpg


-Then it was time to remock up everything to make sure everything was still fitting correctly. Really I just wanted to see how the new rotors were going to look with the painted calipers.


14991-albums1610-picture46982.jpg


14991-albums1610-picture46983.jpg


-Luckily after not getting much done over the weekend I got some good news on Monday that the transmission was done and ready for pick up! So now I can get back to my original schedule.


14991-albums1610-picture46984.jpg


-After picking up the transmission and getting it home I made the probably unsurprising decision that I should paint the transmission before reinstalling it. It wasn't in bad shape, but after seeing a post from Justin (Owner of U-Joint Colorado) on Expedition Portal of a van he did this to, I couldn't stop myself. So I pulled out the wire wheel and scotch brite pads and started working on cleaning and prepping the transmission for paint. At this point, it kind of looked like I was going for the polished look!


14991-albums1610-picture46985.jpg


14991-albums1610-picture46986.jpg


-I then started on the painting process I used VHT engine enamel primer first followed by a VHT Engine Enamel Nu-Cast paint for the main case and a matching black for the pan. I think it turned out pretty great!


14991-albums1610-picture46987.jpg


Primer Coat

14991-albums1610-picture46988.jpg


Primer Coat

14991-albums1610-picture46989.jpg


Nu-Cast Coat

14991-albums1610-picture46990.jpg


Nu-Cast Coat

14991-albums1610-picture46991.jpg


Black Pan Coat​
 

aarcaris94

Active member

-Unfortunately after painting late into the night I went out the next morning to check on it and the black section of paint seemed to be bubbling up and still wet after many hours. I think I tried to rush it and missed the recommended process for allowing the paint to dry between coats. So I retaped things off and wire wheeled the black paint back off the pan. After that was done it was much better, but still not great but good enough for now.


14991-albums1610-picture46992.jpg


14991-albums1610-picture46993.jpg


14991-albums1610-picture46994.jpg


-Then it was time to install the transmission and transfer case. Since this was my first time installing a transmission I was a bit nervous, but after some finagling, I was able to get the transmission installed to the engine. Then it was time for the transfer case. I decided to do this in two parts since I was working by myself but I think it would have been easier to do it as one piece if you could. Either way, though I did end up getting it installed. One thing that was a little freaky for me was that the transfer case housing is extremely close to the gas tank plastic skid. Initially, they were pushed into each other pretty good which made me a bit nervous. After talking with Chris he said that it's normal for the transfer case to touch the skid and that I should loosen the tank straps and push it back as far as I can and then it should be fine. So that is what I did. I hope to eventually get a long-range tank (if I can find one or have one made that is) and then at that point I can clear that area a little more for my own peace of mind.


14991-albums1610-picture46995.jpg


14991-albums1610-picture46996.jpg


14991-albums1610-picture46997.jpg


14991-albums1610-picture46998.jpg


14991-albums1610-picture46999.jpg


-I wanted to go ahead and get the transmission fully installed the next day so I started on the cooler lines and all the electrical bits. When I was uninstalling of one the cooler lines when removing the transmission I had a problem with one and ended up breaking the line off to get it out. At the time I had ordered a new cooler line so I was ready for the reinstall. Now that I was ready for it I pulled it out and realized that the line was too big and upon further investigation learned that it was for the 5 speed transmission, not the 4. So I had to put a halt on that again and moved on to resetting the pinion angle and getting driveshafts figured out. I used some PVC to get my angle to the transfer case as close to the required amount as possible and took all my measurements so I would be ready for ordering my Tom Woods Driveshafts.


14991-albums1610-picture47000.jpg


-I then went back to the rear axle work and tacked the perches into their new location. Then I could work on my shock mount mock up. Using the shock mounts supplied by U-Joint I was able to get the shocks lined up and tacked into place. Then it was time for the not so fun disassembly of the rear end to get the axle out for full pass welds. After getting it out I figured it would be a good idea to do some test runs on some scrap to give myself a little more practice again. My welds still aren’t pretty, but they are very slowly improving.


14991-albums1610-picture47001.jpg


-Now that the axle was out I could work on getting the shock mounts welded up and the spring perches welded. Once these were in let the axle sit for a while so It could cool before starting on the paint prep and painting again.


14991-albums1610-picture47002.jpg


14991-albums1610-picture47003.jpg


14991-albums1610-picture47004.jpg


14991-albums1610-picture47005.jpg


-I used the same Semi Flat black and now the axle looks new. After getting it painted I went ahead and got the brakes, and shocks all back on it just to make sure everything was fitting how it should.


14991-albums1610-picture47006.jpg


14991-albums1610-picture47007.jpg


14991-albums1610-picture47008.jpg


aarcaris94

Active member
DIY 4x4 Conversion continued:


-Then I went ahead and got all my brake lines remounted, my abs lines on, and the parking brake cables in place.


14991-albums1610-picture47009.jpg


-After this, I went ahead and got the wheels and Tires back on and lowered them down to the ground. A bit of a shock, as the back is now sitting about 3” higher than the front. I reached out to both Chris and Justin as they have both been very helpful throughout this process and both said that it should settle quite a bit once it gets driven some, but if it doesn't that I might have unfortunately been part of some of the early orders for spring through Alcan. I guess some of the early batches were going out a little higher than they should, so if this is the case after driving it I may need to remove a leaf or two out of the pack. A real bummer, but I am hoping that this just settles in after a bit of time. The other thing that I now know for sure is side steps/ rock sliders and going to have to be the next thing on the list because this is a stretch to step into.


14991-albums1610-picture47010.jpg


14991-albums1610-picture47012.jpg


-After feeling a bit deflated I moved back to the transmission work now that I got my cooler lines from the local dealership. I also decided that since everything was ripped apart it would be a good time to install a Max Cool 40k transmission cooler. Mounting was easy, but getting the right fittings is proving to be a bit more of a challenge. So far I have tried lots of my local stores and eventually ordered some fittings online that should be here this weekend. Hopefully, those ones work and I can get this part buttoned up soon.


14991-albums1610-picture47013.jpg


14991-albums1610-picture47014.jpg


-I am starting to see the finish line in my sights, but it feels like I keep hitting dead ends! At least there are plenty of things to switch to when this happens. After running into problems with the cooler I switched back to trying to get the transfer case situated. Started off by running a tap through the mounting holes for the shifter and then attaching the jig. Then it was time for the scary task of cutting a big hole in the floor of the van. I used a hole saw and a cut off wheel to get the metal out of the way. Since I have 3 layers of insulation up front plus the flooring the drill didn't actually make it to the flooring, which was great! I used a knife to slowly cut out the insulation and then cut a slot in the flooring so I could poke the shifter up through the floor to see where it was going to land. Still need to figure out how I want to seal off the shifter on the bottom side of the van as I don't like the idea of having a big open hole in the insulation.


(about here the pictures started to really drop off)​


-After getting the shifter mocked up I moved back to the rear axle and got everything all finalized and cleaned up. Installed the diff cover, brake lines, abs lines, diff breather, and locker cable. After getting the shifter installed for the transfer case I started to second guess my decision to go with a cable actuated locker. The cable was going to be entering inside the van almost in front of the sloped section of the counter inside and I felt like this wasting going to look very clean or thought out. So after some research and calls, I was able to arrange a swap out with East Coast Gear supply for Ox lockers electric actuator. So now the Locker is cable actuated but electrically controlled. There was a perfect spot in between the top shock mount for me to mount my actuator, so with some drilling and painting the actuator was also mounted at this time.


14991-albums1610-picture47067.jpg


-After getting the parts I needed to make the connections for the transmission cooler I jumped back into that to finish up the installation. I used the supplied bypass since I live in Bend and half the year we are in the cooler temps with snow I figured I needed to make sure the transmission wasn't staying too cold and actually getting up to temp. Not the cleanest install but I think it should work!


14991-albums1610-picture47073.jpg


-Then I moved into the engine bay to install my ARB Breather manifold. This will house the breathers for the front diff, rear diff, and transfer case. For now, I have left the transmission alone, as it's already above the floor level and if that is underwater I have bigger issues.


14991-albums1610-picture47074.jpg


-The next day my Tom Woods Driveshafts showed up! If anyone is looking for driveshafts I would highly recommend them. These are the second set of driveshafts I have ordered through them and they are great quality, very quick turn around, and extremely nice and knowledgable.


14991-albums1610-picture47075.jpg


-I wanted to take some time to work through the electrical side of things so I could test everything to make sure I didn't have any problems. First thing was to wire up a front facing camera. My head unit allows for multiple cameras so figured now that the van is so much taller it might be good to have a wide angle camera on the front for pulling into tight areas, or for on the trail. Not the highest quality camera, but should get the job done.


14991-albums1610-picture47076.jpg


-Then I installed my sPod kit from U-Joint. This was a pretty easy install and would highly recommend it as it makes wiring up accessories super easy! The OX locker actuator did require some extra work as it is ground side switching so I had to add in a relay to get it to function properly, but overall not to bad. Front Locker was super simple as all I had to do was cut and resplice the provided wiring harness directly into the sPod. All the wiring I added followed the same practice as my inside wiring using heat shrink, marine grade tinned wire, heat shrink crimp connectors, and all wrapped up and protected in a wire loom.


14991-albums1610-picture47077.jpg


14991-albums1610-picture47078.jpg


14991-albums1610-picture47079.jpg


-Since I had all my wiring stuff out I also decided to relocate and extend my DC/DC wiring by adding a waterproof Anderson plug connector that way I can easily disconnect it if needed as well as clean up the connection on the battery in the engine bay.


(Forgot to take pictures of this)​


-Again since I had my wiring stuff out I decided to install the lights into the bumper. I went with a Baja Designs Squadron Driving/Combo in white for the inner position and a Baja Designs Squadron SAE Fog light in Amber for the outer spot. This allows us to legally use the fog lights on the road. These were easily wired up to the sPod and really put out some good light and finish off the bumper!


14991-albums1610-picture47082.jpg


-Next up for the wiring was the transfer case indicator switch. I used a small indicator light from Amazon and was able to squeeze it in right next to the dash cluster. This keeps it right in my line of sight while still being pretty unintrusive and close to factory looking.


14991-albums1610-picture47080.jpg


14991-albums1610-picture47081.jpg
 

aarcaris94

Active member

-Then I received my brake lines from Crown performance for the rear lines which meant I could get the brakes all wrapped up. What I thought was going to be a quick swap out turned into a long frustrating process. Unfortaunly the connection points from the F250 and E350 for the axle side of things and frame side of things were different, so I had to get creative and used some unconventional fitting styles to achieve the right brake line path. I had to add on some new welded tabs for the brake lines and a few other modifications but in the end I was able to get it all to work. I think it turned out okay. Not the best, but not the worst. I then hooked up the parking brake cable and got everything adjusted and cleaned up!


14991-albums1610-picture47083.jpg


-Then it was time to finally start filling fluids! I ended up switching basically all fluids over to Amsoil, except the engine oil as I had just recently changed that but the next oil change it will be switched. One thing I found while looking for brake parts on NAPA was a transmission pan that had a drain plug installed in it, so before getting things filled up I swapped the poorly painted one for a new pan with a plug to make it easier to service.


(Forgot to take pictures of this)​


-Then it was time for the first official start of the van since this all started. Since I had an exhaust shop appointment on Monday morning I had to do some test drives just to make sure everything was working right. So at 8:30, I fired the van up and I'm pretty sure I terrified every one of my neighbors as it had no exhaust and was coming straight out of the manifolds! I quickly realized it was much too loud to be driving around to break in the brakes so it had to wait till the morning.


-The next morning It was time to see if it would fit out of the garage door. I was a little nervous about this as our driveway is a little steep and the van was a little taller than it should have been in the rear. So with the help of my wife, we slowly inched it out the garage door. Unfortunately, it did not fit out the door without letting air out of the rear tires. Once it was out it was time for a quick test around the block and then it was to drop it off at the exhaust shop for them to reroute the exhaust and driver-side cat. They quickly got it done and I had it back by mid-afternoon. It was finally drivable! VR garage in Bend did a great job on the exhaust, they were quick and ended up being cheaper than their original estimate which seems to never happen!


14991-albums1610-picture47086.jpg


14991-albums1610-picture47087.jpg


-It was great to see the van out of the garage, but it was short lived as it was time to finish up the rest of the work. By this point, the front end had dropped some, but the rear was obviously still sitting very high, so after talking with Chris I decided that it was time to pull the trigger on getting the rear end dropped.


14991-albums1610-picture47084.jpg


14991-albums1610-picture47088.jpg


-Luckily the van pulled right into the garage with no adjustments when pulled in the front end first. Still a little tight but at least it fits!


14991-albums1610-picture47089.jpg


14991-albums1610-picture47090.jpg


14991-albums1610-picture47091.jpg


-Chris has suggested which leafs to pull, but I wanted a second opinion just to make sure so figured why not call the ones who made the leafs, Alcan. So I called Alcan, but the main guys were at SEMA, so they said they would get in touch after they were able to call them later that day. The next day they called me back to see if I could get the van re-weighed so they can determine which leafs to remove. Luckily I was able to find a scale much closer to my house than the one I used last time and was able to get it weighed the following week. Surprisingly the van didn't really gain much weight in the 4x4 conversion. Not entirely sure how, but I ended up being 7,480LBS total and roughly 3,580lbs on the rear axle and 3,560lbs on the front. There is roughly a 340lbs missing when adding the front weight and rear weight up so I am just going to go with the total weight of 7,480LBS as that was the displayed amount when the van was fully on the scale with me in it.


14991-albums1610-picture47095.jpg


-While I waited to talk to one of the head guys at Alcan we had some additional things show up in the mail. Vandit is now officially with its custom license plate! We also got our custom switches from OTR Switch Guys.


14991-albums1610-picture47096.jpg


14991-albums1610-picture47098.jpg


-We also got some miles on the van and started our break in process after getting it aligned. We tested out the 4x4, the lockers, and even got it out on some dirt before the snow came in! Since then it's been pretty much only snow driving.


14991-albums1610-picture47099.jpg


14991-albums1610-picture47100.jpg


14991-albums1610-picture47102.jpg


aarcaris94

Active member


-Then I got a call back from Alcan. The person I talked to said that stock they are building the rear leafs to be at 4,100lbs so I was pretty light at 3,580lbs. I am surprised that my full camper build is so light, but I am not unhappy about it, except that meant I needed to pull some leafs. So he suggested I pull the 5th and the 10th leaf to bring the back end down some so I started on the not so fun part of pulling the rear end back a part. In doing this I ended up damaging one of the threads on the ubolt, so I also had to replace one of those which turned into all 4 as my local shop only had 5/8" rather than the other 9/16" bolts. Not a bad thing they ended up bigger, but wasn't planning on it.


(Forgot to take pictures of this)​


-While I had the back end ripped apart I decided to work to finally mount my shock reservoirs. Since I went with the adjustable LSC shocks I wanted to have easy access so I wanted them on the outside of the frame rail if possible. I ended up using these universal remote reservoirs from Accutune to mount to the frame. I didn't like the hardware they provided, so I went back to my old ways and added a threaded insert and some black stainless steel hardware. I think this achieved the accessibility of the adjuster and can't say they don't look cool too!


14991-albums1610-picture47104.jpg


14991-albums1610-picture47106.jpg


-At this point, I was still waffling on whether or not I should swap to 37's. I talked to discount and they said that I could still do the swap if I wanted, and I would only need to pay the difference in tire cost, but I wanted to do one final test before I made that call. When I was at Technique Vehicle Outfitters picking up my axles (since they took delivery for me) I noticed they had a flex ramp in the parking lot so I called them up to see if I could do a quick test to see what my clearances look like with 35's and see if 37's would fit. This made it pretty definitive to me that 37's would not stuff in the rear wheel wells without some real reworking of the wheel wells and fender flares. So this time around I will be sticking with 35's! Also, have to say I am extremely impressed with the flex of the U-Joint suspension system. The shop measured the distance up the ramp and it made it 55" up which was better than a Raptor, Tacoma, 4Runner, Powerwagon, and more! Not to bad for a fully built out camper van!


14991-albums1610-picture47107.jpg


14991-albums1610-picture47108.jpg


-I am still working through the break-in miles and will hopefully sooner be able to get the van all cleaned up and get a good walk around video and pictures.


-Next up will probably be sliders, as this thing is a bit of a stretch to step into especially at the barn doors.


aarcaris94

Active member
Update:

-As some may have seen on some other threads I have moved forward with the rock sliders/ Steps for our van. As I mentioned before I decided to leave this build to the professionals as I would have either needed to buy lots of new tools that I don’t have space for and will have limited use for or paid someone to do the work of bending, and cutting of all the parts. Also not to mention I am in no an experienced enough welder for welds that are going to be visible! So all this to say I reached out to a fabricator buddy who has done some other house projects for me in the past to see if he would be interested in building some sliders. Luckily for me he was available and ready to get going on them right away. So I started trying to dial in my design.
I knew how I wanted them to look but was unsure of material sizes, so I started my search to see what I could find for comparison. Unfortunately most sliders out there are built for much smaller vehicles like Tacomas, 4Runners, Jeeps, and other mid-size vehicles so their material sizes wouldn't be as helpful. After some digging, I found a few companies that are making sliders for full size trucks and more specifically Ram 2500/3500 trucks one of which is White Knuckle Off Road. On their website, they show some Ram trucks with flat beds and campers running their sliders as well as an AEV Ram Prospector. After some deeper diving, I found that an AEV Ram Prospector XL weighs roughly 9,000LBS which is heavier than my current van weight. So I figured that their material choices must stand up to the abuse (If you're interested to see these sliders take some abuse check out the video on their website). So this led me to do some redesign of my original idea.

-So here it was the concept. I wanted to use2"x3” .188 wall rectangular tube for the main piece, then use 1.75” .120 wall DOM for the outside tube. This makes the main structure which only really leaves the connection point to the frame. For this I followed what White Knuckle was using and went with 1.5”x1.5” .250 wall square tube. The last part of the slider was the actual tread plate. This is a piece of sheet metal that has the pattern cut on a plasma table and then a flare added to it using a dimple die to add extra traction. The overall goal of the slider was to create something that sat tight to the body, added protection for the body and allowed for an added step into the van.

14991-albums1548-picture47317.jpg

-After some revisions to the design due to the limitations of the bender that my buddy had access to we had it finalized! He got to work on them and before I knew it he had them fabbed up and ready to get the mounting brackets figured out.

14991-albums1617-picture47216.jpg


14991-albums1617-picture47217.jpg


14991-albums1617-picture47319.jpg


-We felt like it would be easiest to build this part on the van just to ensure that there were no interference issues with any of the mounting points. We spent one day getting this part done and they really are turning out awesome! For mounting to the frame we went with a bracket that connects with 2 bolts on the face of the frame and 2 bolts that mount on the underside of the frame. This allowed for a connection with some extra support given that it's on two different planes. For the most part, it was pretty straightforward to drill the holes, but we ran into two separate issues. One was the parking brake cable mounts and the second was the frame being fully boxed at the front of the frame. For the parking brake, we decided that we will relocate it, so for now, the brackets have been cut off and some new ones have been fabbed up and will be reinstalled after the final install. For the boxed section of the frame, one of the other guys in the shop came up with a pretty creative solution. Given that they have access to lots of machinery he drew up a quick bracket, sent it to the laser cutter, and had some nice long handle plates that got some bolts welded to them. This allowed us to feed the plates up through the frame till we could get it lined up with our holes and still allow us to bolt through the outside of the frame.

14991-albums1617-picture47318.jpg


14991-albums1617-picture47218.jpg


14991-albums1617-picture47219.jpg


14991-albums1617-picture47220.jpg


14991-albums1617-picture47221.jpg


14991-albums1617-picture47222.jpg


14991-albums1617-picture47223.jpg


14991-albums1617-picture47224.jpg


14991-albums1617-picture47225.jpg

-After getting the main structure all set and done on the van we dropped them back off and then Casey added some added gussets to help strengthen the frame-to-slider connections. Then it was off to powder coating. Decided to go with a textured black powder coating to match my Aluminess bumper. Now it's just a waiting game for those to get back from the powder coating.

14991-albums1617-picture47226.jpg


14991-albums1617-picture47227.jpg
 

aarcaris94

Active member
-Luckily in the meantime, my final front shocks showed up! These shocks were ordered through Accutune off road and were custom tuned to the van. While they had them apart for the tuning process I also had them add in a 90 degree fitting for the hose so it would be more ideal for the hose routing.

14991-albums1610-picture47307.jpg


14991-albums1610-picture47308.jpg

-Finally had some time to work on the shock swap so I went ahead and pulled out the temporary shocks and got my new ones mounted up. Then came time for the more challenging part, mounting the reservoirs. Probably because I get a little obsessed with little details I also really wanted to run the reservoirs frame mounted rather than the typical shock body mounted way. So I also ordered some mounts just as I did in the rear. Due to the length of the hose and the added brackets on the driver's side I was limited on my mounting location. I played around with a few opens one of which being vertical but in the end, the original horizontal mounting won out. Since I have had good luck with them so far I used my favorite method of threaded inserts. I had to cock the reservoir at a slight angle to get everything to miss and not stress the hose. I also had to use a couple of shock bearing spacers to make up the difference on the rear bolt because the frame dips inward.

14991-albums1610-picture47309.jpg

Temporary shocks

14991-albums1610-picture47310.jpg

Test fit for Vertical Mount Reservoir

14991-albums1610-picture47311.jpg

Test fit for Horizontal Mount Reservoir

14991-albums1610-picture47312.jpg

Test fit for Vertical Mount Reservoir

14991-albums1610-picture47313.jpg

Ignore the Wet paint

14991-albums1610-picture47314.jpg

Ignore the Wet paint

14991-albums1610-picture47316.jpg


14991-albums1610-picture47315.jpg

-One issue that I currently have is that the passenger side hose is in a slightly different orientation causing it to get a little close to the shock tower. After talking with Accutune they said the real fix for this is to uncharge to shock remove the reservoir, spin it in the correct way, and reattached it. This is obviously not ideal but I think I can get this taken care of when I go back to the shop for the installation of the sliders. Or I might just need to not let my OCD get too out of control and leave it alone.

-Unfortunately, I still haven't fully finished my break in the process as I was out of town for a bit for work and seeing family and then once I got home both my wife and I got pretty sick. We are now starting to be on the mend and hoping that soon we are going to get out on a real trip, even if it's just for a night or two!
 

Forum statistics

Threads
186,078
Messages
2,881,739
Members
225,874
Latest member
Mitch Bears
Top