Welding Square tube to Square tube

jmnielsen

Tinkerer
Seems this is as good of an area as any to ask this question here.
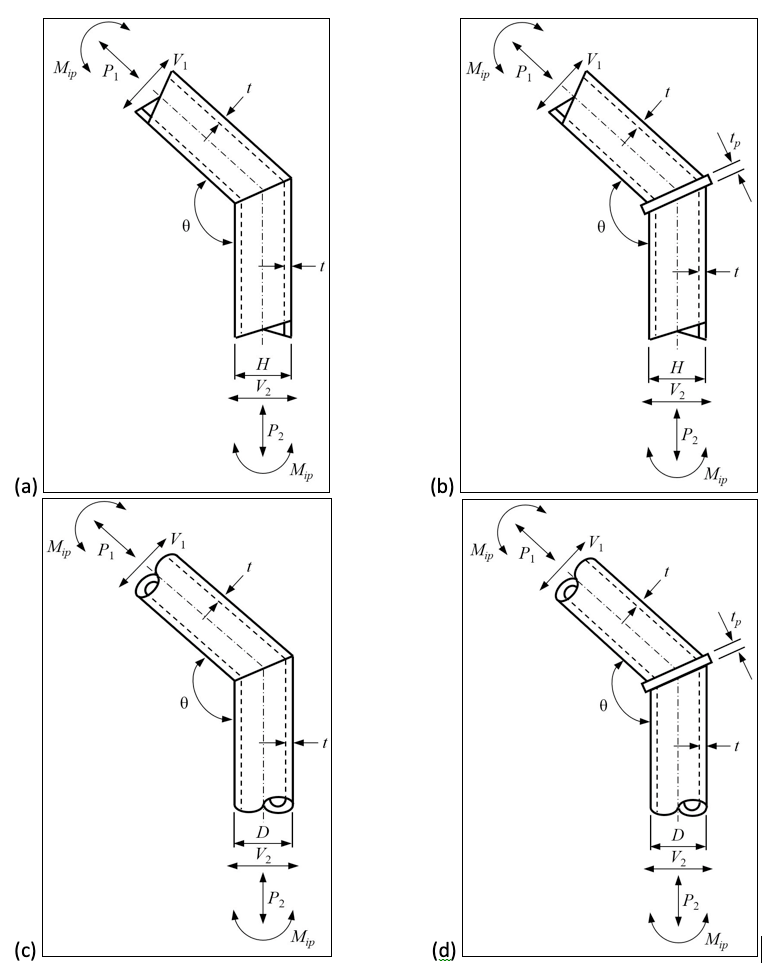
I'm in the design phase of a project and am curious the standard way of welding square tube that is cut at an angle to square tube of the same size, example below.

1687294979113.png

Here I have 1.5" square tube that is cut at a 10° angle that needs to be welded to the top of another piece of 1.5" square tube.
Obviously the mating length on that 10° cut is longer than 1.5" (1.5712" in this case).
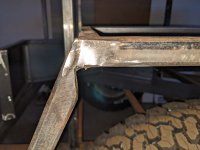
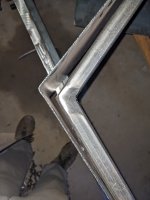
What is the proper way to mate these two pieces? Cut the angled piece so that it fits the square (making an "L") like shown in the picture?

Thanks!
 

smokeysevin

Observer
Do an L shaped notch on the intersecting tube and weld all around.


You didn't ask about it but if you do a mitered joint between 2 tubes that maintains an open section on the inside (like a pie cut or elbow), structual detailling design manuals recommend installing a flat plate between the two open sections to prevent the tube deforming/collapsing when a bending load is applied. I will try and find a diagram for what I am talking about.

Sean
 

jmnielsen

Tinkerer
Do an L shaped notch on the intersecting tube and weld all around.


You didn't ask about it but if you do a mitered joint between 2 tubes that maintains an open section on the inside (like a pie cut or elbow), structual detailling design manuals recommend installing a flat plate between the two open sections to prevent the tube deforming/collapsing when a bending load is applied. I will try and find a diagram for what I am talking about.

Sean
Thanks for the feedback.

I think I'm picking up what you're putting down in regards to the second part of your post, but would love to see a diagram if you find one.
 

NatersXJ6

Explorer
Draw with CAD, Measure with Tape, Mark with Chalk, Cut with Torch, Weld with Stick…

0.07” Will be hard to notice in reality and will be consumed in the weld, except that the wall might be so thin you keep burning through it.

Personally, I usually try to cut 1/2 the angle on each, I.E. 2 @ 5 degree to make a 10…. It doesn’t always work.
 

smokeysevin

Observer
Here is the concept I was referencing.

https://steeltubeinstitute.org/resources/hss-knee-connections/


Figure-1.png


Basically, in image B and D you add an extra plate to the joint between the two tubes. This keeps the section (the shape formed by the open cross section of the tube) from bending inwards or outwards. It is an extra step that is not always needed but makes the joint significantly stronger and less likely to fatigue.

Sean
 

NatersXJ6

Explorer
Also far easier to weld, for several reasons. Don’t do this with something you plan to fish wires through or you will experience a “DOH!” moment!
 

wparkinson97

New member
I played with both buildings my fenders. Although it's a lot wider cut than yours would be, the mitered one definitely looks better and was much easier to weld
 

Attachments

  • 1687319588457.jpg
    1687319588457.jpg
    1.5 MB · Views: 43
  • 1687319589265.jpg
    1687319589265.jpg
    1.3 MB · Views: 43

jmnielsen

Tinkerer
Here is a 3D view of the idea I'm talking about. Not actually mitering two ends but one piece would be running along the length and then the other comes down to it at an angle. I'm designing a truck cap/topper, so the one piece would be running along the length of the bedrail and the other is the vertical from the bed to the top portion of the frame.

1687353751216.png


1687353778794.png
 

smokeysevin

Observer
Here is a 3D view of the idea I'm talking about. Not actually mitering two ends but one piece would be running along the length and then the other comes down to it at an angle. I'm designing a truck cap/topper, so the one piece would be running along the length of the bedrail and the other is the vertical from the bed to the top portion of the frame.

View attachment 784012


View attachment 784013
Yeah, that's my fault for derailing the thread. Your originial drawing made sense (to me anyways).

Sean
 

NatersXJ6

Explorer
Yes, let whichever side is less important overhang and burn it in. You are talking about the thickness of a weld bead in offset. Most of it will disappear and you can clean a bit up with a grinder, or use a smaller tube for the upper section.
 

Herbie

Rendezvous Conspirator
At 10 degrees I’d just let the back side of the angle overhang and burn it in. You’re going to melt through most of that material anyways.

Yes, let whichever side is less important overhang and burn it in. You are talking about the thickness of a weld bead in offset. Most of it will disappear and you can clean a bit up with a grinder, or use a smaller tube for the upper section.

Whew. I was thinking the same thing, but was relieved to see others with the same advice.
 

jwiereng

Active member
Draw with CAD, Measure with Tape, Mark with Chalk, Cut with Torch, Weld with Stick…

0.07” Will be hard to notice in reality and will be consumed in the weld, except that the wall might be so thin you keep burning through it.

Personally, I usually try to cut 1/2 the angle on each, I.E. 2 @ 5 degree to make a 10…. It doesn’t always work.
I think the carpenters call it a birdsmouth notch.

Glad you’re not afraid to ask, lots of experience here, nobody came out of the womb with all the answers.
 
Last edited:

Forum statistics

Threads
186,046
Messages
2,881,311
Members
225,825
Latest member
JCCB1998
Top