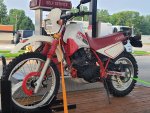
My latest adventure capable vehicle I added to my stable was this 1986 Yamaha XT350. After selling my plated WR400f, I was finding that I missed having a lighter bike to explore on.
One night while browsing the good ol' FB marketplace, I came across the XT. With 2600 original miles, and a clean chassis, I couldn't pass it up.
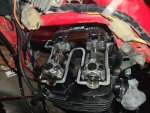
Before riding it too much, I decided to tear it down and inspect all the major services areas. Valve lash was all within spec, and overall the inside of the engine looked about like a low mileage example should.

As a preventative measure, I added a manual timing chain tensioner and also replaced the oil pump gears. Relying on 35 year old plastic to supply the head with oil didn't sit real well with me. The clutch was a little worn, so I went ahead and installed an upgraded EBC clutch with stiffer springs while I was in there.

To help quell any overheating issues, I uncorked the intake and exhaust then jetted to suit. To figure out my jetting, I used a wideband O2 at the tailpipe to read AF/Rs. While not quite as accurate as measuring further upstream, it's still plenty good enough for a trail bike. The pipe length was to ensure I wasn't picking up reversion pulses while monitoring at lower RPMs. I figured the restriction from the pipe is similar to my free flow spark arrestor that I installed once I was done tuning.

I arrived at almost stock TT350 jetting (almost as if Yamaha did their homework) with the completely opened up stock exhaust and opened up air box with Uni filter. My primary main is 125, the secondary is a 120, the pilot jet is a 42, and the primary needle is shimmed with one .032" washer. I wouldn't call it a powerhouse, but it now runs nicely down the road.
The factory suspension is rather weak, but I found it to be adequate once I preloaded the forks an additional 1" and changed to a 15w fork oil.
Next up was some cosmetic fixes. I wet sanded the plastics and installed a new OEM decal set along with a new seat cover. The swingarm was repainted, and the frame was touched up in spots.
I'm pretty happy with the gearing now that I have installed a 520 chain with 15/46 sprockets. Itll happily cruise 70mph, but 55-65mph is the sweet spot for comfortable and stress free running.

To keep the chain happy and clean, I installed a Nemo 2 oiler on the handlebar. The feed line is ran down to the counter shaft sprocket, as this location is much better protected in comparison to the recommended swing arm location.


Next will be new fork gaiters, and then maybe a few mods to improve its ability to tour off the beaten path a little. But overall I'm quite happy with it!
One night while browsing the good ol' FB marketplace, I came across the XT. With 2600 original miles, and a clean chassis, I couldn't pass it up.
Before riding it too much, I decided to tear it down and inspect all the major services areas. Valve lash was all within spec, and overall the inside of the engine looked about like a low mileage example should.
As a preventative measure, I added a manual timing chain tensioner and also replaced the oil pump gears. Relying on 35 year old plastic to supply the head with oil didn't sit real well with me. The clutch was a little worn, so I went ahead and installed an upgraded EBC clutch with stiffer springs while I was in there.
To help quell any overheating issues, I uncorked the intake and exhaust then jetted to suit. To figure out my jetting, I used a wideband O2 at the tailpipe to read AF/Rs. While not quite as accurate as measuring further upstream, it's still plenty good enough for a trail bike. The pipe length was to ensure I wasn't picking up reversion pulses while monitoring at lower RPMs. I figured the restriction from the pipe is similar to my free flow spark arrestor that I installed once I was done tuning.
I arrived at almost stock TT350 jetting (almost as if Yamaha did their homework) with the completely opened up stock exhaust and opened up air box with Uni filter. My primary main is 125, the secondary is a 120, the pilot jet is a 42, and the primary needle is shimmed with one .032" washer. I wouldn't call it a powerhouse, but it now runs nicely down the road.
The factory suspension is rather weak, but I found it to be adequate once I preloaded the forks an additional 1" and changed to a 15w fork oil.
Next up was some cosmetic fixes. I wet sanded the plastics and installed a new OEM decal set along with a new seat cover. The swingarm was repainted, and the frame was touched up in spots.
I'm pretty happy with the gearing now that I have installed a 520 chain with 15/46 sprockets. Itll happily cruise 70mph, but 55-65mph is the sweet spot for comfortable and stress free running.
To keep the chain happy and clean, I installed a Nemo 2 oiler on the handlebar. The feed line is ran down to the counter shaft sprocket, as this location is much better protected in comparison to the recommended swing arm location.
Next will be new fork gaiters, and then maybe a few mods to improve its ability to tour off the beaten path a little. But overall I'm quite happy with it!