BLT Offroad trailer

Great looking trailer!

Can you post detailed pics of the front & back of the canoe setup and support bars? Was thinking of building more of a cage on top of my lid and putting the canoe between the lid and a higher mounted roof top tent, but your setup is so simple and removeable/optional depending on intended use that weekend I may just go that route instead.

Also the box on the front...custom or off the shelf somewhere?

Thanks!
 

HenryJ

Expedition Leader
Can you post detailed pics of the front & back of the canoe setup and support bars?
The canoe mounts are pretty simple. The front piece "goal post" comes apart in two pieces. The top just fits over a straight piece of tubing. This makes it easier to store and also change the length should I need to. Both fit into hitch receivers. The front being vertical, but does not need to be pinned as a strap is welded across the bottom of the tube.
I used the same EPDM "D" shaped seal that I used for the lid to line the inside of them. This works pretty well to protect the rails and has served to be very durable.

I can not take the credit for them exclusively. I took all my ideas from what others have done. I hope they all think as I do ..."imitation is the sincerest form of flattery."
rack.JPG
rack2.JPG
rack3.JPG
rack5.JPG


I use the transport tiedowns to lift it from the racks. They attach to hooks on the ceiling for storage.

rack4.JPG


The two racks just store underneath.

Also the box on the front...custom or off the shelf somewhere?
Off the shelf. The trailer was built in California , and I assume the box came from there too. It is galvanized inside and out. Someone drilled vent holes in it. I guess that is not a big problem as it is not sealed anyway.
 
Last edited:

cj454

Observer
looks great. I used harborfreight bed extenders on my popup when I had it to make racks for bikes and stuff. One in the front and one in th eback like yours. cheap too when on sale for like $20

just an idea.

love it keep th einfo coming.
 

HenryJ

Expedition Leader
I finally had time to build a "stow" for my chock blocks. I found that not only were they taking up space in the box, but they were not getting deployed. Out of sight out of mind , I guess.

chocks.JPG


This will make them easy to deploy and a good reminder that they need to be placed. Opening the lid lifts the angle that retains them. Pretty simple.
 

HenryJ

Expedition Leader
A little solder , drilling, riveting, wiring and I now have a ...
solar2.JPG
solar1.JPG


Solar suitcase

I still need to make a padded case for transporting. That is next. Now I just need some sunshine to try it out!
 
Last edited:

HenryJ

Expedition Leader
Got the protective case put together today:

case.JPG


A couple pieces of masonite, some 1/2" neoprene, a little webbing and some buckles.

The panel works great. I set it out for a quick test.

solar3.JPG
solar4.JPG


14.4V
Now all packed in the trailer and ready to go.
 

elmo_4_vt

Explorer
Nice, I like that a lot better than some of the flexible type panels. And it looks a little easier than a solid mount. What panels did you use?

-
 

HenryJ

Expedition Leader
IMGP0178.JPG


IMGP0366.JPG


Some minor adjustments after the Moab trip.

A newly fabricated attachment / enclosure for the heater. A roll up table , cutting board and campfire grille added to the gear. Some reorganization of the front box and the addition of some magnetic shelving.
A new 3500# axle with brakes is on order and should be ready to pick up this week.

The jury is still out as to the value of the solar panels for other than summer trips with lots of sun. Charging from the truck worked great.
 

HenryJ

Expedition Leader
The new axle was installed a couple weeks ago. It seems to pull just fine and the brake controller works well with it.

Next thing I have been thinking about is a better way to dispense my water supply. I use four 7 gallon AquaTainers. I like the separate containers instead of one large tank. It offers me a better picture of the supply status. Changing jugs imprints better than watching the level in one tank. This also does not have all my eggs in one basket and keeps them transportable. Should the trailer be crippled, or I need to supply someone else in need, I can pull the jugs and take the water with me or pass it on to someone in dire need. That can be important in the dry areas I travel. They just offer a comfortable level of flexibility.

tap.JPG


I already have enough things to efficiently drain my battery, so I'm not really thinking along those lines. What I have done in the past is to lift a container out and set it someplace. The hitch is not very convenient as there is not really room. The box works well, but inevitably it needs to be opened. The older I get the lazy-er, or smarter I get too. I do not want to lift them in and out as much any more. Keeping them inside they stay cooler and secured while we explore. That is my goal.

Sticking with the KISS principal. I began looking. The hand pumps are neat, but those look like work. I don't have the room for one under the lid and don't really want to open it any time I need water while at camp. There are many very nice water systems that I have looked through. It is very tempting to over complicate the project.

Here is what I came up with:

tap2.JPG


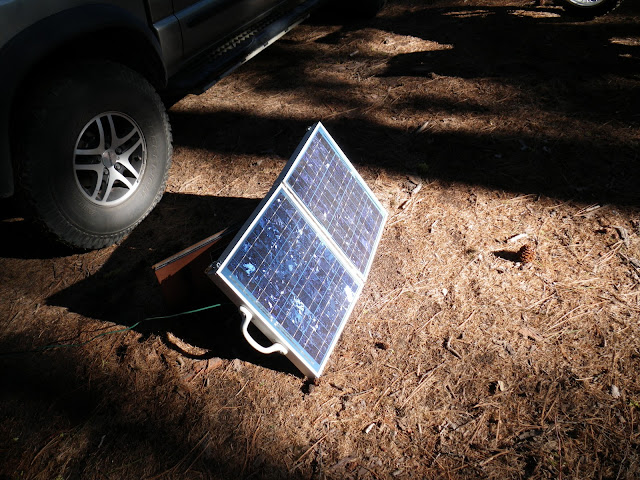
Using the spigot that comes with the AquaTainers, I added a 3/4" NPT female coupler and 3/4" NPT x 1/2 barb fitting attached to 10' of 1/2" hose. A line clamp over the coupler bolts it to an old speaker magnet. On the other end is a super siphon that drops into the water jug. The hose routes through the same access cover used to pass the fridges power cord.

Open the spigot, a few shakes of the super siphon to get water flowing and I am all set with running water. With the magnetic mount I can easily stow it inside for traveling and mount it where ever is convenient. The 10' of hose may be a bit much , but it allows me some flexibility. I may cut it down a little after I see what works for me.

Just thought I'd share the idea.
 

elmo_4_vt

Explorer
Very Nice.... I like the idea of using the valve end with the super siphon.

I guess you'd have to hold the valve open when filling the tube with water?

-
 

HenryJ

Expedition Leader
I guess you'd have to hold the valve open when filling the tube with water?
Yes. I can then shut it once the siphon starts. When filled , then the valve can be used on demand until the siphon is broken.

It all sounds good. We will see how it all plays out in the field.
 

HenryJ

Expedition Leader
Just back from a little camping trip.
This was the first "long" trip with the TW200 on the back.

IMGP0677.JPG
unity1.JPG


It pulled great. No problems with the hitch , rack, or weight distribution. The trailer grossed 2500# with the bike on the back and 32 gallons of water up front. The new axle performed nicely. The braking is subtle, just as it should be. There is no extra effort to stop this combination.

IMGP0690.JPG
IMGP0717.JPG


There was not enough sun to extend battery life very long. I did learn that I switched the power port and it must be on to charge. Duh...
I am still trying to get a handle on how well this is going to work. Right now I'm just not too sure it is the best way to go. running the truck a little bit charges things right back up pretty quickly.

IMGP3195.JPG
IMGP3220.JPG


The heater enclosure (red canvas) works great!

unity5.JPG


The little propane heater kept things warm and dry inside. Extremely comfortable. That is a perfect addition. I don't know how cold it got at night. No frost in the mornings but close I suspect.
I really thought the 12 volt heated mattress pad might be the best answer. My mind has changed. This was just too easy and we were all comfortable with the heat available. The added bonus of the dry interior added to our positive review.

The siphon spigot worked just like it should. We only used one container of water in three days. This was not a dry camp , so there was a water source that offset some of the water needs.

The Sailor's Solution breathable under liner is THE way to go. It adds just a little more cushion.

unity6.JPG


The picture doesn't show the condensation very well. I popped it open when we arrived home to find everything air dried just fine under there. No damp mattress to deal with.

Picassa photo album
 

Hill Bill E.

Oath Keeper
Wow! Awsome build!

Thanks for the great ideas too!!

I was wondering about what to do for water supply piping, and now I know:wings:

I also like the heater enclosure! I use my "Mr. Buddy" heater in my RTT, but if my wife or son is with, there is no room. The enclosure around the window, pure genius!

And the liner under the mattress, I have to get one of those too!:coffeedrink:

Thanks for the great write up and info!!

HB
 

HenryJ

Expedition Leader
Wow! Awsome build!...I use my "Mr. Buddy" heater in my RTT, but if my wife or son is with, there is no room.
Thank you!

You and I are in exactly the same situation. Wife and son mean no room for a heater. I really thought that a 12 volt mattress heater was going to be my solution. No longer though.
We tried a makeshift version of this in Moab last spring. It was an abysmal failure. Upon our return I stitched up this enclosure.

I already had a nice piece of red canvas, six tarp grommets and a couple snaps. Four grommets across the top. Two at the upper corners slip over the support rods. The two between them use the tie down tees to attach as do the lower corners. On the sides I added a snap. It really did go together pretty easily.
I use the sun shades from the truck to add some stiffness to the bottom. This should help prevent the wind from blowing the canvas against the heater.

The bottom is not sealed to the tent. This opening draws in air from outside. The convection currents rise up and exit the top vents. This should be enough fresh air to ease any lack of oxygen issues.

I did not want to leave this unattended, so when my wife asked if we could turn it on for a while to warm it up before we climbed in for the night , I balked.
To my surprise this warmed it up very quickly. I was astonished just how quickly it warmed up. Almost instantly.
We left it on low for the night and were very comfortable. I open the door to crawl out and my breath was taken away with just how cold it was outside. That did an amazing job.
No worries about bumping into it in the night. I am very happy how it all turned out.
I fold it up and toss it inside under the mattress for storage. I was not too sure about the red color. I had it so I used it. As it turns out, it is easy to see. Not difficult to find when stowed inside.
 

Forum statistics

Threads
189,921
Messages
2,922,190
Members
233,083
Latest member
Off Road Vagabond
Top