“Ice cube” A custom square drop camper

kitchen slider built, installed and tested. I also finished the water tank mounts for the front and rear. This will give me 27 gallons of water capacity. I was able to plumb the tank fill where the old fuel filler was.
 

Attachments

  • F36765D5-CFAD-4B04-8853-17BFA30DEC3A.jpeg
    F36765D5-CFAD-4B04-8853-17BFA30DEC3A.jpeg
    2.5 MB · Views: 38
  • 8833B246-5A71-4F67-8E11-5D0E22F9724A.jpeg
    8833B246-5A71-4F67-8E11-5D0E22F9724A.jpeg
    2.5 MB · Views: 38
  • F2AAB6DD-0FFA-4300-9679-99694BD9C9F2.jpeg
    F2AAB6DD-0FFA-4300-9679-99694BD9C9F2.jpeg
    2.7 MB · Views: 39
  • 12AE30C0-ED0F-40E1-8189-E4ABBE3CAFA7.jpeg
    12AE30C0-ED0F-40E1-8189-E4ABBE3CAFA7.jpeg
    2.6 MB · Views: 37
Spray day! Full spray bed liner inside before adding the sub floor. Then install floor and spray again, color spray next. Its not perfect but I was on a deadline to go camping the following weekend. I no also got a chance to cut all the aluminum hatch panels that cover the storage cubbies.
 

Attachments

  • AA29E01C-298A-4520-B081-D7225FA66896.jpeg
    AA29E01C-298A-4520-B081-D7225FA66896.jpeg
    2.2 MB · Views: 36
  • DF162D7B-88CA-4DFA-AEDC-562580488689.jpeg
    DF162D7B-88CA-4DFA-AEDC-562580488689.jpeg
    1.3 MB · Views: 38
  • 9FA53E92-F307-49DD-B379-C73B505E4078.jpeg
    9FA53E92-F307-49DD-B379-C73B505E4078.jpeg
    2.4 MB · Views: 39
  • B1C90AEB-25DD-4178-907B-888BB6CD187A.jpeg
    B1C90AEB-25DD-4178-907B-888BB6CD187A.jpeg
    1.2 MB · Views: 38
  • CDF0FF72-72AF-49A9-B936-2147FA707893.jpeg
    CDF0FF72-72AF-49A9-B936-2147FA707893.jpeg
    2.7 MB · Views: 38
  • 387D8953-7BA3-4FB7-B962-762335A33557.jpeg
    387D8953-7BA3-4FB7-B962-762335A33557.jpeg
    1.9 MB · Views: 39
First night out. Long way from being done but she tows like a dream.
 

Attachments

  • 74CA7873-6EAA-47F0-BEEB-04A9D7ABC7B4.jpeg
    74CA7873-6EAA-47F0-BEEB-04A9D7ABC7B4.jpeg
    3.4 MB · Views: 59
  • AB2462AF-340D-4103-8477-B1B298DC2205.jpeg
    AB2462AF-340D-4103-8477-B1B298DC2205.jpeg
    2.1 MB · Views: 52
Designed and made the electrical panel. Trying to keep it as compact as possible. This will be running from a 170ah lithium battery with 200 watts solar on the roof. I looked and looked for something that was clean and low profile for running the solar wires through the roof but was unable to find anything that looked right to me so this is what I came up with. Should do nicely and is only marginally thicker then the wiring itself.
 

Attachments

  • D39B9BA6-EA46-4FA5-864B-7A1A8866F32D.jpeg
    D39B9BA6-EA46-4FA5-864B-7A1A8866F32D.jpeg
    1.3 MB · Views: 23
  • AA51E4FE-7CEB-43FE-9A85-ECD50874C040.jpeg
    AA51E4FE-7CEB-43FE-9A85-ECD50874C040.jpeg
    1.5 MB · Views: 21
  • FB0FD5E3-9A38-48E4-B433-6A5BE8C99016.jpeg
    FB0FD5E3-9A38-48E4-B433-6A5BE8C99016.jpeg
    1.5 MB · Views: 21
  • EB972E02-7433-4936-8AA3-076D5A806CCE.jpeg
    EB972E02-7433-4936-8AA3-076D5A806CCE.jpeg
    2.5 MB · Views: 20
  • 90489445-380C-42DA-BD5C-D2D7A7CFD7D2.jpeg
    90489445-380C-42DA-BD5C-D2D7A7CFD7D2.jpeg
    2.1 MB · Views: 20
  • D7145C17-B1A4-4F74-8D93-E4556A11FAC2.jpeg
    D7145C17-B1A4-4F74-8D93-E4556A11FAC2.jpeg
    1.7 MB · Views: 21
  • BB6A7585-79ED-478B-BCD5-F694105F1F1F.jpeg
    BB6A7585-79ED-478B-BCD5-F694105F1F1F.jpeg
    2.6 MB · Views: 21
  • F2506BE4-B83B-4B24-B66A-D2C58F506B06.jpeg
    F2506BE4-B83B-4B24-B66A-D2C58F506B06.jpeg
    1.9 MB · Views: 21
  • 43547957-BD5F-4692-8DC4-5AC4C1965EC6.jpeg
    43547957-BD5F-4692-8DC4-5AC4C1965EC6.jpeg
    2 MB · Views: 20
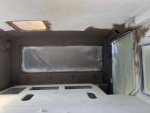
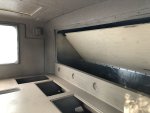
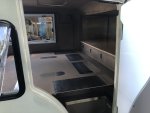
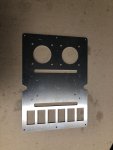
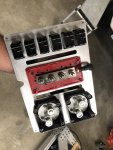
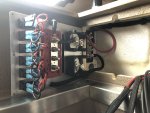
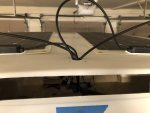
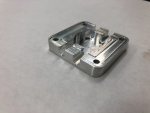
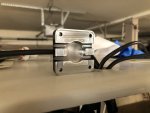
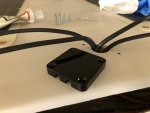
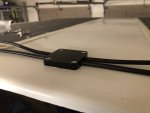
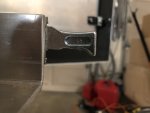
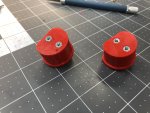
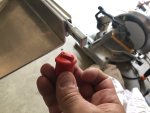
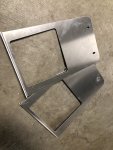
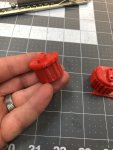
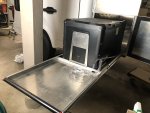
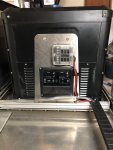
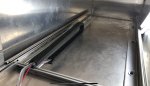
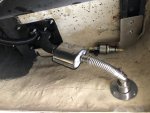
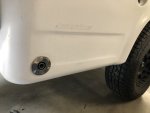
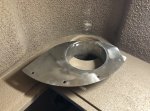
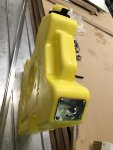
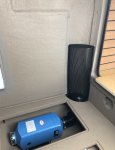
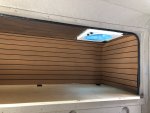
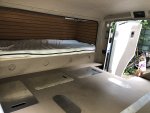
In the spirit of stability I opted to use two 60” locking drawer slides for the slide kitchen. This means both hands were required to unlock and drawer out the kitchen whick quickly became annoying. My solution was to create mounts that attach to the existing locks that allows for a cross bar. Now its one hand opening. Additionally I fabricated some fridge hold downs that bolt to the existing fridge handle locations. The rear fridge mount also doubles as the kitchen sub panel location to run the fridge, charging, and lighting. The power to this sub panel is routed through a small cnc drag chain to ensure no electrical pinching.
 

Attachments

  • 0CD12D63-CE23-4F3B-A817-600AE97231DA.jpeg
    0CD12D63-CE23-4F3B-A817-600AE97231DA.jpeg
    2.4 MB · Views: 24
  • 374517E7-E1C1-4876-B678-D099E85AFD1F.jpeg
    374517E7-E1C1-4876-B678-D099E85AFD1F.jpeg
    2.3 MB · Views: 23
  • FEE65773-21B0-40B5-B42B-B27138D37D8A.jpeg
    FEE65773-21B0-40B5-B42B-B27138D37D8A.jpeg
    1.1 MB · Views: 23
  • 324BD66B-50B7-4177-A259-60389F468541.jpeg
    324BD66B-50B7-4177-A259-60389F468541.jpeg
    964.4 KB · Views: 23
  • 47652D13-B942-49E6-851D-61B515125F6C.jpeg
    47652D13-B942-49E6-851D-61B515125F6C.jpeg
    2.3 MB · Views: 25
  • AE4E3AC8-F4D2-42DA-B3D4-5DA8341398EF.jpeg
    AE4E3AC8-F4D2-42DA-B3D4-5DA8341398EF.jpeg
    1.8 MB · Views: 24
  • DD002DDD-A9EA-48E3-A09C-79BD03048E32.jpeg
    DD002DDD-A9EA-48E3-A09C-79BD03048E32.jpeg
    1 MB · Views: 25
  • AA9760F3-3E8C-49F7-8766-012A5F869BDA.jpeg
    AA9760F3-3E8C-49F7-8766-012A5F869BDA.jpeg
    2.4 MB · Views: 26
  • 304A8487-E069-4851-88A8-18A7F974D5F6.jpeg
    304A8487-E069-4851-88A8-18A7F974D5F6.jpeg
    1.5 MB · Views: 26
  • 2DAACDFF-FB7C-4947-9C85-D05CFB5E62F2.jpeg
    2DAACDFF-FB7C-4947-9C85-D05CFB5E62F2.jpeg
    422.9 KB · Views: 26
Currently in the process of installing the diesel heater. With the limited space I opted to bring the vent up through the floor. Since I have little kiddos and theres always the concern of blankets or pillows covering the vent I created a heater “cage” so it can never be easily obstructed. For fuel supply I have modified a diesel Rotopax which will live in the dead space inside the fridge compartment. I haven’t decided yet if I will permanently mount it with an external fill or go with quick disconnects.
 

Attachments

  • C8ADBC21-DBB6-4505-9EE7-88BBA655E30A.jpeg
    C8ADBC21-DBB6-4505-9EE7-88BBA655E30A.jpeg
    2.8 MB · Views: 32
  • 83749E15-A8D9-4551-ADDD-D7FAD940704E.jpeg
    83749E15-A8D9-4551-ADDD-D7FAD940704E.jpeg
    1.7 MB · Views: 32
  • 3090B940-2571-45EF-A358-A7FA535DA0FE.jpeg
    3090B940-2571-45EF-A358-A7FA535DA0FE.jpeg
    1.6 MB · Views: 31
  • AE532E2F-DB11-4C17-A23A-D4519699D8D8.jpeg
    AE532E2F-DB11-4C17-A23A-D4519699D8D8.jpeg
    3.7 MB · Views: 28
  • 4C1E4C25-D65B-4C74-8308-73D8E08ED1FD.jpeg
    4C1E4C25-D65B-4C74-8308-73D8E08ED1FD.jpeg
    2.9 MB · Views: 29
  • AE8196AF-7359-40C5-9B06-088F7A3BA369.jpeg
    AE8196AF-7359-40C5-9B06-088F7A3BA369.jpeg
    2.4 MB · Views: 31
  • E855C6CA-1E86-4A21-A42D-62B90638BEEA.jpeg
    E855C6CA-1E86-4A21-A42D-62B90638BEEA.jpeg
    1.1 MB · Views: 31
  • 1F01A18B-384C-4109-B005-68CD30D6E635.jpeg
    1F01A18B-384C-4109-B005-68CD30D6E635.jpeg
    3.6 MB · Views: 31
Ventilation fan is installed and wired up. I installed the upper bunk wall foam. I still need to install the front box roof rack before I can add the headliner.
 

Attachments

  • ACA54EB9-A731-4C15-B729-16C67828EB38.jpeg
    ACA54EB9-A731-4C15-B729-16C67828EB38.jpeg
    2.9 MB · Views: 57
  • 27FE8A8F-C602-4C18-9C27-CFB5FE585FDF.jpeg
    27FE8A8F-C602-4C18-9C27-CFB5FE585FDF.jpeg
    2.3 MB · Views: 63
  • A3DA999A-555B-4BCE-937C-8B69DD278D9D.jpeg
    A3DA999A-555B-4BCE-937C-8B69DD278D9D.jpeg
    3.9 MB · Views: 66

Forum statistics

Threads
188,432
Messages
2,904,761
Members
230,359
Latest member
TNielson-18
Top