060s skamper roof repair

Bill Barlow

New member
Roof repair Skamper 60S

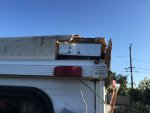
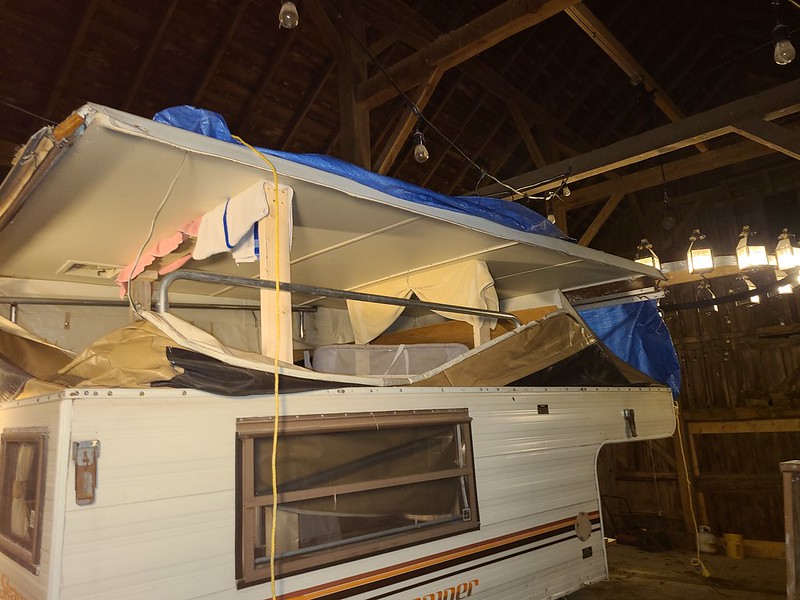
Ok, here's what I did on my roof repair on the rear corners of the Skamper 60S.

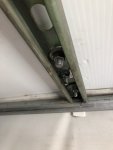
Skamper used the Herco torsion roof lift, the torsion bars tie into the rear corners on the roof. The plywood carries the torsion load and over time warps the corners.
Once the corners get wet its all over!

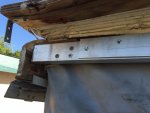
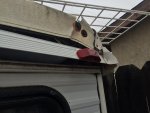
I peeled back the rear flap and installed two aluminum angle irons to between the torsion rods(see pictures).
If I had to do it over again I would have used just one steel angle iron.
I had to patch the corners and fiber glass them.

The Skamper roof is the weak link on this camper, Thinking real hard about scrapping the roof and build a new one the right way.
Maybe next winter?

Bill Barlow
 

Attachments

  • IMG_1647.jpg
    IMG_1647.jpg
    513.1 KB · Views: 119
  • IMG_1646.jpg
    IMG_1646.jpg
    517.1 KB · Views: 116
  • IMG_1549.jpg
    IMG_1549.jpg
    516.1 KB · Views: 118

Johntom240

New member
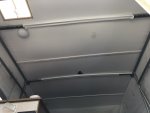
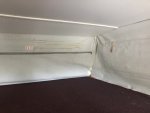
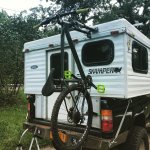
So I ended up using this plastic cardboard it’s really easy to clean and extremely light..the kindorf bars are giving me lots of rigidity In the roof I bent them into an arch, and the roof rack is bolted to them I also got a bike holder that I Bolted to the wood roof supportand added a aluminum angle iron from each side of the torsion bar two beef it up a bit0F2E0AF3-71ED-4CCD-8FD9-2066A1A67254.jpegA10EA9B6-BB85-4DB7-B369-2A9851619326.jpeg756FF8DB-C032-44D2-B245-C4A463240D53.jpegE82C4ACA-9400-4815-B98E-EF148B6C59AF.jpeg50A72CEE-216D-44CE-9285-03513747A468.jpeg
 
Hey, I know this is an old thread but I just picked up a Skamper 065s with the same issues as you. The rear torsion brackets, should they be parallel to the ground when in the correct position? My corners are broken and pushing up because of the torsion brackets. Basically, if I figure out a way to bend the corner brackets parallel to the ground and weld a straight metal bar in between them, would that be the correct way they are supposed to sit? Right now the inside corner of both of the brackets has twisted itself up. Hopefully that makes sense. Thanks in advance.
 

85_Ranger4x4

Well-known member
Hey, I know this is an old thread but I just picked up a Skamper 065s with the same issues as you. The rear torsion brackets, should they be parallel to the ground when in the correct position? My corners are broken and pushing up because of the torsion brackets. Basically, if I figure out a way to bend the corner brackets parallel to the ground and weld a straight metal bar in between them, would that be the correct way they are supposed to sit? Right now the inside corner of both of the brackets has twisted itself up. Hopefully that makes sense. Thanks in advance.

Yup, your back board is giving up.

The four bolts along the back should be aligned.

I am slowing replacing the boards in my 072S (basically a longer 060S) if you have questions. I have learned a lot and have taken a lot of pics, I want to post a thing on it once I get it done.
 
Yup, your back board is giving up.

The four bolts along the back should be aligned.

I am slowing replacing the boards in my 072S (basically a longer 060S) if you have questions. I have learned a lot and have taken a lot of pics, I want to post a thing on it once I get it done.


Please do post pics!

My bolt holes are definitely not aligned. Both corner pieces are tilting outwards. Someone in the past has tried to bandaid the problem with using metal brackets on the outside of the camper corners. But the center of the back board is still C shaped and is no longer touching in the center above the door.

The problem is, the roof lifts perfectly. Smooth and easy as can be. But, it looks like i'm going to have to take it apart to fix it right anyway.
 

85_Ranger4x4

Well-known member
Mine was in pretty good shape, the bolts pulled thru the back and side boards on the right side.


I have directions on how to disconnect the lift mechanism in my build thread in my sig. From there remove the bolt at the front of the torsion tubes (they mount to rear wall of the camper and extend forward against the ceiling) and do whatever you have to do to get them off the top at the rear.

Mine has a bolt that goes up into the end caps you can not see until the torsion tubes are gone and the canvas is dropped.


On 3/4 of mine these are not thru holes, so of course I broke the bolts off on the back two and get to drill hardened self tapping screws out of aluminum.


It is almost a trap as it makes sense to get the end caps open to drop the canvas so you can actually see what is going on. And the holes are blind so there is no way of knowing there is a screw going into them. The bolts break easy, I thought it was just resilient glue.

So easy a caveman could do it right?


I glued 4ly plywood together to form a true 1"x3.5" board, coated them in marine epoxy and glued them in place. Heavy Duty Liquid nails, it says on the tube it is good for outdoor use. From the factory the two plywood layers were just stapled together so I guess that could be an option too. Rear board is done, I just glued the sideboard in last Friday night and it is still clamped together for good measure. I will probably pull the clamps off tonight and see what I have.


There is just so much going with this it is hard to put into words and with mine not being done yet so I don't even really know if I did it right yet.

I know if you put it off you get this:


Mine is a '84 (built the same month I was born) and has the metal end caps, not sure if the later plastic end cap ones have the bolts.
 
So easy a caveman could do it right?

Haha, let's hope so.

Mine is a 95 065S. Just picked it up this past weekend. It has pieces of plastic end caps. Haha. Someone also added metal brackets to the outside and through bolted in a bunch of spots to stop the bending of the wood. It didn't work. The top is bowed and is a good couple inches from touching the back wall in the center.

I'll check out your disassembly instructions. That's the only real part that worries me as I'll be doing all of this alone. Getting the torsion bar re-clocked by myself seems like it's going to be tough. But, I have a ton of clamps and ratchet straps. I think I should be able to get it done.

Do you see any reason not to weld or bolt a metal bar in-between the two rear brackets? It makes sense to me to keep those brackets from rotating and ever going through the roof again. But, I haven't disassembled anything yet and won't really know how the system works until I take it apart.
 

ripperj

Explorer
I just redid the torsion bar mounts on my Northstar with a very similar roof.
I definitely recommend putting a piece of flat stock under the torsion brackets. Drill the holes for the 1/4-20 bolts nicely so there is no slop. I used 1.5” wide by 1/8” thick flat stock. I put like 10 wood screws into the stock along it’s length to keep it from moving.
I did one side at a time, so my flat stock is only 3’ long on each side, but if you have the roof off, or well supported , it could be one long piece.
The canvas attachment molding will sit on top of the flat stock.
I also added a stainless plate about 3”x6”x1/8” on the outside , basically a big washer. I used stainless fender washers for the two side mounting bolts.

I had no issues reclocking the springs , make sure you mark them when you take them out of the socket, I’m not sure the hex?? End is symmetrical. My tubes pointed a few degrees outward before there was any tension on them. Once I was done, the roof went up much easier, just being rotated out of position a few degrees makes a big difference, off course I added four 100 watt panels, so now it’s harder to crank again :)

I failed to take pics, I was by myself and racing the weather :)


Sent from my iPhone using Tapatalk Pro
 

ripperj

Explorer
This pic shows the outside plate and washers
68f5caea04a005c953cded625c3cf35c.jpg

7a13fed8d51d9b6d77211421e8825dd2.jpg


Sent from my iPhone using Tapatalk Pro
 
This pic shows the outside plate and washers
68f5caea04a005c953cded625c3cf35c.jpg

7a13fed8d51d9b6d77211421e8825dd2.jpg


Sent from my iPhone using Tapatalk Pro

I'll be trying to disassemble the Heco system this weekend. Unfortunately it seems to rain here every afternoon. I already removed the canvas from the entire roof since there was water damage from the fantastic fan and a lot of the foam insulation separated from the roof and was soaked.

I have to look at the clearance but I was thinking of using 1.5-2" flat stock and tying it to both corner brackets on the flat. Basically running parallel to the rear wood. It sounds like you ran yours perpendicular. This way there is no way the brackets can twist up and I can add a couple more bolts to the center of the rear board to add more support where there is none. Don't know if that makes sense.

I'll know more when I actually start looking at things and start removing pieces.
 

ripperj

Explorer
My flat stock spans the rear inside of the roof. My torsion brackets are angles, with two mounting screws in the rear and one on the side (times two for both sides)

Edit. The picture showing the plate is the rear of the camper
Sent from my iPhone using Tapatalk Pro
 

Forum statistics

Threads
188,406
Messages
2,906,948
Members
230,176
Latest member
Arcadia1415
Top