1983 Toyota 4X4 Chinook Build

Arjan

Fossil Overlander
Sure.

1587327095334.png

They're ideal in the Land Rovers - and theRRC's where there is no space to fit the radio whatsovers...
1587327255798.png

They're cheap, play MP3, have an FM radio and weigh next to nothing.

Do an eBay search on "car MP3 radio" and have fun... Most is CN origin - but some of the brands also have these "discless" units

HTH
 
Wow, that's exactly what I've been looking for! No amount of google searching using words like 'mini' 'small' etc. pulled up anything like that. Thanks a bunch.
 

redthies

Renaissance Redneck
If you want an actual name brand, there are tons of options. I installed one of these in my 1st Gen 4Runner.


TheCascadeKid

Observer
Loving this build!

I was recently researching aluminum radiators to bolster the cooling system on my Gen1 4Runner. I know you are tight on space, but did you add some rubber spacers at the mount points? Seems like this can be critical in avoiding fatigue cracks and radiator leaks on aluminum.

Keep us posted not the build progress!
 
I follow your build on IG. Glad I found this build thread. I'm going to start the process of getting our camper onto a 4x4 chassis.
Thanks and good luck! I'm hardly a subject matter expert, but feel free to reach out with any questions and I'll do my best. I'm much better at responding on IG since it goes straight to my phone; my IG account is @poormansearthroamer.

Loving this build!

I was recently researching aluminum radiators to bolster the cooling system on my Gen1 4Runner. I know you are tight on space, but did you add some rubber spacers at the mount points? Seems like this can be critical in avoiding fatigue cracks and radiator leaks on aluminum.

Keep us posted not the build progress!
I did not add any and it's something that's always in the back of my head while I'm wheeling. I need to upgrade my e-fan anyways and adding the rubber washers will get done then.
 
Last edited:
Alright guys, a build update is long overdue, so here goes:

Like I mentioned a while ago, COVID forced me to accelerate my plans to return to Colorado. Since this truck was still in strewn in pieces across my yard and because I found myself completely unemployed, my work was set out for me. Because of how I was planning to seal the cab through, I had to find a welder to help me shift the camper 1" farther back from the cab. Through @yotatrader on IG, I found @matt.wallace24 to help me out. He fabbed up two more mounts and also shifted the existing mounts back 1". Since I'm writing this well over 6 months (and many wheeling trips) later, I can vouch for his work; it's held up great. Pictured below is one of the two mounts he came up with (it's upside down).


28.jpg

Next, it was time to remount the roof. I ended up tearing out my first insulation and wiring job and have not redone it. I used a lot of cheap butt connectors and I wasn't too thrilled with the quality of plywood I used to finish it, so it all came out. Since I was running short on time, I ended up just putting the unfinished roof back on for the drive home. I did paint up the scissor lifts on both sides; it looks good but isn't nearly as durable as I would like. Powdercoating is in their near future.
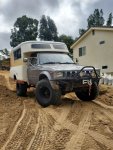
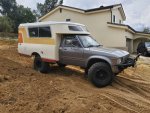
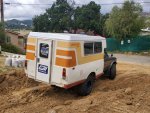
As much fun as I was having ripping unreasonably (for a 4wd 22r) gnarly stop light burnouts in the bedless pickup, it was time to actually remount the camper. I opted to use the same process I used to remove it, just in reverse. Thanks to Matt, I had an extra set of hands this time and it was much more smooth. The next day, I drove it into the lot next door for a quick cellphone photoshoot.

29.jpg

30.jpg

31.jpg
 
Last edited:
Figured it's time for an update. Not a whole ton of camper build progress, but I've been sorting the truck side of things out, mechanically. I've also been wheeling this thing across the western US for the last year and have a bunch of good photos of that that I'll include.

I've gotten the poptop fabric back from the upholstery shop, rebuilt the front axle, burned through three used L52 transmissions, and just now finished rebuilding my 3rd trans. I also upgraded the cooling system again, due to overheating issues. I edited the previous post where I installed the aluminum radiator to reflect the change. Nothing too exciting, I just doubled my CFM and installed a much nicer harness and controller for the fans.

I know that the L52 generally sucks, that the input bearing is a known problem (it's gone out on all three that have been in my truck). I got 5,000 miles out of my first that came in the camper when I bought it and around 2,000 out of the other used ones I've put in. Unfortunately, I have no fab tools or skills, so I'll just keep tossing them in as they go out. This next L52 is the first one in the camper that's been rebuilt and I'm hopeful that it'll last quite a bit longer. An engine swap is on the near horizon and I don't want to go through all the trouble of swapping a W series in just to remodify everything when a new engine goes in and changes all the dimensions.

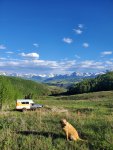
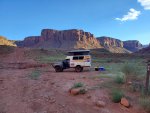
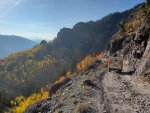
First, some adventure photos. I've taken it from Los Angeles area, to Phoenix, to Jackson. Mostly, I spend my time down in Southwest Colorado.

11.jpg

8.jpg

A lot of you can guess where these next photos were taken. The above camp spot was in this same super popular area, but on a not often taken trail. I didn't see a single other person all 14 hours I was parked here.

6.jpg

7.jpg

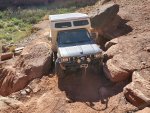
The image above was one of the only obstacles that has stopped my adventure in its tracks. I had rocks on three sides, and just couldn't get enough turn angle to slip between it all. This truck is way more capable offroad than I was expecting, and it's seen more than its fair share of tough roads. My only complaint is its departure angle; the rear of the camper extends way far past the back axle and it's a limiting factor on a lot of obstacles.

6.jpg

5.jpg

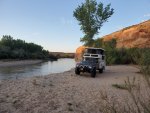
This camp spot, above, was definitely in a flash flood prone area. Even though you can't see it in the photo, I was on a bank nearly 4' above waterline. I was willing to gamble the river wouldn't rise that high for such a great camp spot.

4.jpg

2.jpg

1.jpg
 
Last edited:
Now for some build progress. I got the fabric back from the upholsterer and I love it. It was made by candle light with a foot powered machine by an Amish guy on the east coast. He used YKK zippers and Sunbrella fabric, both of which I can wholeheartedly recommend if people are on the fence. It's waterproof, light proof and easy to clean.
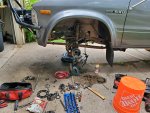
Next, I rebuilt the front axle. Both axle seals had been leaking (and lubing up my front rotors); the leaks finally progressed to puddles under my tires each night after driving. The rebuild went smoothly. It was my first time doing an axle; not nearly as bad as I was expecting. I should have done it like a year prior. I used Marlin Crawler's kit for this ( Front Axle Service Kit | Marlin Crawler, Inc. ); it was every bit as good as their reputation suggests it to be.
axle 1.jpg
Next, I installed a heavy duty clutch from Marlin while swapping out one of my junk ass L52s. I also had the flywheel redone. The rig was having trouble getting the stock clutch to engage when on steep hills. When I pulled it out, the stock clutch looked fine; it just probably wasn't up to the task of moving a motorhome up some of the mountains I've climbed in it. I used this 1981-88 4cyl 1,600-lb HD Clutch Kit | Marlin Crawler, Inc. and it completely fixed my issues.

clutch.jpg
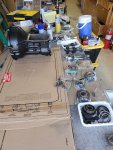
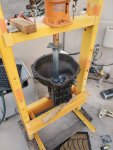
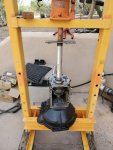
Next was the biggest auto repair I've ever done: rebuilding a transmission. I'd researched it for months, but you can't really find a whole lot of info on rebuilding L series transmissions online. I assume this is because most intelligent and clear thinking people take them straight to the dump when they go out. Since those words don't apply to me, I decided to rebuild mine. I took a million photos (and plan on documenting the process over on YotaTech eventually) and it all went fairly smoothly. The only build thread I could find ( how to tear into the L52 transmission - YotaTech Forums ) suggested that the shafts could be pulled out with the bearings on the shafts (or that the bearings would simply slide off the shafts easily while everything is together), but that wasn't the case for mine. I had to cut out 3 of my 4 main bearings before the shafts could be lifted out the top. There's no mid plate, like on a W series, so I then had to get creative on how to press the bearings onto the shafts while they were inside the housing.
I used Marlin's kit ( L52 Kit | Marlin Crawler, Inc. ) and had only one major complaint. There's large snap rings that fit around several of the bearings; these help them stay in the position they're meant to be in. All but one of my new bearings came with those rings; one did not. Luckily, I had kept all the old parts in a box and I just reused the old ring, but I would have been screwed if I didn't have it. Something to keep in mind.

10.jpg

trans 1.jpg

trans 2.jpg
A couple things to be aware of with this transmission. As you can see in the photo above, I had to support the output shaft at its nose while pressing on the output bearing. I pressed it on as far as I could before it contacted the back of the case, then removed one of the support plates which dropped the level of the shaft and centered the output bearing in the housing, then I pressed it the rest of the way on. Also, this meant that I then had to the build the 1st and 2nd gear clutch inside of the transmission. I'm not sure if stuff like this is normal with other transmissions, but I wasn't expected to have to do it based on my research and it kinda sucked.
I finished the rebuild with no extra parts and everything shifts and spins the way it should. At this time, I haven't yet installed it in my truck. That's the final test and I'm kinda nervous about it.

For what it's worth, I still post everything first on my Instagram (@poormansearthroamer) and it's way easier to get ahold of me there.

That's about it for the updates. I have an ARB dual air compressor, chest fridge, spray insulation kit, full solar setup, and more sitting in my garage; there's definitely more to come; I just need to find the time to put it all together.

 
Last edited:
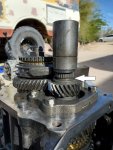
Got a couple of updates for you all. First, the L52 I rebuilt blew 5th gear into chunks on the highway about 800 miles in. There's supposed to be a C clip that fits in where you can see the arrow pointing; it fell off... Not really sure how that managed to happen, but after it was gone, 5th gear was able to lift up about .75" and all the load was placed on the edges of the two gears. I know it was on there when I finished because I can see it present in the photo I took after finishing the 5th gear setup. Pretty bummed out about that, but whatever. I've got a redemption round planned.

19.jpg


I've finally gave up on all things L series and installed a W56B; I modified the stock crossmember to work with the W series. It was a tight fit in the trans tunnel so I also modded the crossmember mounting surface to drop the transmission about half an inch. It was my first welding project, so the welds aren't pretty, but I think (hope) they'll hold. If not, I'll fix it and maybe do a better job the second time. Luckily for me, the Craigslist special W56 has some bearing noise. I've already sourced a buildable core W56 to rebuild, so I'll keep you all updated on that.
 
Last edited:
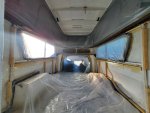
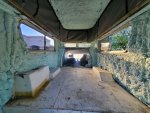
Next, an even more exciting update: the camper finally got spray insulation! I've been searching for about a year for someone willing to come spray it or who's willing to let me meet them at a job site to spray it there while they're all set up. No company I could find would do it for less than $1,000 so I ordered up a Foam It Green 602 kit for $900 shipped and did it myself. It was super messy, but I seriously could not imagine a better way to insulate a rig like this. I went with a closed cell foam and it tied everything together nicely and I was able to fill up all my walls and roof with at least 1.5" of foam. The roof has at least 2"everywhere with 3"-4" at the peak. I'm super pumped on this and I'm really glad I didn't go with foam board or wool; I really feel like I completely maximized the level of insulation this rig could hold.

As far as the product, Foam It Green sent good instructions and the application process went super smoothly. You can really get into the weeds online about this company and I've heard their customer service can be less than thrilling. Luckily, I didn't have to find out. I will say, I was not too impressed with their idea of palletizing for shipping. The product comes in two large, heavy pressurized tanks about the size of regular propane tank. They simply tossed the two boxes on a small pallet and lightly plastic wrapped them. No banding, no real restraints. They'd clearly shifted in transport and the pallet was all cracked and broken. Obviously, the product worked great so I must have gotten lucky. Still something to note. Here's some photos.

foam 1.jpg

foam 2.jpg
Obviously, I went super heavy on the spray. I paid $900 for the kit, so I'm damn well gonna be using $900 worth of product. I plan to trim it all down flush with the studs. I've looked at a few different ideas on how to do this, but I think I'm just gonna go to town with a wire cup and expose the studs, then either use a long sawzall attachment or just keep trimming with the wire cup. Open to ideas on this.

Next up is cabinetry. The plan is floor to ceiling cabinets on either side of the entry way, a front to back countertop to the left with the chest fridge underneath on a slide right up behind the driver's seat. On the right will be the bed; I'm thinking of a jackknife futon that I'll reframe to not look like Chinese garbage and also to maximize the bed space in my rig. I'm not much of a carpenter, but I really want this to look nice so I'll be taking my time researching what style and stain and such that I like. I have access to a decent wood shop, so I should be able to come up with something good. If anybody has some woodworking Youtube channel recommendations, I'm all ears.

The space will be designed to be used with the top up or down. I'm planning on using this rig for year round camping and I want to be able to stay warm by keeping the top down during winter time camping if needed. On that note, who's got experience with chinese diesel heaters (or any diesel heaters at all) at elevations above 10,000'? I know you can modify the fuel supply on the Chinese units to provide a good burn mixture in the thin air, so a Lavaner 5kw Pro will be my first attempt. I'm not opposed to spending Webasto money, but I didn't get a warm and fuzzy on successful super high altitude operation of any of their kits during my research. I've read that people have done well with a Espar D5 with their high altitude kit, but that's nearly $3,000 brand new including the high altitude kit. Anyone got a used one???
 
Last edited:

Henry_G

Observer
Next, an even more exciting update: the camper finally got spray insulation! I've been searching for about a year for someone willing to come spray it or who's willing to let me meet them at a job site to spray it there while they're all set up. No company I could find would do it for less than $1,000 so I ordered up a Foam It Green 602 kit for $900 shipped and did it myself. It was super messy, but I seriously could not imagine a better way to insulate a rig like this. I went with a closed cell foam and it tied everything together nicely and I was able to fill up all my walls and roof with at least 1.5" of foam. The roof has at least 2"everywhere with 3"-4" at the peak. I'm super pumped on this and I'm really glad I didn't go with foam board or wool; I really feel like I completely maximized the level of insulation this rig could hold.

As far as the product, Foam It Green sent good instructions and the application process went super smoothly. You can really get into the weeds online about this company and I've heard their customer service can be less than thrilling. Luckily, I didn't have to find out. I will say, I was not too impressed with their idea of palletizing for shipping. The product comes in two large, heavy pressurized tanks about the size of regular propane tank. They simply tossed the two boxes on a small pallet and lightly plastic wrapped them. No banding, no real restraints. They'd clearly shifted in transport and the pallet was all cracked and broken. Obviously, the product worked great so I must have gotten lucky. Still something to note. Here's some photos.

Obviously, I went super heavy on the spray. I paid $900 for the kit, so I'm damn well gonna be using $900 worth of product. I plan to trim it all down flush with the studs. I've looked at a few different ideas on how to do this, but I think I'm just gonna go to town with a wire cup and expose the studs, then either use a long sawzall attachment or just keep trimming with the wire cup. Open to ideas on this.

That is going to make a HUGE difference. Have you decided on a heater?
 
That is going to make a HUGE difference. Have you decided on a heater?
I'm hopeful, too! Maximizing insulation on this was a top priority of the build, I'm pretty pumped to have gotten it done.

I'm still gonna start with the Chinese diesel heater option and go from there. Their fuel mapping is easy to modify so they should be pretty receptive to tuning for high altitude. I'll post the updates here; I'm sure someone will find it useful.
 

Forum statistics

Threads
188,362
Messages
2,906,008
Members
230,117
Latest member
greatwhite24
Top