preacherman
Explorer
Land Rover XD full fluid flush, new plugs wires and...RTV caulk??
Arriving home after a great weekend in the mountains I got straight to work on the XD. Making a list of parts I would need from Rovers North, I put together a rather large order. Of first priority was what might be an overheating problem. I say might because I was not convinced the overheating my ultra gauge was reading was actually overheating. My hunch stemmed from two things. First, the truck didn’t seem to actually be showing any overt signs of overheating. It was not smoking, spilling over, losing power or even registering hot on the dash gauge. Normally I would not have thought twice about it, but all the horrors stories of Discovery’s blowing engines because of overheating had me second-guessing myself.
The only reason I was actually worried in the first place was that the ultra gauge sometimes screamed at me that the truck was overheating. The gauge would run between 185 and 230 within a matter of seconds. :Wow1: It would go up to 230 briefly, and then back to 190, then 175, then 215. To make matters worse, I could hear air sloshing around in the heater core. The truck obviously had a new water pump and fan, so maybe someone had tried to find the issue and gave up??
Not wanting to risk it, I went crazy on the Rovers North web site and ordered the entire cooling system except the heater core. Since we intend to take this on long backcountry camping trips the peace of mind was worth the price. I ordered a new radiator, expansion tank, cap, hoses, Land Rover thermostat, gaskets, temp gauge, and even new hose clamps. Since the water pump and fan looked new I simply tested those. They tested out fine.
Digging in, I completely drained and flushed the entire system. There was quite a bit of calcium buildup in many of the parts and I was glad I got new everything. Once I removed the old radiator I found a pinhole leak that was behind the mounting pillar, I never would have found it. The radiator also looked like it had been re-cored before. The bad black paint job was a dead giveaway. Testing the old sensors, the ECU sensor tested bad, but the dash one tested fine. The bad ECU side sensor would explain the jumping reading coming form the Ultra gauge. The gauge uses the ECU sensor and the dash used the other one. That mystery solved, I started replacing everything.
Once I got the cooling system all back together I borrowed a buddies vacuum coolant tools. I capped off the heater core to check it and was delighted to discover it would hold 15lbs of vacuum for 3 minutes with no problems. Not having to take off the dash is always a good thing. I then vacuum tested the entire system. I almost forgot this step but was glad I didn’t once I heard the sucking noise that told me I had put the thermostat gasket on backwards. Fixing that, I then moved on to filling the system up under vacuum. After I buttoned everything up I had a very cool running Discovery XD.
New Radiator Installed

Next I flushed everything. Starting at the front of the car I flushed the oil and put in a larger filter and some fresh oil. While the oil was not terrible, it needed changed badly.
Completely draining the power steering fluid I topped it up with a full bottle and a half of Lucas power steering stop leak. Hopefully that will put a dent in my “chassis lubrication system”.
Moving on to the diffs, I discovered the front was heavily contaminated with water and low on fluid. I was glad I had not driven far with the oil level this way. Completely flushing the old oil out, I topped up with fresh gear lube and moved to the rear. The rear cap gave me a struggle. It took a big breaker bar and some choice words to get the drain off. Once off, I discovered what appeared to be original fluid mixed with a fresh “top off” layer. Nice. Flushing the diff, I topped it off with fresh oil as well.
Crawling under the Discovery, I next checked the transfer case fluid level. Sticking my finger completely into the transfer case, I could not feel any oil at all. Great. This is the last thing I need. Draining the case I was surprised and relieved to find it had a small amount of fresh fluid in the case. Looking at the case closer, someone had tried to repair a large transfer case leak by smearing RTV sealant across all the leaking spots like caulk. They of course used black RTV in an attempt to hide the hack repair, but it was obviously to stop the leak. Shaking my head, I took it all apart and did it the right way. Since the oil was now out, it didn’t add too much of a step to remove the covers and do it right. I topped up the transfer case to the correct level and with the correct fluid and was very glad I didn’t drive it back like I had originally planned. I really might have fried that transfer case.
Moving onto the tranny I discovered I would have to drop the cat’s to get the transmission pan off to change the oil and filter. I had noticed that one of my O2 sensors was throwing a code so I decided to order new sensors and drop the cats, replace the back sensors and change the transmission fluid and filter the next weekend. Crawling around changing all the fluids I did discover a few more issue to fix and a few issues someone had already attended to. The good news is I discovered the Land Rover had a new flex joint :wings:, new shocks and lift coils (they look to be OME) one new u-joint, and a recent fuel filter. I made my list of next week’s parts orders and called it a day.
The next day I popped the hood and started on the plugs and wires. There was an audible wine from the alternator through the radio that was one of two things. Either there was a bad spark plug wire, or the rectifier in the alternator was bad. Getting out my amp meter I first discovered a crack in one of the spark plug boots that was causing the plug wire to arc to the manifold. I had suspected the wires would test bad and already had a set of Kingsborne 9mm wires on hand. Pulling the plugs I also discovered two different types of spark plugs. 7 of the plugs where regular bosch plugs and one was a bosch 4+. That might explain the mis-fire code for cylinder 4 with the odd plug (a code I had also gotten when I plugged in the ultra gauge). Running to the parts store I picked up a new complete set of NGK plugs to go with the new wires.
With the new plugs and wires changed I tested the radio. While the wining noise was better there was still a slight noise on acceleration. Testing the alternator I found out why. The rectifier was stuck open allowing 15.2 volts out at all times.:Wow1: While I had planned on changing the alternator at some point for peace of mind in the boonies, I had hoped to wait a few weeks. Luckily I have a great place locally that re-builds all of our alternators for our work fleet. I could drop it off with them and see what they said.
When I dropped it off a few days later, the counter guy saw me walking up holding an alternator in my hand. “That will be $65 and will be ready tomorrow. He said. Then turning it over and seeing the Land Rover Logo he piped back up, “Oh wait this says Land Rover, It will be $149 and will take a week.” So that is how this goes, I thought….
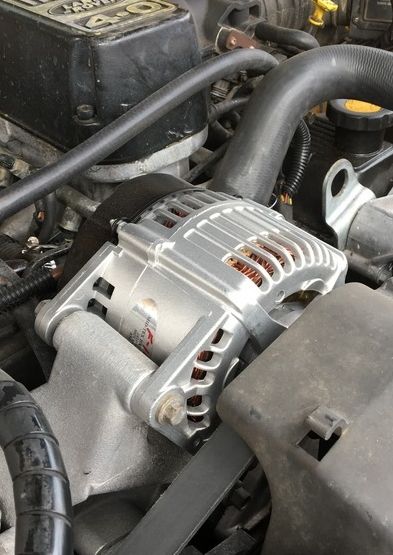
New Alternator Installed
Arriving home after a great weekend in the mountains I got straight to work on the XD. Making a list of parts I would need from Rovers North, I put together a rather large order. Of first priority was what might be an overheating problem. I say might because I was not convinced the overheating my ultra gauge was reading was actually overheating. My hunch stemmed from two things. First, the truck didn’t seem to actually be showing any overt signs of overheating. It was not smoking, spilling over, losing power or even registering hot on the dash gauge. Normally I would not have thought twice about it, but all the horrors stories of Discovery’s blowing engines because of overheating had me second-guessing myself.
The only reason I was actually worried in the first place was that the ultra gauge sometimes screamed at me that the truck was overheating. The gauge would run between 185 and 230 within a matter of seconds. :Wow1: It would go up to 230 briefly, and then back to 190, then 175, then 215. To make matters worse, I could hear air sloshing around in the heater core. The truck obviously had a new water pump and fan, so maybe someone had tried to find the issue and gave up??
Not wanting to risk it, I went crazy on the Rovers North web site and ordered the entire cooling system except the heater core. Since we intend to take this on long backcountry camping trips the peace of mind was worth the price. I ordered a new radiator, expansion tank, cap, hoses, Land Rover thermostat, gaskets, temp gauge, and even new hose clamps. Since the water pump and fan looked new I simply tested those. They tested out fine.
Digging in, I completely drained and flushed the entire system. There was quite a bit of calcium buildup in many of the parts and I was glad I got new everything. Once I removed the old radiator I found a pinhole leak that was behind the mounting pillar, I never would have found it. The radiator also looked like it had been re-cored before. The bad black paint job was a dead giveaway. Testing the old sensors, the ECU sensor tested bad, but the dash one tested fine. The bad ECU side sensor would explain the jumping reading coming form the Ultra gauge. The gauge uses the ECU sensor and the dash used the other one. That mystery solved, I started replacing everything.
Once I got the cooling system all back together I borrowed a buddies vacuum coolant tools. I capped off the heater core to check it and was delighted to discover it would hold 15lbs of vacuum for 3 minutes with no problems. Not having to take off the dash is always a good thing. I then vacuum tested the entire system. I almost forgot this step but was glad I didn’t once I heard the sucking noise that told me I had put the thermostat gasket on backwards. Fixing that, I then moved on to filling the system up under vacuum. After I buttoned everything up I had a very cool running Discovery XD.
New Radiator Installed

Next I flushed everything. Starting at the front of the car I flushed the oil and put in a larger filter and some fresh oil. While the oil was not terrible, it needed changed badly.
Completely draining the power steering fluid I topped it up with a full bottle and a half of Lucas power steering stop leak. Hopefully that will put a dent in my “chassis lubrication system”.
Moving on to the diffs, I discovered the front was heavily contaminated with water and low on fluid. I was glad I had not driven far with the oil level this way. Completely flushing the old oil out, I topped up with fresh gear lube and moved to the rear. The rear cap gave me a struggle. It took a big breaker bar and some choice words to get the drain off. Once off, I discovered what appeared to be original fluid mixed with a fresh “top off” layer. Nice. Flushing the diff, I topped it off with fresh oil as well.
Crawling under the Discovery, I next checked the transfer case fluid level. Sticking my finger completely into the transfer case, I could not feel any oil at all. Great. This is the last thing I need. Draining the case I was surprised and relieved to find it had a small amount of fresh fluid in the case. Looking at the case closer, someone had tried to repair a large transfer case leak by smearing RTV sealant across all the leaking spots like caulk. They of course used black RTV in an attempt to hide the hack repair, but it was obviously to stop the leak. Shaking my head, I took it all apart and did it the right way. Since the oil was now out, it didn’t add too much of a step to remove the covers and do it right. I topped up the transfer case to the correct level and with the correct fluid and was very glad I didn’t drive it back like I had originally planned. I really might have fried that transfer case.
Moving onto the tranny I discovered I would have to drop the cat’s to get the transmission pan off to change the oil and filter. I had noticed that one of my O2 sensors was throwing a code so I decided to order new sensors and drop the cats, replace the back sensors and change the transmission fluid and filter the next weekend. Crawling around changing all the fluids I did discover a few more issue to fix and a few issues someone had already attended to. The good news is I discovered the Land Rover had a new flex joint :wings:, new shocks and lift coils (they look to be OME) one new u-joint, and a recent fuel filter. I made my list of next week’s parts orders and called it a day.
The next day I popped the hood and started on the plugs and wires. There was an audible wine from the alternator through the radio that was one of two things. Either there was a bad spark plug wire, or the rectifier in the alternator was bad. Getting out my amp meter I first discovered a crack in one of the spark plug boots that was causing the plug wire to arc to the manifold. I had suspected the wires would test bad and already had a set of Kingsborne 9mm wires on hand. Pulling the plugs I also discovered two different types of spark plugs. 7 of the plugs where regular bosch plugs and one was a bosch 4+. That might explain the mis-fire code for cylinder 4 with the odd plug (a code I had also gotten when I plugged in the ultra gauge). Running to the parts store I picked up a new complete set of NGK plugs to go with the new wires.
With the new plugs and wires changed I tested the radio. While the wining noise was better there was still a slight noise on acceleration. Testing the alternator I found out why. The rectifier was stuck open allowing 15.2 volts out at all times.:Wow1: While I had planned on changing the alternator at some point for peace of mind in the boonies, I had hoped to wait a few weeks. Luckily I have a great place locally that re-builds all of our alternators for our work fleet. I could drop it off with them and see what they said.
When I dropped it off a few days later, the counter guy saw me walking up holding an alternator in my hand. “That will be $65 and will be ready tomorrow. He said. Then turning it over and seeing the Land Rover Logo he piped back up, “Oh wait this says Land Rover, It will be $149 and will take a week.” So that is how this goes, I thought….
New Alternator Installed


")


