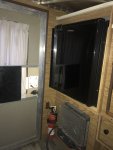
1st gen Cummins/W250 and FWC Grandby revival

RichardSkinner

New member
Looks good! If you add more solar you'll probably want another battery as well. On my Grandby I have 2x100W on the roof and 2X115Ah batteries and it works well.

Subscribing to follow.

Thanks, Cayuse. What kind of load/appliances are you running on most trips?

My main power consumption would be to the TF65 fridge. Other than that we have a couple of LED lights, cigarette plug to charge phones, and a fantastic fan roof vent. Just off basic numbers, I know the single battery would make it through the night. Charging up the next day is the questionable part. Theoretical vs observed power generation of solar is frustrating. Add in poor weather variables and there isn’t much calculation and planning except, “oversized the hell out of it.”
 

RichardSkinner

New member
So while I had the truck down I took this as a good opportunity to knock a few things off the list.

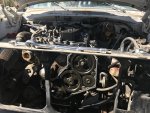
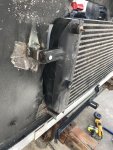
I picked up a intercooler for a 1st gen from a buddy last year. My non intercooled model doesn’t have room for the intercooler, however. So I had to cut out some room and make brackets. I pulled the rad, ac condenser, and transmission cooler to get to work. We will get to that in a minute.

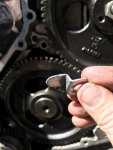
While that stuff was out of the way, I pulled the timing cover to do the “killer dowel pin - KDP”. If you’re not familiar, basically it’s a roll pin that can back out on these engines and fall in the timing gears. Almost certain death to an otherwise hard to kill engine... unless you’re a goof ball like me and blow the head gasket 400 miles from home and crack the head... still kicking myself - but at least it’s a salvageable break.
506368

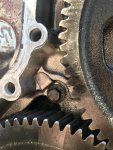
You make a little tab up. The dowel pin can be seen in the background. It’s the little black hole just under the gasket mating surface above the lower gear in the pic.
506369

Then you use an existing bolt to secure the KDP with the tab you made. Crisis averted and one less thing to worry about when deep in the bush.
506370


I threw all that back together, chopped some holes through the rad support, made some brackets, and hot metal glue gunned this puppy in. As you can see, it’s a good thing I’m not a welder by trade. I still have some work before the intercooler is done (piping).506371

Same process with the transmission cooler. You can see it above the intercooler and tucked under the trim.
I don’t have the AC condenser in yet. It will require munching into the lower body panel that holds the chrome trim. I’m not sure what my plan is yet, but I’m cooking up a semi radical idea that should work. So add AC condenser to the “to do list.”
506372

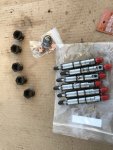
5x12SAC injectors came in!!
506373

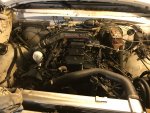
And last night I slipped ‘em in. Threw the rad back in, added oil, coolant, bled the fuel system and buttoned up all the other junk.
506374

The above photo was last night. I fired it up shortly after and was grinning from ear to ear. I took it for a test spin and can already feel the extra power from the modified injectors. I was so excited that after washing up and getting to bed I couldn’t sleep. I laid there for a good hour just wanting to drive it more, but I had work in the morning.

I left it non intercooled for now. I need to get to a buddy’s where I can weld up the aluminum intake horn for the intercooler piping. I also want to drive it some and note EGT with the new injectors. I’ll do the same EGT test after the intercooler is connected. Then the same after turning the injection pump up a little.

Next update I’ll cover the FWC and the plans!

The fridge arrives today! Can’t wait to work on dropping that in.
 
Last edited:

Cayuse

Observer
Thanks, Cayuse. What kind of load/appliances are you running on most trips?

My main power consumption would be to the TF65 fridge. Other than that we have a couple of LED lights, cigarette plug to charge phones, and a fantastic fan roof vent. Just off basic numbers, I know the single battery would make it through the night. Charging up the next day is the questionable part. Theoretical vs observed power generation of solar is frustrating. Add in poor weather variables and there isn’t much calculation and planning except, “oversized the hell out of it.”

I have the Isotherm Cruise 65 fridge (wish I'd gone bigger as two people quickly fill it), LED lights, furnace, fantastic fan, Max Air fan over the bed, 12 volt for phones and whatnot and the water pump. It is very rare that I turn on the inverter and plug into the 110 outlet that I have wired in but it's an option. Before putting solar on I could camp 2+ days with the batteries charged on the drive from the connection to the truck. Since putting the solar on I leave the truck disconnected and let the sun do its thing, never had issues even when in the rain in the PNW.
 

RichardSkinner

New member
I have the Isotherm Cruise 65 fridge (wish I'd gone bigger as two people quickly fill it), LED lights, furnace, fantastic fan, Max Air fan over the bed, 12 volt for phones and whatnot and the water pump. It is very rare that I turn on the inverter and plug into the 110 outlet that I have wired in but it's an option. Before putting solar on I could camp 2+ days with the batteries charged on the drive from the connection to the truck. Since putting the solar on I leave the truck disconnected and let the sun do its thing, never had issues even when in the rain in the PNW.

I’ll take note of your numbers, thanks. I’m not going to be running a furnace with it. I have a wave 3, but haven’t ran it yet. I have a trip this weekend that I might run the wave one to test the condensation problems I read about. I might go diesel heater route. We will see.
 

RichardSkinner

New member
The plan this week is to head to my buddy’s place to mount and balance the “new” tires! I’m also going to mount the truckfridge. It will all be after work, and it’s supposed to rain this week, so it might be tough. Then the wife and I are heading out this coming weekend for our first trip of this year in the FWC! We are very excited.

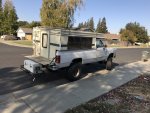
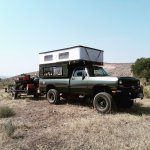
So here’s where the truck sits now. It’s running great after the rebuild. I’ll be driving it more this week to make sure it’s all good.
I’ve dropped a decent bit of cash on parts recently and am going to recover for a while while I cool out on spending. I’ll do smaller projects to clean up loose ends. I need to figure out a method for mounting the Ac condenser in the mean time. I’m pretty sure I’m going to put it inside the engine compartment with a 12v fan. I’ll post details of that as it progresses. I need to get that running for the summer trips anyways. Another project is making some mounts for the engine to mount a belt driven York compressor. I’m getting one from a buddy for a bottle of whiskey. Having onboard air is going to be huge.
506836
I bought a harbor freight trailer hitch rack that I cut and welded a 4” drop on so I can carry some extra gear without having to move it around a lot in the camper.
506837

So the drain valve for the water tank was seriously brittle and damaged. It would leak a bit and I have to use pliers to turn it. I went to Lowe’s and bought some copper fittings and a ball valve. After trying to put it on, the tube from the tank would just spin as I tried to thread on the copper fittings. It was also stripped out. So I figured I’d pull the cabinet apart and take a look at it all. Unfortunately the damn copper propane line builds the water tank in. I’m having a hell of a time with the copper and it wanting to bend. I can’t crack the nut free to get the line off.. so I’m stalling on what to do. I might just rip the copper out and go with rubber hose.

506840

Here is where the fridge is going to go. My brother had made a slide out for an ARB fridge he had here before. I’m going to have to make some simple framing to allow for airflow to the compressor and condenser. I’m still debating putting a couple small 12v squirrel fans before the fridge to air in cooling and efficiency. I’ll try it without first and see how it runs.506841

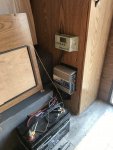
Here’s the electrical system. I’m going to clean this up and relocate the battery. It blocks the turnbuckle access hole and needs a cover. I’m most likely going to relocate this into the compartment below the fridge area or move it into the closet that the charge controller is mounted to in the picture. I’d build it into its own compartment on the floor, so it isn’t visible.

506855


Random Stupid experiment -
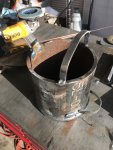
I found a model on thingiverse for this hood ornament like the originals so I 3D printer it. I’ll cast some plaster of Paris around it and then melt out the printed part. I welded up a steel crucible from some scrap that I can melt aluminum cans in. So I’m going to try to cast a reproduction ornament. Well see. It might turn out as garbage.
506846


506839

I’m not exactly sure on my timeline, but I’m going to pull the bed off and have the cab painted. I’ll also insulate the inside of the cab then to quiet it down some. After that, I am planning to make an aluminum flat bed with wood deck. Side boxes are on the plan for storage. I’m kind of a pack rat and like to bring gear for hunting, fishing, shooting, rc stuff, etc..

It had a 6” lift on it when I got it. The rear is on some tall lift blocks that I don’t like. The plan is to eventually put on a 4” lift kit that doesn’t use blocks in the rear... but that costs a decent bill, so I’m going to hold off for now.

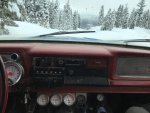
For this weekend, I got away with some buddies for a snow wheeling trip! It was a good time. We stayed at a little cabin up there.
506842

506843

I wrote this post while extremely distracted, so I hope it was coherent.
 
Last edited:

RichardSkinner

New member
Oh yeah, some how the screen door slider/bug screen got lost on my brother. So I modeled a quick one up and 3D printed it in PLA. It works well and slides just fine. It’s too big of an area to fit on my print bed, so I did it in 4 parts with tabs to glue over each other. It also kicks up and over to clear the latch. If anyone wants the STL file to print for themselves or have printed on 3D hubs or something, let me know. I’ll post it on thingiverse.
506857
 
Last edited:

vintageracer

To Infinity and Beyond!
Question about your inter-cooler install as it seems to me you created a lot of extra work for yourself that could have been easily avoided.

Instead of all the fabrication work you performed for the radiator and install of the inter-cooler did you consider finding a good used 91 1/2-93 1st Gen Dodge factory inter-cooler radiator support which would have made the inter-cooler installation an easy bolt in along with an easy bolt in for the A/C condenser?
 

RichardSkinner

New member
Question about your inter-cooler install as it seems to me you created a lot of extra work for yourself that could have been easily avoided.

Instead of all the fabrication work you performed for the radiator and install of the inter-cooler did you consider finding a good used 91 1/2-93 1st Gen Dodge factory inter-cooler radiator support which would have made the inter-cooler installation an easy bolt in along with an easy bolt in for the A/C condenser?

You’re right and I did consider that. However I haven’t been able to find the parts over the last year, so I just went for it. I’m still keeping an eye out and will buy the stuff if I see it. I can still go that route once I find the parts. I’d need the rad support and also all the light housings, grill support, and grill, as all that stuff is different.

Let me know if you ever see those parts for sale!
 

RichardSkinner

New member
Update time!

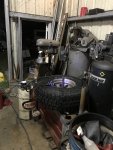
Last week I got over to my buddy Wyatt’s place. This is the same guy I’ve referenced earlier in the thread. He has pretty much everything you need for a project truck including a tire mounting machine and dynamic spin balancer. So we mounted and balanced the new tires!

Mounting machine. Pics of tires on the truck later in this post.
507905


I was totally unmotivated after work the rest of the week... but a co worker who’s an amazing fly fisherman invited me to Pyramid Lake for a weekend of fishing. I can’t turn that down, but I also still had a lot to do on the truck. So, I took Friday off to finish out some last minute stuff.

I adjusted the alignment with the new tires on. Alignment was way off before and I was going for 1/8” toe in, but it was difficult to do by myself. I’ll have to fine tune it when a buddy is over and can help measure. Overall the truck tracked a lot better.

I then went to Lowe’s and got some bolts to mount the drive shaft I had extended a few months ago. I went to mount it up and the shop made it too long! I wasn’t confident when I saw the guy from the shop jump under the trick and whip a dimension with a tape measure super quickly when I dropped it off. I also didn’t want to be a jerk off and say something because I figure it’s his job and he has been doing this for years. Should be good, right? Well... it wasn’t. So I had to continue the trip prep and go without a front drive shaft for this trip.

I continued on to mount up the TF65. I also threw all the paneling back on for the water tank. There’s a slow drip on the drain tube, but I’ll deal with it later. I’m going to have to replumb the propane because the copper lines are twisting when I try to remove them.
507906

Sorry for the poor image. I slotted approximately 10 square inches on the wood base that I made and left the 0.75” gap that runs along the top open. I’ll leave it like this for now to see if that’s enough air flow.507907

At this point, it was Friday afternoon and I was due at another co workers retirement party who lives about 45 minutes towards Pyramid Lake from me. So I headed off to his. We drank beer, ate, and had a good time with a bunch of people from work. I was in no shape to drive, so I crashed on the bench seat in the FWC and just left the top undeployed.

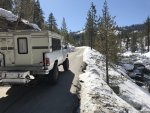
Saturday morning I headed up and over Donner pass on I-80. The truck was running great after the rebuild. The temp gauge stays buried in the lower 1/3 and rises only ever so slightly on heavy grades. That’s normal for a 1st gen. I’m still running the truck non intercooled since I haven’t made up the piping yet. EGTs definitely could be lower, but I had a smile plastered on my face the whole time.

Quick stop for pics! ...and a pack of venison slim jims from this year's deer. (on the tail gate).
507909

So here’s the funny part about that whole drive shaft SNAFU - when I rolled in to Pyramid Lake my buddies were on a sand beach. I approached nose down hill and sort of knew it was a bad idea, but went for it. As soon as I transitioned onto the sand I knew it was bad news. I’ve snow wheeled a good bit and sand is the same in principle and feeling. You’re sort of “driving by Braille” and feeling the way the truck sits and traction. I could tell I wasn’t going to make it out. Sure as hell, I did not. After digging in a little and seeing there was no hope I called it and went for the tow strap before I dug in worse and made recovery harder. My buddy pulled me out in his F150. I had a nice little crowd watching and I felt like a total dumb dumb. Haha... ooooooh well! Seriously could have used my front drive shaft there. That was frustrating. I’ll definitely tell the guys at the driveline shop that story.

Keeping on hardpack roads! The “new” tires felt great.
507910

We fished a couple different areas. I didn’t catch anything, but I also didn’t fish too hard. I was having fun just hanging and enjoying the scenery. My buddies did ok in my opinion, but they told me it was horribly slow compared to some years. Sorry, no fish pics. They rented a trailer in the small local town, so I set up the FWC in the parking space and hung with them for the evening.

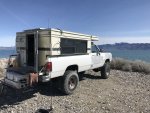
Here’s a pic from our fishing spot today.
507911

Anyways, I saw a couple FWC people running around. Someone had a white 2nd gen Dodge Cummins. I absolutely loved that rig.

The single 100W solar panel and 100AH battery did fine with the fridge. I wasn’t in the camper much except to sleep, as it was a very outdoors oriented trip. But voltage at night fall on the battery was full at 12.81v I forgot to check voltage in the morning, but basically I never caught it sagging at all. However, I only charged my phone and ran the water pump a small amount. For now, I am going to leave it how it is and load test more.
 
Last edited:

RichardSkinner

New member
I don't have any social media aside from forums, but my buddy text me a vid on instagram. So I pulled some snapshots. LoL! F-150 pulling out a 3/4 ton cummins. Gotta love it. Stuff that ego aside and just have a good time.... but still - seriously I wish they hadn't have screwed up the drive shaft. I would have liked to explore the lake more in the risky areas. I spend the rest of the trip avoiding anything other than hardpack. That definitely goes against the mission statement of the build I'm going for.
508195

On the to do list:
  • have drive shaft reworked to fit
  • relocate FWC house battery
  • relocate heater so it’s not below the fridge
  • replumb the propane
  • finish my ridiculous AC condenser idea
 

RichardSkinner

New member
Quiet crowd around here, eh? Any input on paint? I’m unsure whether I want to do a home paint job, or pay it out(I don’t want to spend a ton). I’ll only be painting the cab, as making a flat bed is in my future.

I ordered a Borgeson steering shaft to try to tighten up the steering a little. I also am going to do a cross over steering setup eventually. I’d like to lower the truck from 6” to 4” over stock, but need to save some cash. I think for now I’ll also replace the leaf spring bushings since they’re pretty sloppy. Going over the pass on I-80 where the chain ruts are was pretty sketchy at times.
 

Stan@FourWheel

Explorer
Love it!

I will be following your build.

We have had a few customers do the same over the years.

A picture that was sent to us during our photo contest last year.

:)
 

Attachments

  • photo fwc dodge.jpg
    photo fwc dodge.jpg
    1.9 MB · Views: 59

givemethewillys

Jonathan Chouinard
Love that truck, and the patina is awesome, but there's also something to be said for a nice paint job. I think if you have the tools and skills to do the job, do it yourself, but if you have doubts I'd farm out the paint. Prep is the most important part!

Are you thinking about building your own flatbed? I'm looking forward to seeing where you take this build!
 

RichardSkinner

New member
Paint? Heck no, just clear coat it. That patina is beautiful.
Love that truck, and the patina is awesome, but there's also something to be said for a nice paint job. I think if you have the tools and skills to do the job, do it yourself, but if you have doubts I'd farm out the paint. Prep is the most important part!

Are you thinking about building your own flatbed? I'm looking forward to seeing where you take this build!

Jorgen and Willy's you two are the exact voices in my head! In reality, I have doubts on my patience for doing a good paintjob. I'll get a few quotes eventually. But honestly, I'd rather just spend the dough on something like a Nv4500 that I could install. I was thinking about sealing the patina on the roof and hood and painting(or farmed out) the cab... Coors Banquet colors, baby! haha. Dark gun metal blue lower 1/3 and Golden tan upper. Not sure yet though! Luckily I have time for the indecision on this one.

I am going to make my own flat bed. I need to buy a spool gun, but I think I am going to do it out of aluminum to save weight. The sidewalls of the original bed will make nice storage area for dive/hunting/fishing/everything gear. I am probably going to deck the flatbed with wood for the classic look.

Love it!

I will be following your build.

We have had a few customers do the same over the years.

A picture that was sent to us during our photo contest last year.

:)

Stan! I've seen a bunch of pictures you've posted over the years. You were in mind when I mentioned inspiration in my original post. I live in Sacramento, so I will bring the ol' Creampuff by the shop sometime in the semi near future. That Dodge is a beauty! Absolutely love it.
 
Last edited:

Forum statistics

Threads
188,069
Messages
2,901,861
Members
229,418
Latest member
Sveda
Top