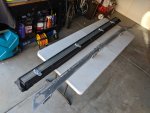
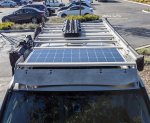
2002 Sequoia Limited 4WD

toyotech

Expedition Leader
Nice. Looks super clean. I would not use the fuel filter it comes with. They are known to leak. I got some aftermarket ones on eBay. A pack of 3 with hoses for spares. Also I would lock the intake for fresh air together with the outside. The fuel tank fuel smell will probably stink up your fresh air mix. Also since your exhaust is inside the box before going out. If that leaks a little. You’ll be sucking that into the fresh air as well.


Sent from my iPhone using Tapatalk
 

Sal R.

Active member
Nice. Looks super clean. I would not use the fuel filter it comes with. They are known to leak. I got some aftermarket ones on eBay. A pack of 3 with hoses for spares. Also I would lock the intake for fresh air together with the outside. The fuel tank fuel smell will probably stink up your fresh air mix. Also since your exhaust is inside the box before going out. If that leaks a little. You’ll be sucking that into the fresh air as well.


Sent from my iPhone using Tapatalk

Funny you mention that because I was thinking about that last night.

Gonna seal up the fresh air intake and reroute the air pickup line.

?
 

Sal R.

Active member
MODIFICATION: OCD Roof Rack and Solar Panel

GOAL:

Peace of mind when ski bumming it camping during the winter months.

PURPOSE:
Now that my heater is fully functional, I decided a solar panel would probably be a good idea to help the battery along when I bum around during the winter months.

However, there wasn't enough real estate on my modified OEM roof rack to accommodate a panel AND all my gear.

I thought about a flexible panel and setting it on my roof, but it was a shoddy install and my anal retentive tendencies just would not forgive such a crappy integration.

So, to accommodate the solar panel installation, I needed a full length roof rack. I chose OCD since one was in stock and delivery favored my timeline for my upcoming trip.

DURATION: 3 Hours

MATERIALS:
OCD Roof Rack
TNuts 47" 10-series cross bars
Renology 100w rigid solar panel
Renology Wanderer PWM controller

COST: $1000

HOW-TO:
Pretty straightforward install. I sunk the panel below the cross bars so that it minimizes damage/impact if I have to carry something on the roof. The panel is supported using some "L" bracket at 6 places.
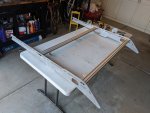
IMG_20191216_161700-131.jpg

Once the brackets were located, I match drilled mounting holes on the underside of the panel and added rivnuts to the solar panel for easy removal/installation.
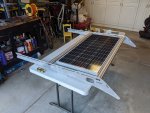
IMG_20191216_162037-132.jpg

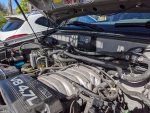
For ease, I mounted the controller in the engine bay firewall. I ran the wires from the roof, down the passenger side A-pillar, into the controller in the engine bay. If the controller goes south, it's a cheap and easy replacement.
IMG_20191125_104753-135.jpg

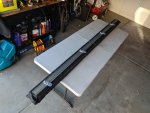
While the roof rack was off the car, I took this opportunity to redo my awning install and misc brackets for my gear to make it easy on myself.

Fortunately, the lower "C" channel aligned with the rail slots for the perfect mounted height. Since the awnings top "C" channel sits above the rack, I shaped new brackets, match drilled new mounting holes on the OCD rack, and filled them with rivnuts for easy removal/installation.
IMG_20191213_151629-133.jpg

IMG_20191213_151553-134.jpg

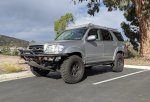
Been too cold to paint and I'm eager to use my new setup, so bare metal it is, for now.
IMG_20191218_110739-136-137.jpg

So much room...?
IMG_20191219_104754-139-140-142.jpg

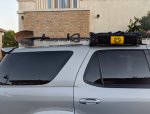
...now that the shovel and deadman have dedicated spots of their own.
IMG_20191219_163419-143-144.jpg
 
Last edited:

Sal R.

Active member
I like how you did the awning mount. That’s legit.


Sent from my iPhone using Tapatalk

Thanks!

It worked out great. The lower "C" channel aligns with the rail slots perfectly for the right mounting height for a minimal profile. It is <1/4" higher than when it was mounted on my OEM rack.

This time, no more universal feet to deal with and it's much easier to manipulate.

4 bolts and 4 nuts and it's on/off. ?
 

Sal R.

Active member
Looking forward to seeing it installed


Sent from my iPhone using Tapatalk

Updated original post.

Don't have decent shot of the solar panel because I'm short and I don't have a ladder. I still have to mount the other 8 bars anyway.

On top of losing my order and taking 4 weeks to send me my crossbars with no restitution, TNuts sent only 3 of 11 bars with the right thread depth to seat the rail bolts. I gotta tap out the rest.

Thanks TNuts for your crappy service.
 
Last edited:

toyotech

Expedition Leader
Updated original post.

Don't have decent shot of the solar panel because I'm short and I don't have a ladder. I still have to mount the other 8 bars anyway.

On top of losing my order and taking 4 weeks to send me my crossbars with no restitution, TNuts sent only 3 of 11 bars with the right thread depth to seat the rail bolts. I gotta tap out the rest.

Thanks TNuts for your crappy service.

Looks good raw. I’d still get it coated. I haven’t had an issue with tnutz before. They wouldn’t send out correct parts??


Sent from my iPhone using Tapatalk
 

Sal R.

Active member
Looks good raw. I’d still get it coated. I haven’t had an issue with tnutz before. They wouldn’t send out correct parts??


Sent from my iPhone using Tapatalk

I'm out of time to deal with TNuts. I'm T-4 days before hitting the road.

The bars were threaded per the order, but not deep enough to torque the bolts to the rails. I have to deepen the threads another 1/4-3/8" to fully seat the bolts.

Paint is definitely on the list. I don't mind the bare look. I dislike that it's mismatched.
 
Last edited:

toyotech

Expedition Leader
Damn. Sorry to hear that. Looks like I need to change the length of the hardware Incase this happens again.


Sent from my iPhone using Tapatalk
 

Sal R.

Active member
Damn. Sorry to hear that. Looks like I need to change the length of the hardware Incase this happens again.


Sent from my iPhone using Tapatalk

It all worked out in the end. Good thing I gave myself extra time. Yet here I am, at the 11th hour, rushing to get my setup in order. ?

Considering there was no consistency in the thread depths, it looks like tapping of the holes was a manual operation with little emphasis on quality control. Probably a good idea to address the bolt length. At the least, include instructions what to do if the bolts don't seat fully onto the rails.
 
Last edited:

toyotech

Expedition Leader
It all worked out in the end. Good thing I gave myself extra time. Yet here I am, at the 11th hour, rushing to get my setup in order.

Considering there was no consistency in the thread depths, it looks like tapping of the holes was a manual operation with little emphasis on quality control. Probably a good idea to address the bolt length. At the least, include instructions what to do if the bolts don't seat fully onto the rails.

Tnutz sells 1” bolts as an added option so they should be 1” in depth. They can’t argue that fact


Sent from my iPhone using Tapatalk
 

Sal R.

Active member
Tnutz sells 1” bolts as an added option so they should be 1” in depth. They can’t argue that fact


Sent from my iPhone using Tapatalk

Yep.

And I thought my tapping days were done.

32 holes I had to tap.

By hand.

Not fun.
 

Sal R.

Active member
First time I started this I got the bars untapped. I did them myself with a tap in a drill. Not fun at all.


Sent from my iPhone using Tapatalk

Definitely not. When I modified my OEM rack, the 80/20 bars were untapped. 13 bars. That's 52 holes 1" deep by hand. I was scared to use a drill. That took awhile.
 

Forum statistics

Threads
188,006
Messages
2,901,038
Members
229,355
Latest member
BDM66
Top