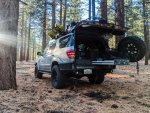
2002 Sequoia Limited 4WD

Powderkegz

New member
Hey Sal, I'm glad you're still keeping up with this thread. It has been a plethora of information and inspiration. I've come across this thread multiple times in my searches for modifications and upgrades. I do have a question though regarding the audio. I'm currently upgrading the system from the outdated JBL and am torn on where to place the sub. I've seen the custom Stealthbox that JL Audio produced but I can't bring myself to spend that much on it. I noticed yours is a custom enclosure, how were you able to achieve this? Did you Dynamat the small space and mount the speaker on some MDF and secure it to the trim panel? Some insight would be appreciated! Keep doing what you're doing, new owners like myself will find all of this invaluable resource material.
 

Sal R.

Active member
Hey Sal, I'm glad you're still keeping up with this thread. It has been a plethora of information and inspiration. I've come across this thread multiple times in my searches for modifications and upgrades. I do have a question though regarding the audio. I'm currently upgrading the system from the outdated JBL and am torn on where to place the sub. I've seen the custom Stealthbox that JL Audio produced but I can't bring myself to spend that much on it. I noticed yours is a custom enclosure, how were you able to achieve this? Did you Dynamat the small space and mount the speaker on some MDF and secure it to the trim panel? Some insight would be appreciated! Keep doing what you're doing, new owners like myself will find all of this invaluable resource material.

Thanks for the kind words.

Regarding the sub, the way I did it is irreversible.

I separated the cubby from the rear panel by carefully drilling out and cutting the plastic rivets that held it together.

Once separated, I used the cubby as a template/mold for the MDF face and shape for the fiberglass. Once it was complete, it's bolted down in the space the cubby used to sit.

I covered the enclosure and the surrounding panels with dynamat to keep the sound clean.

The cubby cover was replaced with MDF face and grill cover for a clean look. It's fastened onto the trim panel.
 
Last edited:

Sal R.

Active member
TROUBLESHOOTING & MODIFICATION: LCA Siberian Poly Bushings

SUMMARY:

My last trip out cut my winter season camping and snowboarding short. I developed a really loud, attention getting, backfire-like clunk/clank/bang that affected my feelings of reliability about getting me out and back. As a result, finding and fixing the problem became the top priority these last six months.

Problems developed after this (see? I get out f'real). Getting out of this area in 2WD was a real fight:
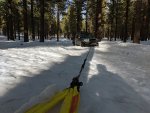
2021-03-05 16_09_25 PXL_20210306_000925849.jpg

I went through an exhaustive troubleshooting effort. Unfortunately, the noise was intermittent and it was not easily reproducible with the car on jack-stands, on flex, or whatever. The car had to be driven in order to determine if I had fixed the problem (or not). The only saving grace was that it was getting worse over time (lol).

Here's the short list of things I checked and/or replaced at the advice of the web:
  • Replaced transfer case
  • Body mounts (replaced)
  • UCA bushings and uniball (rebuilt)
  • LCA bushings and lower uniball (rebuilt and added Siberian bushings)
  • F/R swaybar bushings and links (replaced)
  • Leaking rear shocks (rebuilt)
  • F/R diff and TC fluids (replaced)
  • F/R driveshaft u-joints (replaced)
  • CVJ axle (added grease)
  • Rear axle Califab links (rebuilt)
Ultimately, it could not be tied to ONE issue. Depending on who observed while I drove circles in an empty parking lot, noise would be reported coming from the front or rear of the vehicle. What I found were both reports to be true.

The fixes (that reduced the frequency of the noise):
  • Replacing the transfer case.
  • The passenger-side UCA uniball lining had worn down and it developed <1mm of play.
  • The passenger-side LCA lower uniball misalignment had worn down and was catching the housing under load and articulation.
  • Drivers-side CVJ axle outboard joint was binding with the wheel turned. Adding grease resolved the issue.
  • The passenger-side rear upper Califab link bushing was worn down into an oblong shape that added <2mm play.
  • The driver-side rear lower Califab link bushing was worn down into an oblong shape that added <1mm of play.
Since I was taking things apart and putting things back together, I figured this would be a good time to install the Siberian bushings I had on-hand.
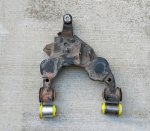
2020-12-03 14_39_26 PXL_20201203_223926360.jpg

Not much to say about this mod really. A literal drop-in mod, not like Daystars for my 02.

A Hobo Freight press and torch made short work of getting the old bushings and "cans" out and the Siberian bushings in.

I did "make" an extension piece to be able to tool the LCA and press out the bushings.
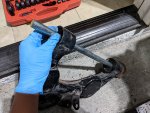
2020-12-12 19_38_46 PXL_20201213_033846186.jpg

They are squeaky though. I kinda wanna take them out...
 
Last edited:

Sal R.

Active member
REPAIR: Heater "T"s and Valve

DURATION:
30 minutes

COST: $30

MATERIALS:
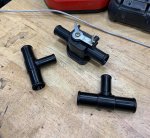
87248-60460 Heater Output T (Qty. 2)
87200C011 Heater Valve

SUMMARY:
My "T"s were leaking and needed replacement. Considering that this is a common issue for high mileage 2UZs that can lead to overheating and/or being stranded on failure of the part(s), at 275k miles I was clearly on borrowed time. I lucked out and they all came out without any issues despite the visible cracks in the old Ts.

I used this writeup: clicky.

Nothing to it, really. While I was in there, I also replaced the heater valve.

Pic courtesy of smola.
217692160_4560105757389492_1527722753068406080_n.jpg
 
Last edited:

Sal R.

Active member
REPAIR/UPGRADE: MetalCloak Duroflex Joints

DURATION:
1 hour

COST: $109

MATERIALS:
Duroflex Joint, 2 5/16" x 9/16" BH x 2 5/8" Housing x 1 1/4" Straight Shank (Qty. 2)

SUMMARY:
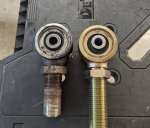
When I pulled the Califab links to rebuild them as part of the troubleshooting process to find my clunks, I noticed that the axle-side poly bushings on the lower links were oblong shaped and worn. It kinda got me thinking that maybe the Johnny Joints didn't have enough misalignment to go thru the whole of the suspension cycle.

In the search for more information, I came across MetalCloak's Duroflex joints. Potentially speaking, it had more misalignment than my current Johnny Joints of ~25deg end-to-end. Add to the fact that its self-centering, rubber, maintenance-free, and flexes 40deg end-to-end, it sounded pretty good. NGL, I kinda miss my cush ride of rubber bushings in the OEM links.

I had to purchase the whole joint (housing and bushing) since none of their rebuild offerings appear to fit in my current JJs. Their CS is open and responsive considering these joints are marketed primarily for Jeeps. Highly recommend.

My clapped out JJs vs. Duroflex joints:
PXL_20210919_003312333-281-283.jpg

PXL_20210919_003512467-282.jpg

Allinol, it was a straightforward swap. Put 300-ish miles on it so far with zero miles off-road and rides pretty nice, so far. The backend does not feeling like it is "wagging" as much at highway speeds.
 
Last edited:

Sal R.

Active member
After missing out on spring and summer, it was real nice to be back at it for resort opening day. I was hoping for more snow for a lil snowwheeling, but I'll take it since I get a jump on the season.

Nothing like steak and eggs to get the day started right.
PXL_20211029_233456477-289.jpg
 
Last edited:

Jim SoG

New member
Jesus man! I read 21 pages of your work, I got to say your detailed posts sure make it seem like I could do some of this (Reality is, nope, pay someone....) I get all inspired, but I need to take it slow and do what I can when I can......

I have a few questions, Is that roof rack your build?

How has the heater worked out with the 2.0 version?

I thought I read you have locked the diffs, what lockers did you go with?

Thank you so very much for your excellent posts and I pray you keep doing more!

Jim
 

Sal R.

Active member
Jesus man! I read 21 pages of your work, I got to say your detailed posts sure make it seem like I could do some of this (Reality is, nope, pay someone....) I get all inspired, but I need to take it slow and do what I can when I can......

I have a few questions, Is that roof rack your build?

I've had two roof racks. A customized OEM rack built by me (sold) and an OCD roof rack (current).

How has the heater worked out with the 2.0 version?

Works out great, as intended. Resolved all the issues I had with 1.0.

I thought I read you have locked the diffs, what lockers did you go with?

ARB air lockers, front and rear.

Thank you so very much for your excellent posts and I pray you keep doing more!

Jim

Thanks for taking the time.
 

tall

New member
REPAIR: Heater "T"s and Valve

DURATION:
30 minutes

COST: $30

MATERIALS:
87248-60460 Heater Output T (Qty. 2)
87200C011 Heater Valve

SUMMARY:
My "T"s were leaking and needed replacement. Considering that this is a common issue for high mileage 2UZs that can lead to overheating and/or being stranded on failure of the part(s), at 275k miles I was clearly on borrowed time. I lucked out and they all came out without any issues despite the visible cracks in the old Ts.

I used this writeup: clicky.

Nothing to it, really. While I was in there, I also replaced the heater valve.

Pic courtesy of smola.
View attachment 675445
Sal, do you remember if you went OEM on the heater valve? And if so, where'd you sourced that baby. You list cost at $30 for the job, but those valves seem to be $70+. Also, how'd your heater valve look? I did the tees last year (130k mi) and they looked pretty good (nothing broken or visible cracks, but they were faded). I wouldn't mind waiting on the heater valve until next year or the year after when I do a coolant flush.

PS: Is Sequoia-Forums finally dead? I'm so glad you did this thread as there was so much of (your) good content there!
 

Sal R.

Active member
Sal, do you remember if you went OEM on the heater valve? And if so, where'd you sourced that baby. You list cost at $30 for the job, but those valves seem to be $70+. Also, how'd your heater valve look? I did the tees last year (130k mi) and they looked pretty good (nothing broken or visible cracks, but they were faded). I wouldn't mind waiting on the heater valve until next year or the year after when I do a coolant flush.

PS: Is Sequoia-Forums finally dead? I'm so glad you did this thread as there was so much of (your) good content there!

Bought my valve and Ts off eBay. Can't guarantee they're OEM. Here's some current listings (looks like price went up). The fittings on the heater valve was in a similar condition as the Ts, but less degraded (didn't crack like the Ts). Considering that they're all tied together, it just seemed like the smart thing to do while I was in there.

Haven't visited SF since I ported to Expo. SF was frustrating to use on mobile esp when it came to uploading pics so I gave up. I'm hardly on PC when viewing forum communities.

Screenshot_20220323-190356-309.jpg

Screenshot_20220323-190329-310.jpg
 
Last edited:

Forum statistics

Threads
188,005
Messages
2,901,027
Members
229,355
Latest member
BDM66
Top