2002 Tahoe "Expedition" build

02TahoeMD

Explorer
Thanks for the kind words fellas. No trips since the overhaul - I sank much of my fun money into the rig and am currently saving back up to try and take some sort of trip this summer. I did get the chance to go out and play in the snow this winter and got a nice pic down at one of the state parks in my county. I get a chance to take the rig out for a real trip...will definitely post back here.

WinterWonderlandGuytonRd_zps096d2e90.jpg
 

kojackJKU

Autism Family Travellers!
Awesome pic. I noticed a rehab kit on eBay for the front suspension. Any thoughts on them? Good quality parts?

I'm going to change the shocks next week with Monroe reflex monotubes as they work exceptionally well on my jk.i figure they have to be better than the crappy pro comps that are on it now.
 

COCHEV

New member
Awesome rig, man! do you have any close up pics of how you mounted the defender rack to your factory roof rails? What do you think of the defender rack in general? thanks,

Jason
 

xandr87

New member
You have yourself a beautiful rig and great looking traveling companions! I love the ideas and the overall set up you have going. Keep up the good work!
 

aaron77

New member
I feel your pain with the brake lines! I replaced all my hard lines with stainless steel ones a few years ago. I got my kit from classic tube. It was a huge job but well worth it! Keep up the great build. I have an 02 z71 Tahoe so this build is especialy interesting for me.
 

02TahoeMD

Explorer
Awesome rig, man! do you have any close up pics of how you mounted the defender rack to your factory roof rails? What do you think of the defender rack in general? thanks,
Jason
Thanks for the compliment and apologies for the delay in a reply. I used some metal angle brackets that I fabbed up to bolt to both the roof rack frame and the underside of the rack itself. I also used hose clamps that I painted and then covered with heat shrink tubing. So far I am happy with the Defender rack, it will probably require a repaint in a year or two. If you have welding skills and a pipe bender anyone should be able to build one of their own. But, I have neither so...the Defender suits me fine. Here is a pic of the mounts.
HPIM0375_zps246f3cf7.jpg


Now, onto the latest other work I have done to the rig! :elkgrin:

Over the past few months I took a lot of vacation time to do some maintenance and modifications. The biggest project I did was to replace the rusted brake lines (one of which failed last year) with the pre-bent stainless steel kit from Classic Tube. The project was very time consuming and took about 4 days to finish. But, doing it myself saved major coin and made the literal headaches of banging my head under the chassis worthwhile.And there is considerable peace of mind knowing the truck will not blow right past any more stop signs!


HPIM0378_zpse0bf2511.jpg


HPIM0380_zpsbdf76b66.jpg


I also got rid of the defunct OnStar antenna (GM went all digital around 2006 and my system was the old analog. Thus, useless) and replaced it with a GM factory XM antenna. I used an SMBcable to attach it to my Onyx receiver.


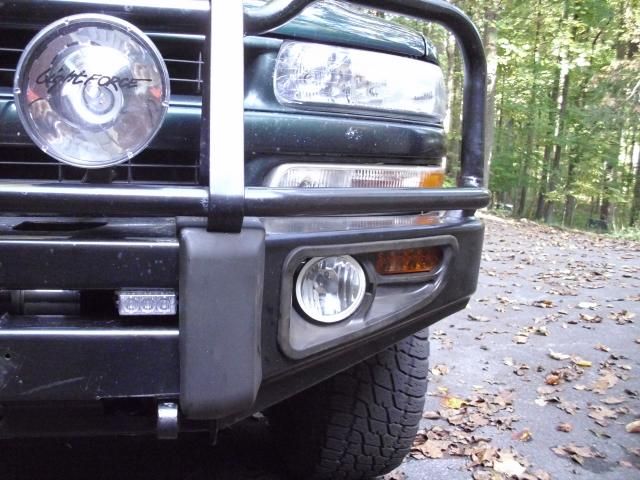
The ARB turn signal housings would burn bulbs out on a fairly regular basis, some research here on Expo revealed this to be a common problem. This time around the outlet itself was broken so my solution was to replace the entire housing with a standard 3 x 9 oval LED turn signal. They fit almost perfectly in the metal brackets from ARB.


HPIM0389_zps332b901a.jpg


Another project I tackled was to add a cooling fan with speed control to the dog window grates. This way I could provide a more comfortable environment should I need to leave the dogs in the truck on a warm day. This just plugs into a cigarette lighter. I test ran it for an hour and had no heat build upon the line nor any appreciable drop in the battery so I figure I should be good to go for a stop to get lunch or dinner while traveling.

HPIM0385_zps21e1541a.jpg


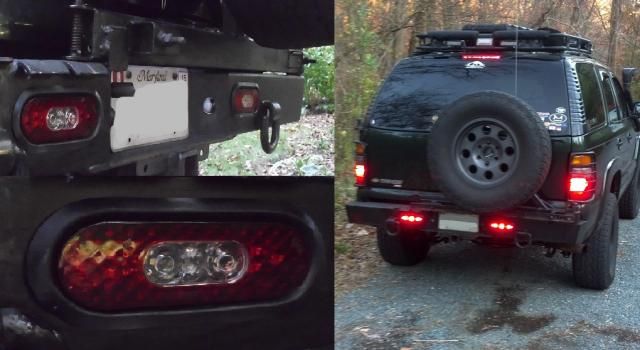
Some more electrical modifications involved the tail end of the vehicle. Grote Industries introduced a standard oval light that is a combination of tail light, brake light,and reverse light. I decided to give it a try since I really like having extra brake signal warning, and I used them to replace the reverse lights that have been in the bumper since I put it on the rig. I have not hooked up the taillight function yet but have the brake and reverse lights wired. I also added super bright LED reverse light bulbs from SuperBrightLED's. They were kind of pricey but I am happy with the light output. From the same company I also got some LED floodlights to replace the rear basket lights. The new floodlights also have a much broader area of illumination versus the lights that I had been using for the past few years.

HPIM0392_zps8fbc462e.jpg


Grotetaillights_zps7e963eef.jpg


Another mod for the tail end was to add some white hide-away LED's from StrobesNMore to the reverse lights.These compliment the strobes that I already had in the brake light housings. I have also had some amber TIR3 lights sitting on the shelf for awhile. These were added to both the top rear deck with some metal brackets, and then I added a pair of them to the middle of the ARB bumper. Here is a short YouTube Video of the light mods.


Many times over my travels I have wished I could have had a dashcam running to capture a memorable view of scenery, wildlife running in front of the truck, epic weather, or some act of moronic driving skill. I bought a Novatek A118 dashcam and wired it up to a switched circuit. I like it a lot and I think it takes pretty decent video. It records in 5 minute segments that are overlapped by a few seconds each. If I record something worth saving,it is very easy just to pop the micro-SD card into a computer and copy the file over. Here is another short YouTube video showing some samples of the footage I got.


A118Camera_zps9022a53c.jpg


Last year when I repaired my intake manifold gaskets I was really surprised at how dirty the inside of the manifold was. I did some research on the issue and realized that an oil catchcan could be a big help to keeping the intake cleaner.After browsing some GM related websites I decided to make my own oil “catchcan”. I modified a Craftsman air compressor filter by mounting it to the firewall and plumbing it in line with the PCVvalve. The filter is stainless steel wool. I did this install in September and checked the filter last week. The steel wool is now grimy with some globs of oil in it, with a small amount of oil down at the bottom of the housing. So, I would say that the thing is actually working.


HPIM0404_zpsc1df8b49.jpg


So, that is it for now, this could be considered my August to October modifications update. Stay tuned for an update detailing the work I have done November to December.
 

Forbye

Observer
Great job on keeping the dogs safe. The deputies where I work uses Tahoes for both bomb and drug dogs. They have outfitted them with temperature sensing auto start system that starts the truck when preset temp is reached. if the system fails it sets off an alarm. The systems can be found at any police outfitters store along with several other K-9 specific Tahoe accessories.
 

rayra

Expedition Leader
I REALLY like what you did with that grille guard / bumper. Been shopping for a solution for my '02 K1500 Suburban, essentially the same vehicle. And I've got much the same criteria. Most of the guards I've found all look like a damned cattle fence panel, so oversized and ill fitting. They look like the huge front guards on Aussie outback-crossing tractor trailer rigs. Ugly as hell.

Nice work overall. Have you done anything about or for the suspension yet? The front tie rods and control arms seem so spindly to me.
 

kojackJKU

Autism Family Travellers!
I think they are fine. As things wear, replace them with NAPA gold parts. They are stonger than factory. That's what I am doing with my suburban. Adding the lift will be a great addition because chev's sit so bloody low. My 2010 avalanche I just got is like a 2wd.
 

TroutByFlyCO

New member
Awesome Tahoe!!!

02TahoeMD- First of all I want to say you have an awesome ride! It's great to see another fellow Chevy addict! I couldn't help but notice your Pikes Peak sticker on your back glass. There's nothing liking peering over the top of a Colorado 14'er. Next time tour out here hit me up as I would love to show you around some CO back trails. I just read every thread and am now inspired. I have an 04 Tahoe Z71 and if you don't mind I plan on utilizing some of your ideas to enhance my Tahoe. Keep up the awesome work!!
 

TroutByFlyCO

New member
Catchcan

02TahoeMD- I noticed that one of your last projects was the addition of a catchcan. I actually looked into this about a year ago. Do you happen to have a write up of your procedure? Thanks!!
 

TroutByFlyCO

New member
Another question

02TahoeMD- So sorry man for all of the questions, I'll have to for sure buy you a 6'er of Fat Tire if you ever make it out here to CO. But way back in the beginning of the thread (2008) when you had the stock front bumper, do you remember how much or if there was any rubbing with your 295's? The reason I ask is because the front ARB will have to wait due to budget constraints. I do have future plans for the front ARB in the future though because that bumper just looks awesome on your rig! Last question: The front ARB you purchased was for a 100 series Landcruiser. Does it matter for what year of Landcruiser? Thanks man!
 

02TahoeMD

Explorer
Sorry folks for the delay in responding, I had no idea it had been so long since I took time to review things and respond. As always, I sincerely appreciate everyone's kind words and compliments.

I REALLY like what you did with that grille guard / bumper. Been shopping for a solution for my '02 K1500 Suburban, essentially the same vehicle. And I've got much the same criteria. Most of the guards I've found all look like a damned cattle fence panel, so oversized and ill fitting. They look like the huge front guards on Aussie outback-crossing tractor trailer rigs. Ugly as hell.

Nice work overall. Have you done anything about or for the suspension yet? The front tie rods and control arms seem so spindly to me.

Replaced the tie rod ends with Rare Parts versions, they are mentioned in this thread back in late 2013. Hard to believe it has been that long since I put them on. Also have put on Moog pitman and idler arms.

TroutByFlyCO;1829767- [SIZE=1 said:
First of all I want to say you have an awesome ride! It's great to see another fellow Chevy addict! I couldn't help but notice your Pikes Peak sticker on your back glass. There's nothing liking peering over the top of a Colorado 14'er. Next time tour out here hit me up as I would love to show you around some CO back trails. I just read every thread and am now inspired. I have an 04 Tahoe Z71 and if you don't mind I plan on utilizing some of your ideas to enhance my Tahoe. Keep up the awesome work!![/SIZE]

Thanks for the compliments, I do appreciate it. Feel free to copy any of my ideas you like! Pikes Peak is one of my favorite places to visit for sure. Been too long for me since I have been out there.

I noticed that one of your last projects was the addition of a catchcan. I actually looked into this about a year ago. Do you happen to have a write up of your procedure? Thanks!!

I found a great thread on Tahoe Yukon Forum with literally tons of information about catchcans, both home made and professional versions. Definitely recommend searching through there.

So sorry man for all of the questions, I'll have to for sure buy you a 6'er of Fat Tire if you ever make it out here to CO. But way back in the beginning of the thread (2008) when you had the stock front bumper, do you remember how much or if there was any rubbing with your 295's? The reason I ask is because the front ARB will have to wait due to budget constraints. I do have future plans for the front ARB in the future though because that bumper just looks awesome on your rig! Last question: The front ARB you purchased was for a 100 series Landcruiser. Does it matter for what year of Landcruiser? Thanks man!

Happy to answer questions, beer or no beer :beer:No there was no major rubbing from my tires, a little bit of chatter from the edges of the wheel liners. A very simple fix with some shears, find the point of contact, and trim a bit off. Problem solved. And yes the "donor" vehicle was indeed a 100 series, which ran from the late 90s to about 2007 I think. I am not 100% sure that the dimensions are different between the various versions of the Land Cruisers, the 100 Series is the only one I bothered to go after with a tape measure.

So, onward to some overdue updates. ....
 

02TahoeMD

Explorer
2015 - 2016 updates

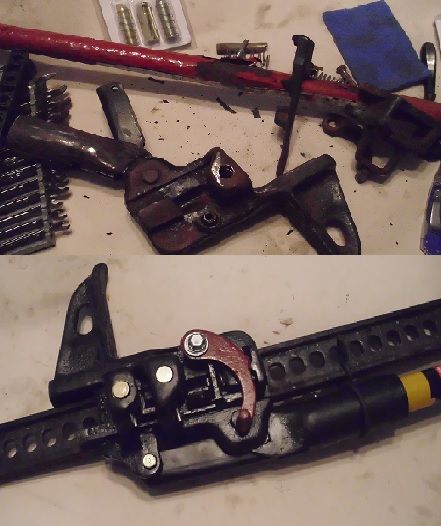
A minor update I did was to completely rebuild my Hi-Lift jack. It had suffered greatly riding on the back of my bumper and I questioned whether the thing would still work safely or not. I got a pin rebuild kit and stripped it down, and repainted the body of the jack and got a new pipe for it as well. The Hi-Lift looks vastly improved now and works great.


HiLiftbeforeandafter_zpsac4b35ea.jpg


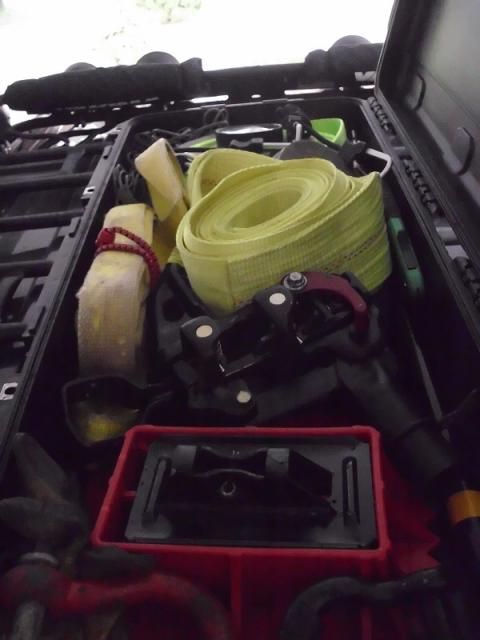
So, to store the rebuilt jack, and also get all of my recovery gear into one place that would be easy to access in the event of a catastrophic "stuck" event, I mounted a Pelican - style case to the roof rack and it held everything except the Hi-Lift center bar. I left that mounted to the bumper since it wont matter if it has some rust on it. I have had it up there for a year and find it more convenient than having to sort through gear bags when traveling.
RoofCaseopen_zps28d5b98a.jpg


Also, sometime last year I went ahead and added lift bags to the rear coils. Great project.
HPIM0401_zps2ec71279.jpg

Here is where the fill outlet is mounted
HPIM0402_zpsed0bb40a.jpg

No I am not living in Wyoming......yet. Hopefully someday.


Another project I had was to mount up a Panasonic Toughbook CF-19 to run a DeLorme mapping program. I just used a simple computer mount by Onyx and snugged it up next to the center console. I like the CF-19 since it can be used as a travel computer for emails, etc, flipped over to tablet mode while driving, and is also ruggedized and guaranteed to handle the rigors of traveling on some of the washboard and pitted roads I visit when out West.
ComputerNavview_zpsd9b98acd.jpg

Tablet mode. The backlight can be turned way down making it much less distracting than it may appear in this photo
TabletNav_zpse89d84f6.jpg


My last notable project was adding repeater lights to the rig.I have taken a fair number of trips overseas and I always liked the repeater lights that were prevalent in most cars and trucks on their roads. A member on the Z71T-S forum did them for his Suburban and I was hooked on the project. It turns out that GM does make a factory repeater light for the Suburbans ( part #15999784) Very straightforward to install, drill hole, route wire though the fender towards the turn signal lights that I have mounted in the front bumper. All done.


IMG_20160121_160421_952_zpsswbec6fx.jpg


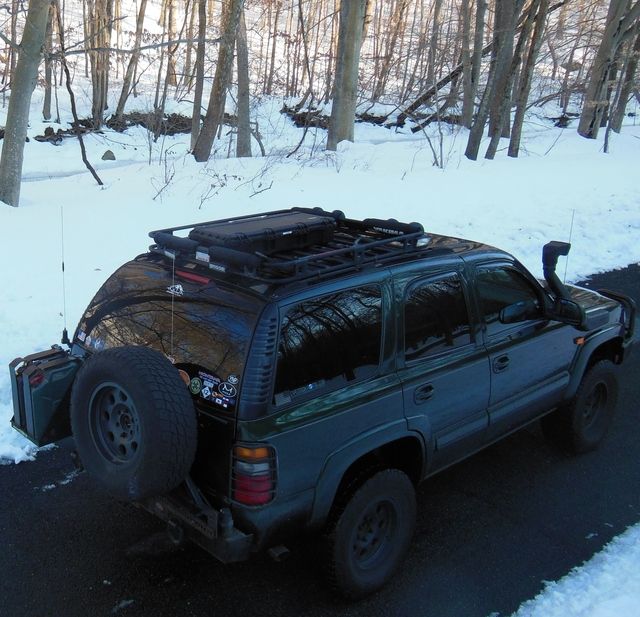
So here are a couple recent photos to wrap things up. This one shows the roof rack with the newrecovery gear case, and I also had been running with my spare gascans mounted up as a means of securely storing the fuel for mysnowblower since I do not have a garage to park the blower in anddidnt want to have to haul gas from my back shed to the front drivewhile doing battle against Blizzard 2016.
DSCN1348_zpsjvfrp6lf.jpg


And an obligatory shot with my kids. Dogs love trucks....and snow. :)
DSCN1346_zpszqj3qtwx.jpg


I will try to improve my response time to questions. Thanks also to those that have sent me PM's and emails over the years to discuss this project. I have appreciated the interest and conversations about it.

Safe travels....
 

Forum statistics

Threads
188,155
Messages
2,902,905
Members
229,582
Latest member
JSKepler
Top