2003 Suburban 1500 Pop Top Conversion

boll_rig

Adventurer
Rayra and Pntyrmvr, good points. I have planned to use aluminum angle to sandwich the canvas to the vehicle and make that inside damn. And potentially also will make an outside wind/rain damn for in front of the seal. Not really worried either way because water that gets in will just hit the canvas and not the inside of the camper. Also going to get waterproof spray for the canvas.

I've had those same ones on my rig for over 3 years, one of them gets condensation after going under water for a few days, but the rest all are flawless. The screws on them got some surface rusted, but I just hit them with some flat black paint to match the light body

I am an in awe of those last pictures. Looks so awesome, can't wait for more!

Geno you mean you've had the exact same ones, and for three years? Impressive. Hey did you ever go through with your monstaliner idea?

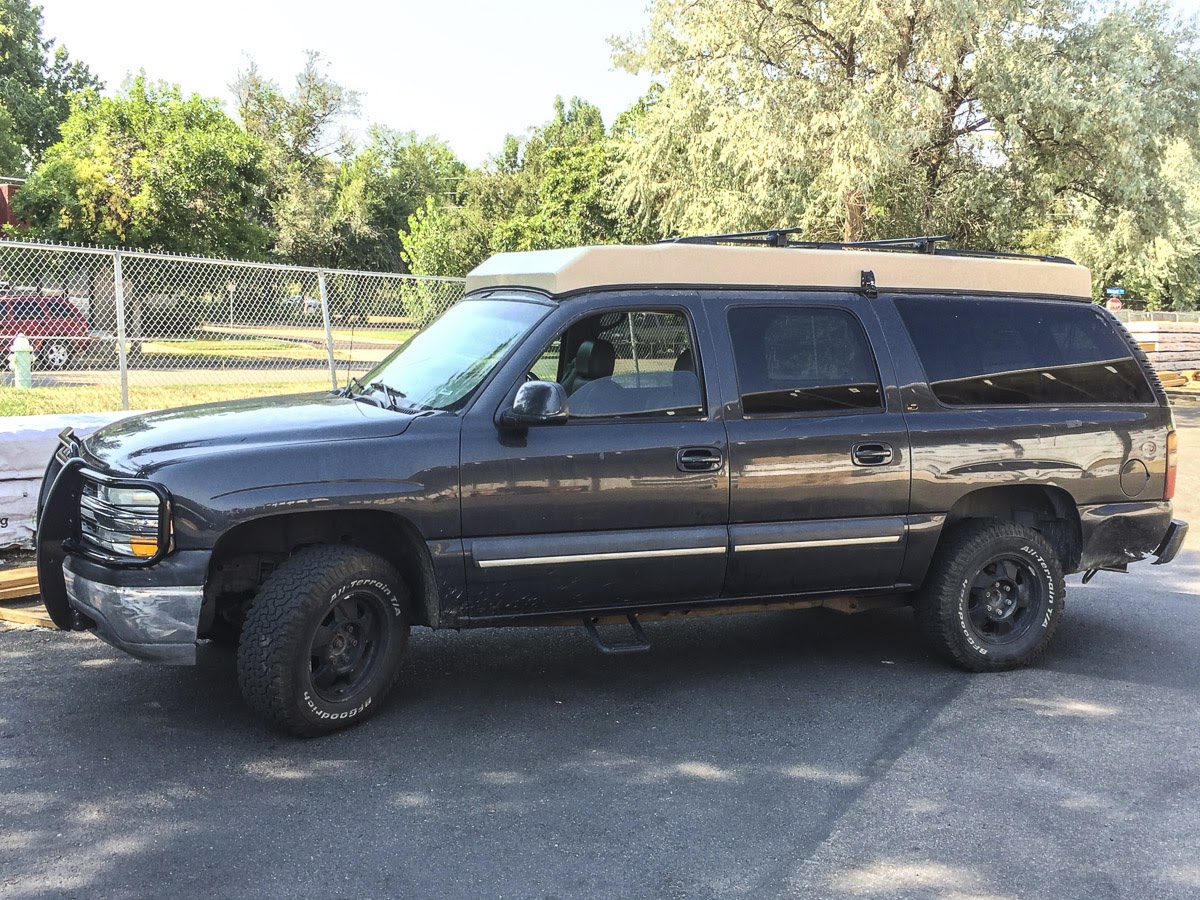
Thanks for the comments everyone. Kind of crazy that its actually all coming together.
 

Burb One

Adventurer
57b94136648b7ceef9bbf05721fdb557.jpg


This one's been of there for over three years, it's been hit on rocks, bent the mount etc., but still works. I like the "warmer" color on them vs the white leds.

55e218c5d1117db76ef62d3e5baad6ce.jpg


Painted the trunk a month ago for color testing. The paint is rock hard, tried to scratch it and it doesn't at all. Only thing is you use a lot of it.... i had ordered 2 gallons, currently have 2 more gallons coming because I don't think 3 would be enough and want to do it in one go.... the trunk used 1 quart and I only got 1 coat.... maybe get around to painting it next weekend...


Sent from my SAMSUNG-SM-G870A using Tapatalk
 

Pntyrmvr

Adventurer
Sportsmobiles use a 2" strip of plywood to hold down the canvas. The sandwich, from sheet metal up is as follows:

1- 2 butyl tape strips about 3/4" wide in parallel around the perimeter
2- rubber fender welt 3/4" wide set at the outside perimeter of the canvas
3- canvas itself
4- 2" wide 1/4" plywood strip running the entire interior perimeter of the canvas
5- sheet metal screws at about 3" on centre holding it all down

I mention this assembly sandwich as none of the members has a sharp edge that might damage the canvas over time. I think the aluminum angle might jeopardize the material.


"Talk is cheap. Whiskey costs money."
 

rayra

Expedition Leader
How about something like that polyethylene landscaping border stuff, with the fat round top and 4" wide blade. COuld be adapted or something like it found, which would put a nice radius at the joint with the canvas. Anything with a rounded edge or bead would work. I know there are various aluminum extrusions that are used for attaching awnings and such.

85069c44-7af7-4d2f-84e8-238d17885212_400.jpg


---


Got my aftermarket stereo install working, sans any expensive adapter. The factory amp needs 12v on the pink wire on the factory aux (Tape / CD) loom, which also plugs in the back of the factory radio but ISN'T serviced by the normal aftermarket cable adapter. This applies 2000-2002 Subs and maybe also 2003-2006 NON Bose. But maybe Bose too. That power to pink wire tells the factory amp to turn on / accept line inputs from the four pairs of speaker inputs. I fed it from the blue/white wire on the pioneer radio harness.


Behold, the Tower of Power. Or Tower of Babel. Or horrific head-on accident in the making. Whichever you prefer.

tower%20of%20power_zpsyiojy4uh.jpg


From top to bottom:
iPhone
Dashcam
7" Samsung Android tablet with built in GPS and Bluetooth, runs offline nav apps and Torque app for vehicle data via a $15 bluetooth adapter on the OBDII port
Pioneer AVH-280bt head unit, hands free phone, USB and aux cable inputs, DVD / DIVX, bluetooth connectivity.
And to come, these are mockups
Kenwood 2M HAM radio
CB radio which will also have a PA speaker.
 
Last edited:

boll_rig

Adventurer
Rayra the tower of power/accident waiting to happen looks pretty bada**! Nice work work getting it all put together without an adaptor.


Sportsmobiles use a 2" strip of plywood to hold down the canvas. The sandwich, from sheet metal up is as follows:

1- 2 butyl tape strips about 3/4" wide in parallel around the perimeter
2- rubber fender welt 3/4" wide set at the outside perimeter of the canvas
3- canvas itself
4- 2" wide 1/4" plywood strip running the entire interior perimeter of the canvas
5- sheet metal screws at about 3" on centre holding it all down

I mention this assembly sandwich as none of the members has a sharp edge that might damage the canvas over time. I think the aluminum angle might jeopardize the material.


"Talk is cheap. Whiskey costs money."

Thanks for this info Pntyrmvr.. Also just actually looked at your user name for the first time, hilarious... Anyway, It hadn't really occurred to me to seal it under the sandwich, whatever that ends up being with. And Rayra thats a good idea to get something to line the aluminum with. Right now I'm thinking I could just use that Butyl window flashing I already bought and haven't used. Cut it into two 2 inch strips and put it under the aluminum and bend it around the angle with its adhesive, that way the canvas has something softer to ride against.

Geno those are definitely the same ones and they look to be in pretty good shape! Also gotta love the bottle opener right above. But were pretty much in the same boat, got those LEDs for the warm light. And gotta say that the trunk looks great. Definitely uses a lot though! Like I said I used 2.5 gallons for just my roof, and really only got about 2.5 coats. 4 should be enough for the whole truck though. When is that happening? excited to see it.
 

boll_rig

Adventurer
Also, I finished the interior more or less. Here's a photo of it upside down.
jDyAy2ws85mlO9UMX2dmKQr7DyZKmIrCC2nRz3UhYOBLLSosQ4JZLglrYFc5fqcaMk9X9I2ScKCotUlSJbKrz0UCwJpCwhqCMTjB9lsblKBLTpenoXlE7hhORNy8M2NunRahnE_nzChpy-ySgIkdMrjtLTcmGZzRVid0W2qG_lJYy88yonb7VE-V7J1y7ow36KPzEW1e20i9q3kNNfpl4ueSG96B36AeoRN1sq-P76N7utBYiDAqVOIAnsq7spSl68tzXJ0QB3hTqnIo7dm0SNiTm79n5IkBBRSpgZJTuw1ze-YZMubWL_y0hhKUpE85ZC5eQP3e9vBv_QpUFeaLjf2Mv-M_0DY-fjiUn_DbVFoZ5AKZIoARZuT1UU3Vk2nPkW0oRZfIHryGv46fhS5bZHQOCLHj8vJn64JNvKJXK92vlA0nj4bN08gQ4ZUCNB2VXwupZ0zaDeq40yj2mKyiZZ84w5O3y3MkkoaL3LpwZt0RRzz3Hr0WINIQ__FDYHoQDLO6OiWO4f13UZg6XmDa_qP9NFNES1ZPx2Rp_e8dz5lFoCmWeYQrv_cflw3px9EOK02fl-pgm3zFFAIE8_sM_9Bmdak9N5w=w900-h675-no


Now I could have tried to match the interior of the suburban with some grey headliner but I kinda thought what the hell, I'll live a little and add some color, so I used this blue watercolored sheet that somewhat resembles a night sky. Also made it almost completely mechanically tacked on so I can take it down, mess with wiring, or put something else up.

Here are some close ups.
Thats the front LED light switch/dimmer and the double USB port for charging. Black pouch to put phone in while charging or hold notebooks etc. You can see I just taped the cloth to sq tube but it will get pulled taught and sandwiched behind tent material.
sfOl8Ww8bGXWmbScakjknK2kKyZF5Z41mdWRBlKp9eZroFVUXRhJpps_zMAU_OFYlZOrgZF8FkTw7f1qk5Ai0SAFvl34yJ3yZZMYDJjV7wTxWLcAgQD2xiEbmcVexzXySZKsjnGN_xmRQsTJC4Byybz9CZ8wi7685W8AOpEjyrBZCLHPmVJvMNeSYl3sIGAAu5JPcZ-fNhK0mpw1cb_6P3Nx0ZB7ag9jd8Wic_S8esjeCJ16BxF6yuqBIg1MUnsh1eygJ_xux71v85qdrO_f_sSK0ZrkK9lFGuOsl7-drca0MO0yggWpcHHCmM_y3Z_QyJOGZASWot3ZD0rOndkr0hfLpw29wnyB-jb6nP93GUWIFH-m7N89-G1X1U4JAzRwfg7YJnCb5cwpZO2IPA0EUZxBF2qvFHZyXgf_JeLvNz68vOMWIYIwlc6b1jjmDxQ83F1r-kwECIfZeqjf4mRuQzuXPWLX2L_fbJkGLtCUkBdCLxqwsya9lZMuB0HGQD-3pmNGUj1zQq3U6NyUDUTyc8AEeCZrvsJArC7UPn1mpyA_X8K03duDLoKWgFy7siNYewttexeVw2UUsKb3sCTfljzKs6p2drY=w900-h675-no


I stained this wood and trim with a mix of natural and golden oak. Then polyurethaned it and tacked it with brass screws and sunken washers.
0kJ9EJQDNt4Ib1g9YIL-HYB2y1c1KjpoVIzH8bMBlKAb2avPmt7U-tZAQ0X8Rb2EStMdnjS_GiXHWRkPi5ZEa8oVwCt2Nie8GX07wH6gBKfx2nvikZg1ltxup88BQyy2aw1jO9REnqsunkb_WpIZ55wSXRFXZjdmMPoWriAst-EzGtEmXAjw6InxO7r5wWX3_neJIGAvFzVvzQFC_yeb2t11gtW780fhzono_Nd_JqC4PydRZKQ6yuUw0K6vQxiCstcEiEjyHD6d8hFWkJ-z2VOBeCziqS6n45jERFb1Fwcqa4E6gOolufIWfE0w8Iixeei0tNNeSawlnMJ02mkZXF4wUGXl84Av8phUKXbh92fLerJZ6gNDzjNbGOLXgNXn5AwUySbbiB3QYRfACfspGG4vvwBHRJplienUUDMkwb4smo7r0AxBJ1wyPC--puQxdNGD4PpJXM-hHvSRFxB4mmibjEYCuGarT2NcHo5jEmb5n5UJCHfRcL-aNDsrC6KsxwzrcCHM9uEOllL-wFZWXe16H6G1xM93YK4FQvX7CkBqktN1grxVztH9BTpO3wkg6XgsTGfWOWSfPhWL8NagnbNFlBNi7XA=w900-h675-no


yW8WPvooqBhmVe63qco05EwpMBNlVkVEO4TMrXdKlNJPTcpYxvBSkaYPaVlfgZMCkr9OOQwhNGy6LuPhJyX4JNBvLZfc8MWQ7R73XGXIRUIi30nB7I1yI1phLWqNOe-y-4vqElkBHetJ1UgXD0cD7dDyrNcB042n8YK7q_EoYMfASVHJjJZt6x68aoLWWLuDM6oxUsEC-LXRVTabh7MxdWWbWyfxORC30t4AdMHNDBedWAQIJlBbn5fL9IzQxofpG3l4K6Y2t3GKRuqYwDDZ01vlkDb5UzL_T4CuDgpHSKgMiZnz-qC9OheL16c5Y-eGOWURirDbYvHIMyML1PQK2Ugs8xY3RF-jj9qvJjhLBi3MfEqm08UwjEO7CrF7uuCpbrg6argdcm_S1eWjKOW_ESIJPWafBawVUpAecyFGnzpOXxSB4Dk0PN75JqrPQbdMhjYglARxYcqbqoY1o96L9hNbuL7oitKjZ_XZQLpk87qPxb0O5sqsSbylWI7DQMLrS_iON2nfbZdiurjvsRyok7biZWY3LSTpf3btjRN30356Ieh8BvuIgK4uhQpBAPGrocY_yaW1vbWcjaHrbcwe00bGu62qeEI=w900-h675-no


I decided to go with cork board on the front plywood because I thought it looked different and figured I could tack maps, photos, drawings into it. The front crossbar of the hinge will sit on frictionless plastic cut into the cork board and then U-clamped through cork into ply. The rear ply will stay open like that with the crossbar resting on plastic and held down with bent sq tube. I like the open wooden frame. In general I thought it was going to be cool to see/show how this thing all worked, so I tried to incorporate the mechanical/structural elements as part of the design and aesthetic as opposed to covering everything up. That and getting to my roof rack bolts.
nb56rp4nNVrqFqgvuUw0V27GzZ6kncbCT0KkokcYxeR88yNGzFRvDvi1xBlrHjOrDH0MVt_sPONfDdOOFrpYlcMfvrsvk-arft4JPEKdzkxJHtSEePkRLaOeQaUEcqwmihd3Bd8Nf_91S9U0ZsDBvWupsT-2eBafc0rdqKAWDZkZ43xJ2LWdCyEbWVeWKGoUvGsaTT00Qa8WVZPPFKm015tltSWyYjsunCsch08qngGX7FzOnoXkBPId_vvdYb0T-Uy1sCoUzKH1mdyEDPfaB_INbxwsSMVAVUwYUlqp9kkVw0P1HBPKo9slCYzUHEyakKCNvbqQve4QD_bdoU8vE7Lh-I_FqCoeIfXkIm1AlrlimdMhq88-MnUEnbBpYma7paYC3GZJqN6XodLGENplJhpqaZQeoGBbNRh6Zmyo4gKBRyNtZgvAxa1RqXU-hpP_aGfC3VdjfQhfec-yZRX_eeJfgAlvFezFVHZtvUcL1dELrBHKRiC6GL_XTHoFsRjwRPS7OxdLwjQqFHl6a79yCFiUgJivjciZNquaDBuJbDivgOQ0ut9FmPcgIZ2C-DOLQMHBQtJ9tq_BH39Suq4qs3nq2P508KQ=w900-h675-no


And here's my favorite last minute change. Making these two side LED's "float" by raising them up on the mounting points. Figured it would be cool to use the L bracket as a tunnel of sorts and have them float through it. Really no point at all other than looking unique and adding a potential huge headache with the canvas. Realized they may get squished or bent and might need to add one reinforcement stand for when the topper is down and canvas is there..... But until then I'm liking it. :sombrero:
wUY_y3cnvnwXECPk-i_7FQCvb_Etv6vyxXSmJl11_-Mfma6pE9dwm4BbOmfFdwGARXipr0UMPfIvJD_fWaAhOzugKKAEUPLtL1Auc_rWI1nYwXhjLvSR8PQmdTWMUUfy976XV_IL7ZSpKnNICC7W2KsREAFtWq1Db3HKJJfwSPD_wWN_jK7QZcYUL-lI7otJ1mBbR3jAKCCIyUiQghWfwocRLf42AgwmRWb9L7cOuyugnVQ64DlbiLtrA64EGNOGTc4HN7jJk8UTGTJ49nQt8vXFdNKozU1h3EPZ28snQn6lsNQYIIfWvClTPBdTkG6tYUulHpb_u3bCRbUTy5RZCrQ0ARIEZrDhE3j28UzVpfRZkkiOUJkinTRkPHB0_Nh1mamFzzLs4b0BMeoD1jgN5z0SGS8JC9Q3jwlt2odtnfHZhl6fFS63_FNZbMwK75EKDXRsj2gEgMdtcBVUpr5LmA1S_N3PXICVtYnTwCfa22pyejjWkvKVJb68eK0cTt9fHfdXmbpf40Z7Rai7Xo4rm4MXBfbmF2PlXa6nGAP_bk0rRUXgQp4xYm9iqdZjCP-Np-xlM7r9Pa5no953jC0cS2daGAIt_00=w900-h675-no


Just used spray adhesive to mount this cork board. The other section has yet to be fully adhered.
mdDJVFRAUENbjM_3VS4dXdl-mqirwewsqJCIzyq7Q6e4_uQlUlU93WE2tEoDQzAJcgfUkI69H1RhqsxKck8aRRwf9NG5ZEIjriiu1zL49XfSEHv3cj6g0QiDxWQWkN_yNqpPwOQbpNuzbDr0JNN4a75EP3gDK3xs4t8LgdemyTGFXJdU2EAnDKclUhBxK_xAh8e35q2lge6zVHhiib9TOcxIyW1nlCGWKGARVAHX1ouqGRb72sPmx3TCzz2oJ024UNJhbY8aSpry0am6XqMIFF6GZweteTe3VYjbySQjdeMpCBz9bxUUXPYNJ5o_vXr6kPtWq18p3IZ2q0EzvlJdmwlOkgG4FN25ginfvnHuB_SU31zTQ6wqWl2cEG49hriqJHaBtL1RBtC-Dyx-83wnGQ1dte5oSp2MFzNCJLR4bHf6ihHeZ-uK1UjGKXXAPcBU9w04JCNahASQHZWRdZf68RXV-2vz271DLHSMB6vkjp6fEqttOs1b-aIobqgwASaeQlKbsCxLrzTLfNB1YmabVCn7N8A6XidNGrPQD6S1-xfoopHat4tcIMwjQ6DjlBnDUzFHvvPE8EO8MavxhWJAmr0x-MDhz4Y=w675-h900-no


Heres the vertical strut mount and a brass hook. Underneath is resin glazed plywood blocks that the strut will actually rest on, or vice versa as its upside down. Going to look nice without the tape.

tCrnkIETwNbhCKpT6rBsWmsrcEQdknFifN4k2DYocv6XwX8T-oiXSeTp6pLvfNPb67UPWqzO0wTZiyVBKe1N91yO3ydew0qtf3JWmbBclnXZrxCb3QlZdN9YDYsBN_wE6CaaJkbuw1d590h0KXOpc-em1eBCDx-zxtXpGBcFUG9PrKpjyc_7JRnUVLKBUY8Ax91yJ88G_SBRVsGBbNQwLDUkVokTjlncAUx4cDrWB1y8ZRLbPjC-kdWwZc1_hFt-CmOKkJyw7e_A10eKdpx0tgzMPkNONJpkl9Ck5nkk5ZRp4DklGg-wcy3sfp7_0S2XgDZsLMhZIf46CiqW0WeWbiQCp6Dqfx4NHLH9gma05mHZjvahYPCczHZQZsvDe70YbH7qy_bny4TefUvbxbXFBGQL8ePyYwuc3POcjwDFZpW30RHFIqnsLUviKonZZGRqHOA3XheTBSaeCK0O4VCru6UfbIv3ExD9tBAxE_QaOn6GbxONQ9hqhYqV2LRnA8vSbRWu6fB1XNB9nAlytwobBCv6vYdTVRz1rrANB6ApjirxIx61a7Fzqj12fk199aTOpjwc7Glf-CLlKKArx-OlfaIR2LaSDfM=w900-h675-no


And again on the car. Complete lack of thought when mounting those side LED's not realizing that when down, the canvas would block the light. So I cut the front bed LED down and mounted it in the middle here.
7iuaGpUrxnOgKW5jkwvrWbjFG-Dz9VA1Z76Z7A-He6uoWclKAWZbtd0kWMVc6kV2CImLbW6xD5FEn50sZ4Y9FSMKkDzgxSKADHdTRudTVrka--cJLaMXVtaMcJ-ytfv9hEnzKizeu7JdFSiB_aEEMXjumcN2VfMb9NhOPRZFOGrblVbEWM6h2WGr6rPWlmCQwJc_-kSYApu53CxWXVRyrOMawvtOAaKxKZFa9lulH_dkpsfBeSUu_dYqaW0hgbCldPOf2Fz96tItniHFHHXUaI1bjVD3DtTPMjlMz3zqJIujvuOkMjnLL1N55Q_yIzmMRnDdxfhFdHnoQj3yUuragQLVnvyCmy2Y5krnGp0YXKTPrvCp81Cs1_frlfkqgpDu0XkNJVww13484fafl0I1UEWQarXbtqCoxWYfBJyIq8uetZd3kTpu6ea7I6tObuHBQVZOVvryeE0eo06_jVzEy-uaiaj_muc_xKVYpJhRCKEhLSwNQkVg5JYrApFurcu1-iWBXfcCHOP56lkMYu8MYAhQz2ZQYG8CE3hHbaFOmvKs-mdAxzbYJVMRHe60wvgmraHxTsJUnCnvci-Cq-2YT3D5gi-zRNs=w900-h675-no


So thats the interior. Would have liked to be able to spend some more time making it a little better, but limited myself to only two days, trying to finish this thing has me racing. Any suggestions before she permanent?


Left for a few hours yesterday, not a cloud in the sky and didn't think much of the roof being wide open now that the topper is back in the garage.. Sure enough the sky opened up 30 minutes later and I couldn't get back. Probably rained an inch in 45 minutes... Whoops. 3rd time its happened now I should probably be more careful.. Might need a carpet swap.. dark blue could be nice and matching.
SAM7_3HPBwWAoxGgSrRUQ3-ghH7lowCqh1WDF6306ozDj7nTWhwack0G0mqx1Uv7du8PdXsGkcYfT0t0rj0UNwe2JU1v0zPv39nX0wfnoAMWfrOZCOU-uDOFt2zDHr3aietSTme7yCPnvkckUN4AeSmlt67K82joKFGDAHWey5mwmWr-dTftI59gcTZQNcANXs0cJPdTm4t7512GC-qlGSDDJdxjxVSaKWVhLaEEDMmnY6Z6PssUViIIcO181jL89h9SYIiWGLrh20ewK7BIuCEzc6FEjBzdanS2-EAQdIw2dY7cwavI39K5zw-iyjbZwvft80HynGg0L_EDVaPtedC70-IR6tM59tZ4BfZC-vj5qyUnsFpiAXTWvvuKQJVEWTKnP3AlQX7PatkjsKsL1r23gI7DLM1MBfHP37MMEaufhOSWqeQWycfKgOcBPIverIxt0yu8UVzxFVbOQngHdnwYZqCruQRTpJ2cdfhQpjluPDWEbsAlu2yLCSNIKKfuhwzl-1bwPxEFX111HYVK0NJF0unKyCYuvLafskgLrxnkXf5ppiOHgFzCY1l7xHgT9kix7yxlemo87whbYzRFH0Hy43tR6AM=w900-h675-no
 
Last edited:

rayra

Expedition Leader
well the good thing is that carpet section is basically a waterproof liner. Pry those tabs out of the 3rd row seat mount brackets and get a box fan blowing on it and things will be fine. And the plastic / rayon? carpet is pretty easy to clean. Our German Shepherd has twice made a mess on mine, tore it all out, threw it down on the driveway and blasted it with the hose then laundry soap and a push broom and it's come out out good as new. The factory rag/foam insulation under it was unaffected.

And the cork is a fine old skool idea. Should have remembered it. A mess when it gets old / degrades, but real nice when fairly new. For both sound and temp insulation.
 

Pntyrmvr

Adventurer
Okay the top looks like it is good and stiff. How have you reinforced the opening in the steel roof?


"Talk is cheap. Whiskey costs money."
 

boll_rig

Adventurer
Okay the top looks like it is good and stiff. How have you reinforced the opening in the steel roof?

"Talk is cheap. Whiskey costs money."

I haven't. I chose my cut location based on the main cross bar support and left that intact. At the rear I left that one untouched as well, only cutting out two smaller supports in the middle. However bolting the uni strut in 5 places into the cross bar supports, and support ends where i cut has seemed to strengthen it a little on the long sides. And believe it or not the crossbar hinges that move across the hole add something as well. Hoping its enough because it's all I am planning to do.


well the good thing is that carpet section is basically a waterproof liner. Pry those tabs out of the 3rd row seat mount brackets and get a box fan blowing on it and things will be fine. And the plastic / rayon? carpet is pretty easy to clean. Our German Shepherd has twice made a mess on mine, tore it all out, threw it down on the driveway and blasted it with the hose then laundry soap and a push broom and it's come out out good as new. The factory rag/foam insulation under it was unaffected.

And the cork is a fine old skool idea. Should have remembered it. A mess when it gets old / degrades, but real nice when fairly new. For both sound and temp insulation.

I figure that in 3-4 years I'll have more motivation to replace things that have degraded, like the cork, but you are right, it will fall apart eventually ha.
And thanks for the carpet info I was going to tear it up today to dry it. Problem is, even after all day in the sun with a fan yesterday, theres still standing water between the insulated rag stuff and the metal below.

What green leafy material in you floor board sir? Ilmao

Sent from my QMV7A using Tapatalk

Hahah, what is that stuff!? Amazing what falls into the vehicle when you've had no roof for 2 months. All cleaned up now :ylsmoke:

Yesterday, as I said above, I mounted the hinges. Gotta say that felt good. Getting them tight and vertically straight on the curved roof just took some aluminum stock shims at the outside edge. And I essentially just cranked them down so much that they fit the lengthwise curvature of the roof.. shouldn't effect the lift really. But man they are on there tight! Here are some blurry photos to get an idea of the flex.

Ie3WVi-Ce-uvW69FpVpUOOa6ge4hbN3bhd_Cr2Wu3GsPVFF7JlZ-x99-U1sEvxIdqCtATXCoqu8llkMBq12de9KLueEwbsKiHPzRzE07lzLW7IZyecvBesLZZf3horARJLRfMmgU6SpCDyjVL4O09CoW_TqOtU-zJTgX82OUcRpQmc_4L02e-bckeDREeYd5ocpxwpEs__9ARkGLsaxYo4KvDNtqIu5O1IFN2GcKCvCErZDUYYvqDYvtM33WCZg17g7CjgRhd0dMkjS3NtTdu3vcuQ3gHGUuH4y5A7ka7v27Yal7N-P2tRKBQ_onIXWYyALt7Juo2wkx4re0pchO2pOHc2Tlej5NudKUA__qCwDEw26HKUivL2ZeBYqOpuJpdHQkDtTZwnlmofrDkwC-yz9GeTpdOAnwZcbvLqBnTSHuh1tOfYBZb4iMmt8Au1EG5dho8ipKm-S2exN4tIfHuQyorkMSFT--LDWFXZX9kQlwP6wU69oA8AP3ytwlrkY1ewV7iC790jTKlcwmsxi2bdj6xseliGPydLZWxj9s_zcAPwvKKFbhKnLMZHxy9428MTlfZ862moEvGVD63mnQ0WO1PvTooOw=w900-h675-no


JXH4R9jsdKJGHF03Rf2vfAVcC7nYrLywAnDcrfbAYXsn3zOEtIMsklLoIPtrkObH-DE9WZCwXsu3l4foc6qOCNfLR2ZidG6jYsXtBaR5qfX0ptGnQ62gvSr_fZ82lAPwgH_YB1PgFSX766oopMfMevKUfxM4TAGMV1gaYT913Brv3Ic1aTCIPa6rFLWtmLVlZoUPa4OhLx8_YzKyVF2E7GfhGjn51AFKFhDMoWSQ8x5HeuhOM-3jJz2MGuao_u1sviZU-4eGErv6syxzAvKar6A09MLLdxNWhE1W4ffuuuUi566pXVuj8fbFAtb_sYr5w6r9R2nj5StfhdyHeu1dZJg5iW2V-QR_Q9SfPS5MHuYCywK1KGkzCQjk44wKJA6RXkefKbFhS87N-pPoy8Qg69G_lIPenP3TpwW-r93xdlCBC5tZkznesLutM1GiEjMUnuQBQHAd47PRbiYxcZ_qHskiwNlK_D95_gDW7Pi8WAoyVzE3Bv0WGdpfwR3oqeOIIjmkAnWC8eRyo8bTqgHNjd6kzfr1xT80PPI400ugJD0zBbJiNE5a5x_soNr1UVB6aCGJG5qoers0n50CgM201ZA6yVArUJU=w900-h675-no
 
Last edited:

rayra

Expedition Leader
If you've somehow got water UNDER the carpet anywhere than those recesses for the 3rd seat clamps, then yep, you better pull it all out and get it dried out. You have to fully unbolt the 2nd row seats to get the rear carpet portion out as the front and rear halves overlap under those seats. And the rear cargo area side trim panels have to come out, to lift the rear carpet end off a couple studs in the floor back around where your goal zero box is mounted (IIRC). And you have to take the 'C' and 'D' pillar trims off before you pull the side panels. All the panels come off by hand. You have ot sort of lift the faces straight away from their mounting surfaces, to pull the spring clips out of their holes.


The debris field from the last 'Poop-pocalypse'. Our dogs were at the groomers all morning, from early on. Our doofus GSD couldn't hold it in on the drive home. Took a massive dump in the cargo area then tracked it all over before we could stop him. First clue was the massive stink. Immediately shut down all the ventilation and dropped the windows. Our husky-GSD mix was just sitting in the 2nd row passenger seat with a look of disgusted embarassment on her face. The other 2nd row was folded down, so the GSD had access all over. Middle of our heat wave a month ago, no choice but to immediately start tearing everything out and cleaning it, 105-107F temps. Two friggin' hours. Bad Dog, No Biscuit.

poopcopalypse160621_zps9h1qbawa.jpg
 
Last edited:

boll_rig

Adventurer
Rayra, hilarious story but man what a pain in the a**! Lucky I don't think I'm in it that deep. The water didn't make it past the drop into the second row so what I did was pull the rear tie down tabs (which were almost unboltable due to rust), have already pulled the rear cargo area side trim and hung the carpet through the roof. Almost all dry after two days.
 

boll_rig

Adventurer
Little carpet update.

Years of salty wet surf and snowboard gear.. after pulling these I sanded them down a bit and coated them with some paint.
zW1ZSroTtZUBBjgR_JrwkRtVMzPzg1EPq8pel6fha9daUYtV15qW9mbzoX71YApcmfTLGs8X-VTlYkG-du8Mn9DF6A3rmhq8ouTuoMtEQlbF87cW8LiTYieJp0J5sP_4oKeM_2kthiOkVIzSTaUa1bgYq15dwS0s7boS1GPbZG4WhR61Vjn_EHpFGuB10eNTM10BhCNxe-UGuBixfc2gs4rmhjnH6crpGD3FI_G6clkwnp14m377-FqxXv14X2xSFnDHZioy310r-5Y7MGvwzXXCdKIXZVSTtBzj93QF6nr6j1ymVOo2glGfS7OsyiKxI6LWgGD7mPsv-4nHYmXWmraPy5lN1v-ohhwetTZqf8lRjM05t3mXsz0pQSdZInJCZ-gMckBXZoznlQx7CzuN8XDKJwFF6ur_A8lHAVaq9MGq4pwjPFE2ilqKfMKFg0JhVX__FBrZ5jflVrjUnhYTTP7URt4uRHrUozfOdRWutPxkf73TuTGjhXaXuBOnaVNqwSXxu9FK3t89iwU69R_28C5MYMquEr5427wMuoOWxKI_nb5BhTK3v87T7XQRAFun-cKwqKtDfEViyt5vd_9aXw3EKDsyZT4=w675-h900-no


Drying out. More sand than I can believe got down below there.
942eTVG-vMbuM8zfz4eh9gtQ-6uQrxs1k2_A5gw52vb7KL2K4ScNTe_17WgaOj92Xr0l3wkc1ICIqbpStT_1auZ9AHJunn1W6hlLlAZq--8VHU4rhQSfq2nVXA7ey-1VQxZXyAPoqi7-ZFY1kAuBLwtEL7MSXsUyTX3L3DT1TSBb6X1kqK242_q1SGjeZ_6icLrMoIjjjfYUF4_8tByX2gBOoZFPMqdDyTcWLbYR0xvHyx66jDtBSNnOzb48uef0g7Q2GgeiPfTwdUNddNv22MMiZoAqzMSNvGNfQThg2DveorKgz8udM2g32asA_iR463a2H950Vku7W2XLRy9GIAgQ_k3LZXGH9Ee4hkc1lEsghRlDwOl0CSQKpomNLH3VWoKZ35GCTFPk33VW8uLpvPiB9SNz-fAhCW0qANB6uwAePw3KeW-xWghW9IKAV04gE0sck2P1LboD8KAfKK6fInWNHcaiBp2VJzEYOtP--InDz7cXoPh_5chsSmAqaiJnUS3m4oSlUB8n51lDn6pREqGTLja0J19WXDqFgaibVP2oTQj5KjEOHln-txg924o2QHZ5ATJj1JkLk2iNhe189_ZJCvmd8-c=w900-h675-no


All put back together.. After drying and giving each layer of carpet/insulation a quick deodorizer/bacteria killer spray I decided I might as well put a blue carpet in the back to match the ceiling so I cut this 5x7 up to fit.. Tacked the exposed end with sheet metal screws to hold it down under the trim.
xFJGX86S_7q91ZpnN0DQsSRAtsU3wEzRV52rmh-ZA_Lvab6caw0PyIP3r2AcdCJI0DlBVH2dXB9uRabIs9Ep5Ma1MRrXY3gePq9ZCrRGJwfruFwky-a-CwUzbMKoaNqpTw0EH-bLFnHXYrXMmH-yTyftj9F4Uaq24DVQyjMJ0H7Rxw93GUKIesXKUlcrK0rAjKBZotpgeknyNesRv_EvBQF-OT5Lo4mLNf_GOD9JmtBeX_xjyZCsw8D55sbQXCwIpiEyxx6sFpYDX8gsZ0tAEZlAja-Zekus0BmNsgXEOHHCutPQSZgIqEHenXRcXTQz-tZVC1lFVrL_uwbCxj9NSLx9XrnaktVsYSfCZPw-unhn3D2K81BXVU8p34W0TWxv22KkwyqWIt0YQwI-oVySPRsyVWj6mNJ3Cas0vq3Lf8gFIHaMmKaaxCvuQ9CCivpfSeS-z7A3rrtFkprYg11onAn5oqdH4BQ49SHOYPkKl-6nwvz0QBSCK7SUegwWvNMoS8bw2gxgy-kzGKRWFErk2Wxnjsq6sPoX-uaVy3wD5mnQ2_TCXhN3Ef8Nr1UNZqU_KW89lGBe8zIiEBzWba9nQ2_MaSsoz2E=w900-h675-no


3XXulffJlJxWfSBOB2XCauh2Ltd8ia3qSrvK6sVTEgHTUmrPHycmXYjqpghWF2lAOTljb1NJZn0teyBYO8N_XSNuthclKG9IQLgbWpSbSQBVi-41tFACOJ27A7m7qkL5yEZ2enGLHq8trUZ3vbiHTnaUqecRGCU2FvlaCUbH02SgB4E0-vcipqt-mg_7J6QoCw2dBhgoq4-Kl6HNWaKIfgNkeXnjPUVR_tvKijVZB6s7xIdFR9BTwZHF97Q7w0CiBWJjeWwiOpDuL1PtPAoQWkvfi7HH_ydocKfCO_XyXVbPfsnlA4e0USW-jL1A-adm6bqupnplfYhNVQb-JNKN4msSGb4rgoue62hykjh17g2-jLjglyZoy9vwE6ruq8Wgje5c8yVDOOp0uGttZ15VtwLaJUU_hBRdv2oRy7_TAyRGm0Wa2cj14Z-0q1vbaSDQR0I6iTrx7v_K6--eJxfV9v4ZS19W3IJam0pwmdy39nOF5qRGzhMFyv3kC1VpxSiTMHsc3Kx_YZDyd0lJ7ouQR0nxHBRyEUM4vQA9HogZ94nohLnLAfYH6VBVRla7vNYWwrQnBbT7-OcSM9fYSsoLiyxMlOychSA=w900-h675-no


Did this in about an hour, pretty easy however not that permanent. Sliding stuff in and out may want to pull the carpet. Was 20 dollars at home depot so thought it was worth a test.
 
Last edited:

boll_rig

Adventurer
Been busy chipping away but thought I would post some progress photos.

Finally cut my cork board and put in my slider plastic to ease the lifts.
6QaJnidasEdHGDDLR9ujdhxMZwa39pujGoYWEfC7PqG0tBLGkM0ZF86fZ6meJ3klIsNklKJ_36lrn2SVcs115kiMxOszuwyXQVF6rCS5yTgnU7ZRuBfB7l8S63mkLB19lu18jjpW5TeCfJHpSHb7f5O_XqaMozdTYXVaaFFDQnSuZCyl-pKYw3RjIZd10QP_VFCKxIYowNE-nnj8QrUg1BOfVaskpvJKMRoPVJ975g_dVZP3-_lJGaH6EXPbAFNXtWcVC1cL9T4mK-CoZ3p8V95fdx_fuEQgdEO_8-0sYwm3aQve3GKGkAxNiL_BkM8IC7Jn3vpblucfZJumI2j553uDYwqg8iBX0Q1tMi95O718qEyuKnbftQDqYkqTNvvlVbDah48hX5NzsBlDyRkmrNn1IUq_ht7tFy-bvuU4z0y7vzTelEckc2yLJlN27j_fqn41Dxwxs2SOb-DzAn0IxvYHyCVl0-kzA33JvldLZuog3HULeXXnUPY-NMZRUya438ZWsHw7F0kHAihl8wLq1PKwQcKcCNr7JfjZAcZd7IYXz9I0ew_7-o433Do1ehzGgAtqZ9_AuREvoNlFTohImGwVJI95ht0=w675-h900-no


Really like how this fits in. Was planning on fastening with more u brackets but thought it looked nice with just the ends and seems to hold very well.
l9zx1y_AHMJN3tndiWB68zqm_IoL4809_1DwVLsgXLy_z0Fe32BgtcLVoH4eoq1yCaEcJMwjVyu2AyyC0wKCxA64QYSiE0iZnKpscLNwwbcMu1gT7Th0kxP8zS1MVl45hPoHRa6cPc6NzmNPrnv-2DJvzEkYuNcZC2EdTZy3Y-Coid1hRFcjJFBPJhe0TlXPJqoC_n-I77-V7ZyllQ9dnnbloeT3F7jTKFqkALyGpkHxrIIkzbQB4Ht5zAZ18LfvsFiOwpXSS3noBwOXUeNsR74L3hqbhk-U5uICCxiDuXXWB4c-N2BDxiZvhm8SW-3yIVv93jPmEUI1lbFwBm9d0E8xwOt81Ag2YBqU02McE81BNomgcgrqiZcAgpUyW8KGgHkTPgvsrCg33_dOk19rX_sZDd7bsY-KiK-d_UayRndLA0PSEuKR2s9wJLG13htPqBi4DKq45YBc05LMKN43UZ_S3XN67a_iwaGZgJ9PEzwjN9ZoUsvOgaxa-uIzTJoPPXIugmRHv2W2EJVLc4lIxv2iDNgAEq7aJN7pAXbrvM-yroFJxAn0NwlsysUEQfgDZWEZa6rKlXDM7NK3bVmSAaw5F4dbfKg=w900-h1200-no


Next up was installing the jeep hood latches. Took about 4 hours. Had to drill through the body of the car, find the hold, get it bolted down, do the same through the 3/4" aluminum sq tube on the topper but the real pain was making them snap due to the different latch angle than what they were made for.
yPkdvNXU68QDWfbq38R-X-Tp1whlHlLWSgWgdbrrTMlzLZODHBA2zykAaJwVCAdjswo1xZGa3BlX1-nuRTxpozXPvt_Kxphu7ql6gmKInK0gQKpzsSq14g4ky1_NzTlq2DxLFoFLFnJuV-Ps4hr2jnxWeLVvmiV42ehYeG0Rvqry2_sExV2SeyXf7VWL8y67CUqc2t9QA-vt3TqoPVGCL3TlUSgIr5Sf7qMlfr-p9US7Tc6ZNXoIBchJ3z7ApUnMmAdKAUp7semO0Yy3QlKGchSzL2qpCu1BEnowv23zSTEnK_lcVPnKPiObUzHB_4DbbSVT9rIxcbd9x1SAn8c7jAcJc98MfDHOB_HTzrbJu_HXaOmCtAZQ1Wdiq1NlmImvwiKAdzYmlB2WiBexz_HSzMFsqLo1lfUCek5mVqSGixFDQiDKlAqKhT6XPBJOLm3geeCeN7ak1uXuL1W2J1UFgVORq9c0s3_RbnpaWKVtKJqgTLzrzlijbjtAf-rSDZQclstkaWnHb-Sspm_ORPADLbDU5APBfndYb_jilugUDs87owA9Z5vqIIOtKBwFzo9e5ud5n5iSXCorgxvtlVteSm299TU5t2I=w1000-h750-no


Had to sand/grind and file until I made a fitting for the tab to grab onto. They hold the topper down so well now that I can shake the entire car by roof racks. Happy with the result and I like the heavy duty look. Chose to mount them in the middle for peace of mind when on rough road with load on the roof. They are positioned dead center to the racks above to reduce stress on the cross hinges.
PPCKrppjaqZ4BtrxpsF4dbzexGZTzW8dnhm5uesg3fU2zhMpMkMICLC_0W1qMc29EL22Yd-HITxWPyGjuVg0RmBbiPYmXYw4ZWy97G4xQpTSZ0XoDt-FibHeLzaRu6ge7e5T8DhDvNW5CK8X2JM7nA9XOtz19ykMUyLn9LCzedM9I-NI1B5XmqgPMcgyIKyT2_3KC3VBNhpklUHBLMLt-eU6pzyYdy3jkJPWWJ3zvGf-KYkHI6J2jb0TtA6VtGrUWI9p1-2nJmg4wJFVkE1UGdf21dlcyMMWDOq1jfzwM_c2u00A2gjN7ze_AS1LUSSN_oT3ssWfgNF8s4U3vXxijTQgb-0lIgxLfxuLfcfzGETMYS6JFvSG3QIVjoJ7F8D2y5SqXv7jMIfBZk2rmq65PS2Y3lpziG8LWK_9jfvCTkRICrVKr8asJtKfYzxmrC_u4vpHA3HaoApXsXUWYY6okwKaz943-XT0CGH9i84yJHHpvngXCZPmlNloafs9ln0ibtuff1BRWyPnN3DrwpfeBuGUX4pgpovR9XMtNihdvQvv8A5upWFzjBRjjFiDRfRz32XjN05-pt5JtkM1zyzf8J1QND-Zpgo=w750-h1000-no


Bed time!
pyRmv8GGo4ph2gSq8J_ptoM6RtSWSjEZsG0qOM1bDNI3fsfefxpMQwHdx2ovOAgzus5S8lmp5CP0rQyZ7xabwqVk1shaZqLmlKRz2yPK0Apzr_vgNnDbvg0wdkDpOfVxAFVgu8_PNFiUMT58GltN2fM8UlthJS1tjPc0HCE6XAquyAjRCL67C6yHrkf-Y6BLsws14uRtQr9E6hyGt9uNUNL95dho75vCYiDQExPHln6kgFV8j2PenUom2hwJVIiU14SIdJsylvp2nlgmDZ2WjR0orV3Jq-xg4VpRMrMmVjoMWccqS7RSrgQMhS1rgKRzJ2u4dGb23bT65yxqtqlHL9YYceoanJ5xV5EBAGw_IOw0lPFQEWMcbV-mHk94jcruA2vJCxLalTza6q7YPJZc5NTFuKGxHToDnE02l-5ijJHN1XikhGcBA0xLqZgii3LNOPfE_VzgXcQ8fzsNDnevgtb2qu7KO5czlwSSEqPV753v4i9lBsYDeOmv3odmhLt-doRVJx2lqNBL23T7vSa6wlxHRDXZgn64TQcP3E0AJnYPQki6FoMXFuBMOD6XYhRHIidJadGndmJCcPxGKtnmE-pTvSaPtp0=w750-h1000-no


19.99$ carpet from home depot mounted on 5/8" cdx. first time carpeting, not pretty on the bottom but she works.
nJb0VTIA0Q55rYycINcNZqx6bLtQGuEgb8hznw2O6K_DCJJqvRDkzTH8kgQw0fJnVL2M3R1mWbpnrlP2lz1_SN567rq4CzzIG09NuBQ_TQSIaJpO83DLH2a4RjLUBAn0Qbw6H8HykKa-XsHZXtMf1OTr4HzOIRZgc7ZLkjHuUnXoV3lOBT9orCOmDrvPts8KeRF-fk78iuCKPkdmPb1Nqzym-HoCs1Fhk0ItSLaD808oswbbdN4h9QlbYI1nPO1WlH7p4mnAs27KsY-o85oUKOqexYGtW-loaCTJ5lGFc-dXKMNHZBZz7tgS9a-aB777eZZIqRQj7MPOZzOZYiSKIurL49nnYhcMIg0Nv42-qpvoME-x8SAACpy9-QmVND3Qt7F40taO09AotnbEPzjTsZmbwhEF_6_Zy3S_Sjis6J3abMKCefGV73pmJspAf_EftkhEAgVjVoYVOsAmFsE8SX1Fz0EGNQWa393AFOzgQWdvce2401KdlCiuEQkD03dNCw_4ZOJkUvlnWe5lUpsAGxaBV34t0QtUESOiSs9wPIn1lEZC76OWWfc0m68x9AwigbnVFA6YHBIbdRmtK3QQcvpBIukExXQ=w750-h1000-no


Prettier on the top. Chose to leave an excess of carpet on this close end which I pulled down to my wooden ridge where to the extendable bed platform will rest. This way after gluing and stapling, the carpet covers the bit of the suburbans cut roof that was exposed. To secure the platform I used liquid nails to glue shims to the roof of the car. When dry, I drilled sheet metal screws through them and into the roof. In the gaps between the shims and over the sunroof I layed down 2 inch foam for sound barrier/insulation and then screwed my bed platform both directly into the sheet metal and into the braces below.
lT2Iq8IaPoI2AkIL1EVn7erWSUhuEEWfIrh605CTBZh6tlldafQO9ZrulZfTvBQpyq1kBvdotDT4X7wn3InLCksFPc6DE1xIrw1BPiOgDO3QZnCM_eHjk7RCH5xZDdPxrRd6gP7bVs6A8wUEj-1oX-rOsZJbRzPiy_li-IhUwvhp2QZRtlcZmjyMJXccAalNHn23jq7stbew0jVvS7Q5YlkXuvREQN-MrNxOemJY-DS7AeX9dShz2qygcSuI9ERrsDwOGApK1UnWEZ8S10nN8EmS_t1HpeFGTKNyz-mx79Fz3lbznFCa2pkRFirLSnO630sUKqXV9SPuIpmQt_FfpszXUVw-SnZmQBBqSpjUZ_ccpqGLUUfQ1mePuP_gEf9zPybu3Sb5GsroGfPZvErSm8iHhxOjDd69IJQPrH62uoerYhG-9dtQKBw_E2C79V4T0qn7tg0MIFjZuXqEuv9MXIRPrp0xpoAYgr2RInsoW9QegUtkSv8lAaz2cfwJQspwY3gXD8Qds-eyANyhQN0RNgi98SEk9xX6dw5dbm8055n7Bqt5Rp4_CAaKAeyc_yzXmev4msea5jyWXtQMNTqrhEvq8fQVMEk=w1200-h800-no


Next was to cut the foam. This here was the 2" very dense bottom layer. Used a jig saw and it worked pretty well to my surprise.
UgKDWnE6a-WrUoL60EIIV5fXqn2qPiJfFjYJevKek2OGTjw84SjTsTWRZGZC26uc1bw4WxTir5c033ppUF5DFY94IR5FJspAEvuRTm8lSzQrLXsaJQtLjUHBz1KU6i93dx5mWZPuOrGWT2E_n-WlA_POckzQ9xL4vtP1Rdw7GQxRT9bN3Po9aUnZbm4ayG7bGucQy9iBMCoE972Mtp3aUiRYyKZiXcQLVPW-LFDTemL5m4ExOJNulBtgw-SeXq5BbDuB0h159ykhqC-qYO3GsoKiknlbFQhLYw99Brto-pRTN66sz7-Tb6MrWTNAWto6U04hrX1Akm59rPTgeGnyWDgyoUxlIQXP5f5-FzvZaOf0xeWzbWaEHy7dorH_sxfSL2RPam1C0kROWEErtymt7FzHQZxRcAB-Dv_Ny6oQDaS1BZQjuhAHHk-BmY6j-p7UXuMRVjC3F7Om5LFIl5e02opqUJeHsBMXY7YVGLo7z65c9GnQZiOSuUyxeaV9v4bAGV0miMZvY3EO0NzVA0KEZNZ67fVpoG1eZfW5SYZVuAdSM_8Ou7kSWIqw5mmQe6NIAriNZOLzN8TcBsKjcQZ1BU4tlwKX21s=w1000-h750-no


xRzpdGn6b7YNZxhVhtVObVmj5meLunFnbGl_dUCy-xu7LG96EBT0yrPgnEowHmpWDXUL8PfF9JVmXUDm0NLI4kUs-tqNC_wbZJ2IFoimbC9mAlY6wfWuGNGnC4lVg6WPhMad4tNNzu48PDtTUCY9lc80WFQyW5GJxAmcqjNGidUo0uNcEoFxZTElIQJoeYf1HdsaHXrpQaf6dbMgfscdUaV7ozgE_fmX7miZrT1EocPi_ChqovVFrhKjP3bIdQo6D6yjkO5SrAPxVqsSmegfcGtfTSLnJDqhujrIZD5spzF28kYa9duF44cQ_tkqGJZWrV6sljz6BGhaKGNdYjulPilMkDTfCxPAMiwGLhE1ZmeOrqf80Up7pYppPRjQ_XGqzVEOlNi5WWOPxZ5mHyX4SatNB4FyARNOQlgEyqrYdgsY2OIDb79upwwqzp1ebrPKMAxP8GwqNogMxcBgkaoeGdE27DD_SB1GHH0dG9a2zXDY5kasKVpPWsqAJ5fDwav_OHLlnvXFmKNsdBjNnWcbstUDCPNOetJbNesZHvwRqAW38G7AHzIXyqa1JyWGLGFc5peSiFdz_u74l50NFlTvr63ykbp9uPY=w1000-h750-no


Little rough around the edges but will get upholstered eventually. Again I have a 16" sliding platform that will rest at the end of the bed to make the entire sleeping area a full 6'4"
fG5e1Pl6zvQ0YcfC-tJMWT_7QGsbhKWi9kWeot0Tt2tIaiInAY0Useho8aCpL9VrYebNjf2UaCDAaC616u0ukGE5WodMFgR1xC6ydnxo_tEDnpMtqRstHIf8RN3w4PggjUMD2hilheC97a6D7MyBABby-Tn33GPSHIqKxDVyOMOAGa7uBb0ny-NrtVurML2xQwRHrVseBfym7YzJb2yoQSFB0s2DIgzUrOvUISOmuHDigUHzMoqQa0PfutlGUitbSwRiNi-BZOWsF4BbY1ohWwzulMNkjQvWfTvppFwZGxgdlucwioV2RaCHF8esr8EZWbedb1fa9FmCcyKvtEMSgeHUOP9Rq4fn-Ucgo38eIuYMyu-q0NBGVTx9-jp2oYpV-eke__IjbQ3W9qZKcg166HR_jThe1nnQYJKtpUOfixvISC5KVOvLQLHoEpYgWSn1tERaDi0zF5p2BaEZi-K3PcvhAcHoiQgYN4HJIGyUDq7d72-wQWdxDDIfJJLYxEqux4tQudYxJpwk4Hyhi25t8iZ4C3OItXeYj3Q_MW9T_2FGN5CUPatJRn7p4SiU7ReK8PzfaSnVEWib9TD0Y5NML7-tgGzHGe4=w1000-h750-no


Now I couldn't cut the memory foam with the jig so I had to use some large cloth shears.. little rough but better than and exacto. This has to be damn near the comfiest camper bed Ive ever laid on... and it somehow fits under the roof. Should squeeze with a blanket and pillow as well because that memory foam squishes into nothing.
cWGDa0EKPcOD37J30C_ND8A_ZPuV0UWsk5vEUCZHsjTR4H7jk2Q-UTVfZP3Xw89ZuS6nAqHAmznCw99H--0fQ8Z4uax5bT83ybEb9w8OwDiA74PScpzlJ49zl7wAo-DxTPO0Ou6a3Zo-Pf9Ln1ID7kw-E7wVq_vfRcBKf7_-koJd4ZYdGiUSW_4v1tZQYOgl-xVhm8LNGwzOq0nvH3-ykfiLshLF_1TzhEvnmXe38ugSLv46Ft14qDk-87T5p8bhD-Csi6flO-WJgV8YaG98ibt2_01PWwML4s5A4xE39vZ1otrWnNAhWePoHS647ZI9OI97gjFMRMOlSv8FNGWUcr5lDg2Ti2Txm3dtBeyXJ5q_n_Da5k2X_DIlKv2E1fkRxIb3K_pYxe2vZp1Bk2a_pROcylt5yi1yGtnhd9ntncyDXa0XCc0-X-3NG1q8_khP_7pSsPbMFYQnbCICdJoY4ZHMeHe-yMrE_iEW3eTMp_zyyoYrX-TPn3QiqFzANKuN9WYxZ6R-70NkS1us9HrKOERnmLtdgrOiYzkscAJ-adc5HqNrx-5o09UgPPzvgVmpK9dZ8jUpkWrX6-hVPrHdsfu_d0ltBKU=w1000-h750-no


She's looking pretty damn good at the moment.. Other than the massive rear panel dent.. whoops... Forgot to mention I did install the cross bars to the roof rack. Also just went ahead and dropped in on a grill guard from aries.. 280$ shipped, bolted right on. The jeep latches, guard, and cross bars really making it come together.
GAqjXs48hlJCAWn2jFrMqdbGv7AoY9PYvlW1Oy9dT62pD5g2jkEWCTMlf09dANC5unH5zi1tuP_6RLtlmbrgwuJpSRQXCdt9DuM765u75tSqH2g440I-W2IHwgMq2zIKkC6Q0R-AbJ5VnKeArBFX3KduqIYQwcl4yFKxocW_2U9BUFg9UIK9ugVoQ91KluuEuHEDakA-r1km-cEi-iVFZmg9vW32Gs_dLoc-lKoADicHarfOoTlm28gY4XZeRLXWqE894YC42-yTvEX9caq-HHvR3vSc5SCQkG2ENo9O6jRivDj0HjGj2N954CwzQZRPc07SoEN-zmAg5ubegQ9yJBjBtFBJmVR-EBt6ADn1-CM23sFl3MVOfOYutUqwoxVWHBQ0b6qIcHM38YC_Ld7j_CpCvm3eJuOiZ67KqoXtqOlal9Bz62DW1QbOyxV8GjGUX4ugaZ7I_a7eyG9UTtkzjyzO7wVJpEVw-1rDH_jdQmH23tr_yqTDuruXrSSYPgJtAFwLKXwyMVRjgTj589xMlRAGUVTXs3vBaoQWBnaIwyIdk4BXHgrYKa6sSDrVmIjkY14ITRcXrOObW20T8eB55-VQ1booHE4=w1200-h900-no


Another angle with the rack on. Found this gem on craigslist for 500 flat. 89xr 250. Got it for my younger brother, he'll get it when I get the money ha.
6zEuX6vcG9uzeyhbr_G64yu1AKYLQKjG0M9Tavh1QQrwWWc2OO6P-uaqADsPWCYiEtmRf3S-nMxanABKeZLGWky7y9m9ZH4C5zlxccueFvqhmHnDXXEN2R030QKMHac1cQWURWAGySnlBOpEZUT1CeWNNP_8NQEPMYl4ULrI-YWHd9L5Me94Rw1vVMmGAUfRH-zofbdsNYly5jKdqbMKAqofmLwkdd7QXD1Qnj7nEwOhwuns46ZZx0dMyhG-4FP1IHHuJ3NlrSGu6FcBOeJUllHE_Xcj_V87Bf83Jf6QpFcHgpL3jOuG-eYaYG2iKf8Mj-WIrvp6sBm85_aK2LCYQyp6087z-1O6HgWGpg7welw-u2nWEr_yK2lxhJ9LyQfOqtVN9erwpv8eIA9D4itGKZqvIAw8jnei49li5YdtIYLj9lqK0refx4tNN5932ixHqdzRfHOcq730jOjaOxNMV_COxAi0UXyLsxZahB8VbNlzXRawuh7OF-4PBLesVKZkSSSg-CA_zz7c8rT1DWqoR6_YlRRF9_uMTJt5Y9QTyznYi-ltcamHED-v3eabHTsD3o-WojKBJhm8RjaAxQ8zTdnDI-YQhE4=w1200-h900-no
 
Last edited:

Forum statistics

Threads
186,492
Messages
2,886,633
Members
226,515
Latest member
clearwater
Top