After the paint cleaning and removal of the decal tags the list of upgrades starts to grow. Under the hood I'm looking at replacement of all belts and hoses, fuel filter, and air filter. The under hood area is clean and looks to be original in nature, no one has alter it.
On the trip home the radio was very hard to listen to. Removal of the door panel from the speaker area it was fried, both sides were the same. Radio being just the standard version AM/FM and upgrade was needed.
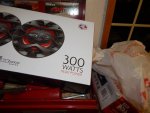
And trying them out with the original factory radio I can truly say that sounded like crap, back out and into the box another trip back to the retailer.
Back again, upgraded the speakers now installed and sounding great. A simple Review search on the speakers is all it took to find better ones, I should have started there.
With the speaker review search I did one on some over the counter radio's as well, the first one that I had purchased was also returned with the 1st set of speakers, I went with middle of the road upgrade in the radio, an off the shelf Pioneer. The install kit calls for a interface wiring kit that really only keeps your chimes, key-seat belt in place, for $49 I did not install it.
The dash plates and door panels were a task to remove, but with a U-tube video it when along fairly quick, without the interface wire kit I needed to find a wire that was key on only, wiring diagram showed these at be light tan in color the one I used was easy to find and tap into.
Radio and speakers were a great improvement over the original equipment.
Looking for wheels is a task that I tried to tackle next, I wanted to do this before I purchased the tires. I found a set of GMC wheels on Craigslist. The listing said they were new in the box.
I got the address and took a short ride, The guy had four Chrome Rims from a purchase he made back in 2003 for his pickup, sold the truck in 2005 and never installed them. Rims with Center caps all for $100, I purchased them! But they never went on the Van, I installed them on My GMC Yukon. The Van wheels I've upgraded with two cans of shaker paint and one of clear coat.
I had the caps from the Van purchase, they're like new and the paint came out great on the wheels and the new rims look great on the Yukon as well!:truck:
Trying to get the maintenance items taken care of and in place I sat down and ordered parts, from all of the hoses, belts, shocks and brakes. These all were coming from Rockauto.com.
I have been ordering from Rock Auto for a while now and always have been satisfied with their quality and they had stood behind their products with me. There were some great rebates on brakes and shocks if purchased by 10/31, I made it.
I wanted to upgrade both brakes and shocks and after pricing at two local auto part stores I got them at Rock Auto for less than 1/2 even with the shipping.
I've now taken the Van to have the tires installed, I have chosen 10plys and in the 245/75/16 size. Before I purchased them I tried on 265/75/16 that I had on hand and as I'm not lifting the van I felt this was a better size for how we're going to use her.
The 265's seem to work ok but in the front there was very little clearance when turned fully left or right, we travel about 30% urban and 60% two lane/paved and 10% dirt. The 10plys were chosen as were planning more desert and stones rip as we all know. In the rear we will have 27gal water tank on board and felt the added weight the Van might do better also with the 245's
As I posted the Van is getting the new tires installed and then I'm moving her over to the Auto Repair shop for install of brakes, shocks, hoses, belts and a few little items. Before taking it we started sizing her up for the start of the camper build.
After you take out the rear seats there seems to be a lot of real estate back there.
But having the 1998 GMC we understand it get's small very fast!
With the van out of the yard, I get started on some of the interior. While out on the road we viewed a van that was made into a camper by a boat builder. I hope to use his style of build for ours.
I'm always looking for ways to reuse item's;
This is just an tossed out bunk bed, I'm going to use it for my base supports and corner supports. I cut it all down at one time so I may start with the plane and sanding.
No time to waste as we're planning our first trip in April of 2016:bigbossHL:
This site uses cookies to help personalise content, tailor your experience and to keep you logged in if you register.
By continuing to use this site, you are consenting to our use of cookies.