2004 Dodge Ram 2500 Rig Build

TimCasa

Member
October 2019:

With registration complete, it was about that time to get the transmission fixed, considering that it will be driven more.

I brought it in to a local transmission shop, in hopes to get a new transmission put in. The day after driving it in the shop, the tech notified on some of the repairs they have made to address the transmission issue.

Turns out, the throttle valve cable was so loose, it was hard to tell if it was an internal transmission issue or not. Furthermore, they claimed that the neutral safety switch wires were exposed from its insulation housing that rubbed raw from the front of the transmission. It was a bittersweet moment to know that I didn't have to spend 6k for a bulletproof transmission, but after they replaced that plus a full transmission fluid flush, the truck shifted well!

I wish I had done more research about these trucks' nuances, but i've learned either away.

Separately, these came in!

Meat.jpg

5x Cooper Discoverer STT Pro in 315/70/R17 Load Range E

So did these:

Wheel.jpg

AEV HD Salta's 17" Rim

I plan to have them mounted at a shop and do the balancing myself. I personally like the sleek look of not having wheel weights taped into the rims.
 

TimCasa

Member
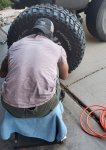
After helplessly attempting to mount one tire on a rim, I took them all in to a local shop to mount them for $8/piece. Thank goodness for pre-TPMS vehicles. It's a lot less work to simply install a Schrader valve and not program a TPMS gauge.

After the tire shop did me a solid, I went ahead and poured in some ceramic balance beads into the tires via the Schrader valves.

BBeads.jpg

After spending time pouring all these in via the valve stem, I'd rather watch the grass grow.

Better yet,

BeadBeer.jpg

I decided to pour myself a cold one. I deserved it.
 

TimCasa

Member
November 2019:

Slapping it all together

New Shoes.jpg

Wheels.jpg

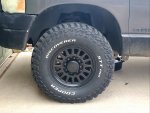
My, my. These (almost) 35" fit the wheel well (pun intended). The +27mm offset the Saltas have really accommodate the clearing issues most folks run into when throwing on 35s on stock height. Wheel turns at full lock with no rub. Plus doing a little math and calculating the dynamic oscillation in the z-coordinate made room for just enough clearance (in the mm!). Tune in on the future suspension I'll be slapping on this rig! It's going to be gnarly.

Here's some poke action in the rear with a very modest offset:
Poke.jpg

The front has the same situation, and they'll be addressed with the appropriate equipment.

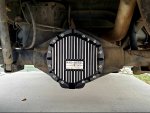
In addition to new wheels and tires, I decided to do a little "upgrade". Oh, how I wish I had done the research prior making the purchase. A dry rotted fill plug gasket and leaking gear oil rushed my purchase and ended up with this.

Diff Cover.jpg

I've recently watched Banks' new diff cover design and appreciate the innovation based on real-world data. I did end up with the Mag-Hytec diff cover beforehand; however, if the opportunity to obtain a new diff cover presented itself, I would definitely go with the Banks diff cover.
 
Last edited:

Halligan

Adventurer
Like the build. Got to love the 5.9 Cummins. Is yours an early 2004 with the 305hp/555tq HO or the later 2004 325hp/600tq?
 

TimCasa

Member
Like the build. Got to love the 5.9 Cummins. Is yours an early 2004 with the 305hp/555tq HO or the later 2004 325hp/600tq?
It's a pre-04. When i had it dyno'd for emissions test, it ran at 260hp to the wheels, which is the 15% power loss expectation from the rotational mass.
I definitely love that it's pre-EGR!
 

Halligan

Adventurer
It's a pre-04. When i had it dyno'd for emissions test, it ran at 260hp to the wheels, which is the 15% power loss expectation from the rotational mass.
I definitely love that it's pre-EGR!

Actually the 2004 model year 5.9 came in two versions, the early 2004 (made before 1/1/04) and the 2004.5 (made after 1/1/04). Both were a pre-EGR engine with the latter having a catalytic converter. Check the white sticker on the side of the valve cover and it should tell you the HP for the engine. Both were great engines and its just nit picking at this point. If you take a picture of the engine compartment I could tell the difference from the fan shroud.
 

TimCasa

Member
Actually the 2004 model year 5.9 came in two versions, the early 2004 (made before 1/1/04) and the 2004.5 (made after 1/1/04). Both were a pre-EGR engine with the latter having a catalytic converter. Check the white sticker on the side of the valve cover and it should tell you the HP for the engine. Both were great engines and its just nit picking at this point. If you take a picture of the engine compartment I could tell the difference from the fan shroud.
I am tracking, ha. It's a pre-04 as based on the MFG date and the HP/TQ is the 305/555.

I was also just making a separate statement that the 5.9's were a choice of poison over the 6.7 because of the pre-EGR system. ?
 

toastyjosh

Adventurer
Nice truck!
I know you changed your fuel filter, consider adding a additional fuel filter. This will help save your injectors.

and this:
Replaces restrictions in the stock fuel system

Also on the higher mileage diesels i have had very good luck with this stuff, its like franks I put that ******** in everything!: https://www.hotshotsecret.com/fr3/


TimCasa

Member
Nice truck!
I know you changed your fuel filter, consider adding a additional fuel filter. This will help save your injectors.

and this:
Replaces restrictions in the stock fuel system

Also on the higher mileage diesels i have had very good luck with this stuff, its like franks I put that **** in everything!: https://www.hotshotsecret.com/fr3/

Ahh yes, thank you for that! I didn't think to install an additional fuel filter.

As for HotShot's Secret, I am definitely switching to it from Power Service. Especially after watching a by-comparison video on well it fared with lubrication and anti-corrosion.
 

TimCasa

Member
November 20, 2019:

Getting ready to conduct maintenance on the drivelines. I've had a weep by the pinion shaft on my rear axle. I thought it would be a great idea to re-balance and replace all the u-joints and the carrier bearing on the driveshaft while I am at it. Upon pulling the slip yoke out of the transfer case, I noticed a grooved line on the outer diameter of the slip yoke. When I had brought in the driveshaft for re-balance, I was told that the transfer case bushing may have caused it and that I should replace it, along with replacing the output shaft seal. The slip yoke was replaced but with a new one that didn't have the big dampening collar (or whatever it is called).

At this time, I have the driveshaft back, replaced all the u-joints, and will likely wait until I can replace the pinion and output shaft seal along with pressing in a new bushing. Man, this project is a PITA so far!
 

SixLug

Explorer
November 20, 2019:

Getting ready to conduct maintenance on the drivelines. I've had a weep by the pinion shaft on my rear axle. I thought it would be a great idea to re-balance and replace all the u-joints and the carrier bearing on the driveshaft while I am at it. Upon pulling the slip yoke out of the transfer case, I noticed a grooved line on the outer diameter of the slip yoke. When I had brought in the driveshaft for re-balance, I was told that the transfer case bushing may have caused it and that I should replace it, along with replacing the output shaft seal. The slip yoke was replaced but with a new one that didn't have the big dampening collar (or whatever it is called).

At this time, I have the driveshaft back, replaced all the u-joints, and will likely wait until I can replace the pinion and output shaft seal along with pressing in a new bushing. Man, this project is a PITA so far!

Consider upgrading to the one piece aluminum driveshaft and eliminate the carrier bearing. That is what i did on my 06 Megacab.
 

TimCasa

Member
December 2019:

After getting the rear driveshaft balanced, I replaced the u-joints and carrier bearing on them. I was regretting the fact that I didn't mark the driveshaft for reference to install it back onto the axle. However, i was told that it wasn't necessary since it was rebalanced and (essentially) replaced.

Working under a truck to install the shaft was difficult because was heavy! Not to mention, if you slightly slide the yoke in the transfer case, the holes will always likely not align at the axle.

After spending some time under the truck, i took a good look at the transfer case and axle pinion seal to realized they were weeping.

I had initially challenged myself to replace the pinion seal on the axle, the tail shaft bushing and seal, but finals were coming up and had no time.

This time around, i went to a professional to have the work done. Turns out, there were so much metal particles from the transfer case and the rear axle that was necessary to have them rebuilt. I could not believe my mechanic at first, but he allowed me to actually see what was going on in both boxes.

I also got to learn that the front driveshaft had a divet in which a grease fitting hibernated, untouched. I was told that the front shaft was bound to have broke apart while driving soon, with costly damage to the t-case, transmission and possibly hitting the fuel tank.

Needless to say, i got the drivetrain rebuilt regardless of the potential shaft failure. I was also recommended to switch to full float hubs to circumvent greasing that cardan joint every oil change.

I didn't go with full floats just yet, but part of christmas did come early for me!
Upgrade.jpg

After spending money for someone else's time, i think i'll do this install under my own shade tree after finals. I also can't wait to throw in juicy suspension to accommodate this set-up!
 

TimCasa

Member
January 2020:

New year, new steering!

20200110_173029.jpg

To start things off, I swapped out the old steering shaft with a Borgeson. I wish I had taken photos of the process, but it was more important to conduct a brute-force install filled with swearing and banging things along the way. I thought I had purchased the wrong product until I realized the shaft is telescopic! Once I was almost done with buttoning up the project, I drilled a dimple onto the mounting surface of the steering box end to ensure the tension nut from the shaft created a good friction point onto the steering box. I also flushed out the power steering fluid from the reservior. While there is much more to improve on the steering response, the Borgeson shaft alone is a night and day difference on steering. I'll have to reconsider swapping out the hydrobooster and, potentially, the steering box as well. I'll likely go as far as getting a steering box brace, too.

Next up, this:

20200110_174118.jpg

08.5+ Synergy T-style steering kit with a King steering stabilizer! Now, most would argue that the steering stabilizer is an overkill and that a less-expensive stabilizer would suffice. I wouldn't argue with you! However, I am satisfied with the purchase so far.

20200110_174743.jpg

Toe out, anyone? I wish I was able to upload the full photo without cutting some parts out. Anyway, it's steering refresh time! I did not have the death wobble; however, I love being proactive on the issue. So, out with the old.

20200110_175040.jpg
In with the new. Surprisingly, I was able to get the factory-spec 1/8" toe-in, so it tracks straight! Getting the pitman arm out was the toughest. The self-help autoshop I did this install at was baller, as it had a Snap-On pitman arm puller as it has the taper to fit between the steering box and the pitman arm. Since this is a 3rd gen, I also had to get the updated pitman arm to work with the t-style steering kit. The draglink was a bit of a pain to install, even though I had locked the steering wheel. The biggest challenge was tightening the jam nut to 300-ft.lb.
What I did was use a big crescent wrench and tightened using all my strength. I then put a bottle jack underneath the handle-end of the wrench and jacked it up until the nut turned an extra 45 degrees. Golden.
 

TimCasa

Member
What's the point of a good steering kit without refreshing the rest of the components? Well, there isn't a good one.

20200110_172557.jpg


Carli Ball-Joints in the works! I got the chance to clean out my Harbor Freight grease gun and put in the new grease Carli provides with the ball joint kit.

20200110_172625.jpg

Got both ball joints pressed out! I was disappointed to see that a knurled ball joint was used for the lower, but I managed to swell the bore to ensure there is enough clamping force for the Carlis. Although I had full access to professional-grade tools, I still went ahead and cranked down on the press kit by hand to determine if the ball joints caught on to the bore and potentially damaged the new ball joints.

Also during this time, I was able to align the steering wheel with the wheel as well. So, for those looking to upgrade their steering kit, I highly suggest purchasing the Synergy over the Mopar 08+ kit as self adjustment for alignment is shade tree mechanic friendly.

Oh! I also installed the Carli track bar with the whole steering set up! I will definitely upload a photo of it when I get the chance.
 

Forum statistics

Threads
188,197
Messages
2,903,675
Members
229,665
Latest member
SANelson
Top