You are using an out of date browser. It may not display this or other websites correctly.
You should upgrade or use an alternative browser.
You should upgrade or use an alternative browser.
2004 Tacoma SAS
- Thread starter 8sixFabrication
- Start date
8sixFabrication
Active member
Yeah, I plan on running them. I am trying to retain ABS so I need to keep the drive flangesAre you running the drive flanges on the front? Iirc, mini truck selectable hubs will work on that axle as well. Can’t remember if solid axle or ifs spline count, though
8sixFabrication
Active member
I decided to take the day off from work, and squeeze in a little more. It wasn't a ton of time, but good progress.
I was also able to get ahold of Marlin and get the stud problem resolved, so that's cool.
First thing was to get the knuckle wipers/tins put together and start packing the knuckles with grease. A buddy who works at our local Land Cruiser shop gave me a neat tip, to coat the felts with grease. It seemed like a good idea to keep as much moisture from trapping in them, so I coated both sides with some grease to see how it works out.
After getting that sorted, I moved onto the RCVs. It was a pretty big struggle to get the tone rings on them. I fought them for a while due to not really having anything to easily get them on before taking a lunch break and doing a little research. After a few minutes reading a thread on ih8mud, I decided to try heating them up. That worked well using a propane torch and evenly heating them to get the rings installed.
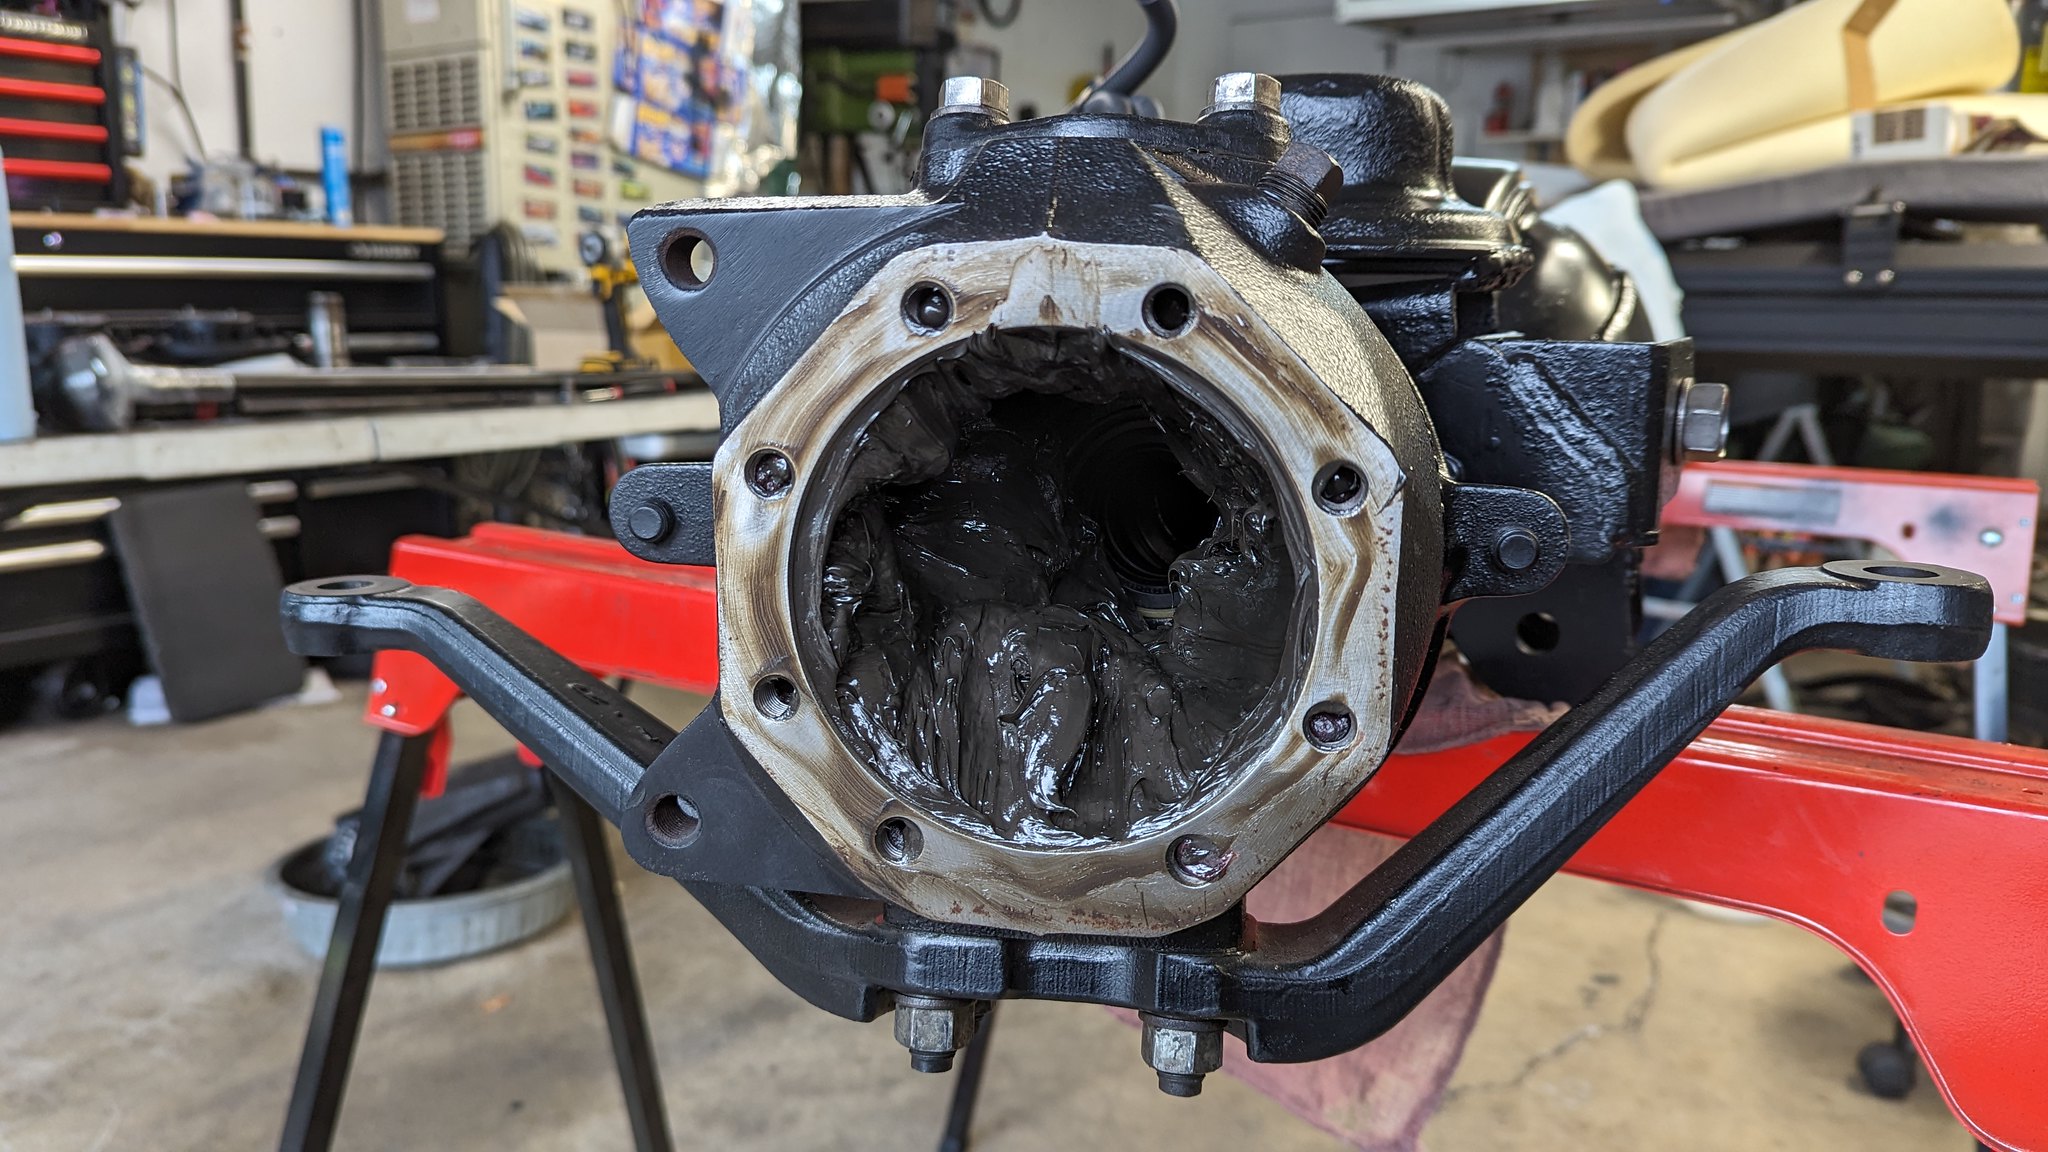
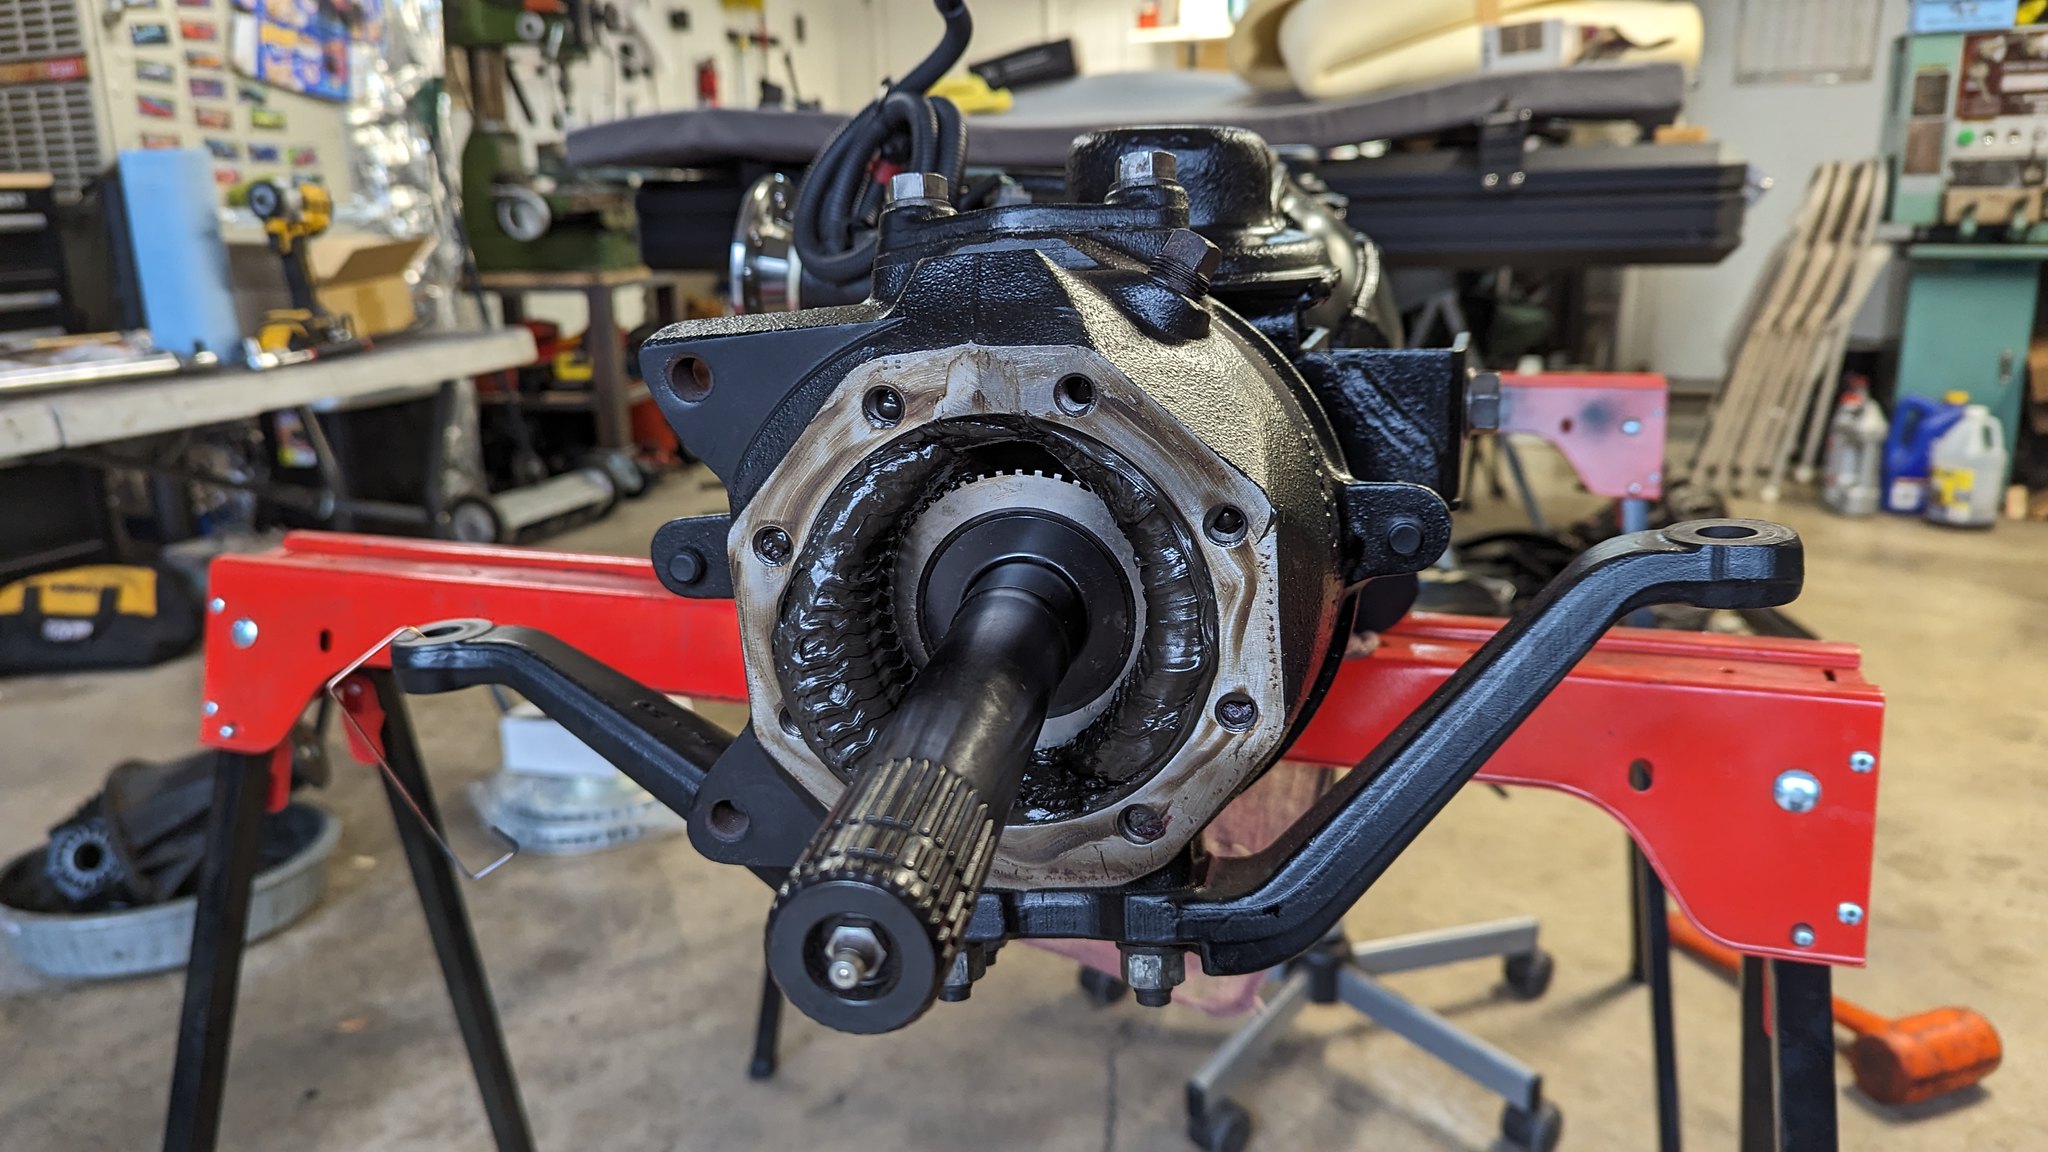
With that fight being over, I got the spindles installed and ABS sensors in. Now I just need to get the bearings/races, rotors and hub studs onto the hubs, then I can install those and it should be ready to put back in the truck for the final time!
I am going to try and sneak some work in on it in the evenings after the gym this week and hopefully have it back in the truck Friday. We shall see what life has in store though.
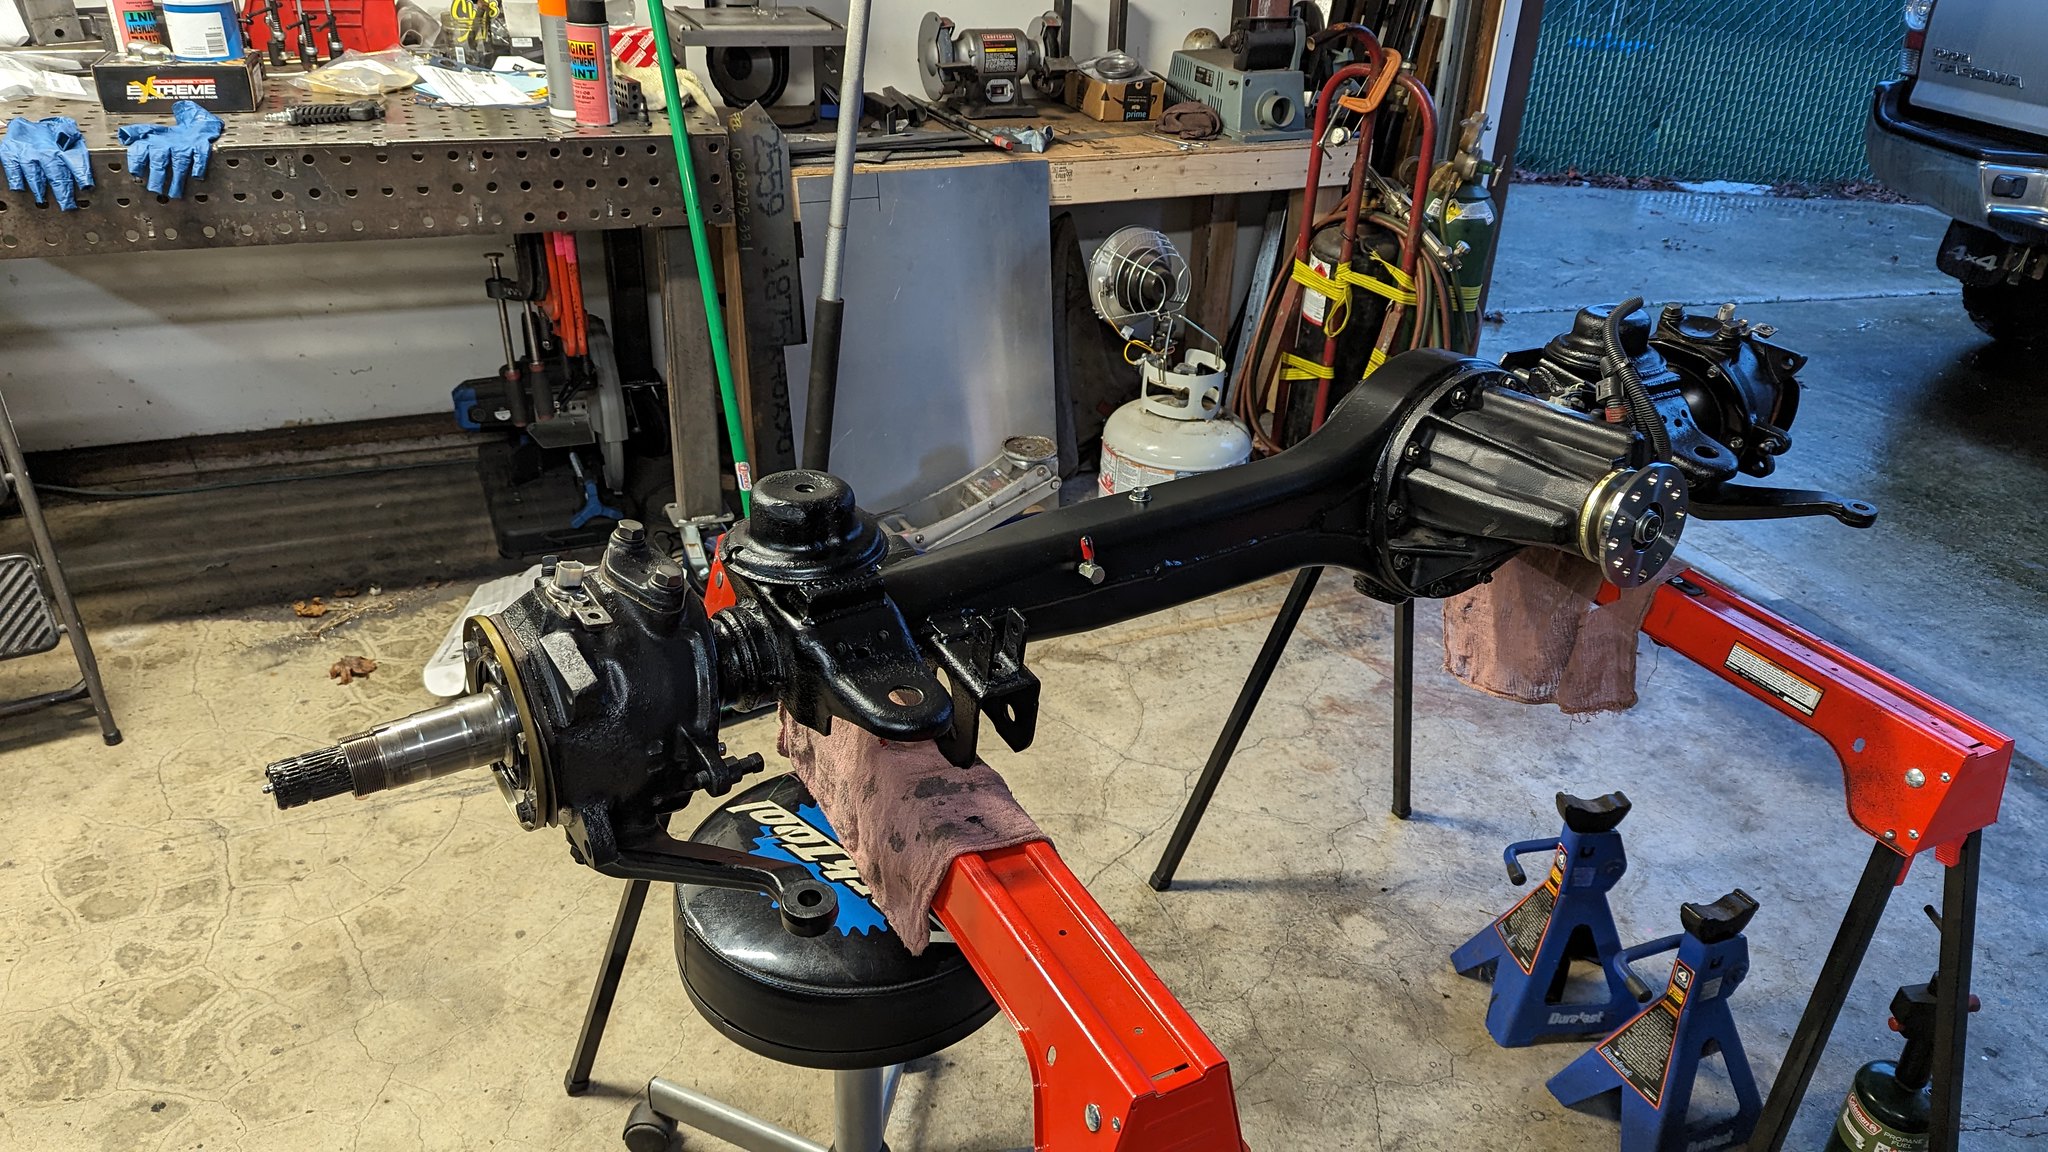
I was also able to get ahold of Marlin and get the stud problem resolved, so that's cool.
First thing was to get the knuckle wipers/tins put together and start packing the knuckles with grease. A buddy who works at our local Land Cruiser shop gave me a neat tip, to coat the felts with grease. It seemed like a good idea to keep as much moisture from trapping in them, so I coated both sides with some grease to see how it works out.
After getting that sorted, I moved onto the RCVs. It was a pretty big struggle to get the tone rings on them. I fought them for a while due to not really having anything to easily get them on before taking a lunch break and doing a little research. After a few minutes reading a thread on ih8mud, I decided to try heating them up. That worked well using a propane torch and evenly heating them to get the rings installed.


With that fight being over, I got the spindles installed and ABS sensors in. Now I just need to get the bearings/races, rotors and hub studs onto the hubs, then I can install those and it should be ready to put back in the truck for the final time!
I am going to try and sneak some work in on it in the evenings after the gym this week and hopefully have it back in the truck Friday. We shall see what life has in store though.

8sixFabrication
Active member
Small progress report.
I had some struggles getting this thing back together, but it should do for now.
The other evening I got the bearing races pressed into the hubs, bearings packed with grease, and the hubs/rotors on.
After that was figured, I ran into a snafu with the drive flanges. The cap wouldn't fit. After getting some info from some buddies at Land Cruiser NW, I realized I needed the "long" flanges that were on the 95/96 axles. Which is fine because as my buddie pointed out, the splines inside the short flanges wear over time, causing slop. So now I have the correct ones, and they shouldn't have any slop. Those got painted and installed
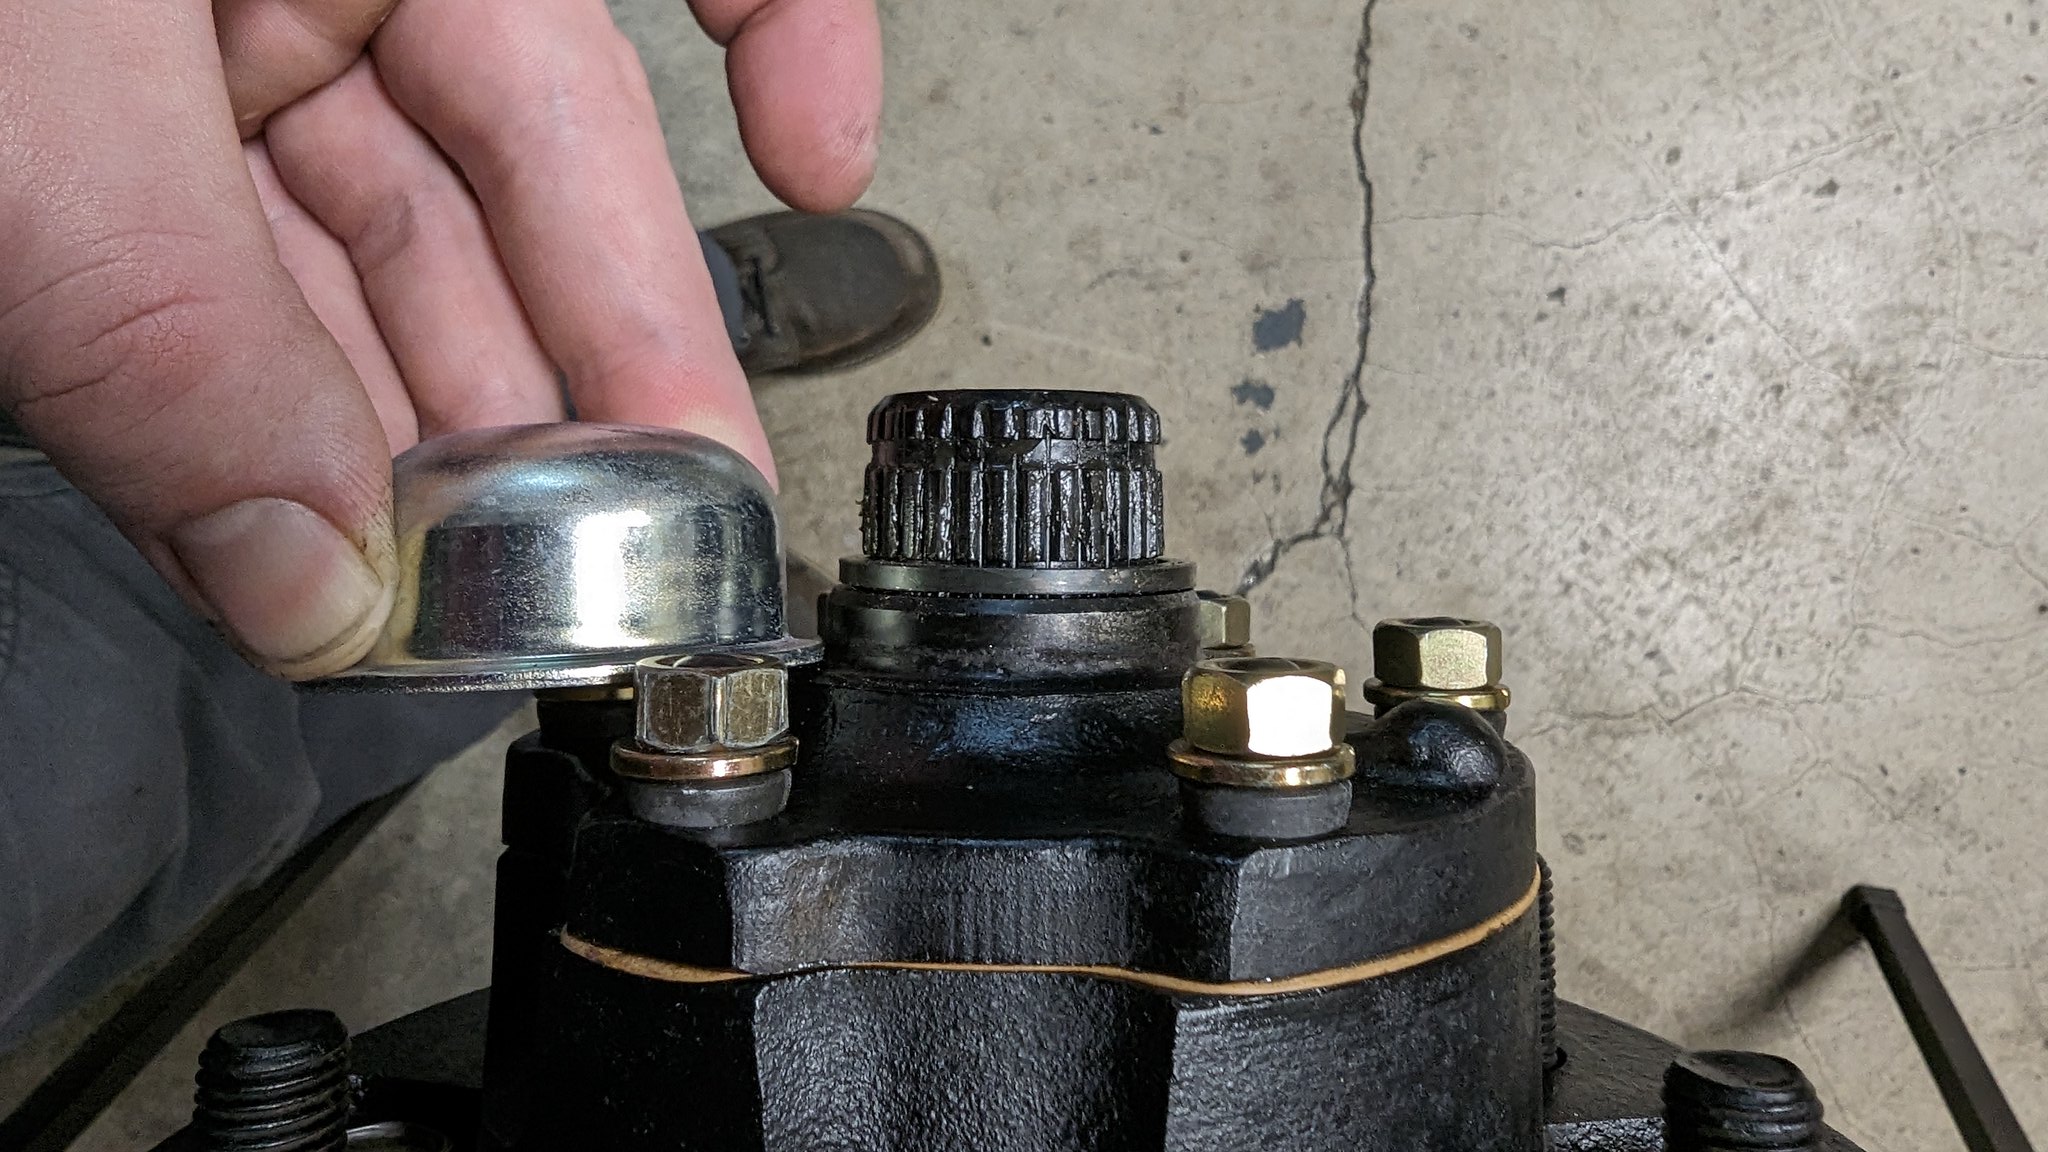

Then I installed the new hub studs which is where I had my next issue.
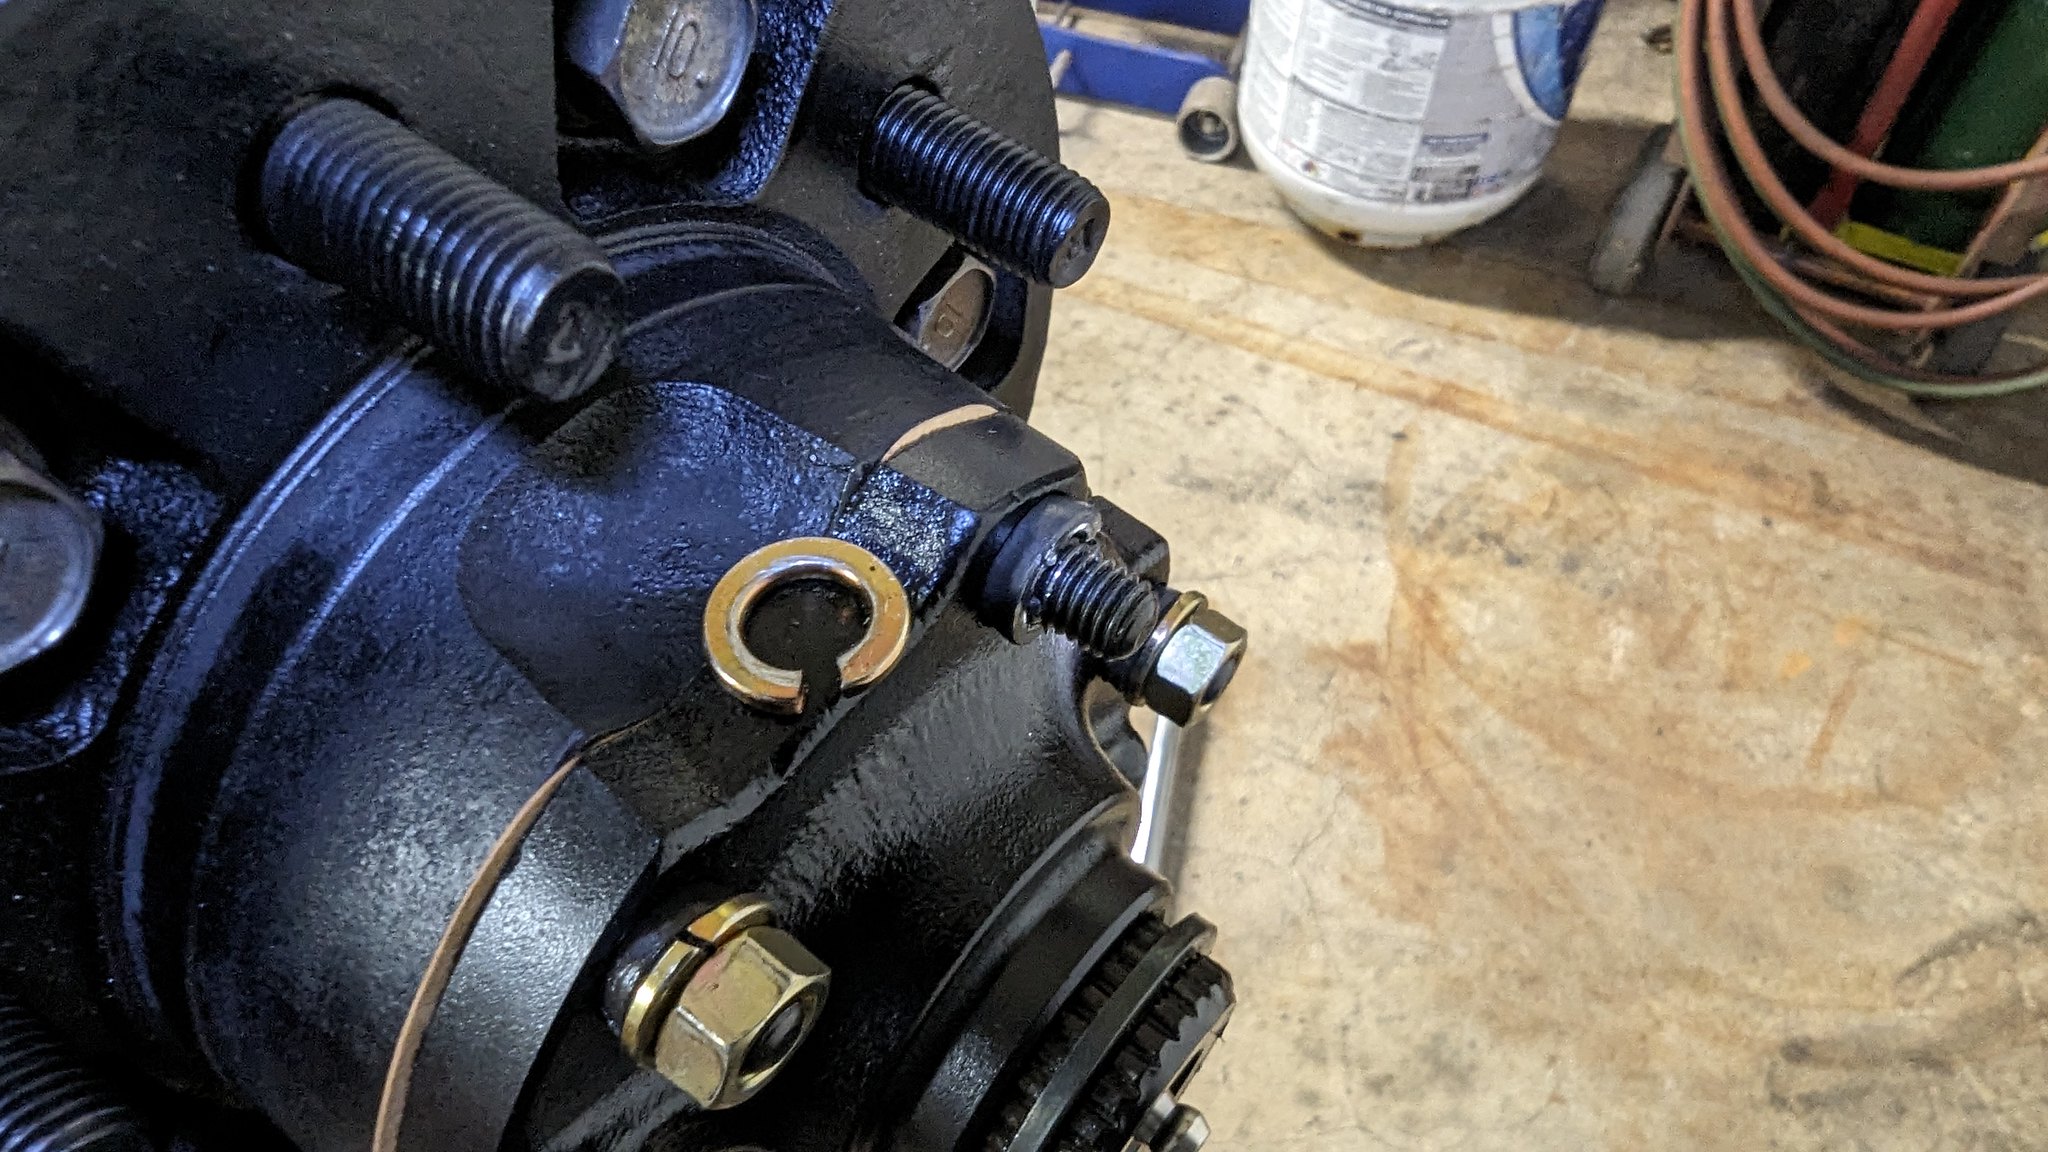
These kits from Marlin use a split washer, which doesn't play nice with the cone washers. Factory had flat washers which makes more sense. The material in the split washer is soft and I couldn't even hit the torque spec before they were messed up. They even damaged the threads a little on the studs and dug into the cone washer. I was able to throw back on the stock washers and get them to torque, but I will probably order some stuff from the dealership because I have a couple oddball washers in there(somehow there's only 10 of the 12 I needed for flat washers?)
I am pretty disappointed in these Japanese made fasteners that Marlin has. Marlin has been great with their customer service, and I know they don't make these. I will still buy products from them, probably not these stud kits anymore though. From now on, I will buy OEM for the little extra that it costs.
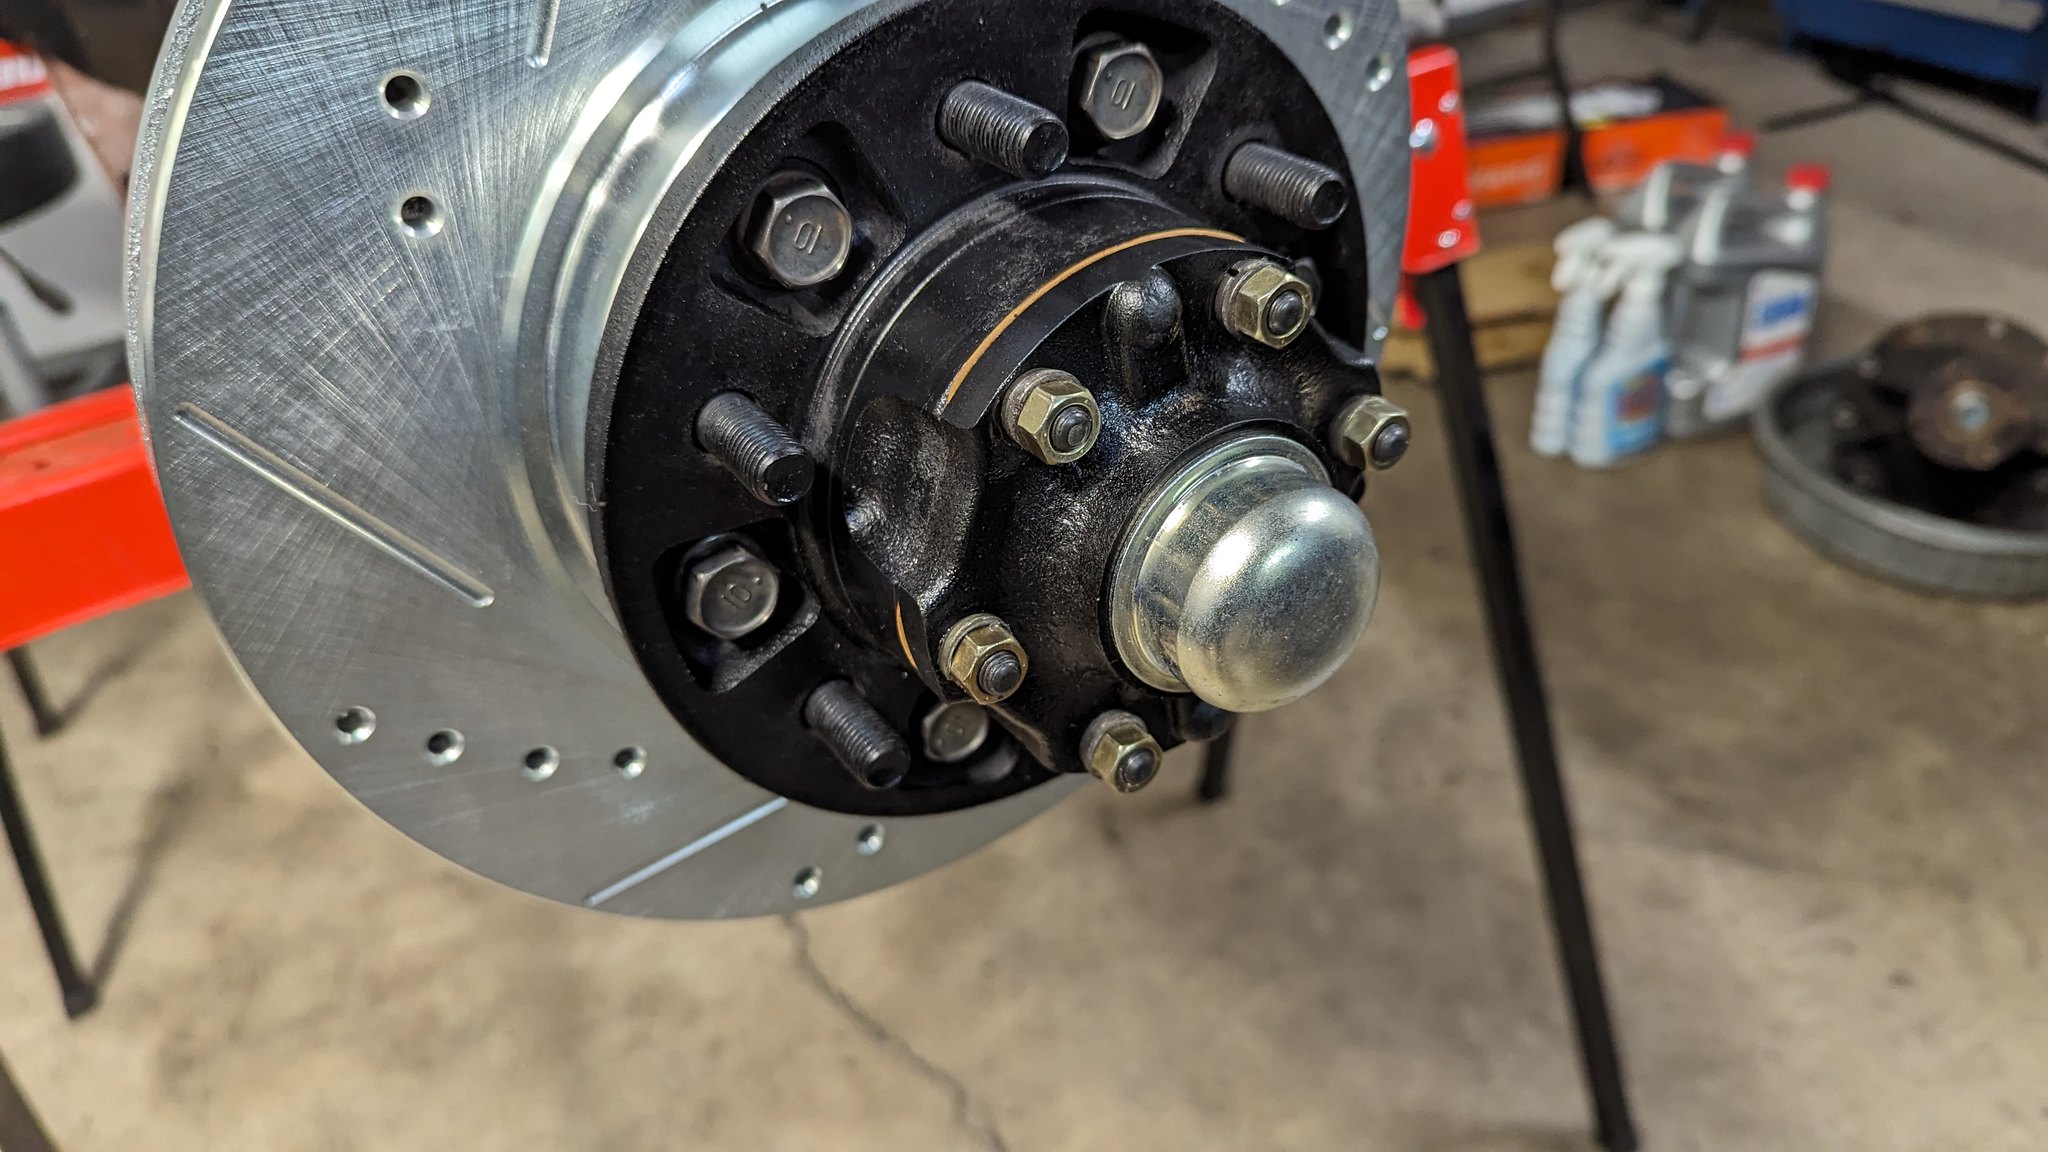
With those issues resolved, I finally had a complete axle again. That delayed things, but it was a nice checkpoint.
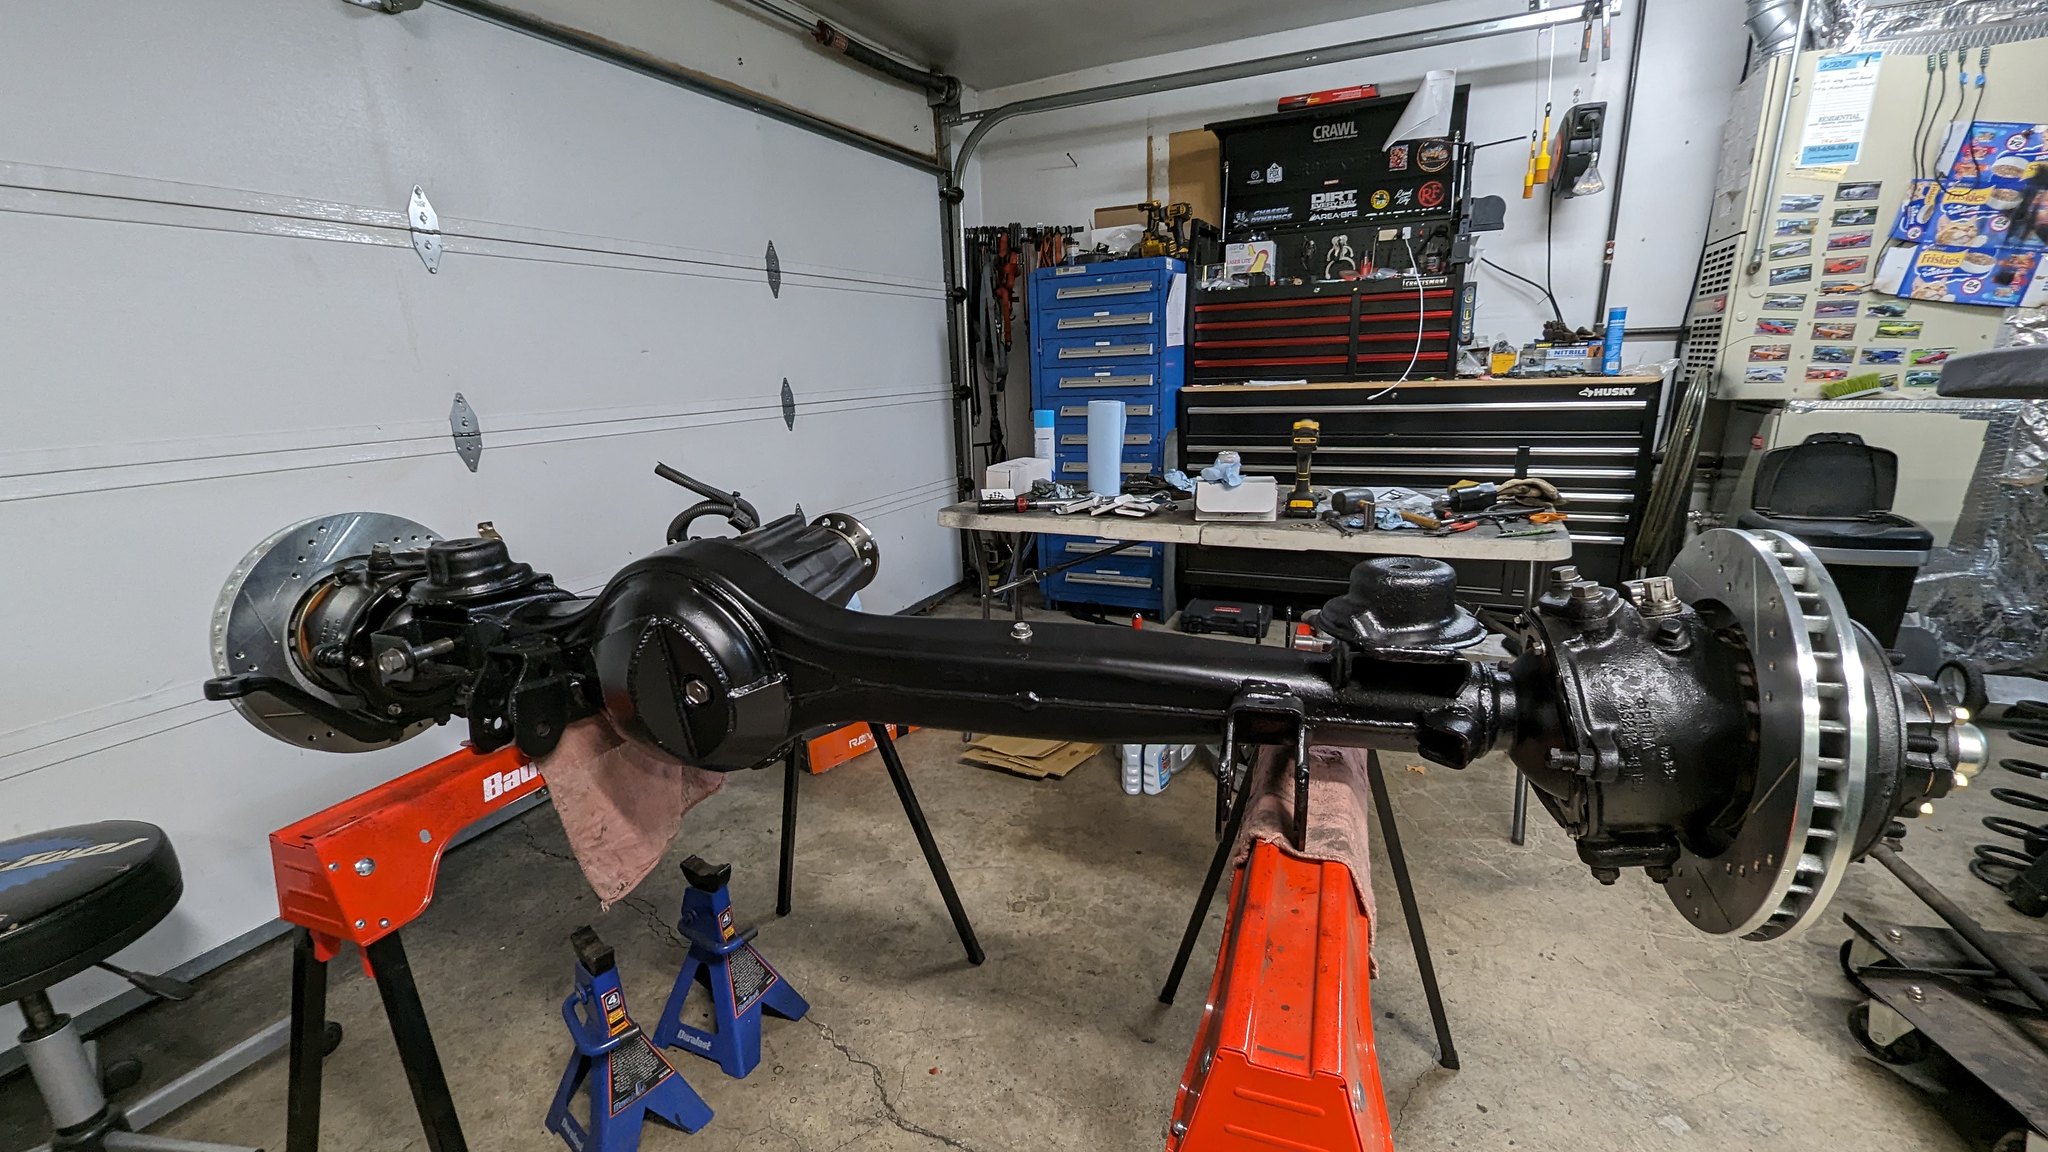
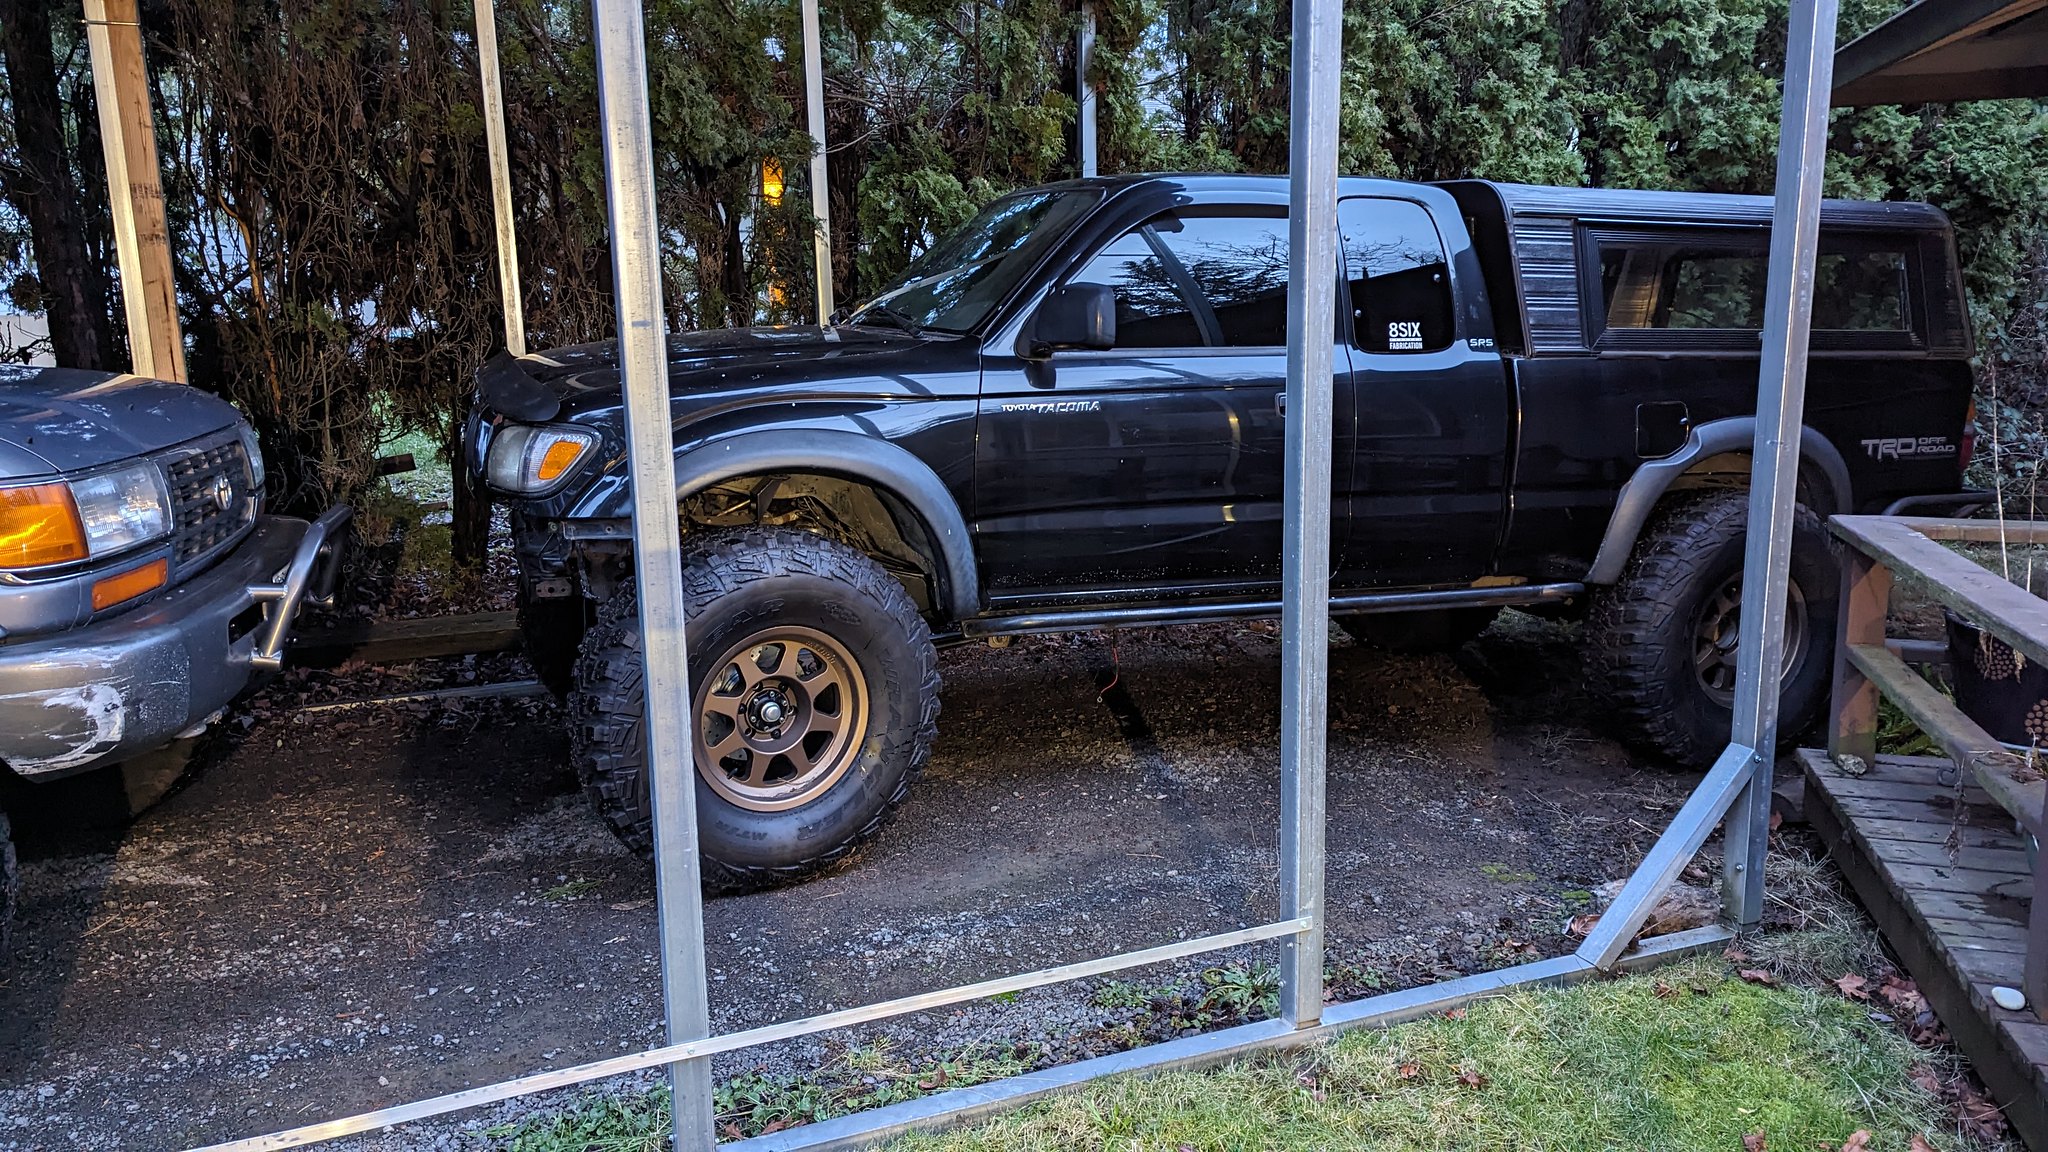
This evening I had a little time to get the axle back under the truck. It's certainly not as far along as I hoped by now, but I sort of need to boot this project from the garage for a little bit while I work on some other stuff. I probably wont be making any progress on this for a couple weeks at best, but hopefully I can get back onto it soon. For now, it can sit halfway under the carport and let some more moss grow on the canopy

I had some struggles getting this thing back together, but it should do for now.
The other evening I got the bearing races pressed into the hubs, bearings packed with grease, and the hubs/rotors on.
After that was figured, I ran into a snafu with the drive flanges. The cap wouldn't fit. After getting some info from some buddies at Land Cruiser NW, I realized I needed the "long" flanges that were on the 95/96 axles. Which is fine because as my buddie pointed out, the splines inside the short flanges wear over time, causing slop. So now I have the correct ones, and they shouldn't have any slop. Those got painted and installed


Then I installed the new hub studs which is where I had my next issue.
These kits from Marlin use a split washer, which doesn't play nice with the cone washers. Factory had flat washers which makes more sense. The material in the split washer is soft and I couldn't even hit the torque spec before they were messed up. They even damaged the threads a little on the studs and dug into the cone washer. I was able to throw back on the stock washers and get them to torque, but I will probably order some stuff from the dealership because I have a couple oddball washers in there(somehow there's only 10 of the 12 I needed for flat washers?)
I am pretty disappointed in these Japanese made fasteners that Marlin has. Marlin has been great with their customer service, and I know they don't make these. I will still buy products from them, probably not these stud kits anymore though. From now on, I will buy OEM for the little extra that it costs.

With those issues resolved, I finally had a complete axle again. That delayed things, but it was a nice checkpoint.


This evening I had a little time to get the axle back under the truck. It's certainly not as far along as I hoped by now, but I sort of need to boot this project from the garage for a little bit while I work on some other stuff. I probably wont be making any progress on this for a couple weeks at best, but hopefully I can get back onto it soon. For now, it can sit halfway under the carport and let some more moss grow on the canopy


Jeremy P.
Adventurer
Are the Landcruiser tone rings and sensors going to give the correct signal for the tacoma? I had thought of trying to do something to add tone rings to the Landcruiser hub (I'm running locking hubs) but haven't bothered so I just have all the dashboard lights on.Yeah, I plan on running them. I am trying to retain ABS so I need to keep the drive flanges
8sixFabrication
Active member
Sorry I never saw this post. I believe they should work, The amount of teeth is the same as the original tone rings. I believe I even tested the resistance values of the ABS sensors too and they're the sameAre the Landcruiser tone rings and sensors going to give the correct signal for the tacoma? I had thought of trying to do something to add tone rings to the Landcruiser hub (I'm running locking hubs) but haven't bothered so I just have all the dashboard lights on.
8sixFabrication
Active member
The time has come to make the final push to get this truck back on the road! Unfortunately, life has has been chaos lately, causing months of delays on things and preventing me from getting back onto this. In March, I lost my mom pretty swiftly to cancer, and the fall out from all that really put things on hold.
Between that, needing to wrap up the renovation on my living room, pushing out the last commitment I had from the garage (this sweet Datsun 260Z), and the wife's 80 series needing some last minute maintenance, everything got pushed out several months. The plan originally was to get back onto this beginning of April, but here we are.

No real updates besides the truck being back in the garage ready to get loved! We're hoping to go to Moab this fall and take this, so the fire is really under my butt to get this done. Starting next weekend, I plan to hit the ground running and start knocking stuff out!

Between that, needing to wrap up the renovation on my living room, pushing out the last commitment I had from the garage (this sweet Datsun 260Z), and the wife's 80 series needing some last minute maintenance, everything got pushed out several months. The plan originally was to get back onto this beginning of April, but here we are.

No real updates besides the truck being back in the garage ready to get loved! We're hoping to go to Moab this fall and take this, so the fire is really under my butt to get this done. Starting next weekend, I plan to hit the ground running and start knocking stuff out!

8sixFabrication
Active member
This afternoon, some unexpected progress was had thanks to a positive Covid test  . I don't feel crummy enough to sit on the couch all day, but I can't work at my normal pace because I still don't feel 100%.
Either way, I will make the best of being stuck at home until I am clear to go back to work.
This afternoon, I pulled the steering shaft, and firewall plate out. The shaft was temporary, and meant to get a proper length and use to move the truck around.

I took some measurements to make sure I maintained the same length, and kept things clocked. From there I cut the part needed off the end at the steering column side, and cut the weld at the plate for the rag joint. The piece I cut with the splines at the steering column end got machined to slide into the new shaft, as to keep things as true as possible. I machined the new shaft from .750" cold roll round bar. The opposite end got machined down to slide into the rag joint flange. Everything was machined to within .001-.002", to ensure a good fit. From there I TIG welded them together.
Once that was welded, I cleaned it up and painted it, along with the u-joint at the steering column because it was rusting some. I still have some things to sort out on the firewall plate, but wanted the paint to cure on this before the final install.


After that, I decided to pull the steering box, thinking I would clean it and paint it so I can install it for the final time. I decided not to paint it after cleaning it. Personally, I think assembled parts, hosed in paint looks like crap. Especially when they are originally equipped with zinc plated fasteners.
I still needed to tend to the way the new high pressure line connects to the box. It took me quite a while to get the surface flat and square so I had a good fit against the compression washer. But with some patience, a grinder, and a hand file to keep the final product flat... I was able to get it to a place where I was happy. You can see the adapter to an AN fitting sitting there in the second photo. That will be what adapts into the new high pressure line that I had custom made by a really cool outfit down in Eugene OR.
Before sorting all that out, I did remove the pitman arm, cleaned it up an got it painted.


With the box done, I decide to install it for the final time. I did decide to cave, and just use the SAE hardware that came with the mounting kit. I generally prefer to keep all metric hardware if possible, but that doesn't always seem realistic. Hopefully I can keep this momentum moving forward.

Either way, I will make the best of being stuck at home until I am clear to go back to work.
This afternoon, I pulled the steering shaft, and firewall plate out. The shaft was temporary, and meant to get a proper length and use to move the truck around.

I took some measurements to make sure I maintained the same length, and kept things clocked. From there I cut the part needed off the end at the steering column side, and cut the weld at the plate for the rag joint. The piece I cut with the splines at the steering column end got machined to slide into the new shaft, as to keep things as true as possible. I machined the new shaft from .750" cold roll round bar. The opposite end got machined down to slide into the rag joint flange. Everything was machined to within .001-.002", to ensure a good fit. From there I TIG welded them together.
Once that was welded, I cleaned it up and painted it, along with the u-joint at the steering column because it was rusting some. I still have some things to sort out on the firewall plate, but wanted the paint to cure on this before the final install.


After that, I decided to pull the steering box, thinking I would clean it and paint it so I can install it for the final time. I decided not to paint it after cleaning it. Personally, I think assembled parts, hosed in paint looks like crap. Especially when they are originally equipped with zinc plated fasteners.
I still needed to tend to the way the new high pressure line connects to the box. It took me quite a while to get the surface flat and square so I had a good fit against the compression washer. But with some patience, a grinder, and a hand file to keep the final product flat... I was able to get it to a place where I was happy. You can see the adapter to an AN fitting sitting there in the second photo. That will be what adapts into the new high pressure line that I had custom made by a really cool outfit down in Eugene OR.
Before sorting all that out, I did remove the pitman arm, cleaned it up an got it painted.


With the box done, I decide to install it for the final time. I did decide to cave, and just use the SAE hardware that came with the mounting kit. I generally prefer to keep all metric hardware if possible, but that doesn't always seem realistic. Hopefully I can keep this momentum moving forward.

8sixFabrication
Active member
Today seemed to go fairly well. I started by wrapping up the final parts for the firewall plate. I made a replacement piece of rubber out of better material to replace the ghetto piece of hose. Then I machined a plug for the old pass through for the rack and pinion to the steering column. Luckily I had some Delrin laying around that worked perfectly to machine and press in. I didn't want to permanently block the hole because it looks like a nice place to have some wire pass through for some accessories in the future.
With the paint cured on the steering shaft, I re-assembled the rag joint and proceeded onto the final install of the steering shaft.
I also used a little anti-seize on the splines, and installed the pitman arm for the final time.


With those things wrapped up, I wanted to move onto the steering links. The one from the box to the knuckle is too short and weak. The one behind the axle is too weak.
A while back I ordered everything to make new steering links, in addition to a chunk of DOM tubing. I'm disappointed that I had to use weld in bungs from the company I refuse to work with, but it was my only option. So hopefully they don't fail like every other part I have had from them, has. If they do, I will have Sky make me some replacement bars. I found out long after I had these parts that they will thread DOM tube which would have been my preferred way to do this.
I am also short 1 TRE, because I had one go bad on my 85 pickup and needed one in a pinch before a trip. So a replacement has already been ordered.

I used a LH thread and RH thread TRE, threaded into the bungs with 1/2" of thread exposed on each which should give plenty of adjustment. I made sure the steering arm was square, and the wheels were straight forward as I could, then I attached them to the knuckle and pitman arm. From there I measured between the bungs to get the length needed, to cut the DOM to.
Then, I pulled those off, and set them next to the tie rod to get that length.


With my DOM cut, I put them in my lathe to true up the ends, and add an arbitrary bevel for weld prep. From there I TIG welded them together. I got lucky that I had enough Argon in my bottle to get through this, but it was close.
After those cooled off, I scuffed them, cleaned em', then primed and painted them.
While out in the garage working on this stuff, I remembered that there are some parts I will be needing soon to tackle the rear suspension. So I got those parts ordered up this evening. unexciting update, but some cool shiny parts should be showing up soon!


With the paint cured on the steering shaft, I re-assembled the rag joint and proceeded onto the final install of the steering shaft.
I also used a little anti-seize on the splines, and installed the pitman arm for the final time.


With those things wrapped up, I wanted to move onto the steering links. The one from the box to the knuckle is too short and weak. The one behind the axle is too weak.
A while back I ordered everything to make new steering links, in addition to a chunk of DOM tubing. I'm disappointed that I had to use weld in bungs from the company I refuse to work with, but it was my only option. So hopefully they don't fail like every other part I have had from them, has. If they do, I will have Sky make me some replacement bars. I found out long after I had these parts that they will thread DOM tube which would have been my preferred way to do this.
I am also short 1 TRE, because I had one go bad on my 85 pickup and needed one in a pinch before a trip. So a replacement has already been ordered.

I used a LH thread and RH thread TRE, threaded into the bungs with 1/2" of thread exposed on each which should give plenty of adjustment. I made sure the steering arm was square, and the wheels were straight forward as I could, then I attached them to the knuckle and pitman arm. From there I measured between the bungs to get the length needed, to cut the DOM to.
Then, I pulled those off, and set them next to the tie rod to get that length.


With my DOM cut, I put them in my lathe to true up the ends, and add an arbitrary bevel for weld prep. From there I TIG welded them together. I got lucky that I had enough Argon in my bottle to get through this, but it was close.
After those cooled off, I scuffed them, cleaned em', then primed and painted them.
While out in the garage working on this stuff, I remembered that there are some parts I will be needing soon to tackle the rear suspension. So I got those parts ordered up this evening. unexciting update, but some cool shiny parts should be showing up soon!


grizzlypath
Active member

I'm learning about SAS as it's something I'm interested in doing one day. This is the first time I've seen a front spring bucket/bracket that is bolt on, is that normal? I like the modularity; typically I see hoops or a box that is fully welded on.
8sixFabrication
Active member

I'm learning about SAS as it's something I'm interested in doing one day. This is the first time I've seen a front spring bucket/bracket that is bolt on, is that normal? I like the modularity; typically I see hoops or a box that is fully welded on.
I don't think a ton of folks actually use this same setup with coils and shocks, so it's hard to say. But I do often see people fully weld everything. I wanted the ability to adjust my ride height once I have the full weight of the truck on the suspension, and this setup allows me to move the shock and coil buckets as 1 unit and not change the travel any
8sixFabrication
Active member
Today, some progress was made, but it was mostly just chasing my tail and running into problems  . Most of todays progress was done in ping-pong fashion, bopping between different tasks haha.
First bit of progress was getting what I could done with the steering links. I am waiting on the final TRE before I can cross that off the list. For now, the drag link will hang at the end off a bungee cord.


Next I wanted to get the calipers out of the way. I ordered rebuild kits from the dealership a while back. Well, while starting to clean these, and getting 1 part torn apart, I realized that there was way too much rust to save these. Fortunately, a local Napa had some re-man's in stock, so I sent these as cores with the wife to pick up some new calipers. I'm not too keen on using these, but they'll probably do fine.
I got 1 put on with the fancy PowerStop performance pads and such to start getting an idea on routing the brake line.


Another thing that got done was getting the lower knuckle stud hardware replaced. It went together well, and gives me more confidence that my hunch about Marlin getting a bad batch of hardware being correct.


Unfortunately the next 2 small things I needed to replace, in order to cross this specific line off my list, opened a can of worms.
When I installed these new hub stud kits back in January, I was pretty displeased with the split washers replacing the flat washers like from the factory. So I installed what flat washers I had. When I ordered all the knuckle stud hardware from the dealership, I ordered 2 flat washers for the hub studs(I was short 2). Well, when I went to install those 2 washers this afternoon, and torque them down, the stud stripped before it hit the torque spec.
While I was installing the new knuckle studs, I was wondering if I could trust the hub studs, and it seems like this gives me the answer I needed. However, it's an expensive fix (about $140 through Toyota). So for the 3rd time in less than 24 hours, I hopped online and ordered more crap through my local dealership lol. So for now, I wait on more parts to complete that.

Something else I did today, was dig out the sway bar, clean it, and lay it roughly into place to get the idea mill going for mounting it on the chassis side. It will be tricky to get around the exhaust. At least its in place so I can slowly work the mounts out in my head.
Today didn't feel like I got much done, even though I did make some progress. It just felt like I spun my wheels, and towards the end I was pretty frustrated with everything. So I called it a day early, with hopes that it goes smoothly next time.

First bit of progress was getting what I could done with the steering links. I am waiting on the final TRE before I can cross that off the list. For now, the drag link will hang at the end off a bungee cord.


Next I wanted to get the calipers out of the way. I ordered rebuild kits from the dealership a while back. Well, while starting to clean these, and getting 1 part torn apart, I realized that there was way too much rust to save these. Fortunately, a local Napa had some re-man's in stock, so I sent these as cores with the wife to pick up some new calipers. I'm not too keen on using these, but they'll probably do fine.
I got 1 put on with the fancy PowerStop performance pads and such to start getting an idea on routing the brake line.


Another thing that got done was getting the lower knuckle stud hardware replaced. It went together well, and gives me more confidence that my hunch about Marlin getting a bad batch of hardware being correct.


Unfortunately the next 2 small things I needed to replace, in order to cross this specific line off my list, opened a can of worms.
When I installed these new hub stud kits back in January, I was pretty displeased with the split washers replacing the flat washers like from the factory. So I installed what flat washers I had. When I ordered all the knuckle stud hardware from the dealership, I ordered 2 flat washers for the hub studs(I was short 2). Well, when I went to install those 2 washers this afternoon, and torque them down, the stud stripped before it hit the torque spec.
While I was installing the new knuckle studs, I was wondering if I could trust the hub studs, and it seems like this gives me the answer I needed. However, it's an expensive fix (about $140 through Toyota). So for the 3rd time in less than 24 hours, I hopped online and ordered more crap through my local dealership lol. So for now, I wait on more parts to complete that.

Something else I did today, was dig out the sway bar, clean it, and lay it roughly into place to get the idea mill going for mounting it on the chassis side. It will be tricky to get around the exhaust. At least its in place so I can slowly work the mounts out in my head.
Today didn't feel like I got much done, even though I did make some progress. It just felt like I spun my wheels, and towards the end I was pretty frustrated with everything. So I called it a day early, with hopes that it goes smoothly next time.

8sixFabrication
Active member
Today yielded some decent progress. First thing I wanted to do, was rock out the panhard bar. As you can see, it was cobbled together to set the truck up.
I had a rear adjustable panhard bar that a buddy gave me a while back, that I decided to harvest the adjuster out of. There was also a pie wedge I cut into the original panhard to move its direction some, that I had to weld prep and weld up before welding in the adjuster.
Once that was done, and I had the temp sleeve cut out, I bolted both sides into the truck then tacked the adjuster into place. Then I pulled it out and rolled the dice that I had enough gas left on the TIG(I did), and I welded it up. I wanted to make sure I had good penetration considering the importance of a panhard.
After it was welded, I squirted it with some paint, then installed it once it was dry to the touch.


After that was done, I moved onto replacing the hard lines that went from the ABS module to the braided lines. The original ones were so badly corroded to save, that I ordered new ones from the dealership. The long one was a massive pain in the ass to remove and route into place.
After that I just did some small odd things like gather and start prepping the wiring for the ABS sensors, and getting a better idea on how I am going to hold the braded lines to the calipers.
I am luckily feeling much better now, so I will probably venture out into the world tomorrow for some supplies and more Argon for the TIG, which should set me up for lots more progress this weekend

I had a rear adjustable panhard bar that a buddy gave me a while back, that I decided to harvest the adjuster out of. There was also a pie wedge I cut into the original panhard to move its direction some, that I had to weld prep and weld up before welding in the adjuster.
Once that was done, and I had the temp sleeve cut out, I bolted both sides into the truck then tacked the adjuster into place. Then I pulled it out and rolled the dice that I had enough gas left on the TIG(I did), and I welded it up. I wanted to make sure I had good penetration considering the importance of a panhard.
After it was welded, I squirted it with some paint, then installed it once it was dry to the touch.


After that was done, I moved onto replacing the hard lines that went from the ABS module to the braided lines. The original ones were so badly corroded to save, that I ordered new ones from the dealership. The long one was a massive pain in the ass to remove and route into place.
After that I just did some small odd things like gather and start prepping the wiring for the ABS sensors, and getting a better idea on how I am going to hold the braded lines to the calipers.
I am luckily feeling much better now, so I will probably venture out into the world tomorrow for some supplies and more Argon for the TIG, which should set me up for lots more progress this weekend

8sixFabrication
Active member
Todays progress wasn't full of a ton of photo worth stuff, but it still was nice to keep chipping away at the list.
First thing I did was run out for Argon, and parts. All my OEM parts came into my local dealership, so I snagged those today too.

Once I was home and able to get to work, I started by buttoning up some small details, swap out some hardware (including the Marlin hub stud stuff), Install the front shocks, and installing the final TRE and setting the drag link.
From there I needed to address the union in the brake lines between the soft line and the hard line. I made these right angle unions for this a while back, but I wasn't satisfied with the routing.

I made some plates to mount everything, and used some brass straight unions from the local auto parts store. I was then able to push forward on finishing the brakes. They still need to be bled, but they're ready! Tomorrow should bring more progress!


First thing I did was run out for Argon, and parts. All my OEM parts came into my local dealership, so I snagged those today too.

Once I was home and able to get to work, I started by buttoning up some small details, swap out some hardware (including the Marlin hub stud stuff), Install the front shocks, and installing the final TRE and setting the drag link.
From there I needed to address the union in the brake lines between the soft line and the hard line. I made these right angle unions for this a while back, but I wasn't satisfied with the routing.

I made some plates to mount everything, and used some brass straight unions from the local auto parts store. I was then able to push forward on finishing the brakes. They still need to be bled, but they're ready! Tomorrow should bring more progress!


8sixFabrication
Active member
More progress today! Not as much as I would have like to see, but I did have to run out for supplies a ton, so that's probably why.
First thing I tackled was the weld washers for where the radius arms bolt to the frame. I slotted the holes to give some adjustability at the alignment shop. I figured it could be set, then welded into place.
The slotted holes however only allow a portion of the sleeve in the bushing to contact the mount. So I had these little "c" shapes laser cut to fill those gaps. They were pretty tedious to weld onto these washers, but I am pretty happy with how they turned out.


With that done I was able to bolt those in with new OEM hardware. I also tightened up the hardware at the axle. I had to replace the forward bolts with longer, 5/8" fine thread grade 8 stuff, because the caster correction parts I made, made things too wide to use the stock stuff and have enough thread engagement inside the nut. Luckily, 5/8 is only about .004" smaller, so it's not a big deal.

From there I moved onto plumbing in the breather for the diff, as well as wiring in the ABS sensors. I used a generic breather at the end of some hose, and routed it up into the engine bay about where the master cyl is at, to keep it out of water and such. I also made a very basic little aluminum mounting tab to help route the hose, utilizing an existing threaded hole on the axle near the end of the shock. It made for some fairly simple hose routing and securing.
Right in the middle of soldering together the ABS harnesses, my soldering iron died, so I had to run to Hobo-Freight for something to get me by. Luckily it did the trick. I then secured everything together with a million zip ties. I am not super keen on how that looks, but it was the simplest solution for now, until I make sure everything works properly and find a better way of holding everything. I also added some small light springs to help pull everything towards the frame. I've used this method on my other truck and it works well.
Tomorrow I hope to wrap up the power steering system. That will allow me to move onto other parts of the truck for now.


First thing I tackled was the weld washers for where the radius arms bolt to the frame. I slotted the holes to give some adjustability at the alignment shop. I figured it could be set, then welded into place.
The slotted holes however only allow a portion of the sleeve in the bushing to contact the mount. So I had these little "c" shapes laser cut to fill those gaps. They were pretty tedious to weld onto these washers, but I am pretty happy with how they turned out.


With that done I was able to bolt those in with new OEM hardware. I also tightened up the hardware at the axle. I had to replace the forward bolts with longer, 5/8" fine thread grade 8 stuff, because the caster correction parts I made, made things too wide to use the stock stuff and have enough thread engagement inside the nut. Luckily, 5/8 is only about .004" smaller, so it's not a big deal.

From there I moved onto plumbing in the breather for the diff, as well as wiring in the ABS sensors. I used a generic breather at the end of some hose, and routed it up into the engine bay about where the master cyl is at, to keep it out of water and such. I also made a very basic little aluminum mounting tab to help route the hose, utilizing an existing threaded hole on the axle near the end of the shock. It made for some fairly simple hose routing and securing.
Right in the middle of soldering together the ABS harnesses, my soldering iron died, so I had to run to Hobo-Freight for something to get me by. Luckily it did the trick. I then secured everything together with a million zip ties. I am not super keen on how that looks, but it was the simplest solution for now, until I make sure everything works properly and find a better way of holding everything. I also added some small light springs to help pull everything towards the frame. I've used this method on my other truck and it works well.
Tomorrow I hope to wrap up the power steering system. That will allow me to move onto other parts of the truck for now.


Similar threads
- Replies
- 5
- Views
- 2K
- Replies
- 6
- Views
- 1K
- Replies
- 8
- Views
- 2K
- Replies
- 6
- Views
- 3K
