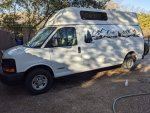
2005 Express Camper Build

Texas Aggie

Observer
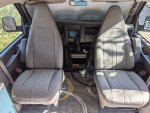
Compared to many builds on this site, this will be a pretty tame, low-key effort. But I wanted to document some of the things I've done and will do to my van - at least for my own purposes, and hopefully useful for others starting their own builds as well. I acquired the van from my father in February 2020 with only 40k miles, so I knew the van's history and that it had not been abused. He had the high top installed and had built a sleeping platform and some overhead storage areas soon after he bought it new in 2005. Over the years, the van became less of a camper and more of a hauler, so the sleeping platform was removed prior to me getting it. It's a cargo van with 1 option - the side windows in the cargo door. No cruise, bare bones radio (now with shot speakers) and the A/C was also barely blowing any air. The first priorities were to get a sleeping platform built and make the van more comfortable to drive. This is what it looked like when I acquired it:


Van side front.jpg

Van inside passenger side.jpg Van inside driver side.jpg
 
Last edited:

Texas Aggie

Observer
Here is the sleeping platform at various stages of construction. I used the existing aluminum angle supports (from the previous platform build) as a base for a pretty simple hinged platform. I wanted to be able to fold up the platform in case I ever needed to haul something big. They're not visible in the photos, but each side has a support leg in the center portion near the wall and near the split line. The support legs that are near the split line are hinged to fold against the bottom of the platform when the platform is raised.

Van bed platform bare.jpg Van bed platform covered.jpg

Van bed platform mattresses.jpgVan bed platform sheets.jpg

Van bed platform side spacer.jpg

The lumber, hinges and 3/8" plywood were all Home Depot sourced.

I chose the gray material (available here: Gray speaker carpet) because it was a lighter shade of gray than most of the speaker box material I'd seen.

The mattresses were bought on Amazon (available here: Twin narrow mattress). I decided on two separate narrow twin (30 x 75 inch) mattresses for a few reasons. The width at platform height was about 72 inches, so it was too narrow for a queen (80 inches wide). A full size mattress would fit, but at 54 inches wide it would have been a bit cramped for two, and would have left 18 inches of somewhat wasted space along the side. The twin narrow configuration provided the best fit from a width perspective and allowed some space along each side (about 6 inches) to function sort of like a night stand to place cell phones, flashlights, etc. Having two narrow mattresses also makes it easier to get them in and out of the van if we need to remove them, it allows me to stack them on one side of the platform if I only need to raise one side for hauling, and it probably makes for a better night sleep since my tossing/turning doesn't disturb my wife. I debated on getting thicker mattresses, but was somewhat concerned about overhead room. I wanted the platform high enough off the floor to store the porta-potti and the cooler, so that set the minimum height. The back portion over the sleeping platform is standard height (with storage between the original roof and the topper) so there wasn't a lot of vertical space to work with. I don't have a measurement from the top of the mattress to the roof, but it doesn't feel claustrophobic. It's not enough room for me to completely sit up comfortably, but my wife can barely do so (5'-10" vs. 5'-2"). We've slept on them for four nights so far, but they seem comfortable. The mattress selection was the first of many "analysis until paralysis" decisions I would make, but hopefully some of this info is helpful for others trying to decide what size mattress for their van.
 
Last edited:

Texas Aggie

Observer
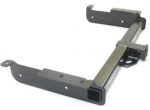
As shown in one of the photos above, the spare tire had been relocated to the inside of the van (because the stock location is a bit of a pain to access the tire). I ended up putting the original spare back in the stock location, but wanted a new spare that would be easier to access. I considered some of the rear door mounts, but didn't want the extra weight hanging on the rear door hinges. I also considered the Aluminess option, but didn't really want to spend that much. Using a spare tire carrier in the existing receiver hitch wasn't desirable because it would block access to both rear doors. My dad mentioned that he had planned to mount something that fit into the open end of the crossbar of the receiver hitch mount (see below), but hadn't found anything that would work. I came up with something that works for me, but this design comes with no warranties expressed or implied.
Van spare tire carrier hitch side view.png

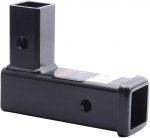
I found a 90 degree receiver hitch adapter on Amazon (available here: 90 degree hitch adapter) and bought two so I could add one on each end.


Van spare tire carrier right angle insert.jpg


The adapter was designed to be inserted into a receiver so that the adapter receiver end is vertical, but I turned it 90 degrees and inserted one into each open end of the cross bar:

Van spare tire carrier underneath.jpg Van spare tire carrier hitch receivers.jpg

I welded the adapters to the crossbar, but you could also drill holes in the crossbar and use a pin to secure them - but there would be some play between the adapter and crossbar if you didn't secure it with something in addition to a pin. Adding the two new receivers gave me a receiver that was basically centered underneath each rear door. I mounted the spare tire behind the drivers side door because the passenger side door has to be opened first. This configuration allows me to open the passenger side door without having to touch the spare tire.

I looked for a hitch mount spare tire carrier that would pivot/angle away from the van to allow access to the driver side door, but didn't really find anything I liked - so I ended up making my own by modifying a fairly heavy duty bike rack that had been gathering dust in my garage. It may not be a viable option for someone that doesn't already have a bike rack they're not using, but it worked for me. If anyone is interested in the bike rack/spare tire carrier conversion, I can post pics of that as well.

Van spare tire carrier bolts.jpg Van spare tire carrier side view.jpg Van spare tire carrier lowered.jpg


Van spare tire carrier cover_LI.jpg

The spare tire cover is from Amazon (available here: Custom spare tire cover). You can send the manufacturer a photo file, and they'll custom print it for you. It's not the thickest material, but for $20, I was pleased. The photo is one I took in Africa of a cheetah that was in the midst of feasting on a kudu (a large antelope).
 
Last edited:

Andy G

Adventurer
Nice, looks similar to the low-key build we're doing on our 2017 Express 2500.

Are you going to lift it or run bigger tires?
 

Texas Aggie

Observer
Nice, looks similar to the low-key build we're doing on our 2017 Express 2500.

Are you going to lift it or run bigger tires?
Sorry for the delayed response - just now saw your post. The current tires are fairly new, so I won't be replacing them for a while. When I do, I may try to up the size a bit, or at least go for a more aggressive tread. As for a lift, I won't be doing anything exotic, but may try coil spacers and small lift blocks. My profile pic was taken in Gold King Basin south of Telluride. There wasn't any hardcore off-roading required to get there, but I was impressed with the big pig's ability to handle some fairly rough terrain. I think the long wheelbase, 2WD and the high roof will likely be my limiting factors on getting to remote sites, so I probably won't get too crazy with suspension mods.

The current project is installing a Chinese knockoff Webasto style diesel heater. Haven't run it yet, but for $108 I figure I don't have too much to lose.
 
Last edited:

Andy G

Adventurer
The current project is installing a Chinese knockoff Webasto style diesel heater. Haven't run it yet, but for $108 I figure I don't have too much to lose.

Where are you thinking of mounting it? I'm looking at one of those also...not sure where to put it and run everything.
 

Texas Aggie

Observer
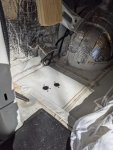
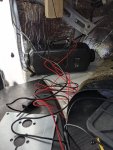
I ended up mounting the heater at an angle behind the driver side wheel well with the tank between the spare tire and driver side rear door. The heater location is close to the back wall, but it seemed to run OK for the few minutes I tested it out - until I accidentally knocked a cable loose from the battery and cracked the glow plug due to the hot shutdown. New glow plug on order and hope the retest goes OK. This is a 5kW unit, but a 2 kW unit would probably fit a bit better in this spot. Debated on 2 kW vs. 5 kW, but my van isn't insulated that well, and I'd rather run the heater on a lower/quieter setting. Some say that you should run them wide open every so often to remove soot, so I may do that.

Heater tank.jpg Heater holes.jpg Heater location.jpg
 

Texas Aggie

Observer
Latest project was to install new seats, seat heaters, and swivel bases for the driver and passenger seats. Initial motivation was to replace the vinyl seats without arm rests with cloth seats and inboard arm rests, and things snowballed from there. These swivel bases are fairly new to the market in comparison to some of the other designs that have been out there for a while.

Edit: Looks like the link to the seats is dead. Here is a link to the seller's eBay store: https://www.ebay.com/usr/seanb69fsu . They also have a physical store (D!ck's Auto Parts in Middlebury, Indiana). The seats were new takeouts and were about $340+tax for the pair.
Swivel base for van.png
I liked the fact that unlike some other designs I'd seen, these had a hole at the pivot that was large enough to run the wires for the seat heaters without having to remove the connectors and insert them through the center of a bearing. This design uses a lubricated teflon plate on the base and pivoting plate to act as bearing surfaces. These bases also don't offset the seats toward the center when facing forward, but do so when facing backward. It is possible to rotate the seats without opening the doors, but it's a tight fit and takes some adjusting of the seat sliders when rotating.
Van seats rotated.jpg
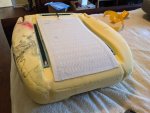
The seat heaters were a fairly straightforward install. I did cut some length of the base pad, even though the instructions said not to cut them. After researching these kits, it appears that it's OK to trim the length, but not the width. The heaters work on both high and low settings after cutting the base, so my research was correct.
seat heater.jpg
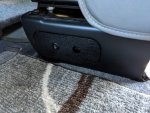
The only issue with the heater install was that I tied them into the fuse box under the driver's seat. I didn't realize that all of the fuses in that box are always powered (instead of only powered when the key is in the ignition position). I didn't want to risk running the battery down if a heater got left on when exiting the vehicle, so I added these delay timers and adjusted them to cut off power to the heaters after 30 minutes. If you want the heaters on longer than 30 minutes, you can reset the timer by pressing the contact switch, which I installed in a panel in the seat base next to the heater control switch (which has off, low and high positions).
Seat heater switches.jpg
Haven't taken a trip in it yet, but I think the swivels will be nice when camping. I probably wouldn't have bothered with the seat heaters if it was just me, but the wife really likes them in our other vehicles. Since the Ebay seats are shipped with the back separated from the base, I figured most of the hard work was already done (versus adding heaters to seats that are already installed).
 
Last edited:

whith

Active member
Good stuff, and I like the tidy insert you made in the seat base to mount the switch. I have mine wired into that under seat box as well, and at least on mine some of the fuses aren't always on. I have them piggy backed onto my head lights and parking lights. Means I need to have the lights on to use them but that's often the case anyway when its either cold and dark or rainy here.
 

Texas Aggie

Observer
Good stuff, and I like the tidy insert you made in the seat base to mount the switch. I have mine wired into that under seat box as well, and at least on mine some of the fuses aren't always on. I have them piggy backed onto my head lights and parking lights. Means I need to have the lights on to use them but that's often the case anyway when its either cold and dark or rainy here.
Thanks for the feedback on the insert. My CAD (cardboard-aided-design) skills aren't that great, so it took me way longer to make those than it should have. It's possible my under seat box had some ignition only fuses, but I couldn't find one, and a quick internet search indicated that at least some GM/Chevy trucks have similar boxes that are always powered, so I went ahead and added the timer cutoff. Another thing I forgot to mention is the swivels did require cutting off about 1/4 inch of the bolts on the bottom of the sliders. These bolts extend through the top plate of the swivel and at factory length they hit the base plate when swiveling. The swivel website shows pictures of how much to cut. Not a big deal, but something to consider for folks wanting purely plug-n-play swivels.
 

cobb ridge

Observer
How are the seat swivels working out? Just to confirm they are inline with the steering wheel and don’t offset? Are they good quality with no rattles? The website says they are offset but they could mean in the reverse position like you stated. Thanks.
 
Last edited:

Texas Aggie

Observer
I haven't had much driving time with the swivels, but in the limited time I've had I'm happy with them. Mine is inline with the steering wheel when facing forward, and inset toward center when facing back. I'm happy with the quality and haven't noticed any rattles. If you have them facing backwards and fully positioned toward the back of the van on the sliders, there is some play if you try to rock back and forth - but I wouldn't doubt that play is in the factory sliders as much as the swivels. I think that's as much a function of the cantilever when you're facing back and fully extended on the sliders as much as it is any fault of the swivels. I obviously don't plan on driving or having passengers ride in that position while driving, so I don't think it's an issue. Overall I'm happy with them, but I don't have any first hand experience with other swivels to compare them to.
 
Last edited:

Texas Aggie

Observer
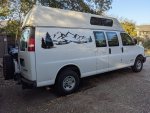
Another update, purely cosmetic. Decided to add some decals to the giant white canvas to make it look less utilitarian. Found these for cheap on Amazon (Mountain scene decal, $27 for 2 decals) and decided to take a chance despite the mediocre review ratings. One decal perfectly fit in the panel on the passenger side, and two decals (with some slight trimming due to the smaller panel sizes) filled up the driver side panels.

I applied them "wet" using the hinge method shown in this video: Decal "hinge" method applied wet. It was my first time trying this technique, and this specific decal was probably one of the harder designs I could've picked for a beginner. All the pointy leading edges of the trees made it difficult to remove the backing material without pulling it off the van surface. On the first application for the passenger side, I left the backing on overnight and it turned out pretty well. On the driver side, I let it set for an hour or so and pulled the backing material off with mixed results. It still looks good from a few feet away, but close inspection reveals some wrinkles where it pulled up and didn't go back down perfect.

If I had it to do over, I'd recommend leaving the backing material on overnight before pulling it. For about $60 for both sides (I bought 2 kits, and each kit included 2 decals), I was pleased with the results. I definitely wouldn't try a decal this large without another person helping, and it might not be a bad idea to try something smaller to practice on before tackling one this big.
Van decal passenger.jpg Van decal driver.jpg
 

tmurph3000

New member
Latest project was to install new seats, seat heaters, and swivel bases for the driver and passenger seats. Initial motivation was to replace the vinyl seats without arm rests with cloth seats and inboard arm rests, and things snowballed from there. These swivel bases are fairly new to the market in comparison to some of the other designs that have been out there for a while.
View attachment 641144
I liked the fact that unlike some other designs I'd seen, these had a hole at the pivot that was large enough to run the wires for the seat heaters without having to remove the connectors and insert them through the center of a bearing. This design uses a lubricated teflon plate on the base and pivoting plate to act as bearing surfaces. These bases also don't offset the seats toward the center when facing forward, but do so when facing backward. It is possible to rotate the seats without opening the doors, but it's a tight fit and takes some adjusting of the seat sliders when rotating.
View attachment 641149
The seat heaters were a fairly straightforward install. I did cut some length of the base pad, even though the instructions said not to cut them. After researching these kits, it appears that it's OK to trim the length, but not the width. The heaters work on both high and low settings after cutting the base, so my research was correct.
View attachment 641150
The only issue with the heater install was that I tied them into the fuse box under the driver's seat. I didn't realize that all of the fuses in that box are always powered (instead of only powered when the key is in the ignition position). I didn't want to risk running the battery down if a heater got left on when exiting the vehicle, so I added these delay timers and adjusted them to cut off power to the heaters after 30 minutes. If you want the heaters on longer than 30 minutes, you can reset the timer by pressing the contact switch, which I installed in a panel in the seat base next to the heater control switch (which has off, low and high positions).
View attachment 641154
Haven't taken a trip in it yet, but I think the swivels will be nice when camping. I probably wouldn't have bothered with the seat heaters if it was just me, but the wife really likes them in our other vehicles. Since the Ebay seats are shipped with the back separated from the base, I figured most of the hard work was already done (versus adding heaters to seats that are already installed).

I bought the same swivel base for the passenger seat of my 2005 Express 1500 and the airbag sensor is hitting the base, keeping the seat from being installed correctly. Did you have this issue? You can see in the picture that I had to stack a bunch of washers for clearance, but that doesn't seem safe in the case of an accident so I'm trying to find another solution.PXL_20210403_192419927~2.jpg
 

Texas Aggie

Observer
I bought the same swivel base for the passenger seat of my 2005 Express 1500 and the airbag sensor is hitting the base, keeping the seat from being installed correctly. Did you have this issue? You can see in the picture that I had to stack a bunch of washers for clearance, but that doesn't seem safe in the case of an accident so I'm trying to find another solution.View attachment 653718
I did not have that issue, but I also don't think my van has the sensor that is creating interference in your case. My van has a switch on the dashboard (that requires the key to turn) in order to activate or deactivate the passenger side airbag. I don't know if that's a difference in the 1500 and 2500 series, or if it's based on other distinctions. My seats are completely manual, so maybe that might be it?
 

Forum statistics

Threads
188,348
Messages
2,903,637
Members
230,227
Latest member
banshee01
Top