2006 GMC Sierra Build

ZMagic97

Explorer
Welllllll, shoot, time to shoot the messenger. Just kidding.

Now looking forward to another hour of my life of dropping the diff(or at least that axle shaft)and changing that outer bearing and seal. Must have messed up the bearing when installing.

Thanks!

No problem. I hope you find thew issue quickly. Sorry to be the bearer of bad news.
 

ZMagic97

Explorer
So a little bit of a backstory:

Back when I got the new tires, I went to the local Discount Tire I've been going to since I started driving. When I picked up the truck, I didn't realize their tech put the old wheels in the back standing up. Because of this, the first turn I took going home resulted in my passenger side camper shell partially popping out, like so:


I went back to Discount and the manager, who has been there for as long as I've been driving, said to get a quote and they'll try to make it right.

It took me a couple weeks to coordinate with Tom's Camperland, the place where I bought the shell, to get it in for repairs. When I took it there today, they fixed the weatherstripping for free, but mentioned the glass was no longer connected there at the frame since the adhesive had come undone. They cannot do the repairs there. I was recommended to use a thin bead of silicone to prevent possible leaks should they occur. Their repair job at $0 came out very nicely.


There is a small rip in the seal, but the creases are working their way out.

After talking to the guy at the shop, I ordered a new sliding window from Leer through them. Everything on the truck is pretty much 100% so I didn't want to cut corners. New window was $298 and some change. That was this morning.

About an hour later I went it with the receipt in hand. I met with the manager and showed him the receipt. He asked why a whole new window was needed and I explained the above with the leaks, not repairable..etc. He was very nice about it and said he had to make a couple calls (to a regional office or something similar I assume). He made a copy of the receipt, took my info down, and said he would have it solved by the end of the day and that my fiancee or I could come by later.

I was home not feeling too great, so when he called I sent my better half over. When she arrived, they gave her the $298 and change in cash. I was thoroughly impressed.
 

ZMagic97

Explorer
While getting tired of just sitting in bed, I remembered I had some Rigid lights I got for dirt cheap a while ago from a guy in need of some cash. I never used them, but they had some wear from being tossed around and being on his JK in Montana.


I took them apart, went to the back yard, and grabbed the same paint I used for the wheels. I quickly gave them a fresh coat of black paint.


I also cleaned the salt and grime off the lenses using denatured alcohol.


I bolted them on and simply zip-tied the connector behind the bar to see how I like them. I need a harness anyway (no idea what I did with the old one..or if I had it) so I'll let them sit there and decided if I like them or would rather have a set of Hella driving lamps.


ZMagic97

Explorer
So the other morning I was out at the store and the dash has 3 quick chimes and displayed "Oil Pressure Low". Immediately my heart sank as I feared an oil pump was out. However, by the time I looked at the gauge it was 80 PSI.

...80PSI?! That's high....then 40...then 0...then 20.

I cautiously drove home and notice oil level was fine, no ticking...etc. At this point I was confident it was a sensor.

I took my Chevy to Autozone and grabbed a sensor. About $51. I had to work that night, so I asked the fiancee if I could do it the following morning. She said no problem.

Thursday morning I grab the new one out of the box. 1 1/16" socket fits like a glove. I try getting the old sensor out... luck. After a while the plastic wire housing snapped off...


Oh yeah, it's buried behind the intake manifold about 8" down, which is below the windshield.

Fiancee calls a local shop. ~$230 for the repair. With the part it's ~$70. $70 in 10 mins of labor is tough for me to swallow. I find out there is a specialty socket.

Back to Autozone. ~$13 out the door for the specialty socket. I get to work.


New VS old.


New one in:


Once I had the socket it was literally a 10 minute job. It's worth mentioning unplugging it will stop the intermittent triple chime alarm of annoyance and will not shut the truck off.
 

ZMagic97

Explorer
Putting the hood in the "service position" makes getting back there a little easier. Look on the hood hinge and you will see a second set of holes, remove the bolts and reinstall them in the other holes. You will now have the hood in a vertical position.

Wow, I never noticed that. Thanks for the info!
 

Colorado_Outback

Adventurer
I never knew that either. Very cool.

I love the look of this truck, especially with the big rims on it. Is it Pewter or Silverbirch?

Another random tip for GMT800's 2000 and later. With the ignition on you can press the dome override button 4x in a row and it will disable the daytime running lights. Mine chimes when it does it. It resets with each ignition cycle, handy for some situations.
 

ZMagic97

Explorer
Wow, I haven't posted in this thread for a LONG time. Reason being: this was mostly my wife's daily driver. Also, my wife and I had a little baby boy in June of 2016. I'm proud to say he came home from the hospital in this GMC.

Shortly after he was born, we sold our home and did a double move for a home that was more room for everyone, including much more garage space for me. I was also restoring a 72 Cutlass which is almost done.

That being said, the GMC didn't really get much attention. It hasn't been neglected, but it hasn't had any issues. My wife daily drove as the family vehicle until 4th of July when we got her a new Hyundai Palisade: our first new car.

So, what happened to the GMC? I took it! And that means it's time to grab some goodies for it. So, updates to come!
 

ZMagic97

Explorer
As I mentioned before, the truck has been great. Now that I'm in it daily, I've been making some adjustments and ado-ons.

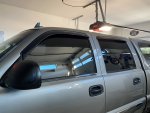
First one is something a bit ironic for the detest, but I do enjoy having rain guards. When we do get rain, I enjoy the sound of it with the windows cracked down, and in the summer keeping them slightly open helps reduce heat build up like a greenhouse.
Installed rainguards.jpg


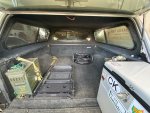
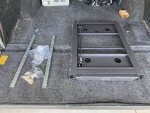
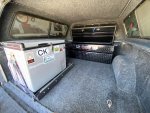
With my WJ Grand Cherokee now gone, I wanted to move over the fridge and slide that was in it. However, I wanted to be able to remove the slide as needed for hauling certain objects. So, I installed some l tracks.
Fridge Slide Install 1.jpg

Part of my goal is to also remove the ammo boxes to free up space near the tailgate. I have a plan in the works for that.

Fridge Slide Install 2 resized.jpg

It mounted well and the tracks with studs make the fridge very quick and easy to install and remove. I did have to bore some mounting holes on the slide as well as make 2 new ones, but that was quick and easy.

Fridge Slide Install 3.jpg

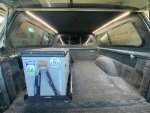
I finished it up and also installed LED lights on the top of the shell.

A couple months ago I had already run 12V power to the rear driver side of the bed that's always hot. The end device is a 12V plug for the fridge or any other item needed. I tapped into that for power to the lights.
 

ZMagic97

Explorer
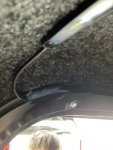
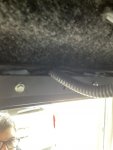
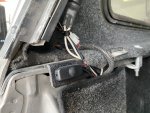
I forgot to mention I secured the wiring at around the camper shell rear window frame using RTV. In the above post, you can see where it was hanging down for the 3rd brake line and is then secured in the last photo.

IMG-0352.jpg

IMG-0353.jpg

I also used RTV to secure the bed light switch after the wiring was cleaned up.

IMG-0351.jpg
 

ZMagic97

Explorer
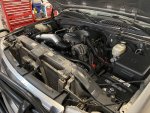
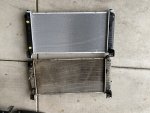
One thing that popped up that I did need to take care of was the radiator. As I mentioned before, I did the water pump and cooling hoses a few months ago, but noticed a very small drip coming from the core support. I had recent deep cleaned the engine bay, so I was wondering if old coolant had mixed with a cleaner and made the look of a leak. After cleaning it off a couple times I was sure it was a pinhole (or smaller) leak.

Before there was a chance for more leaks or potential overheating, I decided to just replace the radiator. Doing so would pretty much complete a new fuel system.

IMG_0370.JPEG

I got a new one delivered to the house, the same GM part number which was already installed.

IMG_0371.JPEG

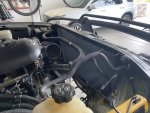
The plastic core support comes off in less than two minutes. After that, all you have to do is remove the 2 larger coolant hoses, 2 smaller coolant hoses, and 2 transmission lines. Then unplug the fans with 2 plugs and remove the fan unit via 2 bolts then lift up. Next the radiator is just two more bolts, tilt it, and pull up as well.

IMG_0374.JPEG

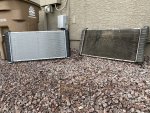
Happily they were an exact match, and the new one looked much better.

IMG_0375.JPEG

After cleaning off the old one, I could not see any signs of leaks. But being it was one drop per time I parked at most, I didn't expect to find anything.

IMG_0377.JPEG

The new unit slipped in nice and easy. As you can see, there is a lot of room to work with. The entire swap took about 90 minutes including me taking photos, sipping a beer, and watching tv in the background.
 

ZMagic97

Explorer
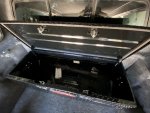
An item that was more fun to do was a toolbox in the bed. I had gotten one some time ago from another truck, but found out the style I like (in bed, under the side rails) are too deep for my extra short bed. I had to sell it, and luckily guy a buyer same day. I used the funds to add in this black Dee Zee brand one. I like that it's low profile and fits between the rails. Not as wide as I originally wanted, but I'm surprised with how much room I do have.

Toolbox interior in truck.jpg

Toolbox in truck.jpg
 

Forum statistics

Threads
188,362
Messages
2,906,035
Members
230,117
Latest member
greatwhite24
Top